The Replay is a weekly newsletter for dev and engineering leaders.
Delivered once a week, it's your curated guide to the most important conversations around frontend dev, emerging AI tools, and the state of modern software.
With the advent of the now-infamous single page application, extreme amounts of JavaScript started getting pushed to the browser. The sheer weight of JavaScript is one problem, but the browser also has to parse the downloaded JavaScript. The UI thread of the browser can hang under such duress as it is pushed beyond its intended purpose. The obvious answer is to ship less code. Code splitting allows us to do that without shipping fewer features.

Code splitting is a complicated business where a bundle of code is split into smaller chunks that can be loaded on demand. Thankfully tools like webpack abstract this complexity behind a less complicated API. Unfortunately, this less complicated API is still very complex. In the React ecosystem, tools like loadable-componets add a much simpler veneer of sanity around dynamic imports.
I want to see more rendering control returned to the server. The browser is not meant to render HTML, and there are many good reasons why rendering React server-side is preferable. I am predicting that we will see a return to more HTML rendered server-side.
Below is some code from my company website that uses dynamic imports to create smaller code files that get loaded on demand.
import React from 'react';
import loadable from '@loadable/component';
import * as Urls from '../urls';
import { RouteProps, Route, Switch } from 'react-router';

export type Page<P = unknown> = RouteProps & {
  heading: string;
  path: string;
  footerPage?: boolean;
} & P;

const fallback = <div>loading....</div>;

const Home = loadable(() => import('src/components/Home'), {
  fallback,
});
const OSS = loadable(() => import('src/components/OSS'), {
  fallback: <div>Loading...</div>,
});
const Blog = loadable(() => import('src/components/Blog'), {
  fallback: <div>Loading...</div>,
});

export const routable: Page[] = [
  {
    heading: 'Home',
    path: Urls.Home,
    component: Home,
    exact: true,
  },
  {
    heading: 'OSS',
    path: Urls.OSS,
    component: OSS,
    exact: true,
  },
// etc.
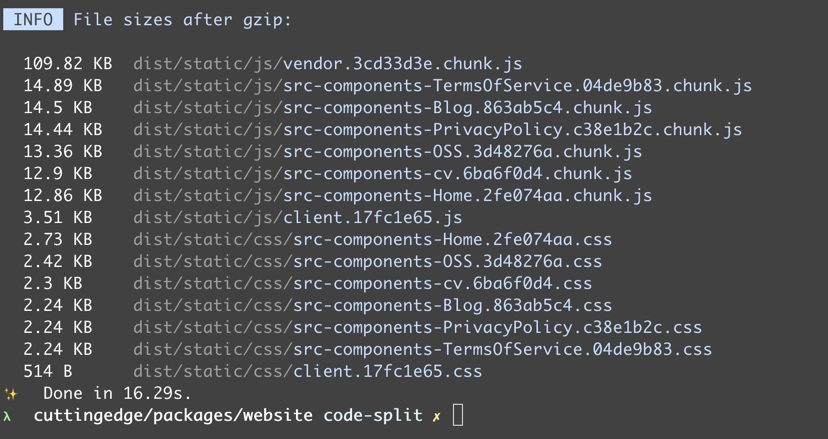
The loadable function takes a dynamic import as an argument and will do the hard work for us. Running a webpack build creates several smaller files that can be lazy-loaded:

I am a big TypeScript fan, and I have always stayed away from anything requiring Babel as having to maintain two different transpiler configurations is not a road I am willing to travel.
The @loadable/babel-plugin transforms code like this:
import loadable from '@loadable/component';

export const LazyFoo = loadable(() => import('./input/AsyncDefaultComponent'));
into code like this:
import loadable from 'loadable-components';

export const LazyFoo = loadable({
  chunkName() {
    return 'input-AsyncDefaultComponent';
  },
  isReady(props) {
    return (
      typeof __webpack_modules__ !== 'undefined' &&
      Boolean(__webpack_modules__[this.resolve(props)])
    );
  },
  requireAsync: () =>
    import(
      /* "webpackChunkName":"input-AsyncDefaultComponent" */ './input/AsyncDefaultComponent'
    ),
  requireSync(props) {
    return typeof '__webpack_require__' !== 'undefined'
      ? __webpack_require__(this.resolve(props))
      : eval('module.require')(this.resolve(props));
  },
  resolve() {
    if (require.resolveWeak)
      return require.resolveWeak(
        /* "webpackChunkName":"input-AsyncDefaultComponent" */ './input/AsyncDefaultComponent',
      );
    else
      return eval('require.resolve')(
        /* "webpackChunkName":"input-AsyncDefaultComponent" */ './input/AsyncDefaultComponent',
      );
  },
});
Now enters the hero of the piece, namely the loadable-ts-transformer which does the same job as its Babel counterpart only it does this by creating a TypeScript transformer. A TypeScript transformer allows us to hook into the compilation pipeline and transform code just like is listed above with the Babel plugin. A full AST is at the developer’s disposal to bend to their will.
The first step is to define the components that we want to split into smaller chunks with the loadable-component’s loadable function:
const Home = loadable(() => import('src/components/Home'), {
  fallback,
});
Next, webpack needs configured. Typically in a webpack ssr (server-side rendered) build, you have a server webpack configuration file and a client webpack configuration file.
The webpack server configuration takes care of bundling the node express code that renders the react components server-side.
To keep duplication down between the two configuration files, I use webpack-merge to create a common.config.js file that is merged into both the client.config.js and server.config.js files.
Below is an example of a common.config.js file that has the common components for both the webpack client and server configuration files:
const path = require("path");
const { loadableTransformer } = require('loadable-ts-transformer');

module.exports = {
  resolve: {
    extensions: ['.ts', '.tsx', '.js'],
  },
  module: {
    rules: [
      {
        test: /\.tsx?$/,
        exclude: /node_modules/,
        loader: 'ts-loader',
        options: {
          transpileOnly: true,
          getCustomTransformers: () => ({ before: [loadableTransformer] }),
        },
      }
    ],
  },
};
I use ts-loader to transpile TypeScript into JavaScript and ts-loader has a getCustomTransformers option which we can use to add the loadable-ts-transformer.
The client.config.js file looks like this:
const path = require("path");
const merge = require('webpack-merge');
const LoadablePlugin = require('@loadable/webpack-plugin');
const commonConfig = require('./webpack.config');
const webpack = require('webpack');

module.exports = () => {
  return merge(commonConfig, {
    output: {
      path: path.resolve(__dirname, 'public'),
      publicPath: '/assets/',
      filename: '[name].[chunkhash].js',
    },
    entry: {
      main: path.resolve(__dirname, 'src/client.tsx'),
    },
    optimization: {
      splitChunks: {
        name: 'vendor',
        chunks: 'initial',
      },
    },
    plugins: [
      new LoadablePlugin(),
      new webpack.DefinePlugin({ __isBrowser__: "true" })
    ],
  });
};
Note the use of the webpack.DefinePlugin to add an __isBrowser__ property into the bundled code. This stops having to use endless typeof window === 'undefined' checks to determine if code is executing on the server or browser.
The client.config.js file also adds the @loadable/webpack-plugin to the plugin array. Do not add this to the server.config.js.
The server.config.js file looks like this:
const path = require("path");
const merge = require('webpack-merge');
const commonConfig = require('./webpack.config');
const webpack = require('webpack');
const nodeExternals = require('webpack-node-externals');

module.exports = () => {
  return merge(commonConfig, {
    target: 'node',
    externals:  nodeExternals({
      whitelist: [
          /^@loadable\/component$/,
          /^react$/,
          /^react-dom$/,
          /^loadable-ts-transformer$/,
        ]
      }),
    ],
    output: {
      path: path.resolve(__dirname, 'dist-server'),
      filename: '[name].js',
    },
    entry: {
      server: path.resolve(__dirname, 'src/server.tsx'),
    },
   plugins: [
     new webpack.DefinePlugin({ __isBrowser__: "false" })
   ]
  });
};
The webpack externals section has tripped me up many times. The externals property allows you to whitelist what gets bundled in a webpack server build. You do not want to be bundling the entirety of the node_modules folder. I find the webpack-node-externals package which has a whitelist option extremely useful.
The server.config.js file defines and entry point of src/server/index.ts which looks like this:
export const app = express();
const rootDir = process.cwd();

const publicDir = path.join(rootDir, isProduction ? 'dist/public' : 'public');
app.use(express.static(publicDir));

app.use(bodyParser.urlencoded({ extended: false }));
app.use(bodyParser.json());

app.get('/*', async (req, res) => {
  await render({
    req,
    res,
  });
});
The important points of the above code are:
app.use(express.static(publicDir)); code points express to the static files that are outputted by webpack using the express static functionapp.get('/*. async (req. res) => { route points to a reusable render function that I will explain nextThe render function is listed below:
const statsFile = path.resolve(process.cwd(), 'dist/loadable-stats.json');

export async function render({ req, res }: RendererOptions): Promise<void> {
  const extractor = new ChunkExtractor({
    entrypoints: ['client'],
    statsFile,
  });

  const context: StaticRouterContext = {};

  const html = renderToString(
    extractor.collectChunks(
      <StaticRouter location={req.url} context={context}>
        <Routes />
      </StaticRouter>,
    ),
  );

  res.status(HttpStatusCode.Ok).send(`
    <!doctype html>
    <html lang="en">
      <head>
        <meta http-equiv="Content-Type" content="text/html; charset=UTF-8">
        <meta httpEquiv="X-UA-Compatible" content="IE=edge" />
        <meta charSet="utf-8" />
        <meta name="viewport" content="width=device-width, initial-scale=1" />
        ${extractor.getStyleTags()}
      </head>
      <body>
        <div id="root">${html}</div>
        ${extractor.getScriptTags()}
      </body>
    </html>
`);
}
The code above makes use of the ChunkExtractor component that collects chunks server-side and then creates script tags or script elements that can be used in the outputted HTML.
${extractor.getStyleTags()} will output the CSS link tags and ${extractor.getScriptTags()} will output the JavaScript script tags.
When running your build, the @loadable/webpack-plugin generates a file called loadable-stats.json, which contains information about all the entries and chunks from webpack.
Once that’s in place, ChunkExtractor is responsible for finding your entries from this file.
The entryPoints array of the ChunkExtractor component is set to ['client'] which maps to the client property of the webpack client.config.js file:
entry: {
  client: path.join(process.cwd(), 'src/client.tsx'),
 },
The client config file’s entry point is now an object with a client property.
The client.tsx file is listed below:
import React from 'react';
import { hydrate } from 'react-dom';
import { loadableReady } from '@loadable/component';

import { App } from '../containers/App';

const bootstrap = (): void => {
  const root = document.getElementById('root');

  if (!root) {
    return;
  }

  hydrate(<App />, root);
};

loadableReady(() => bootstrap());
Normally when rehydrating React server-side rendered code, you would use ReactDom’s hydrate function but in the loadable-component's world above, the loadable-component’s loadableReady function is used to wait for all the scripts to load asynchronously to ensure optimal performances. All scripts are loaded in parallel, so you have to wait for them to be ready using loadableReady.
I have avoided using many of the code splitting packages because of the need for Babel. The loadable-ts-transformer has cured this.
If you would like to see this added to the loadable-component’s source then please chime in on this issue where I discovered about its existence.

LogRocket lets you replay user sessions, eliminating guesswork by showing exactly what users experienced. It captures console logs, errors, network requests, and pixel-perfect DOM recordings — compatible with all frameworks, and with plugins to log additional context from Redux, Vuex, and @ngrx/store.
With Galileo AI, you can instantly identify and explain user struggles with automated monitoring of your entire product experience.
Modernize how you understand your web and mobile apps — start monitoring for free.
Install LogRocket via npm or script tag. LogRocket.init() must be called client-side, not
server-side
$ npm i --save logrocket

// Code:

import LogRocket from 'logrocket';
LogRocket.init('app/id');
// Add to your HTML:

<script src="https://cdn.lr-ingest.com/LogRocket.min.js"></script>
<script>window.LogRocket && window.LogRocket.init('app/id');</script>

Rosario De Chiara discusses why small language models (SLMs) may outperform giants in specific real-world AI systems.

Vibe coding isn’t just AI-assisted chaos. Here’s how to avoid insecure, unreadable code and turn your “vibes” into real developer productivity.

GitHub SpecKit brings structure to AI-assisted coding with a spec-driven workflow. Learn how to build a consistent, React-based project guided by clear specs and plans.

:has(), with examplesThe CSS :has() pseudo-class is a powerful new feature that lets you style parents, siblings, and more – writing cleaner, more dynamic CSS with less JavaScript.
Hey there, want to help make our blog better?
Join LogRocket’s Content Advisory Board. You’ll help inform the type of content we create and get access to exclusive meetups, social accreditation, and swag.
Sign up now
One Reply to "Code splitting React components with TypeScript and NO Babel"
Hi, I’m trying to implement the items described in your article, but am stuck on understanding where I would apply the webpack configuration to be executed in a developer / hot reload environment.