Editor’s note: This article was last updated by Shalitha Suranga on 23 April 2024 to create MVC app templates with Pug, define models with Sequelize.js ORM, and make various improvements to the sample app codebase.

Developers follow various design patterns and practices to build their software systems. Most software development teams use the Model-View-Controller (MVC) software design pattern to improve maintainability and codebase quality. The MVC pattern motivates developers to divide the entire project into three interconnected layers to separate internal business logic from the application interface by creating an intermediate layer. We can use the MVC pattern in large-scale, production-level Node.js web apps to improve overall codebase quality.
In this tutorial, we’ll learn about the MVC architectural pattern and build a well-structured sample Node.js MVC web app using Express, Pug, Sequelize.js, Passport.js, and bcrypt.js.
To follow this tutorial, you will need the following:
MVC is simply a design or architectural pattern used in software engineering. Its main goal is to split large applications into specific sections that each have their own purpose.
MVC also allows developers to logically structure applications in a secure way, which we will demonstrate in this tutorial. But first, let’s break down what each layer of the pattern provides.
As the name implies, a model is a design or structure that typically bounds with an OOP entity of a specific software system.
In the case of MVC, the model determines how a database is structured, defining a section of the application that interacts with the database. The model layer holds the database connection/manipulation logic and exposes methods that only use model objects by putting an abstraction layer over raw data formats used by the database. The ORM libraries help us define models without worrying about database-to-model mapping.
The view is where end users interact within the application. Simply put, this is where all the HTML template files go in MVC-architectured web apps. The view layer never communicates directly with the model — it communicates with the model layer strictly through the controller.
The controller interacts with the model and serves the response and functionality to the view. When an end user makes a request, it’s sent to the controller, which interacts with the database.
You can think of the controller as a waiter in a restaurant that handles customers’ orders, which in this case is the view. The waiter then goes to the kitchen, which is the model/database and gets food to serve the customers, which is the controller handling the request.
Now, let’s build a sample Node.js web app using the MVC pattern!
To understand how to use MVC, we will build a simple login and registration system with a dashboard page that only authenticated users can access. However, this tutorial is more about structure than about the application we are building.
Open up your terminal in an empty folder and run the following command to create a new Node.js project:
npm init -y
# --- or ---
yarn init -y
This command creates a package.json file with some default configuration according to the package manager you used.
For this project, we will need to install some packages to get started:
npm install express express-session pug sequelize sqlite3 bcryptjs passport passport-local
# --- or ---
yarn add express express-session pug sequelize sqlite3 bcryptjs passport passport-local
These packages provide the following facilities:
express is used to implement the app’s HTTP endpoints and render app viewsexpress-session is used to create an HTTP cookie-based user session for Express routespug is used to render server-side HTML views using Pug-based templatessequelize implements ORM logic and helps define models with less codesqlite3 works as the primary database system with the sequelize packagebycrptjs handles hashing passwords before saving them in the databasepassport and passport-local handle authenticationAfter this is complete, you should see a node_modules folder (this is where all the packages are downloaded to).
Now create three folders to represent MVC layers: models, views, and controllers:
mkdir models views controllers
While we’ve created our folders, they can’t do anything without a server. To create our server, let’s create a file called server.js in our root directory:
touch server.js
After creating the server.js file, go to the package.json file and edit the scripts like so:
"scripts": {
  "start": "node server.js"
}
Now, we can run the start script to run our web app.
Let’s create our Express server instance that helps process and return HTTP messages. Copy and paste the following code into the server.js file:
const express = require('express');
const app = express();
const PORT = 8080;

app.get('/', (req, res) => res.send('<h1>Hello Express</h1>'));

app.listen(PORT, console.log('Server is running on port: ' + PORT));
Remember that we already installed Express. Now, we are simply creating an Express app with one sample endpoint on GET /.
On line seven, we are now using the listen() method to start up a server that runs at http://localhost:8080. To confirm that our server works properly, run the following:
npm start
# --- or ---
yarn start
Open the server endpoint from the browser. You’ll see a greeting message as follows confirming that the Express server works:

Now, our server is ready. Let’s add views, controllers, and routes!
With our server up and running, let’s create some .pug template files in our views folder. Because we are following the MVC pattern, we need all our views — that is, what the end users see — to be in one folder.
Inside the views folder, create the following files: login.pug, register.pug, dashboard.pug, and layout.pug.
The layout.pug code is included across all .pug files in the views folder. First, add the following contents to the layout.pug file:
doctype html
head
  meta(charset='utf-8')
  title Node.js MVC Demo
  meta(name='viewport' content='width=device-width, initial-scale=1')
  link(href='https://cdn.jsdelivr.net/npm/[email protected]/dist/css/bootstrap.min.css' rel='stylesheet' integrity='sha384-QWTKZyjpPEjISv5WaRU9OFeRpok6YctnYmDr5pNlyT2bRjXh0JMhjY6hW+ALEwIH' crossorigin='anonymous')
  nav.navbar.navbar-expand-lg.navbar-dark.bg-dark
    .container-fluid
      a.navbar-brand(href='#') Node.js MVC Demo
      button.navbar-toggler(type='button' data-bs-toggle='collapse' data-bs-target='#navbarSupportedContent' aria-controls='navbarSupportedContent' aria-expanded='false' aria-label='Toggle navigation')
        span.navbar-toggler-icon
      if name
        #navbarSupportedContent.collapse.navbar-collapse.justify-content-end
          form.d-flex
            span.navbar-text.text-light.pe-2 Hello #{name}
            a.btn.btn-outline-light(href='/logout') Logout
  .py-2
      block content

script(src='https://cdn.jsdelivr.net/npm/[email protected]/dist/js/bootstrap.bundle.min.js' integrity='sha384-MrcW6ZMFYlzcLA8Nl+NtUVF0sA7MsXsP1UyJoMp4YLEuNSfAP+JcXn/tWtIaxVXM' crossorigin='anonymous')
We used the block content statement here to inject child template contents from other .pug files.
Add the following code to the login.pug file:
extends layout.pug
block content
  .container
    .row.justify-content-center
      .col-md-8
        .card
          .card-header Login
          .card-body
            form.form-horizontal(method='post' action='/login')
              .mb-3
                label.form-label.control-label(for='email') Email
                input#email.form-control(type='email' name='email')
              .mb-3
                label.form-label.control-label(for='password') Password
                input#password.form-control(type='password' name='password')
              .mb-3.py-3
                button.btn.btn-primary(type='submit') Login
                a(href='/register').ps-2 Register
Here we used the extends keyword and the block content statement to inject the login view contents into the common layout.pug content’s block content area. So, whenever the user requests the login view, the Express server will create a complete HTML page that contains the login interface by injecting login.pug into the layout.pug file with the help of the Pug templating engine.
Create the register view by adding the following contents to the register.pug file:
extends layout.pug
block content
  .container
    .row.justify-content-center
      .col-md-8
        if error
          .alert.alert-warning= error
        .card
          .card-header Register
          .card-body
            form.form-horizontal(method='post' action='/register')
              .mb-3
                label.form-label.control-label(for='name') Name
                input#name.form-control(type='text' name='name')
              .mb-3
                label.form-label.control-label(for='email') E-mail
                input#email.form-control(type='email' name='email')
              .mb-3
                label.form-label.control-label(for='password') Password
                input#password.form-control(type='password' name='password')
              .mb-3.py-3
                button.btn.btn-primary.login-button(type='submit') Register
                a(href='/login').ps-2 Login
Finally, create the last view, the dashboard view, by adding the following contents to the dashboard.pug file:
extends layout.pug

block content
  .container
    h4 Dashboard
    span Only authenticated users can view this dashboard view.
We need to render these Pug templates from controllers by following MVC project structuring practices, but let’s render them directly through the server.js to test the views, as shown in the following code snippet:
const express = require('express');
const app = express();
const PORT = 8080;

app.set('view engine', 'pug');

app.get('/', (req, res) => res.render('dashboard'));
app.get('/login', (req, res) => res.render('login'));
app.get('/register', (req, res) => res.render('register'));

app.listen(PORT, console.log('Server is running on port: ' + PORT));
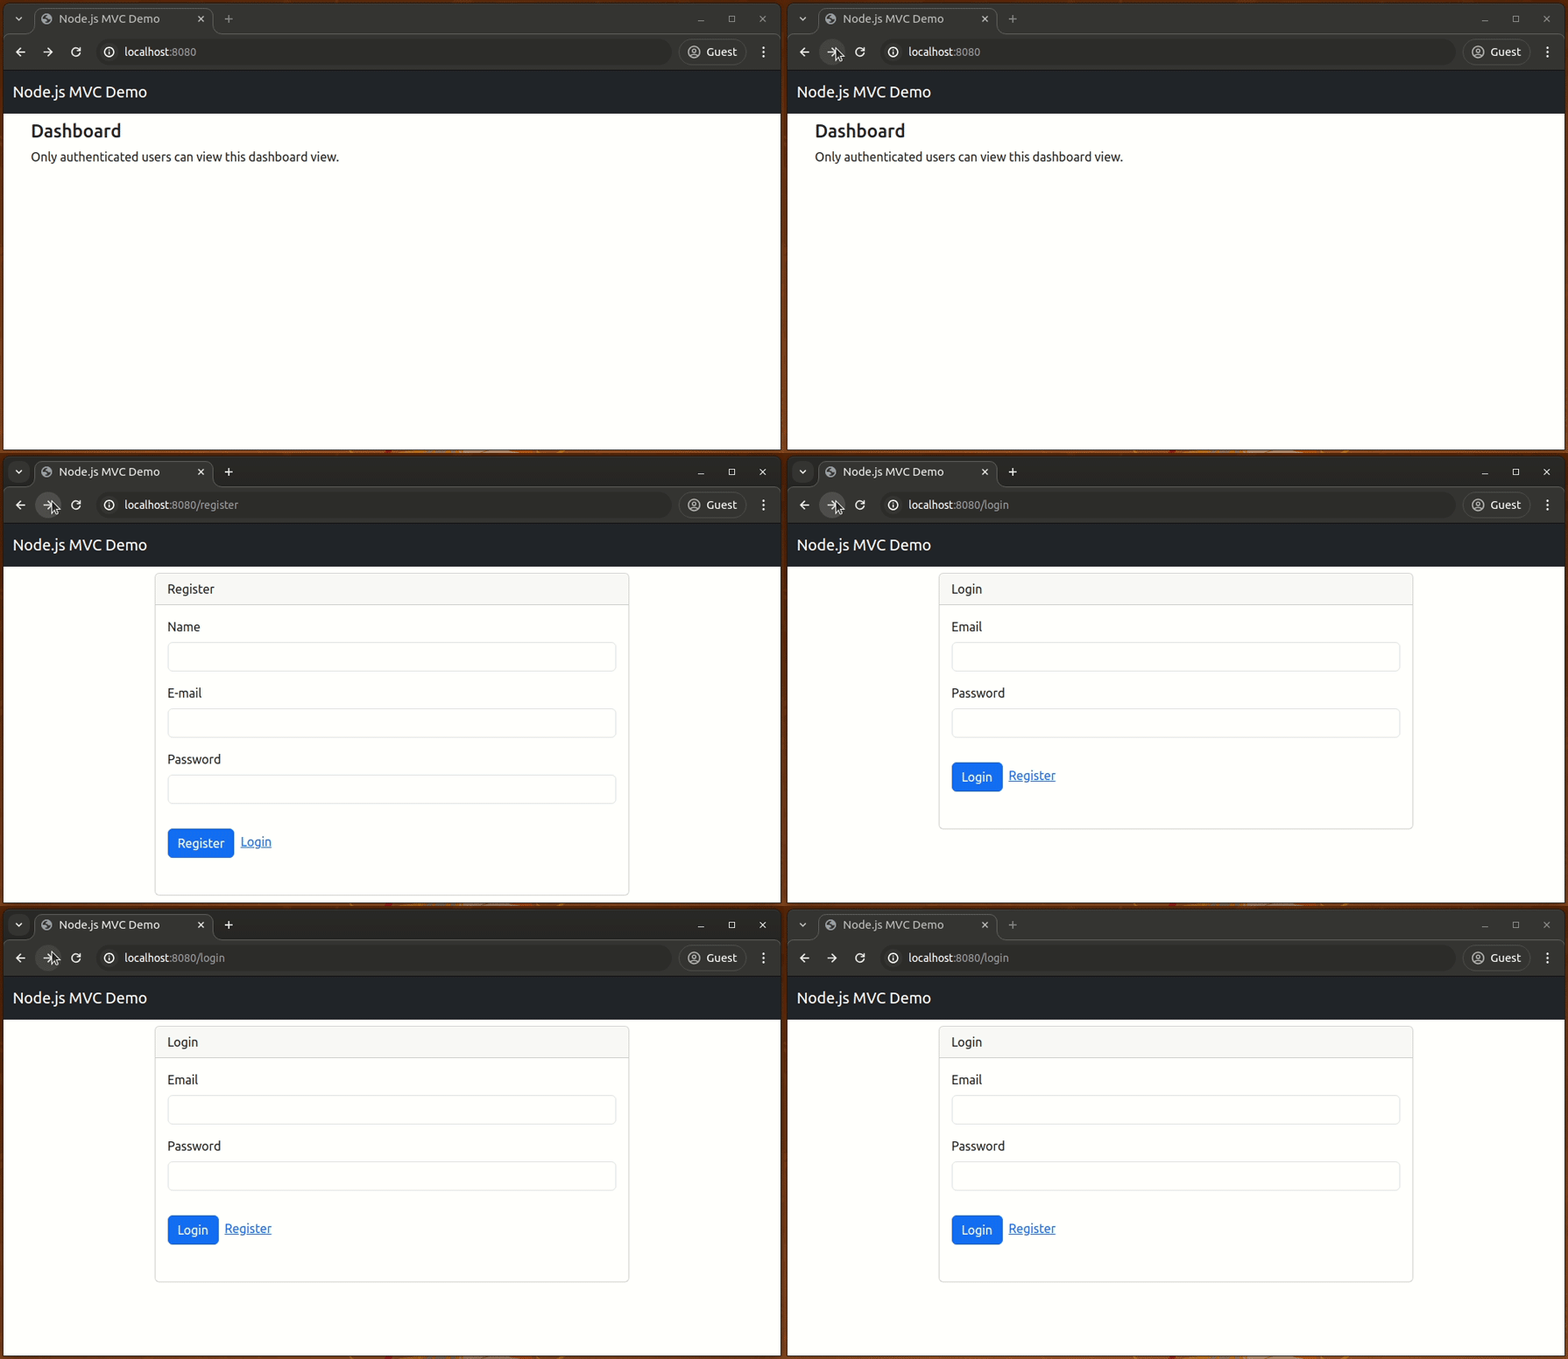
Run the app. Now you can see the dashboard, login, and register views from your web browser:

These views are not dynamic and form post actions won’t work yet, so we need to complete the MVC app by creating controllers and models.
A controller is responsible for generating a specific view by fetching data objects from models. Controllers are usually mapped with routes/endpoints through handlers. For example, the /login route will return the login.pug view by communicating with the login view controller’s loginView handler.
Let’s create a new file to implement controller handlers related to login/register routes. Create a file named auth.js inside the controllers folder and add the following code:
module.exports = {
  registerView: (req, res) => {
    res.render('register');
  },

  loginView: (req, res) => {
    res.render('login');
  },

  registerUser: (req, res) => {
    // TODO: complete
    res.redirect('register');
  },

  loginUser: (req, res) => {
    // TODO: complete
    res.redirect('login');
  },

  logoutUser: (req, res) => {
    // TODO: complete
    res.redirect('login');
  }
}
Here, registerView and loginView functions/handlers render the register.pug and login.pug views, respectively. We’ll use registerUser and loginUser functions for registering and authenticating users after implementing models.
Create a controller for the dashboard page by adding the following contents to the controllers/dashboard.js file:
module.exports = {
  dashboardView: (req, res) => {
    res.render('dashboard');
  }
}
In large-scale apps, we can simplify the complex MVC app structure by linking controllers via router modules. For example, the invoices router module can map all invoice-related controllers with the /invoices router path.
Let’s use this practice in this MVC app too, so you can use this as a template for creating large-scale apps. Create a new folder to store router modules:
mkdir routes
Create a new file named auth.js inside the routes folder and link log-in/register related controller handlers with routes, as shown in the following code:
const express = require('express');
const authController = require('../controllers/auth');
const dashboardController = require('../controllers/dashboard');

const router = express.Router();
router.get('/register', authController.registerView);
router.get('/login', authController.loginView);
router.get('/logout', authController.logoutUser);
router.post('/register', authController.registerUser);
router.post('/login', authController.loginUser);

module.exports = router;
Do the same for the dashboard controller by creating the routes/dashboard.js router module:
const express = require('express');
const dashboardController = require('../controllers/dashboard');

const router = express.Router();
router.get('/', dashboardController.dashboardView);

module.exports = router;
Update the server.js file to use newly created router modules:
const express = require('express');
const authRoutes = require('./routes/auth');
const dashboardRoutes = require('./routes/dashboard');

const app = express();
const PORT = 8080;

app.set('view engine', 'pug');
app.use('/', authRoutes);
app.use('/', dashboardRoutes);

app.listen(PORT, console.log('Server is running on port: ' + PORT));
Now, our routes and controllers are properly structured. Run the app. You’ll see all three views rendered on the browser properly, but views are still not dynamic and not functioning as expected, so now we need to implement the database layer by creating models.
This MVC app will use an SQLite database via the Sequelize ORM library that supports multiple database systems like MySQL, OracleDB, etc.
If you use an ORM library, you undoubtedly don’t need to run database-specific queries and handle connection management logic in normal use cases because ORMs internally do these as inbuilt core features for you. We only have to define models and manipulate/query them with methods provided by the ORM library.
Create a new file named db.js in the root of the project directory and add the following code to set the database connection configuration for Sequelize.js:
const path = require('path');
const { Sequelize } = require('sequelize');

module.exports = new Sequelize({
  dialect: 'sqlite',
  storage: path.join(__dirname, 'mvc_demo.sqlite')
});
The above Sequelize.js setup instructs us to use SQLite as the underlying database engine and save the database into the mvc_demo.sqlite file. Now, we can use the above exported Sequelize instance to define models in any part of the project codebase.
Models are what communicate directly to our database. Let’s create a new model for users in the models/User.js. file using the following code:
const { Sequelize, DataTypes } = require('sequelize');
const sequelize = require('../db');

module.exports = sequelize.define(
  'User',
  {
    id: {
      type: DataTypes.INTEGER,
      autoIncrement: true,
      primaryKey: true,
    },
    name: {
      type: DataTypes.STRING,
    },
    email: {
      type: DataTypes.STRING,
      unique: true,
    },
    password: {
      type: DataTypes.STRING,
    },
  }
);
These are the fields we want to insert into the database whenever a new user registers through the registration page. We can store a name, unique email address, hashed password, and auto-generated incremental integer as the unique user identifier.
Update the server.js source file as follows to synchronize models with the SQLite and activate HTTP-body-parser to fetch form data from post requests:
const express = require('express');
const authRoutes = require('./routes/auth');
const dashboardRoutes = require('./routes/dashboard');
const db = require('./db.js');

const app = express();
const PORT = 8080;

app.use(express.urlencoded({extended: false}));
app.set('view engine', 'pug');
app.use('/', authRoutes);
app.use('/', dashboardRoutes);

db.sync({ force: false })
  .then(() => {
    app.listen(PORT, console.log('Server is running on port: ' + PORT));
  });
Now, the MVC app tests the database connection before running the server when you run the start script, as shown in the following preview:

We have created a schema to store our user information in our database inside the User.js file within the models folder. Now, we can insert a new user into the database from a controller using the User model.
Whenever an end user hits the Register button in the register view, a POST request is sent to the /register route (remember what we did before was a GET request). To make this work, we must go to controllers/auth.js and require the User.js model and bcryptjs because we must hash the password:
const bcrypt = require('bcryptjs');
const User = require('../models/User');
Next, update the registerUser handler in the controllers/auth.js with the following implementation:
registerUser: async (req, res) => {
  const { name, email, password } = req.body;
  if(!name || !email || !password) {
    return res.render('register', { error: 'Please fill all fields' });
  }

  if(await User.findOne({where: {email}})) {
    return res.render('register', { error: 'A user account already exists with this email' });
  }

  await User.create({name, email, password: bcrypt.hashSync(password, 8)});

  res.redirect('login?registrationdone');
},
On line two, we get all the inputs submitted into the form by users:
const { name, email, password } = req.body;
req.body is an Express API object that holds the submitted form data through the frontend of our application.
After line two, we validate incoming data fields with an if condition and send an error message to register.pug if all fields are not properly filled. Also, we check whether a user account already exists with the given email address by using the User.findOne() Sequelize.js library method. If the specific email already exists on the database, we send another error message to the register.pug template. Note that here, we hash the password with bcryptjs before saving it in the database to improve app security factors.
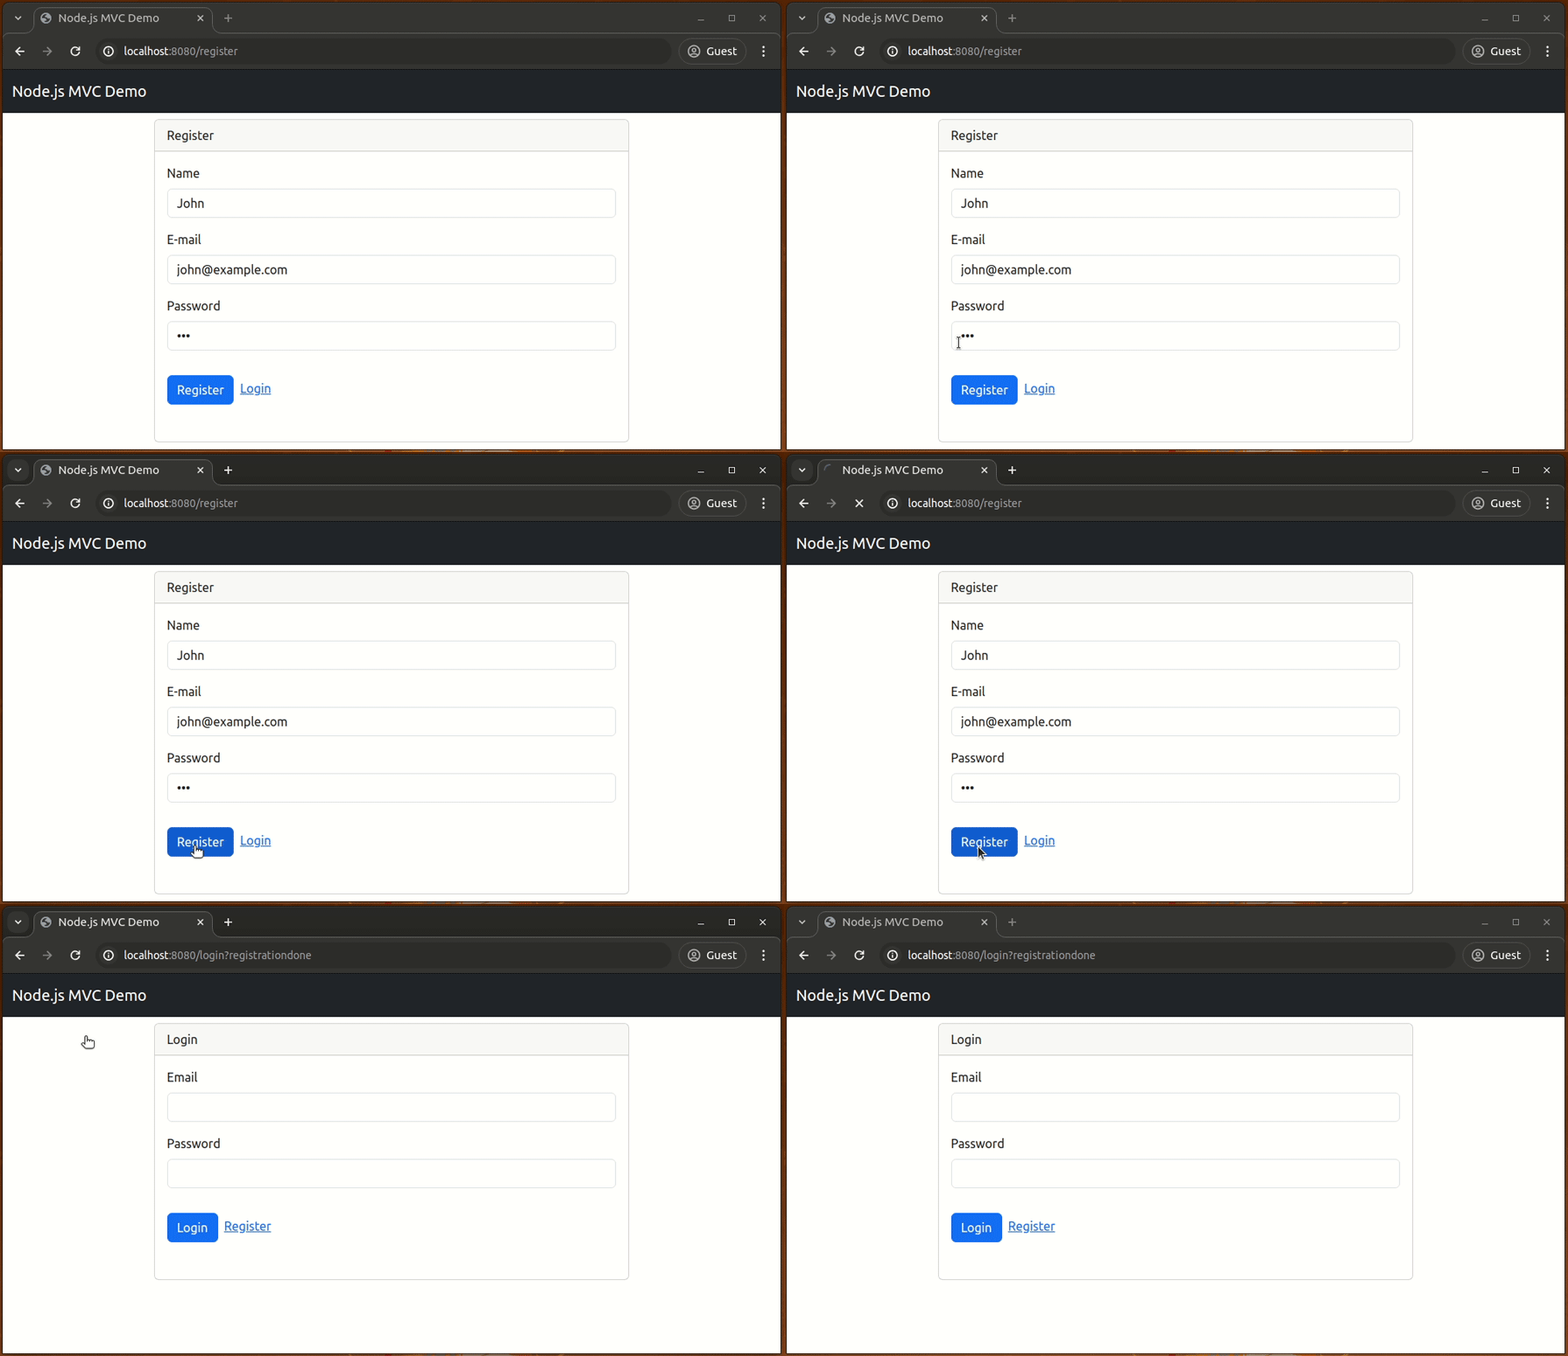
Run the app. Now whenever a user selects the Register button, if everything checks out, the form will create a user instance in the database and redirect them to the login page, as shown in the following preview:

We have made the user registration process work. Now let’s work on the login flow of our application.
To ensure our login page works, we must authenticate users using Passport.js. If there is a user in the database with the specified email, we’ll compare the user-entered password using bcryptjs and let Passport.js redirect the user to the protected sample dashboard view.
For better codebase organization, let’s create a new file named auth.js in the root of the project folder to write user authentication-related logic.
Add the following code to the auth.js file:
const passport = require('passport');
const LocalStrategy = require('passport-local');
const bcrypt = require('bcryptjs');
const User = require("./models/User");

module.exports = {
  init: () => {
    passport.use(
      new LocalStrategy({ usernameField: 'email' }, async (email, password, done) => {
        const user = await User.findOne({where: { email }});
        if(!user) return done(null, false);
        if(!bcrypt.compareSync(password, user.password)) return done(null, false);
        return done(null, user);
      })
    );

    passport.serializeUser((user, done) => {;
      done(null, user.id);
    });

    passport.deserializeUser(async (id, done) => {
      const user = await User.findOne({where: { id }});
      done(null, user);
    });

  },
  protectRoute: (req, res, next) =>{
    if(req.isAuthenticated()) {
      return next();
    }
    res.redirect('/login?next=' + req.url);
  }
};
The above code implements two exported functions:
init(): This function is responsible for activating username and password-based authentication strategy for Passport.js. This Passport.js configuration strategy uses email as the username and the password field as the login password. The init() function returns the User model if the user with the given email exists and the password comparison process succeedsprotectedRoute(): This handler works as an Express route protection middleware that redirects unauthenticated users to the login page. We’ll use this handler to protect the dashboard page of the sample MVC appNow, we need to implement the loginUser handler of the controllers/auth.js file to complete the authentication process. Update the loginUser handler as follows. Make sure to import passport:
loginUser: (req, res) => {
  passport.authenticate('local', {
    successRedirect: '/?loginsuccess',
    failureRedirect: '/login?error'
  })(req, res);
},
The above loginUser function authenticates users using Passport.js by calling the passport.authenticate() function.
Next, protect the dashboard view from unauthenticated users by using the protectRoute handler by updating the routes/dashboard.js as follows:
const express = require('express');
const dashboardController = require('../controllers/dashboard');
const { protectRoute } = require('../auth');

const router = express.Router();

router.get('/', protectRoute, dashboardController.dashboardView);

module.exports = router;
Finally, configure the Express session and initialize Passport.js from your server.js file, as shown in the following source code:
const express = require('express');
const passport = require('passport');
const session = require('express-session');
const authRoutes = require('./routes/auth');
const dashboardRoutes = require('./routes/dashboard');
const db = require('./db.js');
const { init: initAuth } = require('./auth');

const app = express();
const PORT = 8080;

app.use(express.urlencoded({extended: false}));
app.set('view engine', 'pug');

initAuth();
app.use(session({
  secret: 'secret',
  saveUninitialized: true,
  resave: true
}));

app.use(passport.initialize());
app.use(passport.session());

app.use('/', authRoutes);
app.use('/', dashboardRoutes);

db.sync({ force: false })
  .then(() => {
    app.listen(PORT, console.log('Server is running on port: ' + PORT));
  });
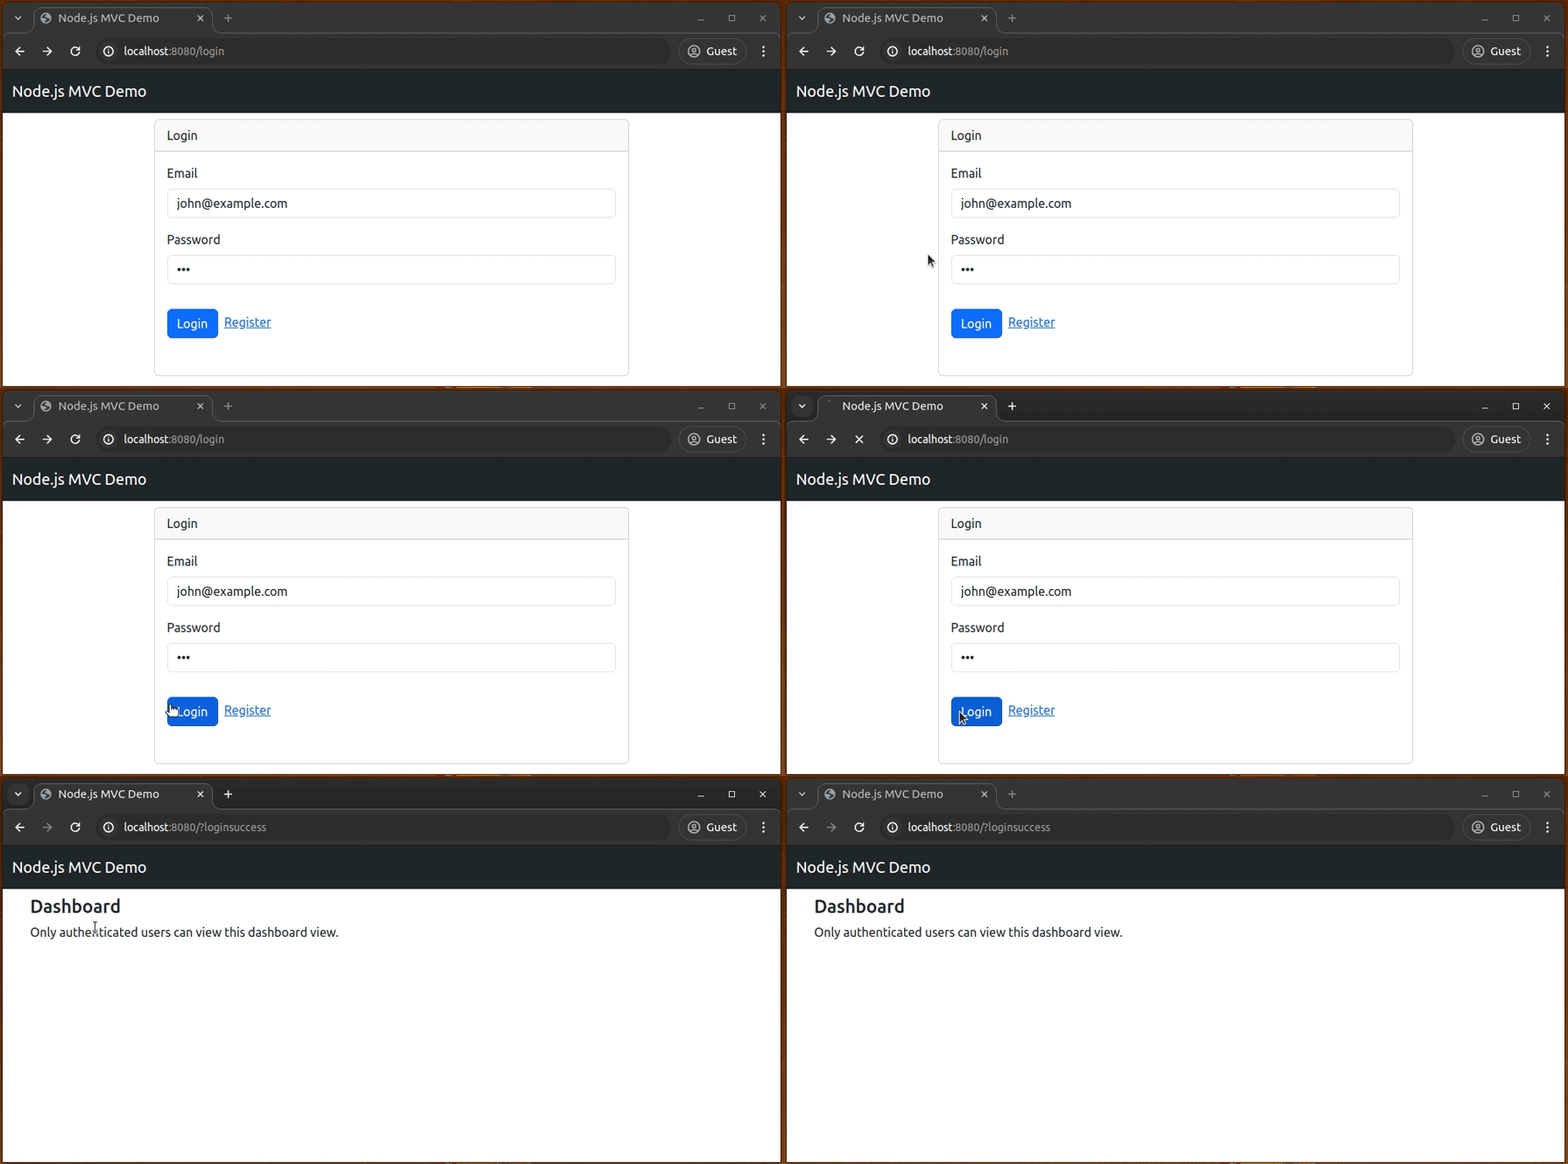
Now, you can test the login feature by entering a valid username and password:

You won’t see the logout button and greeting text yet in the navigation bar area when you are on the dashboard page because we haven’t passed the name data field to the layout.pug template file yet.
Pass the name data field to the layout.pug file to display the logout button and greeting line for authenticated users. You can do so by updating the controllers/dashboard.js as follows:
module.exports = {
  dashboardView: (req, res) => {
    res.render('dashboard', { name: req.user.name });
  }
}
Here, we used only one data field called name to detect the login state from Pug templates, but in production apps, you can pass a user details object to the template that contains their first name, last name, username, etc.
Passport.js’s internal middleware automatically attaches a logout function to every Express request, so you can easily complete the logout flow by adding the following logoutUser handler into the controllers/auth.js exports:
logoutUser: (req, res) => {
  req.logout(() => res.redirect('/login?loggedout'));
}
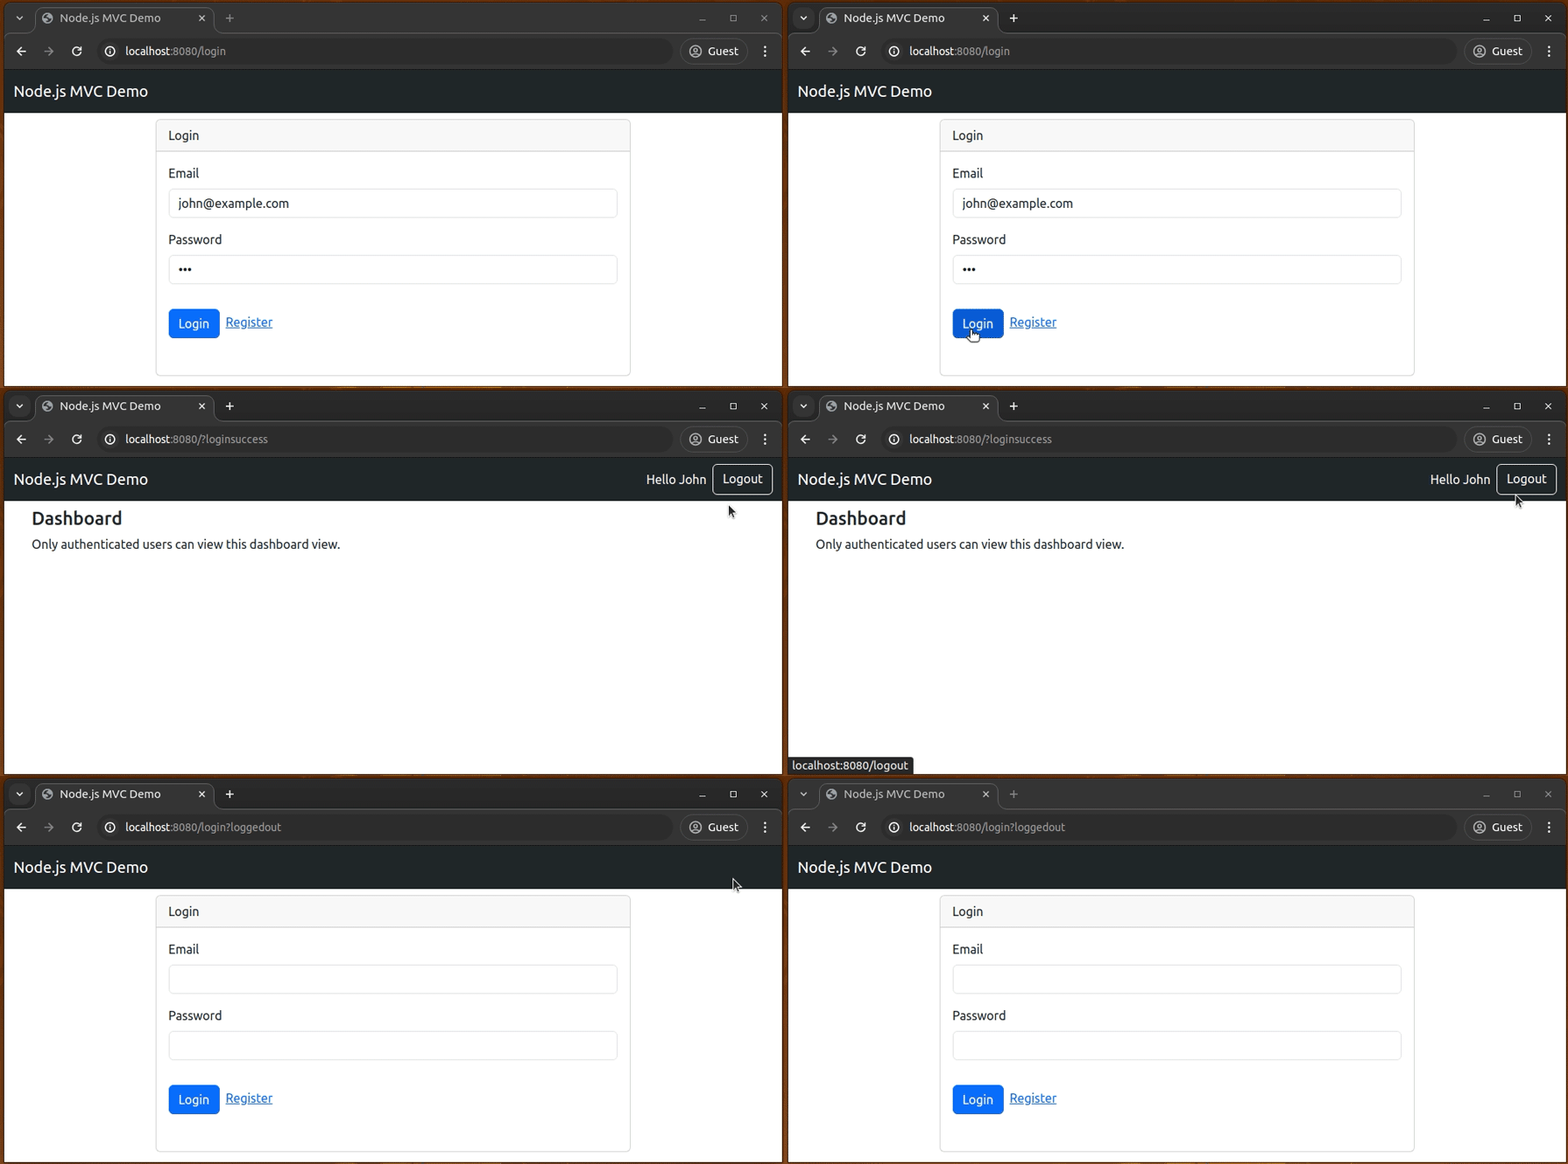
Now, you will see the logout button and greeting message when you visit the dashboard page and be able to log out from the app by clicking on the logout button, as shown in the following preview:

Also, when you visit the protected dashboard page without logging in, you will be redirected to the login page. Don’t forget to test that, too.
Now, the sample Node.js MVC is ready. You can even use this structure for developing large-scale apps as we properly decomposed the project into several folders and files. Browse the complete project source code in this GitHub repository.
Congratulations! I hope you enjoyed and learned a lot about how to structure and build your next application using the MVC architectural pattern.
We were able to explore what model, view, and controller mean and followed this pattern to build and structure a user registration and login system using Express and Passport.js for authentication. You also saw how we put all these together with an SQLite database with Sequelize.js ORM.
Note that you can extend this structure to whatever application you want to create, including a full application.
 Monitor failed and slow network requests in production
Deploying a Node-based web app or website is the easy part. Making sure your Node instance continues to serve resources to your app is where things get tougher. If you’re interested in ensuring requests to the backend or third-party services are successful, try LogRocket.

LogRocket lets you replay user sessions, eliminating guesswork around why bugs happen by showing exactly what users experienced. It captures console logs, errors, network requests, and pixel-perfect DOM recordings — compatible with all frameworks.
LogRocket's Galileo AI watches sessions for you, instantly identifying and explaining user struggles with automated monitoring of your entire product experience.
LogRocket instruments your app to record baseline performance timings such as page load time, time to first byte, slow network requests, and also logs Redux, NgRx, and Vuex actions/state. Start monitoring for free.
Would you be interested in joining LogRocket's developer community?
Join LogRocket’s Content Advisory Board. You’ll help inform the type of content we create and get access to exclusive meetups, social accreditation, and swag.
Sign up now
Which AI frontend dev tool reigns supreme in July 2025? Check out our power rankings and use our interactive comparison tool to find out.

Learn how OpenAPI can automate API client generation to save time, reduce bugs, and streamline how your frontend app talks to backend APIs.

Discover how the Interface Segregation Principle (ISP) keeps your code lean, modular, and maintainable using real-world analogies and practical examples.

<selectedcontent> element improves dropdowns
2 Replies to "Building and structuring a Node.js MVC application"
Hi! A very usefuk tutorial. It has helped me to definetively understand the MVC architecture. Thanks a lot.
I have only one doubt: which is the right way to inform the user that are, for example, empty fields? The code line “console.log(“Fill empty fields”);” I think that is not visible for the user. That is, which is the right way to show input errors (duplicate name, not match password, …) on the ‘view’ from the ‘controller’?
Thanks.
It’s an awful example of MVC. Controllers should have no business logic inside of them! The Model in MVC is not just a Mongo model but the whole business logic with managers, services, db models, etc.