Flutter 3 includes a handful of unique features, fixes, and improvements. One of the most exciting changes is the addition of support for creating casual games with Flutter, alongside the Casual Games Toolkit and template. This template contains built-in functionalities, such as sounds, advertisements, play service linking, FlutterFire, and more.

In this tutorial, we’ll explore these new features by building a Flutter gaming leaderboard for a simple asteroid game and learn how to track high scores with the Firebase Realtime Database.
Jump ahead:
The Replay is a weekly newsletter for dev and engineering leaders.
Delivered once a week, it's your curated guide to the most important conversations around frontend dev, emerging AI tools, and the state of modern software.
Casual games include leaderboards to boost competition and promote engagement among players. Before we dive into building a gaming leaderboard in Flutter, let’s examine our game’s objective.
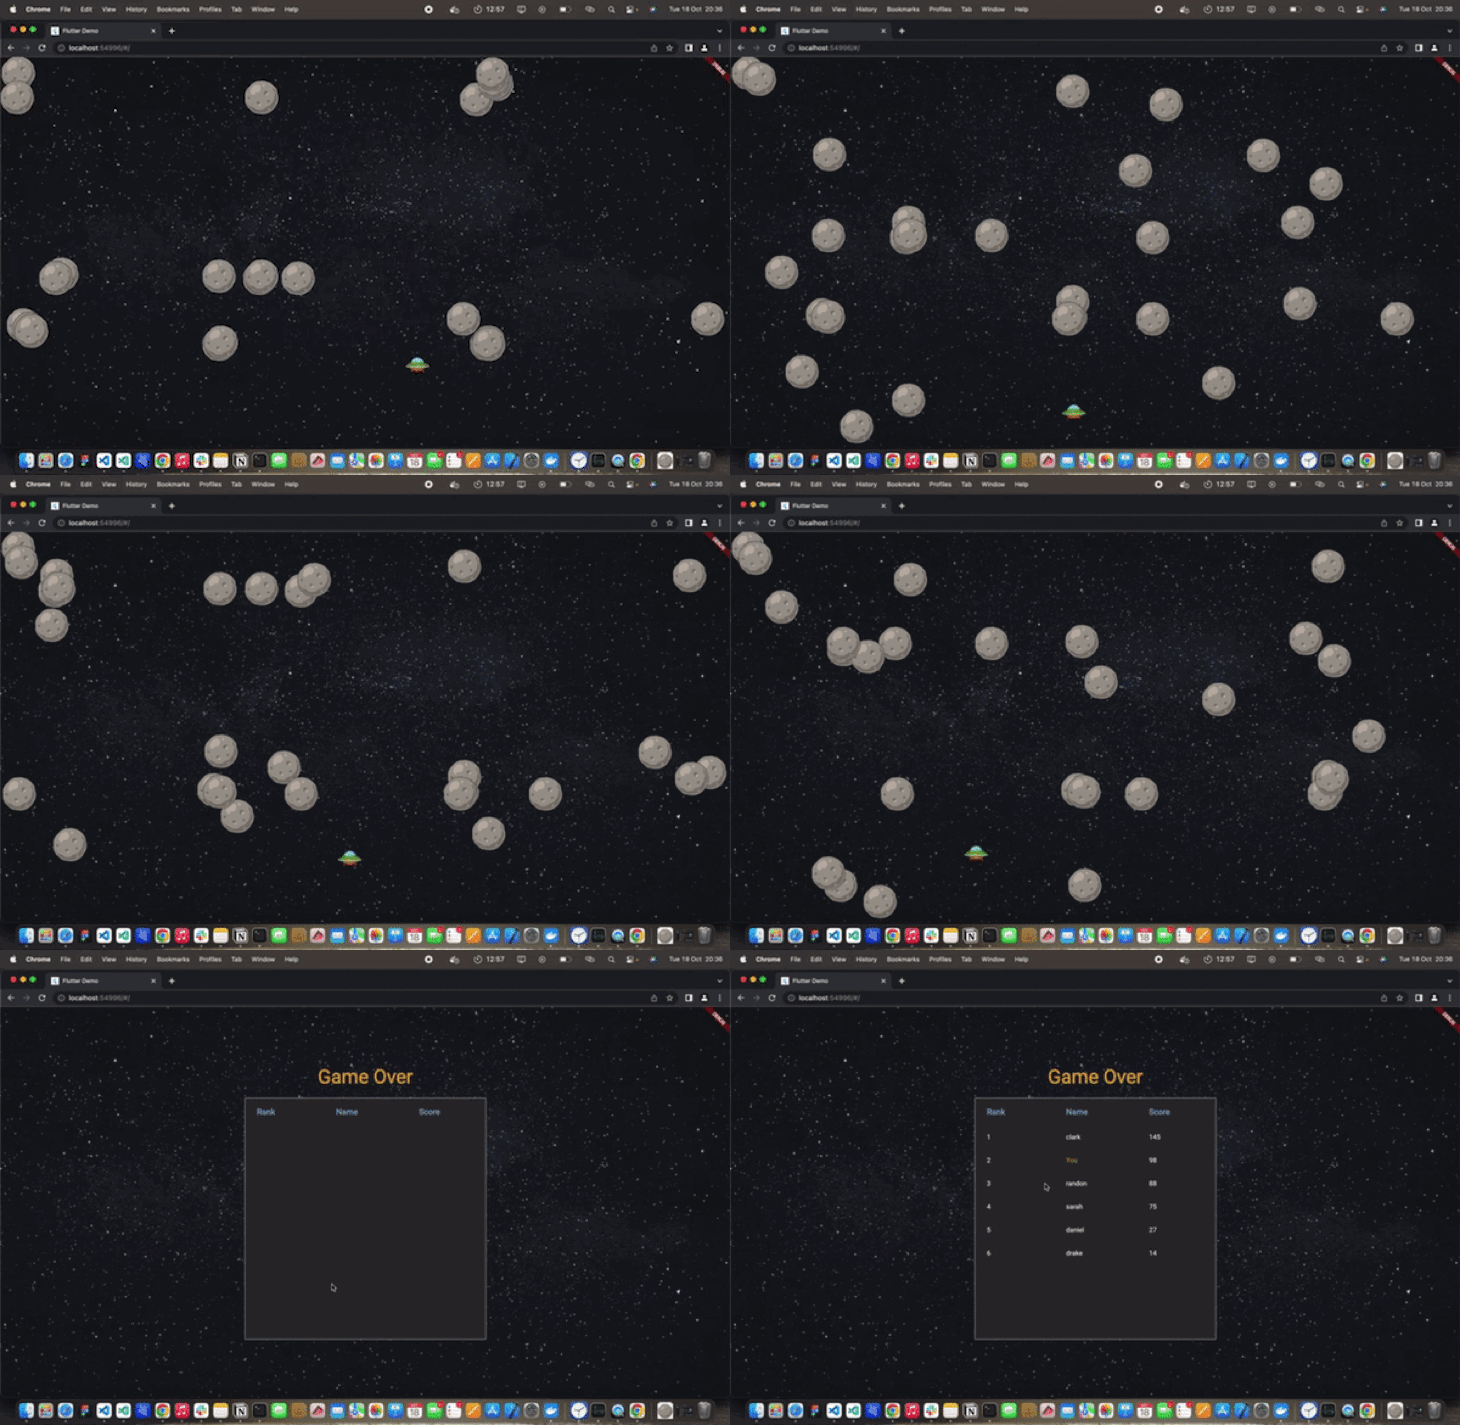
The game concept is simple. The player has to prevent a moving asteroid from colliding with the spaceship using a mouse or trackpad:

It’s important to note that we won’t use Flame because it introduces concepts beyond this article’s scope, but check out this article to learn more about Flutter game engines.
To build our Flutter game, we’ll start by creating a spaceship that follows the mouse and trackpad by using the MouseRegion widget to detect the mouse cursor’s position when it hovers over the region. This widget also hides the default mouse cursor by using SystemMouseCursors.none:
class Player extends StatefulWidget {
  const Player({
    Key? key,
    required this.gameController,
  }) : super(key: key);

  final GameController gameController;

  @override
  State<Player> createState() => _PlayerState();
}

class _PlayerState extends State<Player> with SingleTickerProviderStateMixin {
  Offset? playerPosition;

  @override
  void initState() {
    super.initState();
  }

  @override
  Widget build(BuildContext context) {
    return MouseRegion(
      cursor: SystemMouseCursors.none,
      onHover: (event) {
        playerPosition = event.position;
        setState(() {});
      },
      child: Stack(
        children: [
          Positioned(
            top: playerPosition?.dy ?? -100,
            left: playerPosition?.dx ?? -100,
            child: SizedBox(
              height: 50,
              width: 50,
              child: Image.asset(
                'assets/space_ship.png',
              ),
            ),
          )
        ],
      ),
    );
  }

  @override
  void dispose() {
    super.dispose();
  }
}
In the code above, we updated the spaceship’s position when the mouse moved in the onHover callback, then rebuilt the screen using setState().
After creating the spaceship, we’ll add the randomly moving obstacles (asteroids):
class Asteroid extends StatefulWidget {
  const Asteroid({
    Key? key,
    required this.index,
    required this.position,
    required this.gameController,
  }) : super(key: key);

  final int index;
  final Offset position;
  final GameController gameController;

  @override
  State<Asteroid> createState() => _AsteroidState();
}

class _AsteroidState extends State<Asteroid> with SingleTickerProviderStateMixin {
  final Random random = Random();
  late Offset position = widget.position;

  Offset randomDirection = const Offset(1, 1);

  int lastTime = 0;
  int asteroidSize = 70;

  Ticker? ticker;

  @override
  void initState() {
    super.initState();

    setRandomDirection();
    moveRandomly();
  }

  void moveRandomly() {
    ticker = createTicker((elapsed) {
      if (elapsed.inSeconds > lastTime + 5) {
        lastTime = elapsed.inSeconds;
        setRandomDirection();
      }

      changeDirectionWhenOutOfBounds();
      position += randomDirection * 2;
      widget.gameController.allAsteroids[widget.index] = position;

      setState(() {});
    });

    ticker?.start();
  }

  setRandomDirection() {
    double x = random.nextInt(3) - 1;
    double y = random.nextInt(3) - 1;
    if (x == 0 && y == 0) {
      x = 1;
    }

    randomDirection = Offset(x, y);
  }

  // wall collision detection
  void changeDirectionWhenOutOfBounds() {
    final screenSize = MediaQuery.of(context).size;

    if (position.dx < 0 ||
        position.dx + asteroidSize > screenSize.width ||
        position.dy < 0 ||
        position.dy + asteroidSize > screenSize.height) {
      randomDirection = randomDirection * -1;
    }
  }

  @override
  Widget build(BuildContext context) {
    return Positioned(
      top: position.dy,
      left: position.dx,
      child: SizedBox(
        height: 70,
        width: 70,
        child: Image.asset(
          'assets/asteroids.png',
        ),
      ),
    );
  }

  @override
  void dispose() {
    ticker?.dispose();
    super.dispose();
  }
}
Here, we added SingleTickerProviderStateMixin without using an AnimationController. This keeps the asteroid moving without an upper bound, duration, or AnimationTween. Apart from animating the asteroid, we also updated the direction and position of the asteroid, which is stored in GameController to detect collisions.
Instead of using the common AnimationControllers, we can use ticker to keep the animation running for as long as possible. Tickers are like periodic timers that run every frame instead of every second or minute, allowing us to create animations with better performance.
stack widget in FlutterIn the sections above, we created the spaceship and asteroid widgets. Now, we can add the spaceship and multiple asteroids into a stack widget.
First, let’s look at the addMultipleAsteroids() method to run a loop and add multiple asteroids to the GameController:
class GameView extends StatefulWidget {
  const GameView({Key? key}) : super(key: key);

  @override
  State<GameView> createState() => _GameViewState();
}

class _GameViewState extends State<GameView> {
  GameController gameController = GameController();

  @override
  void initState() {
    super.initState();

    addMultipleAsteroids();
    gameController.addListener(endGame);
  }

        // add 20 asteroids
  void addMultipleAsteroids() {
    for (int i = 0; i < 20; i++) {
      gameController.addAsteroid();
    }
    setState(() {});
  }

  @override
  void dispose() {
    gameController.removeListener(endGame);
    super.dispose();
  }

  @override
  Widget build(BuildContext context) {
    final allAsteroids = gameController.allAsteroids;

    return Scaffold(
      backgroundColor: AppColors.appDarker,
      body: Stack(
        children: [
          // Background image
          Positioned.fill(
            child: Image.asset(
              'assets/space.jpeg',
              fit: BoxFit.cover,
            ),
          ),
          // All asteroids
          ...List.generate(allAsteroids.length, (index) {
            final position = allAsteroids[index];

            return Asteroid(
              index: index,
              position: position,
              gameController: gameController,
            );
          }),
          // Player's ship
          Player(
            gameController: gameController,
          ),
        ],
      ),
    );
  }
}
After the game ends, navigate to the LeaderboardView() to display the user score:
  void endGame() async {
    await Future.delayed(Duration.zero);
    Navigator.pushReplacement(
      context,
      MaterialPageRoute(
        builder: (context) => const LeaderboardView(),
      ),
    );
  }
As you can see, the game ends when the user collides with an obstacle. We’ll detect this with a for loop to calculate if the player’s mouse position overlaps any asteroids.
The algorithm below detects a collision between two circles by comparing the center of both circles and periodically checking if they overlap or collide.
class GameController extends ChangeNotifier {
  final List<Offset> allAsteroids = [];
  final Random random = Random();
  final LeaderboardRepository leaderboardRepository = LeaderboardRepository();

  final double shipRadius = 25;
  final double asteroidRadius = 35;

  bool endGame = false;

  addAsteroid() {
    allAsteroids.add(Offset.zero);
  }

  void checkCollision(Offset playerPosition) {
    if (endGame) return;

    for (Offset asteroidPosition in allAsteroids) {
      if (isColliding(playerPosition - Offset(shipRadius, shipRadius),
          asteroidPosition - Offset(asteroidRadius, asteroidRadius))) {
        endGame = true;
        notifyListeners();
      }
    }
  }

  bool isColliding(Offset mousePosition, Offset asteroidPosition) {
    double distX = mousePosition.dx - asteroidPosition.dx;
    double distY = mousePosition.dy - asteroidPosition.dy;
    double distance = sqrt((distX * distX) + (distY * distY));

    if (distance <= asteroidRadius + shipRadius) {
      return true;
    }

    return false;
  }
}
Upon collision, we end the game and take the player to the leaderboard screen.
Leaderboards show a user’s score compared to all other online players to create a competitive gaming environment. To create a leaderboard, we have to set a metric that shows the user’s performance in the game. Here we’ll use the game duration:
int startTimestamp = DateTime.now().millisecondsSinceEpoch;
void endGame(){
  int endTimestamp = DateTime.now().millisecondsSinceEpoch;
  ...
  int score = endTimestamp - startTimestamp
}
Tracking the duration is simple; subtract the saved game start time from the time that the game ends to get the duration and score:

I’m sure you’d agree that tracking the duration is the easiest part of creating a gaming leaderboard. However, a leaderboard would be incomplete without online interaction, saving, and viewing other players’ high scores.
To keep things simple, we’ll use Firebase Realtime Database to help us authenticate the user and save their high scores. Like every other database, Firebase requires some setup to function correctly in Flutter.
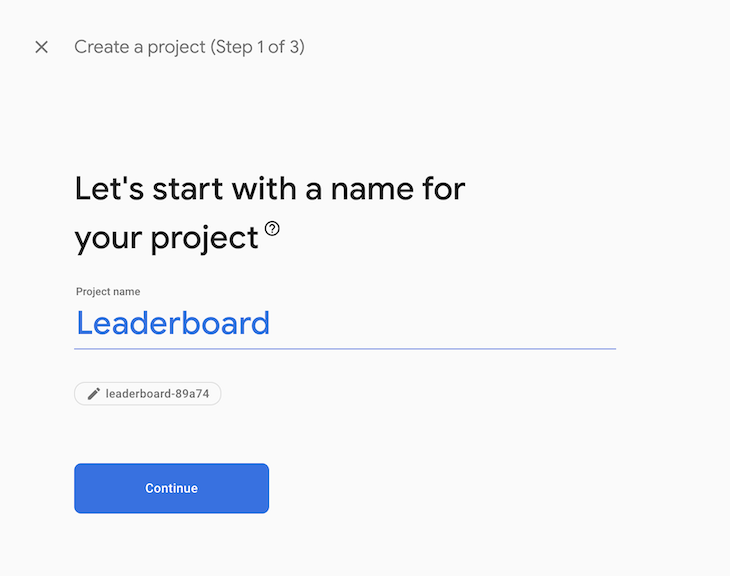
First, create a Firebase account, navigate to the Firebase console, and select create a new project:

Next, click add an app, where you’ll find the list of applications you can add. By selecting the Flutter icon in the image below, you can add Firebase to your platforms and reduce your written boilerplates:

After completing the Firebase setup process, run the command flutterfire configure --project=projectname to generate the boilerplate and add Firebase to your selected platforms.
Next, update the pubspec.yaml file with the necessary Firebase packages or plugins:
...
dependencies:
  firebase_auth: ^3.11.2
  firebase_core: ^1.24.0
  firebase_database: ^9.1.7
  flutter:
    sdk: flutter
...
Authentication is essential for creating our gaming leaderboard because we need to link the user data to the same user in every game. Without authentication, it would be impossible to save and retrieve specific user scores.
Firebase provides sign-in methods that can be easily integrated into our app. For this tutorial, we will use the email and password method and create a login screen to retrieve the user’s email and password, and then sign in the user by running the code below:
Future<void> signIn(String email, String password) async {
  await FirebaseAuth.instance.signInWithEmailAndPassword(
    email: email,
    password: password,
  );
}
Users can also anonymously sign in, but this does not save their data, and they won’t be able to play on other devices.
We need to structure our data to track high scores so we can easily save, retrieve, and sort according to the ranks. One of the best methods for doing this is to use the Firebase database. When the game ends, the user score will be sent to Firebase’s Realtime Database. Firebase provides each user with a unique user ID that allows us to structure the data so that users can easily override the previous game score with a new one.
The structure is shown in the image below:
- leaderboard
      | - user1
            | - name: 'User name'
            | - score: 10

      | - user2
            | - name: 'User name'
            | - score: 15
![]()
Our implementation in Flutter saves the data to the player’s ID, and we’ll use a repository to ensure our code is loosely coupled and separated from the view.
Next, we’ll call saveHighScore() when the game ends:
class LeaderboardRepository {
        ...
  Future<void> saveHighScore(String name, int newScore) async {
    final currentUser = FirebaseAuth.instance.currentUser;
    if (currentUser == null) return;

    try {
      final uid = currentUser.uid;
      final userName = getUserName();

      // Get the previous score
      final scoreRef = FirebaseDatabase.instance.ref('leaderboard/$uid');
      final userScoreResult = await scoreRef.child('score').once();
      final score = (userScoreResult.snapshot.value as int?) ?? 0;

      // Return if it is not the high score
      if (newScore < score) {
        return;
      }

      await scoreRef.set({
        'name': userName,
        'score': newScore,
      });
    } catch (e) {
      // handle error
    }
  }
        ...
}
We need to sort the data from the highest to the lowest to display all user scores. For applications or games with small numbers of users or data, you can sort the data directly in Flutter. However, this method is inefficient for apps and games with more users and data.
For our game, we will use Firebase queries, which are used for ordering, filtering, and limiting the server’s data, to increase speed and decrease cost.
The code below orders data by the high score and retrieves the last 20 data present on the leaderboard. Since data retrieved from Firebase is always in ascending order, we need to reverse the data to make sure it starts from the highest score:
class LeaderboardRepository {
        ...
  Future<Iterable<LeaderboardModel>> getTopHighScores() async {
    final currentUser = FirebaseAuth.instance.currentUser;
    final userId = currentUser?.uid;

    // Retrieve first 20 data from highest to lowest in firebase
    final result = await FirebaseDatabase.instance
        .ref()
        .child('leaderboard')
        .orderByChild('score')
        .limitToLast(20)
        .once();

    final leaderboardScores = result.snapshot.children
        .map(
          (e) => LeaderboardModel.fromJson(e.value as Map, e.key == userId),
        )
        .toList();

    return leaderboardScores.reversed;
  }
        ...
}
Next, we need to convert the data into a model. Flutter models are classes used to convert and cleanly represent data. For example, the LeaderboardModel is created by defining the score and name values, as shown below:
class LeaderboardModel {
  final String name;
  final int score;

  LeaderboardModel({
    required this.name,
    required this.score,
  });

  factory LeaderboardModel.fromJson(Map json, bool isUser) {
    return LeaderboardModel(
      name: isUser ? 'You' : json['name'],
      score: json['score'],
    );
  }
}
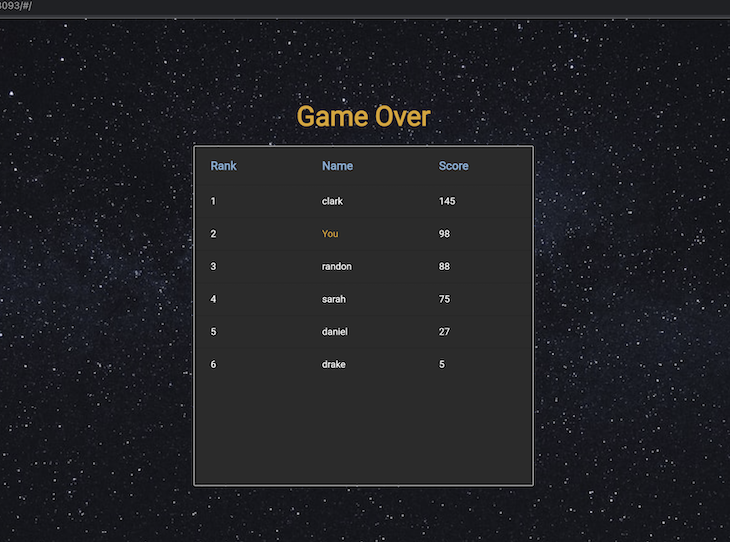
The leaderboard page contains the list of high scores shown in a tabular form with the text Game Over. To create this, we’ll start by building a StatefulWidget to navigate to at the end of the game:
class LeaderboardView extends StatefulWidget {
  const LeaderboardView({
    this.isGameOver = true,
    Key? key,
  }) : super(key: key);
  final bool isGameOver;

  @override
  State<LeaderboardView> createState() => _LeaderboardViewState();
}

class _LeaderboardViewState extends State<LeaderboardView> {

  @override
  void initState() {
    super.initState();
    // We get the leaderboard scores from the repository here
  }

  @override
  Widget build(BuildContext context) {
    // UI widget goes here
  }
}
Next, we retrieve the data from LeaderboardRepository and store it in a _leaderboardScores list.
Then, we will rebuild the page by calling setState(() {}):
final List<LeaderboardModel> _leaderboardScores = [];

  @override
  void initState() {
    super.initState();

    getLeaderboardScores();
  }

  void getLeaderboardScores() async {
    final leaderboardScores = await LeaderboardRepository().getTopHighScores();
    setState(() {
      _leaderboardScores.addAll(leaderboardScores);
    });
  }
Next, we’ll create the leaderboard table in the build method. In Flutter, data tables help display data in tabular form by using DataColumn, DataRow, and DataCells, as shown below:
  @override
  Widget build(BuildContext context) {
    return Scaffold(
      backgroundColor: AppColors.appDarker,
      body: Center(
        child: Column(
          mainAxisAlignment: MainAxisAlignment.center,
          children: [
            Text(
              'Game Over',
              style: context.textTheme.bodyMedium?.copyWith(
                color: AppColors.appColor,
                fontWeight: FontWeight.w900,
                fontSize: 40,
              ),
            ),
            const SizedBox(height: 20),
            Container(
              height: 500,
              width: 500,
              child: SingleChildScrollView(
                child: DefaultTextStyle(
                  style: const TextStyle(color: Colors.white),
                  child: DataTable(
                      dataTextStyle: const TextStyle(color: Colors.white),
                      columns: const [
                        DataColumn(
                          label: Text('Rank'),
                        ),
                        DataColumn(
                          label: Text('Name'),
                        ),
                        DataColumn(
                          label: Text('Score'),
                        ),
                      ],
                      rows: List.generate(_leaderboardScores.length, (index) {
                        final leaderboard = _leaderboardScores[index];
                        return DataRow(
                          cells: [
                            DataCell(Text('${index + 1}')),
                            DataCell(Text(
                              leaderboard.name,
                              style: context.textTheme.bodyMedium?.copyWith(
                                color: leaderboard.name == 'You'
                                    ? AppColors.appColor
                                    : Colors.white,
                              ),
                            )),
                            DataCell(Text(leaderboard.score.toString())),
                          ],
                        );
                      })),
                ),
              ),
            ),
          ],
        ),
      ),
    );
  }
Here, the DataColumn represents the titles and displays the user score and ranks. To implement this, we’ll use List.generate to loop through the data from LeaderboardRepository and return a DataRow with the user score, name, and rank.
Building casual games in Flutter is getting more support from the Flutter community. To explore other examples of casual games built with Flutter, check out Omni chess, 4 pics 1 word, and Orbit.
In this article, we built a Flutter gaming leaderboard with Firebase and learned about the Flutter Casual Games Toolkit. Thanks for reading!
Install LogRocket via npm or script tag. LogRocket.init() must be called client-side, not
server-side
$ npm i --save logrocket

// Code:

import LogRocket from 'logrocket';
LogRocket.init('app/id');
// Add to your HTML:

<script src="https://cdn.lr-ingest.com/LogRocket.min.js"></script>
<script>window.LogRocket && window.LogRocket.init('app/id');</script>

@container scroll-state: Replace JS scroll listeners nowCSS @container scroll-state lets you build sticky headers, snapping carousels, and scroll indicators without JavaScript. Here’s how to replace scroll listeners with clean, declarative state queries.

Russ Miles, a software development expert and educator, joins the show to unpack why “developer productivity” platforms so often disappoint.

Discover what’s new in The Replay, LogRocket’s newsletter for dev and engineering leaders, in the February 18th issue.

Learn how to recreate Claude Skills–style workflows in GitHub Copilot using custom instruction files and smarter context management.
Hey there, want to help make our blog better?
Join LogRocket’s Content Advisory Board. You’ll help inform the type of content we create and get access to exclusive meetups, social accreditation, and swag.
Sign up now