
Decentralization is slowly but steadily gaining traction in the technology world as a popular use case for the blockchain. Because of its accessibility and durability, applications are gradually turning toward decentralization. Financial technology (FinTech) has also begun to migrate to the blockchain, resulting in the concept of DeFi, or decentralized finance.

A DeFi dashboard is a platform that allows users to access and monitor live streams of DeFi assets, and analyze various metrics. These platforms are intended to make interacting with blockchain-based financial systems as simple as possible.
For example, cryptocurrencies and non-fungible tokens (NFTs) are now the most popular forms of exchange on the blockchain. DeFi dashboards are designed to assist someone with minimal programming experience in accessing assets and executing authorized activities on those assets.
A few examples of existing DeFi dashboards are Zapper, Apeboard, and Zerion.
In this article, we will learn about DeFi dashboards, why they’re made, and how to make one of our own.
In order to follow along with this tutorial, be sure to have the following:
The Replay is a weekly newsletter for dev and engineering leaders.
Delivered once a week, it's your curated guide to the most important conversations around frontend dev, emerging AI tools, and the state of modern software.
DeFi dashboards are particularly important for blockchain and cryptocurrency users because they allow easy tracking of investments across numerous decentralized financial platforms. DeFi dashboards provide the following for their users:
First, they are great for easy and swift access to DeFi assets and services. Using most typical blockchain apps has been found to be fairly challenging for newbies, and accessing DeFi assets and using their services individually involves a lot of time and energy. Multi or cross-chain DeFi dashboards, for example, speed up the process of converting assets across blockchains.
Second is the growth of the DeFi community. Because DeFi dashboards are easier for newbies to use, they may be used by DeFi communities to onboard new people to their projects.
Third is DeFi activity tracking and reporting. Most DeFi projects participate in a variety of activities such as pooling, liquidity providing, farming, and so on. Tracking all of these actions becomes challenging, but DeFi dashboards can assist in keeping track of, and reporting on, these activities.
Finally, there’s visualization of DeFi activities. Due to the intricacy of the blockchain, DeFi activities can be ambiguous and require confirmation for certain transactions that run in the background. These activities may be visualized using DeFi dashboards.
Knowing how to design websites isn’t enough for a web developer. To construct a good DeFi dashboard, you’ll need to learn a few more tricks.
Building DeFi dashboards necessitates knowledge of how blockchains work, how values are handled or converted, blockchain cryptography, and so on.
In the follow sections, we will build a basic DeFi dashboard using the Moralis testnet server and React.
You’ll need to set up a new Moralis server to access Moralis testnet server resources in your application.
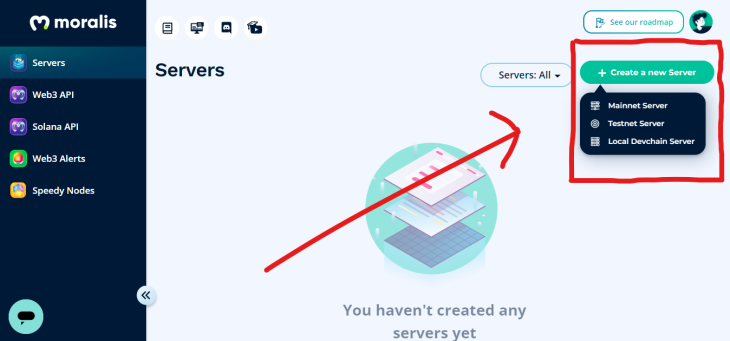
Mainnet, testnet, and local devchain servers are the servers supported by Moralis. Mainnet is utilized for production, and the activities that are performed on it are genuine and effect actual assets. Testnet servers are used for development purposes; this server allows for testing and experimenting without putting actual assets at risk. Local devchain servers are similar to testnet servers, except they are hosted on a local machine, making them exclusively available for local development and use.
We will be using the Moralis testnet server. Take the following steps to create one:
At the upper right corner of the servers page, click the green + Create a new Server button and select Testnet Server from the dropdown menu.
A modal will open, showing the server’s setup settings. Fill in the required information and select the chains you want the server to utilize.
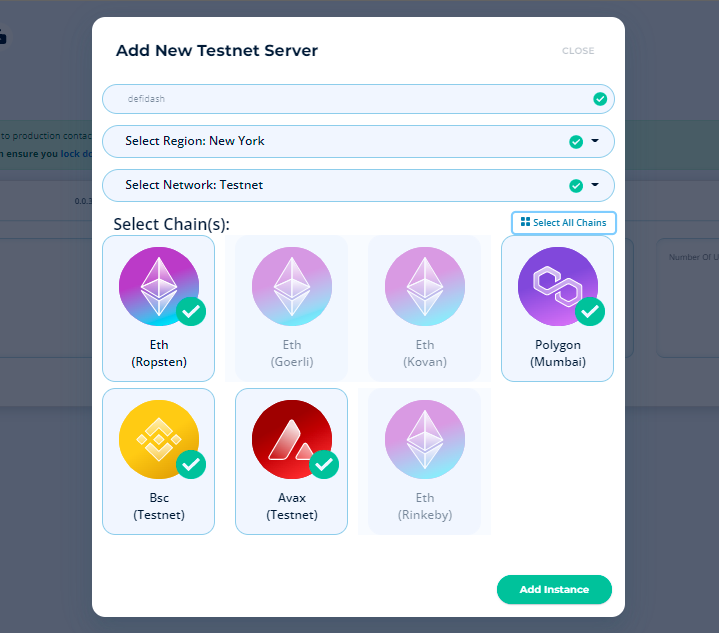
Click the Add Instance button after selecting the chains you want to use. This creates a server instance that appears on the servers page.
The View Information button at the end of the server section may be used to preview the server configuration details. Because the information in this modal is private, don’t keep it open while you’re gone from your computer, and restrict who has access to it.
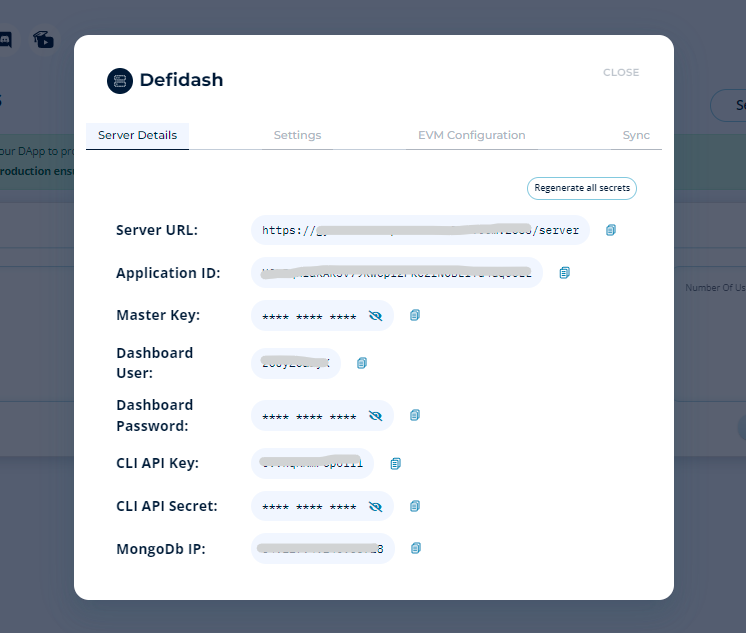
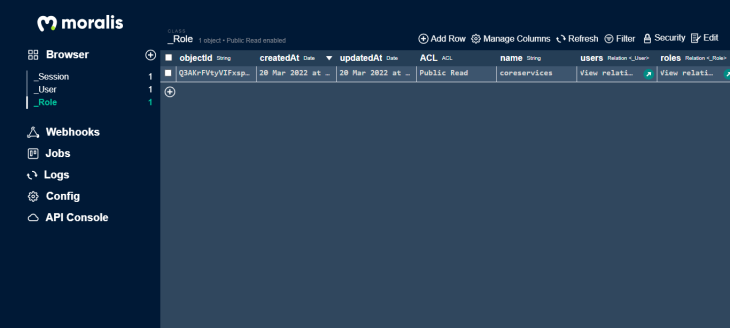
When you dismiss the modal and select the server item from the dropdown menu, a Dashboard button appears, which takes you to the database-like dashboard seen below.
This dashboard keeps track of all the actions that take place on the current server. Because the server is still new, it will be vacant for the time being.
We’ll use React to create our DeFi dashboard. I’ve already created a template for the purposes of this article, but you are free to build a front end for your design and apply the logic to it.
Follow these steps to make use of the template I’ve already created.
First, run the command below in a terminal in a specified directory to clone the Github repository:
git clone https://github.com/wolz-CODElife/DeFidash-template.git
Then, run this command to change the terminal directory to the project directory:
cd DeFidash-template
It’s critical to install the dependencies listed in the package.json file before starting the application server.
Run the following command in a terminal in the project’s directory to install the application’s dependencies:
npm install
When the installation is finished, check to see if the following packages are available:
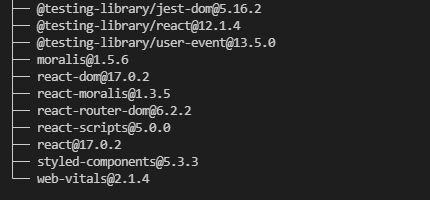
Run the following command on the terminal to obtain this list:
npm list
When you start the application server, you should see something similar to this in your browser.
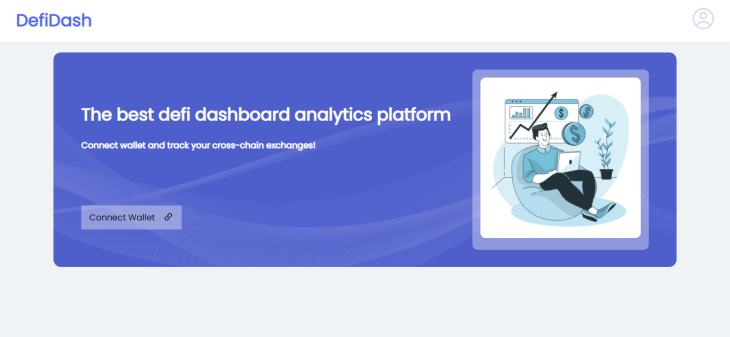
Let’s add some functionality to our user interface now that it’s up and running. To begin, we must supply the Moralis server URL and app ID from the Moralis account we created to our application.
There are two constants labeled SERVER_URL and APP_ID in /src/services/MoralisConfig.js:
export const APP_ID = "YOUR_MORALIS_APP_ID"
export const SERVER_URL = "YOUR_MORALIS_SERVER_URL"
Replace the values with the necessary Moralis account values. We want to wrap our application with MoralisProvider now that we have these credentials. This will aid in the initialization of Moralis as soon as the application is launched.
Import MoralisProvider and add it to the index.js file as a component, as seen below:
import React from 'react';
import ReactDOM from 'react-dom';
import './index.css';
import App from './App';
import { APP_ID, SERVER_URL } from './services/MoralisConfig';
ReactDOM.render(
  <React.StrictMode>
    <MoralisProvider serverUrl={SERVER_URL} appId={APP_ID}>
      <App />
    </MoralisProvider>
  </React.StrictMode>,
  document.getElementById('root')
);
We imported the SERVER_URL and APP_ID from the MoralisConfig.js file in the code snippet above; this may not be an issue because we are developing a test application.
It is recommended to store the server URL and app ID as environment variables for public use or applications that handle actual data. Reverse engineers may be able to access source codes, and if particular credentials are found, they may be used to compromise the platform.
If everything goes according to plan, we should be able to interact and communicate with the Moralis server from our application at this point. The first feature we’d want to build is Moralis authentication, because we need to link users’ wallets to the app in order for it to access their assets and transactions.
To implement authentication, change the following code in /src/pages/ConnectWallet.js:
import React, { useEffect } from 'react'
import { useNavigate } from 'react-router-dom'
import styled from 'styled-components'
import { useMoralis } from "react-moralis";
const ConnectWallet = ({connected, setConnected}) => {
    const navigate = useNavigate()
    const { authenticate, isAuthenticated } = useMoralis();
    useEffect(() => {
        if(connected){
            navigate("/dashboard")
        }
    }, [connected, navigate])
    const HandleMetaMask = () => {
        if (!isAuthenticated) {
            authenticate({signingMessage: "Log in using Moralis" })
            .then((user) => {
                if(user){
                    setConnected(true)
                }
            })
            .catch(error => {
                console.log(error);
            });
        }
    }
    const HandleWalletConnect = () => {
        if (!isAuthenticated) {
            authenticate({signingMessage: "Log in using Moralis", provider: "walletconnect", chainId: 56 })
            .then((user) => {
                if(user) {
                    setConnected(true)
                }
            })
            .catch(error => {
                console.log(error);
            });
        }
    }
  return (
    <SigninForm>
        <div className="title">
            <h1>Connect your wallet</h1>
            <p>Connect your wallet and know everything about NFT👉</p>
        </div>
        <div className="wallets">
            <button onClick={HandleMetaMask}>
                <img src="https://i.postimg.cc/C1v3V2Zp/image.png" alt="Meta Mask" />
                <h2>MetaMask</h2>
            </button>
            <button onClick={HandleWalletConnect}>
                <img src="https://i.postimg.cc/tChHs2wW/image.png" alt="Meta Mask" />
                <h2>Wallet Connect</h2>
            </button>
            <a href="https://metamask.io/download" target="_blank" rel="noopener noreferrer">I don't have a wallet</a>
        </div>
    </SigninForm>
  )
}
export default ConnectWallet

const SigninForm = styled.div`
    display: flex;
    flex-direction: column;
    align-items: center;
    padding: 100px;
    @media screen and (max-width: 648px) {
        padding: 100px 50px;
    }
    @media screen and (max-width: 420px) {
        padding: 100px 25px;
    }
    .title {
        text-align: center;
        p {
            font-size: 18px;
        }
    }
    .wallets {
        display: flex;
        flex-direction: column;
        margin-top: 56px;
        button {
            height: 72px;
            width: 452px;
            padding: 24px;
            border: 1px solid #D7D9F2;
            display: flex;
            flex-direction: row;
            align-items: center;
            background: none;
            margin-bottom: 16px;
            border-radius: 14px;
            cursor: pointer;
            transition: all ease 0.4s;
            @media screen and (max-width: 550px) {
                width: 350px;
                padding: 15px;
            }
            @media screen and (max-width: 410px) {
                width: 250px;
                h2 {
                    font-size: 15px;
                }
            }
            img {
                width: 48px;
                height: 48px;
                margin: 0px 48px;
                @media screen and (max-width: 550px) {
                    margin: 0px;
                    margin-right: 20px;
                }
            }
            &:hover {
                border: 1px solid #5A66F9;
                background: #F7FAFA;
            }
        }
        a {
            text-decoration: none;
            color: #111119;
            flex: 1;
            text-align: center;
            font-size: 18px;
            margin: 24px 0px;
            &:hover {
                color: #8A92FF;
            }
        }
    }
`
The code excerpt includes a React component called ConnectWallet that takes two props: connected and setConnected, which are state handlers that detect whether or not a user has linked his or her wallet to the app.
We defined a constant navigate as a function of the Hook useNavigate() in the ConnectWallet component, and we use the function to reroute the user if he or she is not connected.
We also defined two constants in the useMoralis() Hook: authenticated, which is a function for authenticating users, and isAuthenticated, which is a boolean that tests if the user is authenticated.
Then, every time the component is mounted, useEffect checks to see if the user is still connected. The program navigates to the /dashboard route if the user is connected.
We also have two methods for handling wallet connections: HandleMetaMask, which manages authentication using the Moralis MetaMask provider, and HandleWalletConnect, which handles authentication using the Moralis walletconnect provider.
The component then produces a stylized component called SigninForm that contains the HTML structure of the ConnectWallet component.
We want to get the user’s info from the Moralis server after they’ve been authorized. To accomplish this, change the following code in /src/pages/Dashboard.js:
import React, { useEffect, useRef, useState } from 'react'
import { useNavigate } from 'react-router-dom'
import styled from 'styled-components'
import History from '../Layouts/History'
import Portfolio from '../Layouts/Portfolio'
import { IconCopy, LogosEthereum } from '../services/icons'
import { useMoralisWeb3Api, useMoralis } from "react-moralis";
import { APP_ID, SERVER_URL } from '../services/MoralisConfig'

const Dashboard = ({connected, setConnected}) => {
  const [address, setAddress] = useState("")
  const addressInput = useRef(null)
  const [nativeBal, setNativeBal] = useState("")
  const [activeTab, setActiveTab] = useState('Portfolio')
  const tabs = ["Portfolio", "History"]
  const navigate = useNavigate()
  const Web3Api = useMoralisWeb3Api();
  const { user, logout, Moralis } = useMoralis();


  useEffect(() => {
    Moralis.start({serverUrl: SERVER_URL, appId: APP_ID})
    if(!connected){
        navigate("/connectwallet")
    }
    else{
      setAddress(user.get("ethAddress"))
      fetchNativeBalances()
    }
    // eslint-disable-next-line
}, [connected, navigate, user])
  const handleCopy = () => {
    let text = addressInput.current.value
    navigator.clipboard.writeText(text).then(() => {
      alert('Copied address to clipboard!');
    }, function(err) {
      console.error('Async: Could not copy text: ', err);
    });
  }
  const fetchNativeBalances = async () => {
    let options = {
      chain: "ropsten"
    }
    Web3Api.account.getNativeBalance(options).then(balance => {
      console.log(balance);
      let newNativeBalance = parseFloat(Moralis.Units.FromWei(balance.balance)).toFixed(2)
      setNativeBal(newNativeBalance)
    })
  };
  const HandleDisconnectWallet = () => {
    logout().then(() => {
      setConnected(false)
    })
  }
  return (
    <DashContainer>
      <h1 className='overview'>Overview <button onClick={HandleDisconnectWallet}>Disconnect Wallet</button></h1>
      <div className="header">
        <img src="https://i.postimg.cc/VsGFzCqn/image.png" alt="fakeqr" />
        <span>{address.slice(0, 5) + "..." + address.slice(-4)}</span>
        <button onClick={handleCopy}><IconCopy /></button>
        <input type="hidden" defaultValue={address} ref={addressInput} />
      </div>
      <div className="sub_header">
        <LogosEthereum />
        <h1>{nativeBal || 0} ETH</h1>
      </div>
      <div className="tabs">
        <div className="head">
          {tabs.map(menu => (
            <button key={menu} className={activeTab === menu? "active" : ""} onClick={() => setActiveTab(menu)}>{menu}</button>
          ))}
        </div>
        <div className="body">
          {activeTab === tabs[0] ?
            <Portfolio />
            :
            <History />
          }
        </div>
      </div>
    </DashContainer>
  )
}
export default Dashboard

const DashContainer = styled.div`
    padding: 100px;
    @media screen and (max-width: 768px) {
      padding: 100px 50px;
    }
    @media screen and (max-width: 498px) {
      padding: 100px 25px;
    }

    .overview {
      display: flex;
      align-items: center;
      justify-content: space-between;

      button {
        background: none;
        border: 1px solid #FF0000A6;
        padding: 8px 15px;
        border-radius: 6px;
        cursor: pointer;

        @media screen and (max-width: 498px) {
          transform: scale(0.8);
        }
        &:hover {
          background: #FF0000A6;
          color: #FFFFFF;
          border: none;
        }
      }
    }
    .header {
      display: flex;
      align-items: center;
      img {
        border-radius: 50%;
        width: 40px;
        height: 40px;
        margin-right: 10px;
      }
      span {
        color: #8a8a8a;
        font-size: 15px;
      }
      button {
        color: #8a8a8a;
        background: none;
        border: none;
        outline: none;
        cursor: pointer;
        svg {
          width: 15px;
          height: 15px;
        }
      }
    }
    .sub_header {
      display: flex;
      flex-direction: column;
      align-items: center;
      margin: 20px 0px;
    }
    .tabs {
      margin: 30px 0px;
      box-shadow: 2px 2px 20px #D7D9F2C0;
      border-radius: 10px;

      .head {
        background: #FFFFFF;
        border-radius: 10px 10px 0px 0px;

        button {
          border: none;
          outline: none;
          cursor: pointer;
          padding: 10px 15px;
          background: none;
          &:hover {
            border-bottom: 2px solid #5A66F960;
          }
          &.active {
            border-bottom: 2px solid #5A66F9;
          }
        }
      }

      .body {
        background: #FFFFFFA5;
        padding: 20px;
        border-radius: 0px 0px 10px 10px;
      }
    }
`
The code snippet above includes a React component called Dashboard, which, like the ConnectWallet component, receives the two props connected and setConnected.
Then, we define a set of states for handling data. We also create a list of tabs called Portfolio and History, which will be used to toggle between the user’s portfolio and transaction history previews.
We also define certain Moralis utilities; we built a new object of methods named Web3Api from the useMoralisWeb3Api() Hook, and we define user, logout, and Moralis from the useMoralis() Hook.
After configuring resources, we run a useEffect to see whether the user is connected and then use the fetchNativeBalances() method to get the user’s native balance. If the user is not connected, the application should navigate to the /connectwallet route.
We also implemented the methods handleCopy for copying the user’s Ethereum address, fetchNativeBalances for getting the current user’s native balance on the ropsten testnet (you may change the chain to see the native balance of that chain), and HandleDisconnectWallet for logging out the user.
Finally, the Dashboard component returns a DashContainer styled component that shows the user’s native balance as well as two tabs for displaying the user’s portfolio and transaction history.
The Portfolio component is the first tab on the dashboard that is shown by default. This component contains a tabular list of token balances on the user’s wallet’s ETH chain.
To implement the portfolio tab, change the following code in /src/Layouts/Portfolio.js:
import React, { useEffect, useState } from 'react'
import styled from 'styled-components'
import { useMoralisWeb3Api, useMoralis } from "react-moralis";
import { LogosEthereum } from '../services/icons'
import { APP_ID, SERVER_URL } from '../services/MoralisConfig';
const Portfolio = () => {
  const Web3Api = useMoralisWeb3Api();
  const { Moralis } = useMoralis()
  const [tokenBal, setTokenBal] = useState([])
  useEffect(() => {
    Moralis.start({serverUrl: SERVER_URL, appId: APP_ID})
    fetchTokenBalances()

    // eslint-disable-next-line
  }, [])
  const fetchTokenBalances = () => {
    Web3Api.account.getTokenBalances().then(balances => {
    let newBalances = []
    balances.map(bal => (
      newBalances.push({
        token_name: bal.symbol,
        token_logo: bal.logo,
        balance: parseFloat(Moralis.Units.FromWei(bal.balance)).toFixed(2)
      })
      ))
      setTokenBal(newBalances)
    })
  }

  return (
    <PortfolioContainer>
      <div className="table_responsive">
        <table>
          <thead>
            <tr>
              <th>Token</th>
              <th>Balance</th>
            </tr>
          </thead>
          {/* Table body */}
          <tbody>
            {tokenBal.length > 0?
              tokenBal.map(bal => (
                <tr key={bal.token_name}>
                  <td className='token_name'>{bal.token_logo && <img src={bal.token_logo} alt={bal.token_name} />} {bal.token_name}</td>
                  <td>{bal.balance} ETH</td>
                </tr>
              ))
            :
            <tr>
              <td colSpan="2">No token found</td>
            </tr>
            }
          </tbody>
        </table>
      </div>
    </PortfolioContainer>
  )
}
export default Portfolio
const PortfolioContainer = styled.div`
  .table_responsive {
    width: 100%;
    overflow-x: auto;
    .header {
      display: flex;
      align-items: center;
      svg {
        margin-right: 10px;
        width: 40px;
        height: 40px;
      }
    }
    table {
      border-collapse: collapse;
      width: 100%;
      margin: 20px 0px;
    }
    td, th {
      border: 1px solid #5A66F965;
      text-align: left;
      padding: 8px;
    }
    .token_name {
      display: flex;
      img {
        width: 20px;
        height: 20px;
        border-radius: 50%;
        margin-right: 15px;
      }
    }
    tr:nth-child(even) {
      background-color: #5A66F940;
    }
  }
`
The Portfolio component in the code sample above has a table that conditionally renders rows of token balances for the current user. A row with “No token found” will be rendered if the user does not have any tokens on the ropsten chain.
When the component is mounted, it triggers a useEffect that executes the fetchTokenBalances() method. fetchTokenBalances() uses the Web3Api to retrieve the current user’s token balances and adds each one to a list of newBalances before updating the tokenBal state.
After we’ve set up the portfolio tab, we’ll need to set up a tab to show the user’s transaction history.
To add the history tab, change the code in /src/Layouts/History.js to this:
import React, { useEffect, useState } from 'react'
import styled from 'styled-components'
import { useMoralisWeb3Api, useMoralis } from "react-moralis";
import { APP_ID, SERVER_URL } from '../services/MoralisConfig';
import { IconCopy } from '../services/icons';
const History = () => {
  const Web3Api = useMoralisWeb3Api();
  const { Moralis } = useMoralis()
  const [transactions, setTransactions] = useState([])
  useEffect(() => {
    Moralis.start({serverUrl: SERVER_URL, appId: APP_ID})
    fetchTransactionHistory()
    // eslint-disable-next-line
  }, [])
  const fetchTransactionHistory = async () => {
    let options = {
      chain: "testnet",
    }
    Web3Api.account.getTransactions(options).then(transacts => {
      if(transacts.result.length > 0) {
        let newTransactions = []
        transacts.result.map(transaction => {
          newTransactions.push({
            hash: transaction.hash,
            sender: transaction.from_address,
            receiver: transaction.to_address,
            value: parseFloat(Moralis.Units.FromWei(transaction.value)).toFixed(3),
            status: transaction.receipt_status,
            timestamp: transaction.block_timestamp
          })
        })
        setTransactions(newTransactions)
      }
    })
  };
  const handleCopy = (address) => {
    navigator.clipboard.writeText(address).then(() => {
      alert('Copied address to clipboard!');
    }, function(err) {
      console.error('Async: Could not copy text: ', err);
    });
  }

  return (
    <HistoryContainer>
      <div className="table_responsive">
        <table>
          <thead>
            <tr>
              <th>Transaction Hash</th>
              <th>Sender Address</th>
              <th>Receiver Address</th>
              <th>Amount</th>
              <th>Status</th>
              <th>Timestamp</th>
            </tr>
          </thead>
          {/* Table body */}
          <tbody>
            {transactions.length > 0?
              transactions.map(transaction => (
                <tr key={transaction.hash + transaction.timestamp}>
                  <td>
                    <div className='trans_address'>
                      {transaction.hash.slice(0, 6) + "..." + transaction.hash.slice(-4)}
                      <button onClick={() => handleCopy(transaction.hash)}><IconCopy /></button>
                    </div>
                  </td>
                  <td>
                    <div className='trans_address'>
                      {transaction.sender.slice(0, 6) + "..." + transaction.sender.slice(-4)}
                      <button onClick={() => handleCopy(transaction.sender)}><IconCopy /></button>
                    </div>
                  </td>
                  <td>
                    <div className='trans_address'>
                      {transaction.receiver.slice(0, 6) + "..." + transaction.receiver.slice(-4)}
                      <button onClick={() => handleCopy(transaction.receiver)}><IconCopy /></button>
                    </div>
                  </td>
                  <td>{transaction.value} ETH</td>
                  <td>{transaction.status === "1"? <span className='success'>Successful</span> : <span className='pending'>Pending</span> }</td>
                  <td>{new Date(transaction.timestamp).toUTCString()}</td>
                </tr>
              ))
            :
            <tr>
              <td colSpan="6">No transactions found</td>
            </tr>
            }
          </tbody>
        </table>
      </div>
    </HistoryContainer>
  )
}
export default History
const HistoryContainer = styled.div`
  .table_responsive {
    width: 100%;
    overflow-x: auto;
    table {
      border-collapse: collapse;
      width: 100%;
      margin: 20px 0px;
    }
    td, th {
      border: 1px solid #5A66F965;
      text-align: left;
      padding: 8px;
      min-width: 150px;
    }

    .trans_address {
      display: flex;
      button {
        color: #8a8a8a;
        background: none;
        border: none;
        outline: none;
        cursor: pointer;
        svg {
          width: 15px;
          height: 15px;
        }
      }
    }

    .success {
      font-size: 10px;
      background: #00aa0060;
      border-radius: 20px;
      padding: 3px 7px;
    }

    .pending {
      font-size: 10px;
      background: #aaaa0060;
      border-radius: 20px;
      padding: 3px 7px;
    }
    tr:nth-child(even) {
      background-color: #5A66F940;
    }
  }
In the code above, the History component returns a styled component called HistoryContainer. The component also calls the fetchTransactionHistory() method, which uses the Web3Api utility to collect transactions on the testnet chain of the user’s wallet, as soon as it is mounted.
The application should be completely functioning and ready for deployment after editing the required files to the aforementioned code snippets.
For public access, you may choose to host the application on any hosting platform; I chose to deploy mine on Firebase.
You can see my deployed application here.
After reading this article, readers should understand what a DeFi dashboard is, why they’re made, and how to build one from scratch.
You may design a Zapper clone to put your DeFi dashboard building skills to the test. In the comments area below, please feel free to ask questions or make suggestions.
Client-side issues that impact users’ ability to activate and transact in your apps can drastically affect your bottom line. If you’re interested in monitoring UX issues, automatically surfacing JavaScript errors, and tracking slow network requests and component load time, try LogRocket.

LogRocket lets you replay user sessions, eliminating guesswork around why bugs happen by showing exactly what users experienced. It captures console logs, errors, network requests, and pixel-perfect DOM recordings — compatible with all frameworks.
LogRocket's Galileo AI watches sessions for you, instantly identifying and explaining user struggles with automated monitoring of your entire product experience.
Modernize how you debug web and mobile apps — start monitoring for free.

@container scroll-state: Replace JS scroll listeners nowCSS @container scroll-state lets you build sticky headers, snapping carousels, and scroll indicators without JavaScript. Here’s how to replace scroll listeners with clean, declarative state queries.

Explore 10 Web APIs that replace common JavaScript libraries and reduce npm dependencies, bundle size, and performance overhead.

Russ Miles, a software development expert and educator, joins the show to unpack why “developer productivity” platforms so often disappoint.

Discover what’s new in The Replay, LogRocket’s newsletter for dev and engineering leaders, in the February 18th issue.
Hey there, want to help make our blog better?
Join LogRocket’s Content Advisory Board. You’ll help inform the type of content we create and get access to exclusive meetups, social accreditation, and swag.
Sign up now