useState HookForms are an essential part of most applications. There are a lot of packages available on the different packages for building forms. In this article we will be building a multi-step form using the useState Hook without the use of any third-party packages while achieving the same functionality.

The main priority of the tutorial is to analyze the logic of a multi-step form. We’ll be skipping most of the styling part, so if you get stuck anywhere, check out this repository.
Here’s what we’ll be covering in this tutorial, so feel free to jump ahead to any section you want:
useState Hook to move between componentsLet’s install a new Next.js project by entering this command:
npx create-next-app mulitstep-form
If you would prefer, a React project would work perfectly fine as well. To install a new React project, enter the following:
npx create-react-app multistep-form
Styling is optional, but if you would like to follow along, we’ll be using Mantine CSS for this project.
Install Mantine CSS
npm install @mantine/core @mantine/next @mantine/hooks
Follow the setup guide for Next.js here.
Next, let’s build some components for each step in our multi-step form.
First, we’ll build the Form component, which will handle most of our form logic. Go ahead and make a new file at ./components/Form.js.
import { Box, Button, Title } from '@mantine/core';

function Form() {
  return (
    <Box
      sx={boxStyle}
    >
      <Title
        sx={{
          textAlign: 'center',
        }}
        order={2}
      >
        Hey there!
      </Title>
        {/* Steps */}
      <Button>Submit</Button>
    </Box>
  );
}
export default Form;
(Note: Here, the term “Steps” simply means the different stages of the multi-step form)
Next, let’s make the first step of our form — a simple introductory message.
Create a new file in ./components/First/index.js:
import { Box, Text, TextInput } from '@mantine/core';
function First() {
return (
<Box
sx={boxStyle}
>
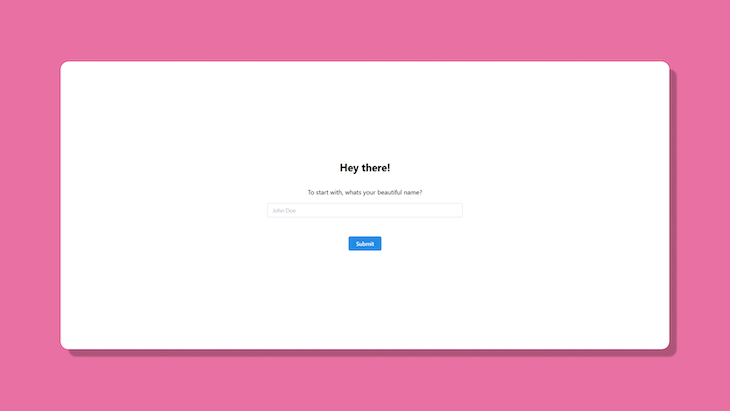
<Text>To start with, whats your beautiful name?</Text>
<Box
sx={{
margin: '1rem 0',
}}
>
<TextInput
placeholder="John Doe"
required
/>
</Box>
</Box>
);
}
export default First;
This is what your output should look like now:
useState Hook to move between componentsNext, we’ll use the useState Hook to move between the different steps.
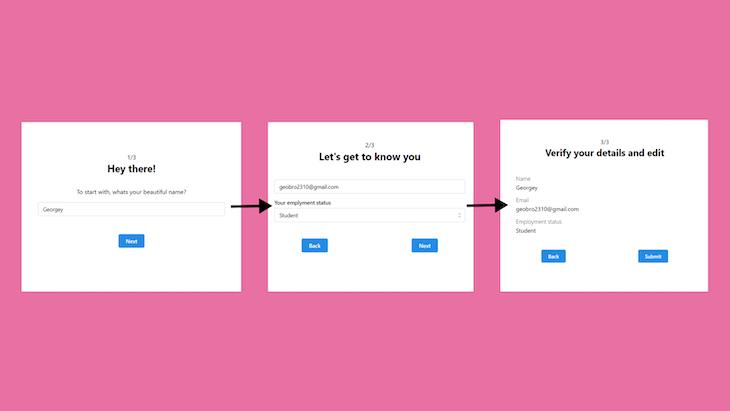
We’ve only made a single step until now, but feel free to add in your own steps. Below is what the flow should look like in this tutorial.
Now with the components ready, let’s add the logic to switch between components.
Initialize a new useState Hook, with its initial value as 0.
const [page, setPage] = useState(0);
Create another function that will conditionally render a different component base on the page value:
import First from './First';
import SecondStep from './Second';
import ThirdStep from './Third';

export default function Form () {
  const conditionalComponent = () => {
    switch (page) {
      case 0:
        return <First />;
      case 1:
        return <SecondStep />;
       case 2:
         return <ThirdStep />;
       default:
         return <First />;
    }
  };

return (
    <>
      <Box>
        {conditionalComponent()}
      </Box>
    </>
  )
}
Next up, let’s create a button which, on onClick, increments the value of page by 1:
//...imports
import { Button } from "@mantine/core"

export default function Form () {
  // stuff

  function handleSubmit () {
    //...stuff
  }

  return (
    <>
      {conditionalComponent()}
      <Button onClick={handleSubmit}>
        { page === 0 || page === 1 ? "Next" : "Submit" }
      </Button>
    </>
  )
}
In the meantime, in the handleSubmit function, we will increment the page. Further ahead in this article, we will be adding validations and use the fetch API to send data over to a Supabase instance.
function handleSubmit () {
  setPage(page + 1);
}
Similarly, we need a button and a function to go back to the previous page. The back button won’t be displayed if the user is on the first page, hence:
{
  page > 0 && <Button onClick={() => setPage(page - 1)}>Back</Button>
}
To keep track of the user input , we’ll create another useState Hook.
const [formData, setFormData] = useState({
  name: '',
  email: '',
  employment_status: null
});
Next, we will pass both formData and setFormData as props to each of our conditional components.
const conditionalComponent = () => {
   switch (page) {
    case 0:
       return <First formData={formData} setFormData={setFormData} />;
     case 1:
      return <SecondStep formData={formData} setFormData={setFormData} />;
    case 2:
      return <ThirdStep formData={formData} setFormData={setFormData} />;
    default:
      return <First formData={formData} setFormData={setFormData} />;
  }
};
To get the form data from our input fields, we will make use of the value and onChange property inside the Input fields.
import { Box, Text, TextInput } from '@mantine/core';

function First({ formData, setFormData }) {
  return (
    <Box
      sx={boxStyle}
    >
      <Text>To start with, whats your beautiful name?</Text>
      <Box>
        <TextInput
          onChange={(e) => {
            setFormData({
              ...formData,
              name: e.target.value,
            });
          }}
          value={formData.name}
          placeholder="John Doe"
          required
        />
      </Box>
    </Box>
  );
}

export default First;
Two things are happening here:
value property contains the current value of the respective Input fieldonChange property is called every single time the user tries to change the Input fieldThe select component is made a controlled input as follows:
<Select
    data={[
    { value: 'Student', label: 'Student' },
    { value: 'Employed', label: 'Employed' },
    { value: 'Business', label: 'Business' },
   ]}
    onChange={(e) => {
    console.log(e);
    setFormData({ ...formData, employment_status: e });
   }}
   value={formData.employment_status}
   sx={selectInputStyle}
   label="Your emplyment status"
   placeholder="Choose one"
/>
Here, instead of e.target.value, we are simply passing the e object as whole. Make sure you don’t pass anything else other than a string in the data prop inside the Select component.
In our last step, we will simply display the form data for the user to cross-check and verify, and — if required — give the user the option to go back and change the input previously entered.
Since we don’t have any input fields in the last component, just pass the formData and display them accordingly:
import { Box, Text } from '@mantine/core';
import Detail from '../Detail';

function ThirdStep({ formData }) {
  const boxStyle = {
    width: '70%',
    margin: '1rem auto',
    textAlign: 'center',
    padding: '1rem 0',
  };

  return (
    <Box sx={{ ...boxStyle, textAlign: 'left' }}>
      <Detail title="Name" data={formData.name} />
      <Detail title="Email" data={formData.email} />
      <Detail title="Employment status" data={formData.employment_status} />
    </Box>
  );
}
export default ThirdStep;
The Detail component looks like this:
import { Box, Text } from '@mantine/core';

function Detail({ title, data }) {
  return (
    <Box
      sx={{
        margin: '10px 0',
      }}
    >
      <Text weight={300}>{title}</Text>
      <Text>{data}</Text>
    </Box>
  );
}

export default Detail;
With that done, your multi-step form can now seamlessly keep track of the form data.
Next up, we will add form validation, to accept valid data from the user.
In the handleSubmit function, we will make create an if...else flow to check the input fields on each page and subsequently move the user to the next page.
function handleSubmit () {
  if (page === 0) {
    // do form validation
  } else if (page === 1) {
    // do form validation again
  } else if (page === 2) {
    // set page === 0 , and clear fields
  } else setPage(page + 1);
}
In the first if statement:
if (page === 0) {
  if (formData.name === '' || formData.name.length <= 1) {
    return alert('Please enter your name');
  } else {
    setPage(page + 1);
    console.log(formData);
  }
}
Here, if the name field is empty or if the length is less than 1, then an alert box is displayed.
Similarly, we add the following validation to the second page, which consists of an email address field and a field for employment_status:
else if (page === 1) {
  if (formData.email === '' || !formData.email.includes('@')) {
    return alert('Please enter a valid email');
  } else if (!formData.employment_status) {
    return alert('Please select your employment status');
  } else {
    setPage(page + 1);
    console.log(formData);
  }
}
Here, we will first check if the email exists or if the email contains the “@” symbol. If it passes the first check, then we will check if the employment_status field contains anything; otherwise we increment page and log the data.
For the last page, we simply want to display the form data, hence it’s enough to set the page to 0 and clear all the input fields.
else if (page === 2) {
  setPage(0);
  console.log(formData);
  setFormData({
     name: '',
     email: '',
     employment_status: null,
  });
}
That takes care of all our validation!
Let’s send our form data to a new Supabase instance. Supabase is an open source alternative to Firebase. Head over to Supabase to create a new account if you’re new.

After creating the project, head over to the home page of your newly created project and grab the anon key and url.
(Note: If you cannot find your keys, try finding them at Settings > API)

With that complete, now install the Supabase SDK, using:
npm install @supabase/supabase-js
Make a new file at ./lib/supabase.js and export the Supabase client, as shown below.
import { createClient } from '@supabase/supabase-js';

export const supabase = createClient(
  process.env.NEXT_PUBLIC_SUPABASE_URL,
  process.env.NEXT_PUBLIC_SUPABASE_KEY
)
For the environment variables, create a new file in the root with the name .env.local and pass in the keys.
NEXT_PUBLIC_SUPABASE_KEY=<Your key>
NEXT_PUBLIC_SUPABASE_URL=<Your url>
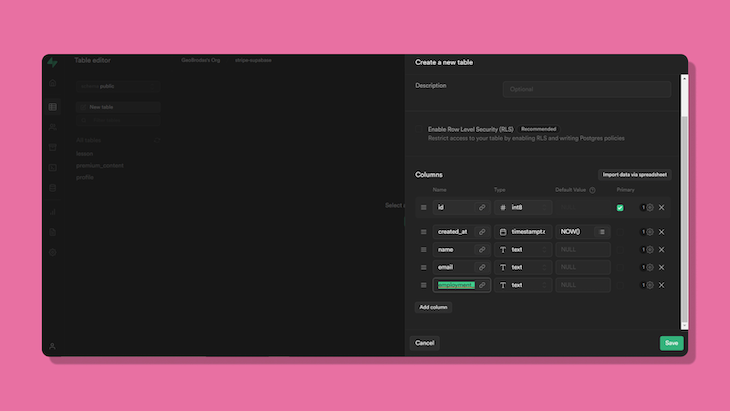
Go back to the newly created Supabase instance, and create a new table in the Table editor.
To handle the Supabase logic, we will create a separate Next.js API route, hence making a POST request through the native Fetch API.
Go ahead and make a new Next.js API route at ./pages/api/post-supabase.js.
async function handler (req, res) {
  // server-side logic
}

export default handler;
Now, since we have an API route through which we pass our form data, we can add another layer of protection to validate our form data. The client-side validation is not always reliable, so you should always implement server-side validation as well before saving the user data to the Supabase table.
Inside the handler function, we will first check if the fetch method is POST.
async function handler (req, res) {
  if(req.method === 'POST') {
    // post logic
    return res.status(200).json({message: "Success"});
  }
}
Next, destructure all form data from the request body, as shown here:
if(req.method === "POST") {
  const { name, email, employment_status } = req.body;
}
Next up, we will perform the server-side validation:
if(req.method === "POST") {
  const { name, email, employment_status } = req.body;

    // server-side validation
    if (!name || name.length <= 3) {
      return res.status(400).json({
        status: 'fail',
        message: 'Please enter your name',
      });
    } else if (!email || !email.includes('@')) {
      return res.status(400).json({
        status: 'fail',
        message: 'Please enter a valid email',
      });
    } else if (!employment_status) {
      return res.status(400).json({
        status: 'fail',
        message: 'Please select your employment status',
      });
    }
}
In this case, if anyone tries to tamper with the client-side validation or perform an MITM attack, the server will still be able to deny the form data, and send back an error response.
With the validation complete, all that’s left is to send over the form data to the Supabase table. To do this, import the Supabase client and call the insert method.
import { supabase } from 'utils/supabase';

async function handler (req, res) {
  // ...server-side validation
  try {
    await supabase.from('formdata').insert({
      name,
      email,
      employment_status,
    });
    return res
        .status(200)
        .json({ success: true, message: 'Post successful' });
  } catch (error) {
    console.log(error.response.data.message);
    return res.status(500).json({
        status: 'fail',
        message: 'Something went wrong',
      });
  }
}
.from is the table to which you want to insert the data. Now this is done, we will make a POST request to this API route from the client-side when the user clicks the button to submit.
Go back to the handleSubmit function, where we wrote the submit logic for page === 2. Let’s call a fetch request to the API route /api/post-supabase:
try {
    await fetch('/api/post-supabase', {
    method: 'POST',
    headers: {
      'Content-Type': 'application/json',
    },
    body: JSON.stringify(formData),
  });
    setFormData({
    name: '',
    email: '',
    mployment_status: null,
    });
    setPage(0);
  } catch (error) {
    console.log(error);
}
If the fetch method runs as expected, we will reset the form data and set page to 0, and if anything goes wrong, we’ll simply log the error (you can display this as an alert as well).
Go ahead and and try out the multi-step form — you should be able to see a new entry in the Supabase table.
In this blog post we have learned how to create a multi-step form. Using the useState Hook, we have managed to create forms that can be easily manipulated.
We can create forms that have validation and can be easily reused without the need to create new forms for different use cases. Most importantly, we have built this multi-step form without any third-party packages like React-Stepzilla.
Install LogRocket via npm or script tag. LogRocket.init() must be called client-side, not
server-side
$ npm i --save logrocket

// Code:

import LogRocket from 'logrocket';
LogRocket.init('app/id');
// Add to your HTML:

<script src="https://cdn.lr-ingest.com/LogRocket.min.js"></script>
<script>window.LogRocket && window.LogRocket.init('app/id');</script>

Learn how to set up Meilisearch, index documents, and build keyword, semantic, and hybrid search with AI-powered retrieval.

Compare pnpm and npm across security defaults, disk usage, dependency strictness, and workspace policy to decide which package manager fits your project.

I migrated 20 production-style components from Tailwind to StyleX. Here’s what the data showed about LOC, CSS bundle size, build time, and type safety.

A guide for using JWT authentication to prevent basic security issues while understanding the shortcomings of JWTs.
Hey there, want to help make our blog better?
Join LogRocket’s Content Advisory Board. You’ll help inform the type of content we create and get access to exclusive meetups, social accreditation, and swag.
Sign up now

