The growing adoption of Web3 has led to a mad scramble of who can build the fastest, most secure blockchain without compromising on decentralization.

Ethereum is currently the most popular blockchain, with the largest number of developers building for it. This massive growth in innovation and adoption has driven the financial costs of interacting with the Ethereum blockchain to ridiculously high levels.
If you’ve ever tried to mint an NFT or swap a token on a DEX like UniSwap, you know how expensive it can get to perform simple transactions. Avalanche aims to fix this problem and more.
Avalanche is an open-source platform for launching decentralized finance (DeFi) applications and enterprise blockchain deployments in one interoperable, highly scalable ecosystem.
Avalanche is a blockchain of blockchains. It’s not a single blockchain like Ethereum or Cardano. Rather, it’s a combination of three different blockchains, each with its own specialized use case. These blockchains are:
For the purposes of this tutorial, we will be focusing on the Contract (C) Chain, as it is what facilitates smart contracts on the Avalanche network. To learn more about what each chain does, check out the Avalanche platform overview.
As mentioned above, the C-Chain is a copy of the EVM that enables the creation of smart contracts. It claims to offer higher speed, higher throughput, lower fees, and shorter transaction confirmation times.
This is because, unlike Ethereum, the C-Chain is based on Proof-of-Stake (PoS), rather than Proof-of-Work (PoW), and a consensus algorithm called the Snowman Consensus Protocol.
Since it runs EVM under the hood, developers are able to use the full suite of Ethereum developer tools to build applications for it. By the end of this tutorial, you will be able to build and deploy an application to the Avalanche C-Chain.
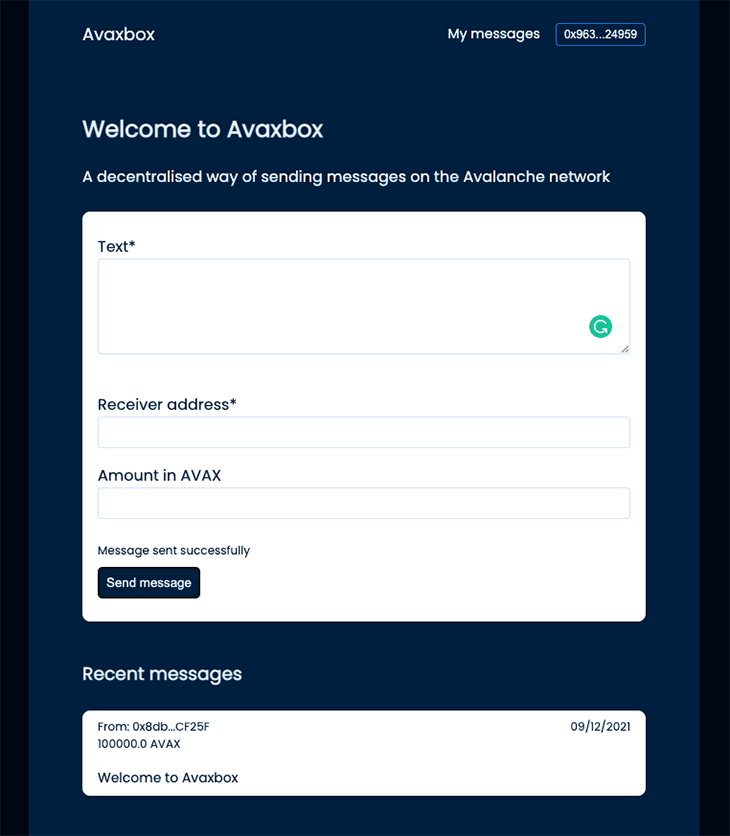
We’ll be building a simple dApp called Avaxbox that allows a person to send a message to an address on the blockchain, with the possibility of sending some AVAX as well.
After building this application, you will be able to run a local copy of Avalanche on your computer as well as deploy and interact with a smart contract on the C-Chain. We will finish it off with a simple frontend built with Next.js and Ethers.js.
Let’s outline all the different parts of the process and the requirements for each —
I will be using GitHub to store all code from the project in this repository. I recommend that you clone the repo or follow along to help solidify (heh) the concepts you’ll learn from this tutorial.
git clone [email protected]:ovieokeh/avalanche-dapp-tutorial.git
This tutorial assumes you have intermediate knowledge of web development and some knowledge of Solidity. All commands are for macOS, so some of the steps may be different for Windows devices.
Since you’ll be deploying a smart contract to the Avalanche C-Chain, you need a copy of the Avalanche network running on your machine for development and testing. Of course, you could choose to develop directly on the Avalanche Fuji testnet, but it’s good to know how to spin up a local instance as well.
To do this, you need to have some things installed:
If you already have Go installed on your computer, you can skip to the last part of this section. Open a terminal and follow the steps below to get Go installed and configured —
ruby -e "$(curl -fsSL https://raw.githubusercontent.com/Homebrew/install/master/install)"
brew update && brew install golang
mkdir -p $HOME/go/{bin,src,pkg}
nano ~/.zshrc)
export GOPATH=$HOME/go
export GOROOT="$(brew --prefix golang)/libexec"
export PATH="$PATH:${GOPATH}/bin:${GOROOT}/bin"
go1.17 and turn off GO111MODULE
bash < <(curl -s -S -L https://raw.githubusercontent.com/moovweb/gvm/master/binscripts/gvm-installer)

gvm install go1.17
gvm use go1.17 --default

// IMPORTANT for go versions above go1.16
export GO111MODULE="off"
This is a Go implementation of an Avalanche network node. Basically, it allows you to run Avalanche on your machine. Follow the steps below to get it installed.
go get -v -d github.com/ava-labs/avalanchego/...
// Run the rest of the AvalancheGo commands in this location
cd $GOPATH/src/github.com/ava-labs/avalanchego

// IMPORTANT for go versions above go1.16
export GO111MODULE="on"
./scripts/build.sh
./build/avalanchego --network-id=local --staking-enabled=false --snow-sample-size=1 --snow-quorum-size=1
Now that you have a running Avalanche node, you can now deploy smart contracts to the C-Chain. First, let’s write a smart contract.
To follow along with this tutorial, you can clone the repository for all source code used to get a reference for all code samples.
npm
mkdir avalanche-dapp-tutorial && cd avalanche-dapp-tutorial
npm init -y
mkdir contracts

npm install -D @nomiclabs/hardhat-ethers @nomiclabs/hardhat-waffle avalanche
npm install -D dotenv ethereum-waffle ethers hardhat solc
Avaxbox.sol file inside the contracts folder, open it in your editor of choice, and start writing your contract
touch contracts/Avaxbox.sol
code contracts/Avaxbox.sol
You can copy over the source code for the contract or write your own. Here’s a brilliant article on writing Solidity smart contracts if you’ve never done this before.
To deploy the smart contract, you need a library called Hardhat to act as a bridge to the Avalanche network. You should already have it installed if you followed the previous steps.
All you need to do now is add a configuration for it, as well as some npm scripts for deployments and some other functions.
touch hardhat.config.js
code hardhat.config.js
require('dotenv').config()
require('@nomiclabs/hardhat-waffle')
const { task } = require('hardhat/config')... code continues
...

/**
 * This is a hardhat task to print the list of accounts on the local
 * avalanche chain
 *
 * Prints out an array of Hex addresses
 */
task('accounts', 'Prints the list of accounts', async (args, hre) => {
  const accounts = await hre.ethers.getSigners()
  accounts.forEach((account) => {
    console.log(account.address)
  })
})

/**
 * This is a hardhat task to print the list of accounts on the local
 * avalanche chain as well as their balances
 *
 * Prints out an array of strings containing the address Hex and balance in Wei
 */
task(
  'balances',
  'Prints the list of AVAX account balances',
  async (args, hre) => {
    const accounts = await hre.ethers.getSigners()
    for (const account of accounts) {
      const balance = await hre.ethers.provider.getBalance(account.address)
      console.log(`${account.address} has balance ${balance.toString()}`)
    }
  }
)

... code continues
config object and configure Hardhat to use the appropriate Avalanche networks
const config = {
  solidity: {
    compilers: [{ version: '0.8.0' }],
  },
  networks: {
    // Configure each network to the respective Avalanche instances
    local: {
      url: 'http://localhost:9650/ext/bc/C/rpc', // Local node we started using `npm run start:avalanche`
      gasPrice: 225000000000,
      chainId: 43112, // Every network has a chainId for identification
      accounts: [
        // List of private keys for development accounts - DO NOT TRANSFER ASSETS TO THESE ACCOUNTS ON A MAINNET
        '0x56289e99c94b6912bfc12adc093c9b51124f0dc54ac7a766b2bc5ccf558d8027',
        '0x7b4198529994b0dc604278c99d153cfd069d594753d471171a1d102a10438e07',
        '0x15614556be13730e9e8d6eacc1603143e7b96987429df8726384c2ec4502ef6e',
        '0x31b571bf6894a248831ff937bb49f7754509fe93bbd2517c9c73c4144c0e97dc',
        '0x6934bef917e01692b789da754a0eae31a8536eb465e7bff752ea291dad88c675',
        '0xe700bdbdbc279b808b1ec45f8c2370e4616d3a02c336e68d85d4668e08f53cff',
        '0xbbc2865b76ba28016bc2255c7504d000e046ae01934b04c694592a6276988630',
        '0xcdbfd34f687ced8c6968854f8a99ae47712c4f4183b78dcc4a903d1bfe8cbf60',
        '0x86f78c5416151fe3546dece84fda4b4b1e36089f2dbc48496faf3a950f16157c',
        '0x750839e9dbbd2a0910efe40f50b2f3b2f2f59f5580bb4b83bd8c1201cf9a010a',
      ],
    },
    fuji: {
      url: 'https://api.avax-test.network/ext/bc/C/rpc', // Public Avalanche testnet
      gasPrice: 225000000000,
      chainId: 43113,
      accounts: [], // Use your account private key on the Avalanche testnet
    },
    mainnet: {
      url: 'https://api.avax.network/ext/bc/C/rpc', // Public Avalanche mainnet
      gasPrice: 225000000000,
      chainId: 43114,
      accounts: [], // Use your account private key on the Avalanche mainnet
    },
  },
}

... code continues
...
module.exports = config
Here is a link to the hardhat.config.js source.
/scripts directory and a /scripts/deploy.js file to hold our deploy script
async function deploy() {
  // Hardhat gets signers from the accounts configured in the config
  const [deployer] = await hre.ethers.getSigners()

  console.log('Deploying contract with the account:', deployer.address)

  // Create an instance of the contract by providing the name
  const ContractSource = await hre.ethers.getContractFactory('Avaxbox')
  // The deployed instance of the contract
  const deployedContract = await ContractSource.deploy()

  console.log('Contract deployed at:', deployedContract.address)
}

deploy()
  .then(() => process.exit(0))
  .catch(err => {
    console.error(err)
    process.exit(1)
  })
package.json and add the following npm scripts
...
"scripts": {
    "accounts": "npx hardhat accounts",
    "balances": "npx hardhat balances",
    "precompile": "rimraf ./build/",
    "compile": "npx hardhat compile",
    "deploy": "npx hardhat run scripts/deploy.js"
},
...
.env file to hold your test and mainnet account private keys. If you do, you can edit the hardhat.config.js file to configure Hardhat to read from process.env. Ensure that you DO NOT commit the .env file to GitHub or anywhere elseaccounts and balances scripts are working
npm run accounts
npm run balances
deploy command and pass in an argument to the --network flag. The value of this argument should correspond to the networks you defined in the hardhart.config.js file
npm run deploy --network local
You should get an output in the terminal with the deployed contract address, as well as the address of the account deploying it.
ovie.okeh@desktop avalanche-tutorial % npm run deploy --network local
$ npx hardhat run scripts/deploy.js --network local
Deploying contract with the account: 0x8db97C7cEcE249c2b98bDC0226Cc4C2A57BF52FC
Contract deployed at: 0xA4cD3b0Eb6E5Ab5d8CE4065BcCD70040ADAB1F00
✨  Done in 1.98s.
All of the work on the backend is complete and you can now move on to setting up a frontend to interact with your deployed smart contract.
PRO-TIP: Copy your smart contracts into Remix, Ethereum’s IDE, for quick testing and debugging. When your smart contract works on Remix, copy it over to local contract file, deploy, and build a frontend for it.
All the work you’ve been doing so far culminates here, with the frontend. This is what your users will interact with and you can basically build whatever you want at this stage.
For this tutorial, we’ll be focusing on a simple Next.js application that consumes our deployed smart contract by allowing users to send a message to an address on Avalanche with some AVAX attached.
To keep the length of the tutorial manageable, I’ll touch on only the most important parts in this section, but all of the component code will be available on GitHub.
Let’s outline the next steps —
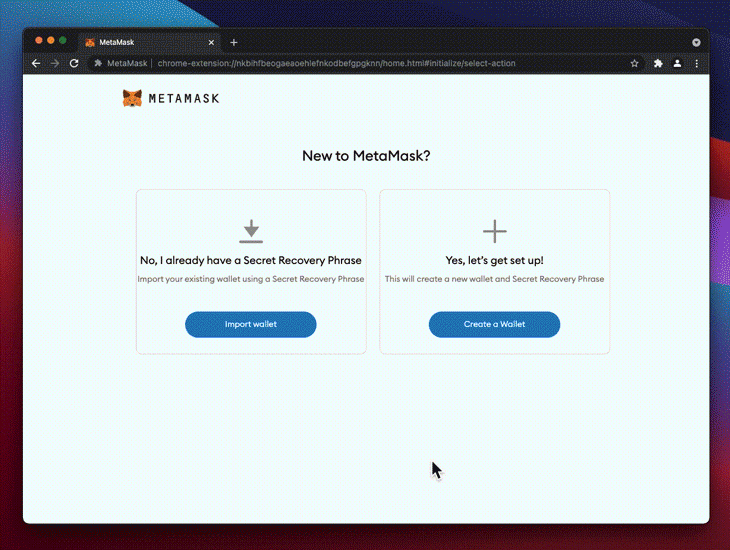
A very important part of interacting with the smart contract from the frontend is Metamask, a browser extension that enables you to sign and send transactions to an EVM-based blockchain network.
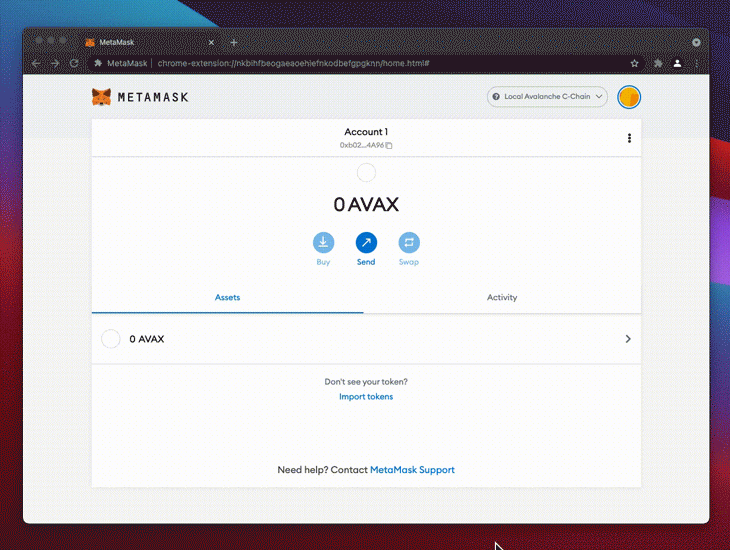
Since the Avalanche C-Chain is EVM-based, you will be able to use Metamask to interact with your deployed contract, but you have to set up the network first.
Follow the steps below to install Metamask and configure it to use the local and test networks. I’ve included corresponding GIF walkthroughs of several steps.
Network Name: Local Avalanche C-Chain
Chain ID: 43112
Currency Symbol: AVAX
New RPC URL: http://localhost:9650/ext/bc/C/rpc
hardhat.config.js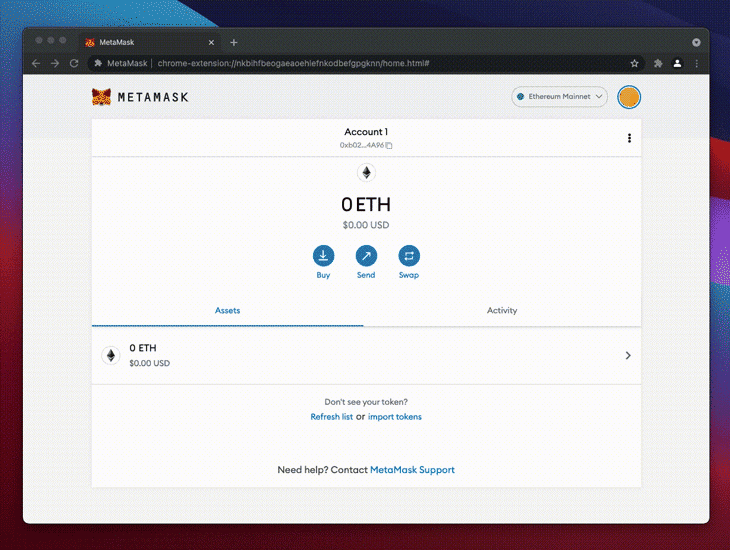
Now, you can import some test accounts to interact with the smart contract that we have deployed.
config.networks.local.accounts in hardhart.config.jsYou can repeat this process for as many accounts as you want!
When your app is eventually live, there’ll be a possibility of your users not being on the correct network either due to interacting with other dApps on a different network, or just the fact that Metamask by default is set to the Ethereum mainnet chain.
You have to add a check for this and configure Metamask to the right network automatically. This has to be done automatically because not all your users can (or want to) configure Metamask manually.
Thankfully, doing this is pretty easy. Let’s open utilities/injectAvalancheNetwork.js and go through the code.
In the beginning, we have some configuration objects for the Avalanche main, test, and local networks.
const AVALANCHE_MAINNET_PARAMS = {
  chainId: '0xA86A',
  chainName: 'Avalanche Mainnet C-Chain',
  nativeCurrency: {
    name: 'Avalanche',
    symbol: 'AVAX',
    decimals: 18,
  },
  rpcUrls: ['https://api.avax.network/ext/bc/C/rpc'],
  blockExplorerUrls: ['https://snowtrace.io/'],
}
...
You can see how similar it is to the data you used to add your local network to Metamask manually. Scroll down to the bottom of the file and you can see the bit of code that actually interacts with Metamask to add this network.
export default function addAvalancheNetwork(network) {
  window.ethereum
    .request({
      method: 'wallet_addEthereumChain',
      params: [
        network === 'main'
          ? AVALANCHE_MAINNET_PARAMS
          : network === 'test'
          ? AVALANCHE_TESTNET_PARAMS
          : AVALANCHE_LOCAL_PARAMS,
      ],
    })
    .catch((error) => {
      console.log(error)
    })
}
The addAvalancheNetwork function is calling an Ethereum method through the API injected by Metamask into the browser. This method, wallet_addEthereumChain, takes in a network config like the one above.
This function can be triggered from a button that you can display when you detect the wrong network. You’re now ready to build a frontend that will interact with our deployed smart contract and use Metamask to sign your transactions.
To keep this article concise, and since frontends can vary so much, I’ll only link to the frontend files. You can read through the source code to see how I’m interacting with the contract via the frontend.
Create a Next.js app in the current avalanche-dapp-tutorial project by following the steps below —
npm install react react-dom next
mkdir components context pages styles utilities views
npm scripts in the package.json file
"build": "next build",
"start:client": "next start",
"start:client:dev": "next dev",
...
All the code for interacting with our smart contract is contained in the /context/avaxbox/avaxboxContext.js file. This is basically a React context provider that exposes some functions that can call the corresponding function in the smart contract. I recommend you go through the code as it has descriptive comments to explain what it does.
You can now consume this context in your components to interact with your smart contract. For an example of how this works, take a look at the MessagesView component.
If you’ve been following along and you copied all the files from the repository, you can start the app using the following commands.
npm run start:avalanche — Starts the local Avalanche node (if not running already)npm run deploy --network local — Deploys the smart contract to the running node (if not deployed already)
context/avaxbox/avaxboxContext.js and replace the address on line 30npm run dev — Starts the frontendTo finish off this project, we’re going to deploy it to a public URL using Vercel. Vercel is the easiest way to deploy a Next.js app.
To get started, make sure you’ve pushed the latest changes to GitHub (Vercel pulls your code from GitHub). Then, follow the steps below to deploy your frontend:

If you followed this article all the way to the end, you’re the best. While we touched on the most important parts of building a dApp on Avalanche, I think there’s still room to improve.
For example, you could add tests for the smart contract and UI, organize the code better, add new features, or even build something entirely new. You basically have the skills to build whatever you want, and the sky is the limit at this point.
Building on Avalanche is almost as easy as building on Ethereum and I hope this tutorial is useful to you.
Client-side issues that impact users’ ability to activate and transact in your apps can drastically affect your bottom line. If you’re interested in monitoring UX issues, automatically surfacing JavaScript errors, and tracking slow network requests and component load time, try LogRocket.

LogRocket lets you replay user sessions, eliminating guesswork around why bugs happen by showing exactly what users experienced. It captures console logs, errors, network requests, and pixel-perfect DOM recordings — compatible with all frameworks.
LogRocket's Galileo AI watches sessions for you, instantly identifying and explaining user struggles with automated monitoring of your entire product experience.
Modernize how you debug web and mobile apps — start monitoring for free.

I migrated 20 production-style components from Tailwind to StyleX. Here’s what the data showed about LOC, CSS bundle size, build time, and type safety.

A guide for using JWT authentication to prevent basic security issues while understanding the shortcomings of JWTs.

Discover how to build, render, and automate product demo videos with Remotion, replacing traditional screen recordings with reusable React code.

Chrome’s Modern Web Guidance embeds modern web platform skills into AI coding agents, helping them choose native HTML, CSS, and browser APIs over legacy patterns.
Hey there, want to help make our blog better?
Join LogRocket’s Content Advisory Board. You’ll help inform the type of content we create and get access to exclusive meetups, social accreditation, and swag.
Sign up now

