Turbo Native Modules are a relatively new addition to React Native’s architecture. They are modified and optimized approaches for creating native modules, improving performance and allowing for easier integration into modern React Native apps. In the previous React Native architecture, they were called native modules.

In this tutorial, we will explore these modules and their role in React Native as we build a custom Turbo Native Module for Android. The custom module will allow our React Native app to access native mobile APIs to retrieve information like device model, IP address, uptime, battery status, battery level, and the Android version.
To follow along with this tutorial, you should have:
Turbo Native Modules are the current stage of the native module transformation with a few extra benefits added to improve performance in React Native. This transformation replaced the asynchronous bridge with JSI to resolve the performance issues during the communication between JavaScript and platform-native code.
The Turbo Native Module architecture is implemented in C++, which offers the following benefits:
To better understand how these modules improve performance in React Native apps, you need to understand the following keywords in the React Native architecture:
The asynchronous bridge is the primary communication medium between the native platforms (iOS and Android) and JavaScript in the old architecture. Here’s how it worked:
JSI is an interface that allows JavaScript and C++ to share memory references, enabling direct communication between JavaScript and native platforms without serialization costs. It calls native methods (C++, Objective-C, or Java) directly from the JavaScript engine, and allows access to databases and other complex instance-based types.
Codegen is a tool that automates the creation of boilerplate code that connects the JavaScript engine to the Turbo Native Modules. It reduces cross-boundary type errors (one of the most common sources of crashes in cross-platform apps) when creating Native Modules while providing a consistent way to handle communication between JavaScript and native platform code.
Fabric rendering architecture is React Native’s new rendering system that works with Native Modules and JSI to enhance rendering performance by reducing unnecessary updates. It supports both asynchronous and synchronous updates.
The Native Module architecture supports modules written in C++. While Native Modules allow you to write native iOS platform code with Swift or Objective C, and native Android platform code with Java or Kotlin, C++ Turbo Modules let you write your module in C++ and it works across all platforms, including Android, iOS, Windows, and macOS.
If your app requires more performance optimizations and fine-grained memory management, you should consider using C++ Turbo Native Modules.
This section will show you how to write a custom Turbo Module to allow our React Native app to access Native Android APIs to get info such as device model, IP address, uptime, battery status, battery level, and the Android version.
To make this work, we need to use the following Android APIs:
To set up your React Native project, run the following command:
npx @react-native-community/cli@latest init SampleApp --version 0.76.0
This will download a template for the project and install the dependencies using npm. To avoid build issues, delete the node modules and run yarn install to reinstall the dependencies using Yarn.
Run the following command to start your project:
npm run start
Then press A to run on Android. You may encounter the following error in the Project root directory.
Error: SDK location not found. Define location with sdk.dir in the local.properties file or with an ANDROID_HOME environment variable.
If you do, navigate to the Android directory and create a file named local.properties. Open the file and paste your Android SDK path like below:
For Mac:
sdk.dir = /Users/USERNAME/Library/Android/sdk
For Windows:
sdk.dir=C:\\Users\\UserName\\AppData\\Local\\Android\\sdk
To implement a Turbo Module, you need to define a typed JavaScript specification using TypeScript. This specification declares the data types and methods used in your native platform’s code.
In your project’s root directory, create a spec folder with a file named NativeGetDeviceInfo and add the following:
import type {TurboModule} from 'react-native';
import {TurboModuleRegistry} from 'react-native';
export interface Spec extends TurboModule {
  getDeviceModel(): Promise<string>;
  getDeviceIpAddress(): Promise<string>;
  getDeviceUptime(): Promise<string>;
  getBatteryStatus(): Promise<string>;
  getBatteryLevel(): Promise<string>;
  getAndroidVersion(): Promise<string>;
}
export default TurboModuleRegistry.getEnforcing<Spec>(
  'NativeGetDeviceInfo',
);
Here, we’ve defined a TypeScript interface and module that interacts with native code to fetch various device-related information.
The getDeviceModel method fetches the device’s model, such as “Samsung Galaxy S21,” while getDeviceIpAddress retrieves the current IP address of the device. For tracking system activity, getDeviceUptime provides the duration since the device was last booted.
Battery-related details can be accessed using getBatteryStatus, which indicates whether the device is charging or discharging, and getBatteryLevel, which returns the current battery level as a percentage. Lastly, the getAndroidVersion method retrieves the Android operating system version, specifically for Android devices.
Next, we’ll configure the Codegen tools to use the typed specifications to generate platform-specific interfaces and boilerplate. To do this, update your package.json to include the following:
"dependencies": {
  ...
},
"codegenConfig": {
 "name": "NativeGetDeviceInfoSpec",
 "type": "modules",
 "jsSrcsDir": "specs",
 "android": {
   "javaPackageName": "com.nativegetdeviceinfo"
 }
}
Now, run the following command to generate the boilerplate code using the typed specifications:
cd android
./gradlew generateCodegenArtifactsFromSchema
You should see the following result if successful:
BUILD SUCCESSFUL in 5s
15 actionable tasks: 3 executed, 12 up-to-date
In your project root directory, navigate to the android/app/src/main/java/com directory and create a folder named nativegetdeviceinfo. Inside the folder, create a file named NativeGetDeviceInfoModule.kt and add the following:
package com.nativegetdeviceinfo

import android.content.Context
import android.os.BatteryManager
import android.os.Build
import android.os.SystemClock
import android.net.wifi.WifiManager
import android.net.ConnectivityManager
import android.net.NetworkCapabilities
import android.text.format.Formatter
import com.facebook.react.bridge.Promise
import com.facebook.react.bridge.ReactApplicationContext
import com.nativegetdeviceinfo.NativeGetDeviceInfoSpec

class NativeGetDeviceInfoModule(reactContext: ReactApplicationContext) : NativeGetDeviceInfoSpec(reactContext) {


}
Next, implement the generated NativeGetDeviceInfoSpec interface.
We’ll start with the implementation of the getDeviceModel() method:
class NativeGetDeviceInfoModule(reactContext: ReactApplicationContext) : NativeGetDeviceInfoSpec(reactContext) {
  override fun getName() = NAME

    // Get device model
    override fun getDeviceModel(promise: Promise) {
        val manufacturer = Build.MANUFACTURER
        val model = Build.MODEL
        promise.resolve("$manufacturer $model")
    }
}
The NativeGetDeviceInfoSpec class defines the structure and interface for the Native Module. The getName method sets the name by which the module is recognized in JavaScript. The getDeviceModel method fetches the device’s model information and returns it as a string to the JavaScript layer using a Promise.
class NativeGetDeviceInfoModule(reactContext: ReactApplicationContext) : NativeGetDeviceInfoSpec(reactContext) {
  ...
  // Get device IP address
    override fun getDeviceIpAddress(promise: Promise) {
        try {
            val connectivityManager = getReactApplicationContext().getSystemService(Context.CONNECTIVITY_SERVICE) as ConnectivityManager
            val network = connectivityManager.activeNetwork
            val networkCapabilities = connectivityManager.getNetworkCapabilities(network)

            val ipAddress = when {
                networkCapabilities?.hasTransport(NetworkCapabilities.TRANSPORT_WIFI) == true -> {
                    val wifiManager = getReactApplicationContext().getSystemService(Context.WIFI_SERVICE) as WifiManager
                    val wifiInfo = wifiManager.connectionInfo
                    Formatter.formatIpAddress(wifiInfo.ipAddress)
                }
                networkCapabilities?.hasTransport(NetworkCapabilities.TRANSPORT_CELLULAR) == true -> "Cellular network IP unavailable"
                else -> "Unknown"
            }
            promise.resolve(ipAddress)
        } catch (e: Exception) {
            promise.reject("IP_ERROR", "Unable to retrieve IP address: ${e.message}")
        }
    }
}
The getDeviceIpAddress function retrieves the device’s current IP address and communicates it to the JavaScript layer using a Promise. It uses the ConnectivityManager to check the active network and its capabilities. If the device is connected to Wi-Fi, it fetches the IP address from the WifiManager. For cellular connections, it returns a placeholder message since direct retrieval of the cellular IP is not straightforward, and for other cases, it returns Unknown:
class NativeGetDeviceInfoModule(reactContext: ReactApplicationContext) : NativeGetDeviceInfoSpec(reactContext) {
  ...
  // Get device uptime
    override fun getDeviceUptime(promise: Promise) {
        val uptimeMillis = SystemClock.uptimeMillis() // Device uptime in milliseconds
        val uptimeSeconds = uptimeMillis / 1000
        val hours = uptimeSeconds / 3600
        val minutes = (uptimeSeconds % 3600) / 60
        val seconds = uptimeSeconds % 60
        promise.resolve("$hours hours, $minutes minutes, $seconds seconds")
    }
}
The getDeviceUptime function calculates how long the device has been running since its last boot and sends this information to the JavaScript layer as a human-readable string using a Promise. It retrieves the uptime in milliseconds using SystemClock.uptimeMillis() and converts it into seconds, hours, and minutes.
class NativeGetDeviceInfoModule(reactContext: ReactApplicationContext) : NativeGetDeviceInfoSpec(reactContext) {
  ...
  // Get battery status
  override fun getBatteryStatus(promise: Promise) {
      try {
          val batteryManager = getReactApplicationContext().getSystemService(Context.BATTERY_SERVICE) as BatteryManager
          val isCharging = batteryManager.isCharging
          promise.resolve(if (isCharging) "Charging" else "Not Charging")
      } catch (e: Exception) {
          promise.reject("BATTERY_STATUS_ERROR", "Unable to retrieve battery status: ${e.message}")
      }
  }
}
The getBatteryStatus function checks the current charging status of the device and communicates it to the JavaScript layer using a Promise. It uses the BatteryManager system service to determine if the device is charging. If the device is charging, it resolves the Promise with the string Charging. Otherwise, it resolves with Not Charging:
class NativeGetDeviceInfoModule(reactContext: ReactApplicationContext) : NativeGetDeviceInfoSpec(reactContext) {
  ...
  // Get battery level
  override fun getBatteryLevel(promise: Promise) {
        try {
            val batteryManager = getReactApplicationContext().getSystemService(Context.BATTERY_SERVICE) as BatteryManager
            val level = batteryManager.getIntProperty(BatteryManager.BATTERY_PROPERTY_CAPACITY)
            promise.resolve("$level%")
        } catch (e: Exception) {
            promise.reject("BATTERY_LEVEL_ERROR", "Unable to retrieve battery level: ${e.message}")
        }
    }
}
The getBatteryLevel function retrieves the device’s current battery level as a percentage and sends it to the JavaScript layer using a Promise. It accesses the BatteryManager system service and uses the getIntProperty method with BATTERY_PROPERTY_CAPACITY to fetch the battery level. If successful, it resolves the Promise with the battery percentage as a string:
class NativeGetDeviceInfoModule(reactContext: ReactApplicationContext) : NativeGetDeviceInfoSpec(reactContext) {
  ...
  // Get Android version
  override fun getAndroidVersion(promise: Promise) {
      val androidVersion = Build.VERSION.RELEASE
      promise.resolve("Android $androidVersion")
  }

  companion object {
      const val NAME = "NativeGetDeviceInfo"
  }
}
The getAndroidVersion function retrieves the Android operating system version running on the device and sends it to the JavaScript layer using a Promise. It accesses the version information from Build.VERSION.RELEASE and resolves the Promise with the version formatted as a string.
NativeGetDeviceInfoModuleNext, we need to package the NativeGetDeviceInfoModule and register it in the React Native runtime, by wrapping it as a Base Native Package.
Create a file named NativeGetDeviceInfoPackage.kt in the nativegetdeviceinfo folder and add the following:
package com.nativegetdeviceinfo

import com.facebook.react.TurboReactPackage
import com.facebook.react.bridge.NativeModule
import com.facebook.react.bridge.ReactApplicationContext
import com.facebook.react.module.model.ReactModuleInfo
import com.facebook.react.module.model.ReactModuleInfoProvider

class NativeGetDeviceInfoPackage : TurboReactPackage() {

  override fun getModule(name: String, reactContext: ReactApplicationContext): NativeModule? =
    if (name == NativeGetDeviceInfoModule.NAME) {
      NativeGetDeviceInfoModule(reactContext)
    } else {
      null
    }

  override fun getReactModuleInfoProvider() = ReactModuleInfoProvider {
    mapOf(
      NativeGetDeviceInfoModule.NAME to ReactModuleInfo(
        _name = NativeGetDeviceInfoModule.NAME,
        _className = NativeGetDeviceInfoModule.NAME,
        _canOverrideExistingModule = false,
        _needsEagerInit = false,
        isCxxModule = false,
        isTurboModule = true
      )
    )
  }
}
The NativeGetDeviceInfoPackage class defines a custom React Native package for integrating the NativeGetDeviceInfoModule as a Turbo Native Module. The getModule method checks if the requested module name matches NativeGetDeviceInfoModule.NAME and returns an instance of the module if it does, or null otherwise. The getReactModuleInfoProvider method supplies metadata about the module by creating a ReactModuleInfo object. This ensures the module is correctly registered and recognized by the React Native framework.
Next, we need to inform React Native about how to locate this package in our main application.
Import NativeGetDeviceInfoPackage in the android/app/src/main/java/com/turbomoduleexample/MainApplication.kt file as follows:
import com.nativegetdeviceinfo.NativeGetDeviceInfoPackage
Then, add the NativeGetDeviceInfoPackage package to the getPackages function:
override fun getPackages(): List<ReactPackage> =
PackageList(this).packages.apply {
  // Packages that cannot be autolinked yet can be added manually here, for example:
  // add(MyReactNativePackage())
  add(NativeGetDeviceInfoPackage())
}
Now, we can invoke the methods in the NativeGetDeviceInfo specification in our React Native code.
Update App.tsx with the following:
import React, { useState, useEffect } from 'react';
import {
  View,
  Text,
  Button,
  StyleSheet,
} from 'react-native';
import NativeGetDeviceInfo from './specs/NativeGetDeviceInfo';

const App = () => {
  const [value, setValue] = useState<string | null>('');
  const getBatteryLevel = async () => {
    const data = await NativeGetDeviceInfo?.getBatteryLevel();
    setValue(data ?? '');
  };
  const getDeviceModel = async () => {
    const data = await NativeGetDeviceInfo?.getDeviceModel();
    setValue(data ?? '');
  };
  const getDeviceIpAddress = async () => {
    const data = await NativeGetDeviceInfo?.getDeviceIpAddress();
    setValue(data ?? '');
  };
  const getDeviceUptime = async () => {
    const data = await NativeGetDeviceInfo?.getDeviceUptime();
    setValue(data ?? '');
  };
  const getAndroidVersion = async () => {
    const data = await NativeGetDeviceInfo?.getAndroidVersion();
    setValue(data ?? '');
  };
  useEffect(() => {
    getBatteryLevel();
  }, []);
  return (
    <View style={styles.container}>
      <Text style={styles.title}>{value}</Text>
      <View style={styles.buttonContainer}>
        <Button title={'Check Battery Level'} onPress={getBatteryLevel} />
      </View>
      <View style={styles.buttonContainer}>
        <Button title={'Check Device Model'} onPress={getDeviceModel} />
      </View>
      <View style={styles.buttonContainer}>
        <Button title={'Check Device IP Address'} onPress={getDeviceIpAddress} />
      </View>
      <View style={styles.buttonContainer}>
        <Button title={'Check Device Up time'} onPress={getDeviceUptime} />
      </View>
      <View style={styles.buttonContainer}>
        <Button title={'Check Android Version'} onPress={getAndroidVersion} />
      </View>
    </View>
  );
};
const styles = StyleSheet.create({
  container: { flex: 1, padding: 20, backgroundColor: '#f5f5f5' },
  title: { fontSize: 24, fontWeight: 'bold', marginBottom: 20 },
  taskTitle: { fontSize: 18 },
  buttonContainer: {marginBottom: 20}
});

export default App;
This React Native code interacts with the custom Turbo Native Module, NativeGetDeviceInfo, to retrieve device-specific information. It uses React’s useState and useEffect Hooks to manage state and perform initial data fetching.
The app includes functions to fetch and display information such as the battery level, device model, IP address, uptime, and Android version by calling corresponding native methods exposed through the module.
The final step in our tutorial is to update AndroidManifest.xml with the following permissions to allow network and Wi-Fi state access, and to enable the getIPAddress method to function properly:
 <uses-permission android:name="android.permission.ACCESS_NETWORK_STATE" />
 <uses-permission android:name="android.permission.ACCESS_WIFI_STATE" />
You can now build and run your code on an emulator or Android device:
npm run start

Then press A to run on Android.
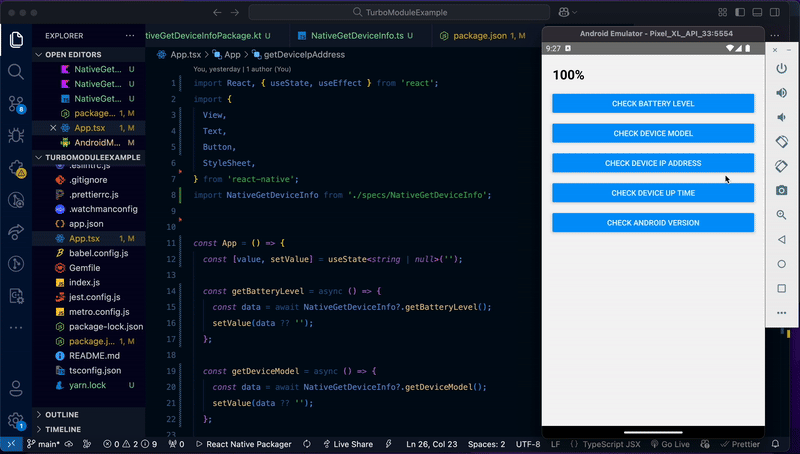
You can get the code for the final build here.
In this tutorial, we explored Turbo Native Modules, C++ Turbo Modules, and their role in React Native. We also built a custom Native Module for Android that allows our React Native app to access native mobile APIs to get info such as device model, IP address, uptime, battery status, battery level, and the Android version.

LogRocket's Galileo AI watches sessions for you and and surfaces the technical and usability issues holding back your React Native apps.
LogRocket also helps you increase conversion rates and product usage by showing you exactly how users are interacting with your app. LogRocket's product analytics features surface the reasons why users don't complete a particular flow or don't adopt a new feature.
Start proactively monitoring your React Native apps — try LogRocket for free.

Learn how to set up Meilisearch, index documents, and build keyword, semantic, and hybrid search with AI-powered retrieval.

Compare pnpm and npm across security defaults, disk usage, dependency strictness, and workspace policy to decide which package manager fits your project.

I migrated 20 production-style components from Tailwind to StyleX. Here’s what the data showed about LOC, CSS bundle size, build time, and type safety.

A guide for using JWT authentication to prevent basic security issues while understanding the shortcomings of JWTs.
Hey there, want to help make our blog better?
Join LogRocket’s Content Advisory Board. You’ll help inform the type of content we create and get access to exclusive meetups, social accreditation, and swag.
Sign up now

