A blockchain is a digital record of transactions that is shared among nodes of a computer network, powering cryptocurrencies and many decentralized applications. The blockchain is an innovative, decentralized, and distributed public ledger that keeps a record of a growing list of transactions known as blocks.

Transactions on the blockchain are recorded and secured cryptographically, reducing potential flaws and vulnerabilities. The blockchain is made up of chain-like connections of different blocks, hence the name blockchain.
Even though it is in its infancy, the blockchain has found application in many industries like finance, government, collectibles, DeFi, security, artworks like NFTs, and more. It has also created lots of opportunities and new jobs for developers, content writers, NFT creators, and more. The blockchain is very important when building decentralized applications because it ensures security and data integrity, building trust in users.
A cryptocurrency is a digitally secured virtual currency developed using cryptographic techniques. Cryptography ensures the security and integrity of the currency. In this tutorial, we’ll learn how to develop a cryptocurrency using Node.js, a popular JavaScript server runtime engine.
Node.js is a JavaScript backend environment that runs JavaScript code outside of the browser. In this article, we’ll introduce Node.js developers to the blockchain space by creating a simple cryptocurrency. Let’s get started!
To follow along with this article, you’ll need:
The Replay is a weekly newsletter for dev and engineering leaders.
Delivered once a week, it's your curated guide to the most important conversations around frontend dev, emerging AI tools, and the state of modern software.
Earlier, we mentioned that the blockchain is composed of several blocks. Let’s explore what the properties of each block are. Every block in the chain is made up of the following properties:
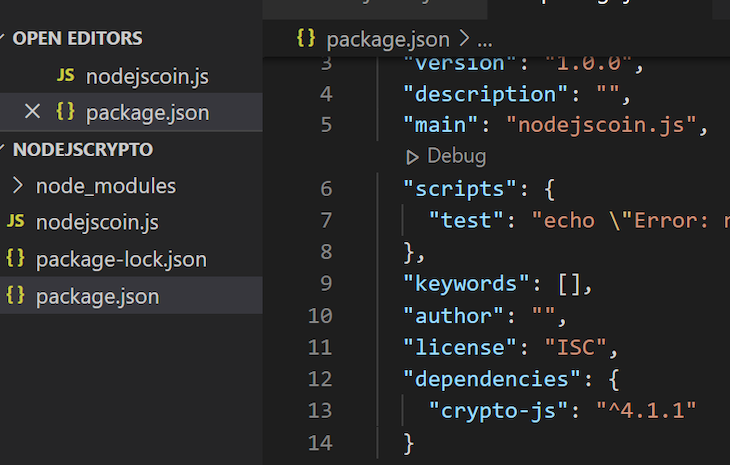
Since we’re building a cryptocurrency with Node.js, we need to first install the JavaScript crypto.js package in our project folder. Create a folder and name it nodejscrypto, as shown below:

To install the package, run the following command in your terminal:
// create a package.json file
npm init -y

//install the crypto-js dependency
npm install crypto-js
We’ll use a single file for this project. Create a file in the project folder named nodejsCoin.js, as show in the image above.
Now that we have our project structure set up with our package installed, let‘s create our first block and subsequently build our own cryptocurrency. Go ahead and copy the following lines of code into the nodejsCoin.js file:
//import that secure hash algorithm from the crypto-js package
const SHA256 = require(“crypto-js/sha256”);

//create a JavaScript class to represent a Block
class Block{
  constructor(index, timestamp, data, previousHash){
    this.index = index;
    this.timestamp = timestamp;
    this.data = data;
    this.previousHash = previousHash;
    this.hash = this.generateHash();
  }

  generateHash(){
    return SHA256(this.index + this.timestamp + this.previousHash + JSON.stringify(this.data)).toString()
  }
}
First, I imported the Secure Hash Algorithm (SHA256) from the crypto-js package, which helps us to encrypt our block hash ID. Then, I created a JavaScript Block class to represent a template for every block on the chain.
As with JavaScript and other object oriented programming languages like Java, whenever a class is created, a constructor method is called by default. Whenever the Block object is called using the new keyword, we call the constructor method and pass the parameters needed to create a new block.
Inside the constructor method, we assigned the values of the parameters, arguments, to the field. The this keyword signifies that we’re referring to the field name that come after it. Lastly, we created a generateHash() method that generates and returns the hash of the block using the properties defined in the constructor. Now that we’ve created our first block, let’s create the blockchain.
The blockchain is a system for recording a collection of data in a chain-like way, increasing data integrity, reducing vulnerabilities, and making the data nearly impossible to be hacked.
More specifically, a blockchain is a distributed database that stores transactions in groups known as blocks. Let’s create a blockchain class that will manage the chain of of blocks:
class Blockchain{
    constructor(){
        this.blockchain = [this.createGenesisBlock()];
    }
    createGenesisBlock(){
        return new Block(0, "11/04/2022", "first block on the chain", "0");
    }
    getTheLatestBlock(){
        return this.blockchain[this.blockchain.length - 1];
    }
    addNewBlock(newBlock){
        newBlock.previousHash = this.getTheLatestBlock().hash;
        newBlock.hash = newBlock.generateHash();
        this.blockchain.push(newBlock);
    }

    // testing the integrity of the chain
    validateChainIntegrity(){
        for(let i = 1; i<this.blockchain.length; i++){
            const currentBlock = this.blockchain[i];
            const previousBlock = this.blockchain[i-1];
            if(currentBlock.hash !== currentBlock.generateHash()){
                return false;
            }
            if(currentBlock.previousHash !== previousBlock.hash){
                return false;
            }
            return true;

        }
    }
}
From the code snippet above, we created a class, Blockchain and invoked the no-argument constructor method, a constructor without parameters or arguments. Within the constructor block, we assigned an array containing the method that creates the genesis block, createGenesisBlock(). A genesis block is the initial block in a blockchain, which you can link other blocks to. You can also refer to the genesis block as the ancestor block.
Every block created on the blockchain always references the previous block on the chain. But the genesis block has no reference, so we have to hardcode its properties within the createGenesisBlock() method. Notice how I called the new keyword on the Block constructor and passed the required arguments to create a block:
011/04/2022First block on the chain0The getTheLastBlock() method returns the latest block on the blockchain, helping us keep track of the current and the previous hash on the blockchain.
The next method is the addNewBlock() method, which takes a parameter called newBlock. In the method body, the hash of the latest block on the chain is set to be equal to the new block’s previous hash. On the next line, I used generateHash() to calculate the hash of the new block and finally push the new block onto the blockchain, which is an array of blocks.
The validateChainIntegrity() method checks the validity of the chain. One core characteristic of the blockchain is that it is irreversible. If any information on a block in the blockchain is tampered with, the blockchain integrity is affected. The validateChainIntegrity() method helps us to check the integrity of the blockchain.
We started our check at index one (1), whereas our blockchain started at index zero (0) with the genesis block, which was hardcoded. In this method, we loop through the blockchain, checking the validity of each block by checking if the hashes between two consecutive block are pointing to each other.
Now, we’ll create an instance of the blockchain, our coin, which I call logCoin. You can give yours any name. Write the following code:
let logCoin = new Blockchain();
console.log("mining logcoin in progress...");
logCoin.addNewBlock(
    new Block(1, "06/04/2022", {
        sender: "Frank Joseph",
        recipient: "LogRocket",
        quantity: 25
    })
);

logCoin.addNewBlock(
    new Block(2, "08/08/2022", {
        sender: "Paul val",
        recipient: "Young A",
        quantity: 34
    })
);

logCoin.addNewBlock(
    new Block(3, "13/08/2022", {
        sender: "Elena",
        recipient: "Mary",
        quantity: 34
    })
);
console.log(JSON.stringify(logCoin, null, 5))
Now, run the code with the following command in the terminal:
node nodejscoin
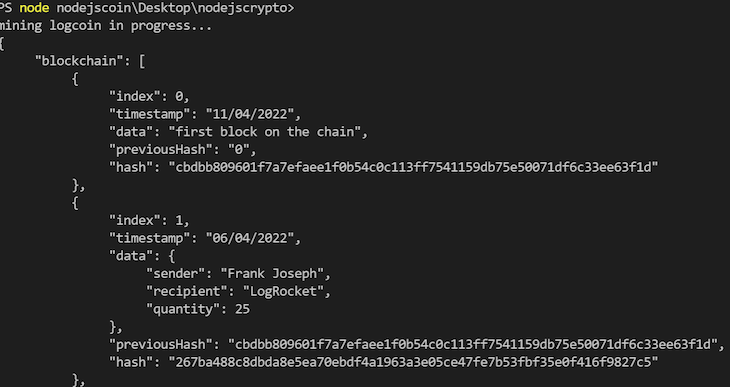
The output should be something like the image below:

In the code snippets above, we created an instance of the blockchain class, with which we’re able to call or invoke the the addNewBlock() method. Remember that the addNewBlock() method takes an argument, so we passed a new block with index, timestamp, and data as objects that contain the following information: sender, receiver, and quantity.
Lastly, we printed the output by using the JavaScript console.log() and converted the output to a JSON file with the JSON.stringify() method, which takes three arguments in this case:
Value = logCoin: The value we’re converting to JSONReplacer = null: Set to null to get all the properties of the blockchain arraySpace = 5: Creates the space between each object on the array, making the resulting output readableWe’ve successfully created our basic cryptocurrency called logCoin. The complete code is below:
const SHA256 = require(“crypto-js/sha256”);

//create a JavaScript class to represent a Block
class Block{
  constructor(index, timestamp, data, previousHash){
    this.index = index;
    this.timestamp = timestamp;
    this.data = data;
    this.previousHash = previousHash;
    this.hash = this.generateHash();
  }

  generateHash(){
    return SHA256(this.index + this.timestamp + this.previousHash + JSON.stringify(this.data)).toString()
  }
}

class Blockchain{
    constructor(){
        this.blockchain = [this.createGenesisBlock()];
    }
    createGenesisBlock(){
        return new Block(0, "11/04/2022", "first block on the chain", "0");
    }
    getTheLatestBlock(){
        return this.blockchain[this.blockchain.length - 1];
    }
    addNewBlock(newBlock){
        newBlock.previousHash = this.getTheLatestBlock().hash;
        newBlock.hash = newBlock.generateHash();
        this.blockchain.push(newBlock);
    }

    // testing the integrity of the chain
    validateChainIntegrity(){
        for(let i = 1; i<this.blockchain.length; i++){
            const currentBlock = this.blockchain[i];
            const previousBlock = this.blockchain[i-1];
            if(currentBlock.hash !== currentBlock.generateHash()){
                return false;
            }
            if(currentBlock.previousHash !== previousBlock.hash){
                return false;
            }
            return true;

        }
    }
}

let logCoin = new Blockchain();
console.log("mining logcoin in progress...");
logCoin.addNewBlock(
    new Block(1, "06/04/2022", {
        sender: "Frank Joseph",
        recipient: "LogRocket",
        quantity: 25
    })
);

logCoin.addNewBlock(
    new Block(2, "08/08/2022", {
        sender: "Paul val",
        recipient: "Young A",
        quantity: 34
    })
);

logCoin.addNewBlock(
    new Block(3, "13/08/2022", {
        sender: "Elena",
        recipient: "Mary",
        quantity: 34
    })
);
console.log(JSON.stringify(logCoin, null, 5))
With that, we’e successfully built our simple cryptocurrency using Node.js. In this tutorial, we learned the basic concepts of the blockchain, illustrated how to develop a block, and finally developed our own cryptocurrency on the blockchain.
Although our coin logCoin doesn’t meet the cryptocurrency market standard, we’ve garnered from this tutorial the foundational knowledge required to get started as blockchain developer. I hope you enjoyed this article, and be sure to leave a comment if you have any questions.
 Monitor failed and slow network requests in production
Deploying a Node-based web app or website is the easy part. Making sure your Node instance continues to serve resources to your app is where things get tougher. If you’re interested in ensuring requests to the backend or third-party services are successful, try LogRocket.

LogRocket lets you replay user sessions, eliminating guesswork around why bugs happen by showing exactly what users experienced. It captures console logs, errors, network requests, and pixel-perfect DOM recordings — compatible with all frameworks.
LogRocket's Galileo AI watches sessions for you, instantly identifying and explaining user struggles with automated monitoring of your entire product experience.
LogRocket instruments your app to record baseline performance timings such as page load time, time to first byte, slow network requests, and also logs Redux, NgRx, and Vuex actions/state. Start monitoring for free.
Client-side issues that impact users’ ability to activate and transact in your apps can drastically affect your bottom line. If you’re interested in monitoring UX issues, automatically surfacing JavaScript errors, and tracking slow network requests and component load time, try LogRocket.

LogRocket lets you replay user sessions, eliminating guesswork around why bugs happen by showing exactly what users experienced. It captures console logs, errors, network requests, and pixel-perfect DOM recordings — compatible with all frameworks.
LogRocket's Galileo AI watches sessions for you, instantly identifying and explaining user struggles with automated monitoring of your entire product experience.
Modernize how you debug web and mobile apps — start monitoring for free.

Learn how LLM routing works in production, when it’s worth the complexity, and how teams choose the right model for each request.

Compare key features of popular meta-frameworks Remix, Next.js, and SvelteKit, from project setup to styling.

Discover what’s new in The Replay, LogRocket’s newsletter for dev and engineering leaders, in the February 4th issue.

AI-first isn’t about tools; it’s about how teams think, build, and decide. Ken Pickering, CTO at Scripta Insights, shares how engineering leaders can adapt.
Would you be interested in joining LogRocket's developer community?
Join LogRocket’s Content Advisory Board. You’ll help inform the type of content we create and get access to exclusive meetups, social accreditation, and swag.
Sign up now
7 Replies to "Build a cryptocurrency with Node.js"
Where is computeHash() that is used in addNewBlock method, coming from? It wasn’t a method of Block class!
All instances of computeHash() have been replaced with generateHash(). Thanks for pointing out the typo!
Thank you Joey for pointing this out. This skipped me. It is supposed to be generateHash() as found in the Block class. I was trying to get the best method name.
There’s an error in the validity check. It will always only check the first two blocks of the chain. Move “return true” statement outside the for loop to fix it.
Thank you Ahlstrand for your observation. I think everything is fine as it is. Try to add more blocks and confirm that the code still works fine with the ‘return true statement’ in the for loop.
It is worth mentioning that the Blockchain class method `getTheLatestBlock` gets called in the `addNewBlock` method with the wrong name `getLatestBlock` so it won’t work.
Thank you for reading the article and letting us know! The typo should be fixed now.