Editor’s note: This article was updated on 8 March 2022 to reflect the latest version of Firestore and include new Firebase SDK APIs.

As the demand for real-time communication grows, developers are looking for easy ways to add reliable communication channels to mobile apps. In this tutorial, we’ll learn how to build mobile chat apps for both iOS and Android in React Native using react-native-gifted-chat, a chat UI designed to empower app developers to build cross-platform chat apps.
To follow along with this tutorial, you’ll need:
Let’s get started!
Let’s take a look at a few of the built-in props we’ll use to create our application:
messages (array) displays messagestext (string), the type of input text. Default is undefinedisTyping (bool) handles the typing indicator state. Default is falsetimeFormat (string) determines time format. Default is LTdateFormat (string) determines date format. Default is llplaceholder (text), the placeholder for an empty text field. Default is Type a message...user (object), the credentials of the user sending the message, i.e., {_id, name, avatar}messageIdGenerator (function) generates an id for each new message. Default is UUID V4You can explore other props in the documentation.
Let’s start by setting up a new React Native app. Open your terminal, navigate into your working directory, and run the command below to initialize a new React Native app:
npx react-native init GiftedChatApp
Once setup is complete, navigate into the GiftedChatApp directory and run the command below to install the required dependencies:
cd GiftedChatApp && npm install @react-navigation/native @react-navigation/stack react-native-gifted-chat react-native-reanimated react-native-gesture-handler react-native-screens react-native-safe-area-context @react-native-community/masked-view react-native-vector-icons
The command above will install React Navigation, react-native-gifted-chat, and the other required dependencies in your project. If you have everything set up correctly, your app should look like the screenshot below once you run it with npx react-native run-ios or npx react-native run-android:

Before we begin building the login screen, let’s update our code to make App.js allow screen navigation. Open App.js, then copy and paste the code below:
import React from 'react';
import { createStackNavigator } from '@react-navigation/stack'
import { NavigationContainer } from '@react-navigation/native';
import LoginScreen from './screens/Login';

const Stack = createStackNavigator();

const App = () => {
  return (
    <NavigationContainer>
      <Stack.Navigator >
        <Stack.Screen name='Login' component={LoginScreen} />
      </Stack.Navigator>
    </NavigationContainer>
  );
};

export default App;
Let’s install one final dependency. React Native Elements is a UI toolkit that allows you to easily create form elements and icons. To install React Native Elements, run the code below in your terminal:
npm install react-native-elements
Next, navigate into your project directory, create a new folder named screens, create a new file named Login.js, then copy and paste the code below in Login.js:
import React, { useState } from 'react';
import { View, StyleSheet } from 'react-native'
import { Input, Button } from 'react-native-elements';
import Icon from 'react-native-vector-icons/FontAwesome';

const Login = ({navigation}) => {
    const [email, setEmail] = useState('');
    const [password, setPassword] = useState('');

    return (
        <View style={styles.container}>
            <Input
                placeholder='Enter your email'
                label='Email'
                leftIcon={{ type: 'material', name: 'email' }}
                value={email}
                onChangeText={text => setEmail(text)}
            />
            <Input
                placeholder='Enter your password'
                label='Password'
                leftIcon={{ type: 'material', name: 'lock' }}
                value={password}
                onChangeText={text => setPassword(text)}
                secureTextEntry
            />
            <Button title='sign in' style={styles.button} />
            <Button title='register' style={styles.button} />
        </View>
    )
}
const styles = StyleSheet.create({
    container: {
        flex: 1,
        alignItems: 'center',
        padding: 10,
        marginTop: 100,
    },
    button: {
        width: 370,
        marginTop: 10
    }
});

export default Login;
In the code block above, we imported the useState() Hook, created two states to store email and password fields, created the login input fields using React Native Elements, and finally added styles.
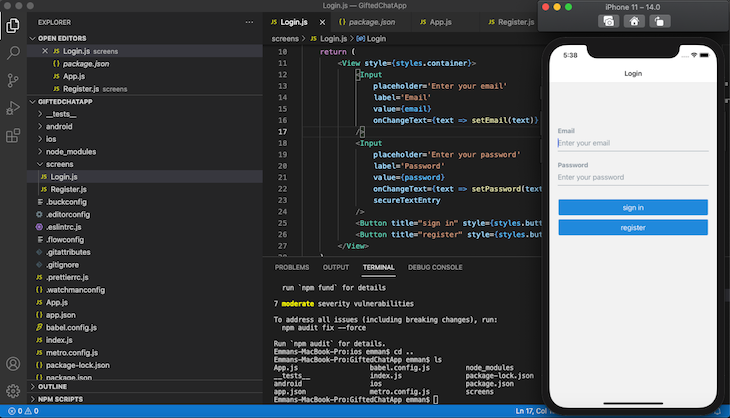
Now, run npx react-native run-ios or npx react-native run-android, and your app should look like the image below:
Now, let’s build a registration screen to add new users to our application.
Navigate into the screens folder, create a new file named Register.js, then copy and paste the code below:
import React, { useState } from 'react';
import { View, StyleSheet } from 'react-native'
import { Input, Button } from 'react-native-elements';

const Register = () => {
    const [name, setName] = useState('');
    const [email, setEmail] = useState('');
    const [password, setPassword] = useState('');
    const [avatar, setAvatar] = useState('');

    return (
        <View style={styles.container}>
            <Input
                placeholder='Enter your name'
                label='Name'
                value={name}
                onChangeText={text => setName(text)}
            />
            <Input
                placeholder='Enter your email'
                label='Email'
                value={email}
                onChangeText={text => setEmail(text)}
            />
            <Input
                placeholder='Enter your password'
                label='Password'
                value={password} onChangeText={text => setPassword(text)}
                secureTextEntry
            />
            <Input
                placeholder='Enter your image url'
                label='Profile Picture'
                value = {avatar}
                onChangeText={text => setAvatar(text)}
            />
            <Button title='register' style={styles.button} />
        </View>
    )
}
const styles = StyleSheet.create({
    container: {
        flex: 1,
        alignItems: 'center',
        padding: 10,
        marginTop: 100,
    },
    button: {
        width: 370,
        marginTop: 10
    }
});

export default Register;
Now that you are done building the login and registration screens, let’s add Firebase to our application to authenticate users.
Install Firebase by running the code below:
npm install --save firebase
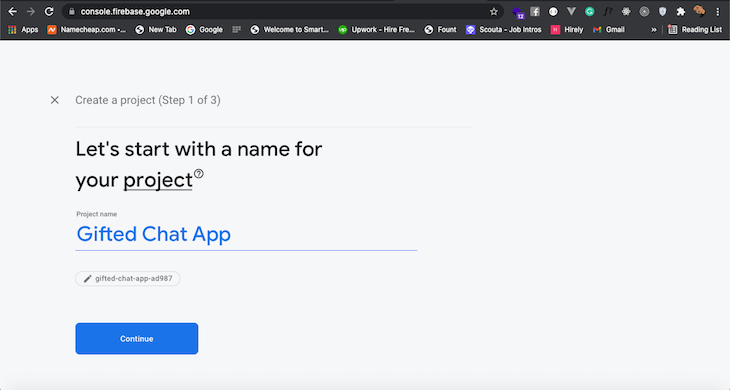
The above command will install the latest Firebase web SDK version. In this tutorial, we will use the Firebase v.9 modular library. Now, head to the Firebase website and create a new project called Gifted Chat App:
Next, we’ll add a web app to the Firebase project we just created. Create a new file called firebase.js in the root directory of the project. Copy the firebaseConfig credentials from the screen below:
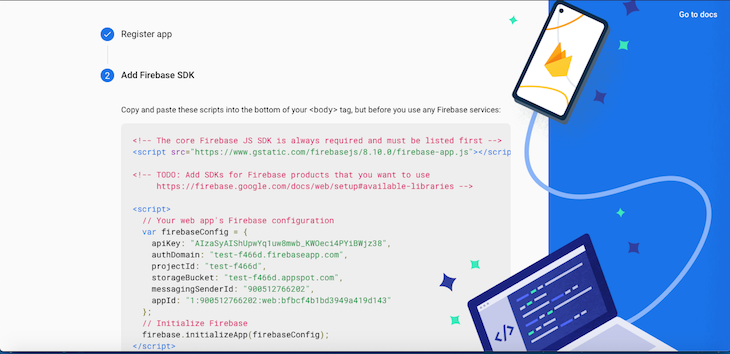
Replace the credentials currently in firebaseConfig with your project’s unique details:
import { initializeApp, getApp } from 'firebase/app';
import { initializeFirestore } from 'firebase/firestore';
import { getAuth } from 'firebase/auth';

const firebaseConfig = {
  apiKey: 'your_api_key',
  authDomain: 'your_auth_domain',
  projectId: 'your_project_id',
  storageBucket: 'your_storage_bucket',
  messagingSenderId: 'your_messaging_sender_id',
  appId: 'your_app_id',
  measurementId: 'your_measurement_id' // optional
};

const app = initializeApp(firebaseConfig);

const auth = getAuth(app);
const db = initializeFirestore(app, {experimentalForceLongPolling: true});

export { db, auth };
The above module initializes a Firebase app and Firestore database connection. It also returns the initialized Firestore connection instance as db and the authentication instance as auth .
Let’s enable user authentication through Firebase using email and password. Click authentication from the sidebar menu of the Firebase console and select Email/Password.
Next, select enable and save:

Now that the Firebase setup and configuration are complete, let’s update the Register.js file to authenticate a new user.
First, add the following Firebase-related imports:
import { auth } from '../firebase';
import { createUserWithEmailAndPassword, updateProfile } from 'firebase/auth';
Copy the code below and place it above the return keyword of the Register function:
const register = () => {
  createUserWithEmailAndPassword(auth, email, password)
    .then((userCredential) => {
        // Registered
        const user = userCredential.user;
        updateProfile(user, {
            displayName: name,
            photoURL: avatar ? avatar : 'https://gravatar.com/avatar/94d45dbdba988afacf30d916e7aaad69?s=200&d=mp&r=x',
        })
        .then(() => {
            alert('Registered, please login.');
        })
        .catch((error) => {
            alert(error.message);
        })
    })
    .catch((error) => {
        const errorCode = error.code;
        const errorMessage = error.message;
        alert(errorMessage);
    });
}
First, we imported the auth object from the firebase.js file we created earlier. Next, we created a register function and passed the auth object, new user’s email, and password to the createUserWithEmailAndPassword method. Finally, we updated the user’s credentials with name and avatar.
Next, we’ll pass the register function to the register button with the onPress handler:
<Button title='register' onPress={register} style={styles.button} />
Here the complete source code of the Register.js file after the above changes:
import React, { useState } from 'react';
import { View, StyleSheet } from 'react-native'
import { Input, Button } from 'react-native-elements';
import { auth } from '../firebase';
import { createUserWithEmailAndPassword, updateProfile } from 'firebase/auth';

const Register = () => {
    const [name, setName] = useState('');
    const [email, setEmail] = useState('');
    const [password, setPassword] = useState('');
    const [avatar, setAvatar] = useState('');

    const register = () => {
      createUserWithEmailAndPassword(auth, email, password)
        .then((userCredential) => {
            // Registered
            const user = userCredential.user;
            updateProfile(user, {
                displayName: name,
                photoURL: avatar ? avatar : 'https://gravatar.com/avatar/94d45dbdba988afacf30d916e7aaad69?s=200&d=mp&r=x',
            })
            .then(() => {
              alert('Registered, please login.');
            })
            .catch((error) => {
                alert(error.message);
            })
        })
        .catch((error) => {
            const errorCode = error.code;
            const errorMessage = error.message;
            alert(errorMessage);
        });
    }

    return (
        <View style={styles.container}>
            <Input
                placeholder='Enter your name'
                label='Name'
                value={name}
                onChangeText={text => setName(text)}
            />
            <Input
                placeholder='Enter your email'
                label='Email'
                value={email}
                onChangeText={text => setEmail(text)}
            />
            <Input
                placeholder='Enter your password'
                label='Password'
                value={password} onChangeText={text => setPassword(text)}
                secureTextEntry
            />
            <Input
                placeholder='Enter your image url'
                label='Profile Picture'
                value = {avatar}
                onChangeText={text => setAvatar(text)}
            />
            <Button title='register' onPress={register} style={styles.button} />
        </View>
    )
}
const styles = StyleSheet.create({
    container: {
        flex: 1,
        alignItems: 'center',
        padding: 10,
        marginTop: 100,
    },
    button: {
        width: 370,
        marginTop: 10
    }
});

export default Register;
Next, add the registration screen to the navigation stack by updating the App.js file, as shown in the following code:
import React from 'react';
import {
  StyleSheet,
} from 'react-native';

import { createStackNavigator } from '@react-navigation/stack'
import { NavigationContainer } from '@react-navigation/native';
import LoginScreen from './screens/Login';
import RegisterScreen from './screens/Register';

const Stack = createStackNavigator();

const App = () => {
  return (
    <NavigationContainer>
      <Stack.Navigator >
        <Stack.Screen name='Login' component={LoginScreen} />
        <Stack.Screen name='Register' component={RegisterScreen} />
      </Stack.Navigator>
    </NavigationContainer>
  );
};

export default App;
Also, we need to add a navigation action from the login screen to the register screen, so add the following code to the Login.js file:
import React, { useState } from 'react';
import { View, StyleSheet } from 'react-native'
import { Input, Button } from 'react-native-elements';
import Icon from 'react-native-vector-icons/FontAwesome';

const Login = ({navigation}) => {
    const [email, setEmail] = useState('');
    const [password, setPassword] = useState('');

    const openRegisterScreen = () => {
      navigation.navigate('Register');
    };

    return (
        <View style={styles.container}>
            <Input
                placeholder='Enter your email'
                label='Email'
                leftIcon={{ type: 'material', name: 'email' }}
                value={email}
                onChangeText={text => setEmail(text)}
            />
            <Input
                placeholder='Enter your password'
                label='Password'
                leftIcon={{ type: 'material', name: 'lock' }}
                value={password}
                onChangeText={text => setPassword(text)}
                secureTextEntry
            />
            <Button title='sign in' style={styles.button} />
            <Button title="register" style={styles.button} onPress={openRegisterScreen} />
        </View>
    )
}
const styles = StyleSheet.create({
    container: {
        flex: 1,
        alignItems: 'center',
        padding: 10,
        marginTop: 100,
    },
    button: {
        width: 370,
        marginTop: 10
    }
});

export default Login;
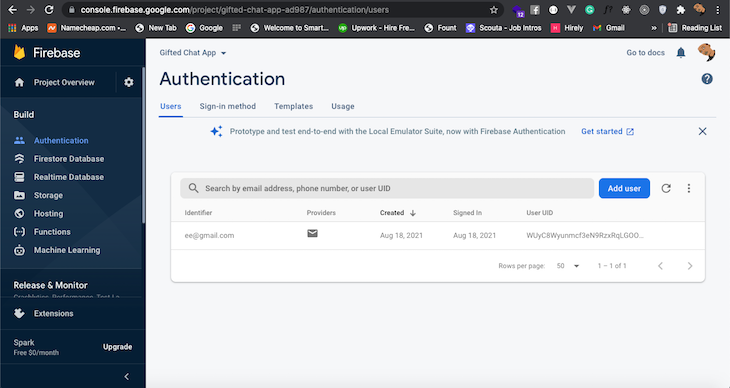
Now, you can register a new user from your app and list them in your Firebase console:
Next, we’ll build the chat screen, where we’ll redirect users after a successful login.
Create a new file called Chat.js in the screens directory.
To create a basic chat app, copy and paste the code below into the file:
import React, { useEffect, useCallback, useState, useLayoutEffect } from 'react';
import { View, Text, StyleSheet, TouchableOpacity } from 'react-native';
import { Avatar } from 'react-native-elements';
import { auth, db } from '../firebase';
import { signOut } from 'firebase/auth';
import { GiftedChat } from 'react-native-gifted-chat';

const Chat = ({ navigation }) => {
    const [messages, setMessages] = useState([]);
    const signOutNow = () => {
        signOut(auth).then(() => {
            // Sign-out successful.
            navigation.replace('Login');
        }).catch((error) => {
            // An error happened.
        });
    }
    useLayoutEffect(() => {
        navigation.setOptions({
            headerLeft: () => (
                <View style={{ marginLeft: 20 }}>
                    <Avatar
                        rounded
                        source={{
                            uri: auth?.currentUser?.photoURL,
                        }}
                    />
                </View>
            ),
            headerRight: () => (
                <TouchableOpacity style={{
                    marginRight: 10
                }}
                    onPress={signOutNow}
                >
                    <Text>logout</Text>
                </TouchableOpacity>
            )
        })
    }, [navigation]);

    useEffect(() => {
        setMessages([
            {
                _id: 1,
                text: 'Hello developer',
                createdAt: new Date(),
                user: {
                    _id: 2,
                    name: 'React Native',
                    avatar: 'https://placeimg.com/140/140/any',
                },
            },
        ])
    }, []);
    const onSend = useCallback((messages = []) => {
        setMessages(previousMessages => GiftedChat.append(previousMessages, messages))
    }, []);
    return (
        <GiftedChat
            messages={messages}
            showAvatarForEveryMessage={true}
            onSend={messages => onSend(messages)}
            user={{
                _id: auth?.currentUser?.email,
                name: auth?.currentUser?.displayName,
                avatar: auth?.currentUser?.photoURL
            }}
        />
    );
}

export default Chat;
With the Firebase auth object, we created the messages state and a function to handle a user logging out. Next, we created a basic navigation effect by wrapping the header nav with a useLayoutEffect.
With the useEffect Hook, we created a dummy message, which we mounted onto the GiftedChat component. The user prop on the GiftedChat component refers to the user who is currently logged in, in this case it’s you.
We need to implement the login feature to open the chat screen, so replace the current login screen source with the following code to complete the Firebase authentication.
import React, { useState } from 'react';
import { View, StyleSheet } from 'react-native'
import { Input, Button } from 'react-native-elements';
import { auth } from '../firebase';
import { signInWithEmailAndPassword } from 'firebase/auth';
import Icon from 'react-native-vector-icons/FontAwesome';

const Login = ({navigation}) => {
    const [email, setEmail] = useState('');
    const [password, setPassword] = useState('');

    const openRegisterScreen = () => {
      navigation.navigate('Register');
    };

    const signin = () => {
      signInWithEmailAndPassword(auth, email, password)
        .then((userCredential) => {
          navigation.navigate('Chat');
        })
        .catch((error) => {
          const errorCode = error.code;
          const errorMessage = error.message;
          alert(errorMessage);
        });
    };

    return (
        <View style={styles.container}>
            <Input
                placeholder='Enter your email'
                label='Email'
                leftIcon={{ type: 'material', name: 'email' }}
                value={email}
                onChangeText={text => setEmail(text)}
            />
            <Input
                placeholder='Enter your password'
                label='Password'
                leftIcon={{ type: 'material', name: 'lock' }}
                value={password}
                onChangeText={text => setPassword(text)}
                secureTextEntry
            />
            <Button title="sign in" style={styles.button} onPress={signin} />
            <Button title="register" style={styles.button} onPress={openRegisterScreen} />
        </View>
    )
}
const styles = StyleSheet.create({
    container: {
        flex: 1,
        alignItems: 'center',
        padding: 10,
        marginTop: 100,
    },
    button: {
        width: 370,
        marginTop: 10
    }
});

export default Login;
Next, we need to add the chat screen component to the navigation stack. Complete the main application screen implementation by replacing the App.js source file content with the following code:
import React from 'react';
import {
  StyleSheet,
} from 'react-native';

import { createStackNavigator } from '@react-navigation/stack'
import { NavigationContainer } from '@react-navigation/native';
import LoginScreen from './screens/Login';
import RegisterScreen from './screens/Register';
import ChatScreen from './screens/Chat';

const Stack = createStackNavigator();

const App = () => {
  return (
    <NavigationContainer>
      <Stack.Navigator >
        <Stack.Screen name='Login' component={LoginScreen} />
        <Stack.Screen name='Register' component={RegisterScreen} />
        <Stack.Screen name='Chat' component={ChatScreen} />
      </Stack.Navigator>
    </NavigationContainer>
  );
};

export default App;
Now, your app should look like the screenshot below after you log in with a correct user name and password:
Currently, the messages in our chat app aren’t stored anywhere. To store messages in firestore, we’ll modify the onSend function:
const onSend = useCallback((messages = []) => {
    setMessages(previousMessages => GiftedChat.append(previousMessages, messages))
    const { _id, createdAt, text, user,} = messages[0]

    addDoc(collection(db, 'chats'), { _id, createdAt,  text, user });
}, []);
The above code snippet needs the following new imports:
import { collection, addDoc } from 'firebase/firestore';
Also, make sure to add relevant permissions to the Firestore console for development requirements. For example, the following configuration allows all logged users to read/write the entire database:
rules_version = '2';
service cloud.firestore {
  match /databases/{database}/documents {
    match /{document=**} {
      allow read, write: if request.auth != null;
    }
  }
}
To retrieve old messages from firestore, we’ll make a call to the database using the useLayoutEffect. Copy and paste the code below inside the existing useLayoutEffect hook callback to load old messages on the chat screen:
const q = query(collection(db, 'chats'), orderBy('createdAt', 'desc'));
const unsubscribe = onSnapshot(q, (snapshot) => setMessages(
    snapshot.docs.map(doc => ({
        _id: doc.data()._id,
        createdAt: doc.data().createdAt.toDate(),
        text: doc.data().text,
        user: doc.data().user,
    }))
));

return () => {
  unsubscribe();
};
Check the complete Chat.js source code with the remote Firestore-based real-time messaging support:
import React, { useCallback, useState, useLayoutEffect } from 'react';
import { View, Text, StyleSheet, TouchableOpacity } from 'react-native';
import { Avatar } from 'react-native-elements';
import { auth, db } from '../firebase';
import { signOut } from 'firebase/auth';
import { collection, addDoc, getDocs, query, orderBy, onSnapshot } from 'firebase/firestore';
import { GiftedChat } from 'react-native-gifted-chat';

const Chat = ({ navigation }) => {
    const [messages, setMessages] = useState([]);
    const signOutNow = () => {
        signOut(auth).then(() => {
            // Sign-out successful.
            navigation.replace('Login');
        }).catch((error) => {
            // An error happened.
        });
    }
    useLayoutEffect(() => {
        navigation.setOptions({
            headerLeft: () => (
                <View style={{ marginLeft: 20 }}>
                    <Avatar
                        rounded
                        source={{
                            uri: auth?.currentUser?.photoURL,
                        }}
                    />
                </View>
            ),
            headerRight: () => (
                <TouchableOpacity style={{
                    marginRight: 10
                }}
                    onPress={signOutNow}
                >
                    <Text>logout</Text>
                </TouchableOpacity>
            )
        })

        const q = query(collection(db, 'chats'), orderBy('createdAt', 'desc'));
        const unsubscribe = onSnapshot(q, (snapshot) => setMessages(
            snapshot.docs.map(doc => ({
                _id: doc.data()._id,
                createdAt: doc.data().createdAt.toDate(),
                text: doc.data().text,
                user: doc.data().user,
            }))
        ));

        return () => {
          unsubscribe();
        };

    }, [navigation]);

    const onSend = useCallback((messages = []) => {
        const { _id, createdAt, text, user,} = messages[0]

        addDoc(collection(db, 'chats'), { _id, createdAt,  text, user });
    }, []);

    return (
        <GiftedChat
            messages={messages}
            showAvatarForEveryMessage={true}
            onSend={messages => onSend(messages)}
            user={{
                _id: auth?.currentUser?.email,
                name: auth?.currentUser?.displayName,
                avatar: auth?.currentUser?.photoURL
            }}
        />
    );
}

export default Chat;
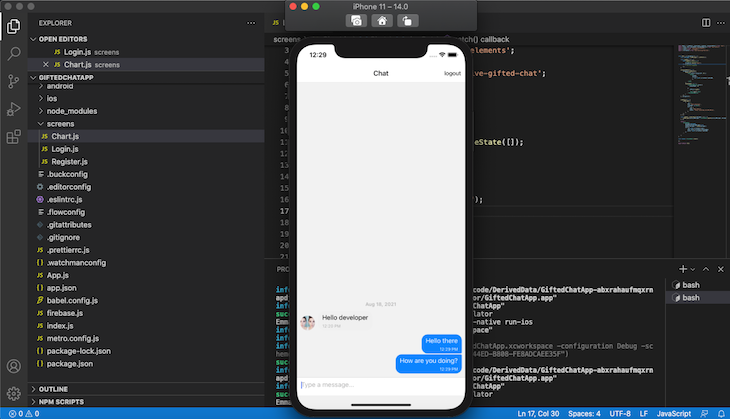
Note that we are only using one setMessages function call inside the onSnapshot listener to avoid unwanted multiple state changes. Try two debug application instances on the simulator/emulator and a real physical device to test the real-time messaging application.
Now, you know how to build a standard chat application with cross-platform compatibility using React Native and Firebase! Our application allows us to chat between multiple devices with an unlimited number of users. You can extend this application further by adding chat sounds, emoji support, themes, typing indicator animations, touchable links, offline notifications, offline message persistence, and various other modern chat app features.
React-native-gifted-chat is a great tool for implementing chat in React Native, helping you to improve communication within your application. You can read more about react-native-gifted-chat and Firebase authentication in the official docs. Also, you can learn more Firebase SDK features from the official Firebase JavaScript API reference.

LogRocket's Galileo AI watches sessions for you and and surfaces the technical and usability issues holding back your React Native apps.
LogRocket also helps you increase conversion rates and product usage by showing you exactly how users are interacting with your app. LogRocket's product analytics features surface the reasons why users don't complete a particular flow or don't adopt a new feature.
Start proactively monitoring your React Native apps — try LogRocket for free.

A guide for using JWT authentication to prevent basic security issues while understanding the shortcomings of JWTs.

Discover how to build, render, and automate product demo videos with Remotion, replacing traditional screen recordings with reusable React code.

Chrome’s Modern Web Guidance embeds modern web platform skills into AI coding agents, helping them choose native HTML, CSS, and browser APIs over legacy patterns.

Learn how to use Fallow to analyze AI-generated code, detect dead code, duplicate logic, and complexity issues, and integrate automated code quality checks into your AI-assisted development workflow.
Would you be interested in joining LogRocket's developer community?
Join LogRocket’s Content Advisory Board. You’ll help inform the type of content we create and get access to exclusive meetups, social accreditation, and swag.
Sign up now

