MediaPipe has been around for a while. Google originally released it as a framework for running smaller on-device models in the browser and on mobile, mostly focused on vision tasks like face detection, hand tracking, pose estimation, etc. It now operates as Google’s open-source machine learning framework, built with TensorFlow andspecializing in helping devs create robust, on-device AI applications for real-time, static, and streaming media across different platforms.

The most recent release enables Vision Models to run fully on-device across platforms, without needing to run models server-side.
In this article, we will explore MediaPipe’s latest APIs while building an object detection and categorization application in React. We will specifically focus on the MediaPipe Tasks API for object detection.
Here’s what our final app will look like: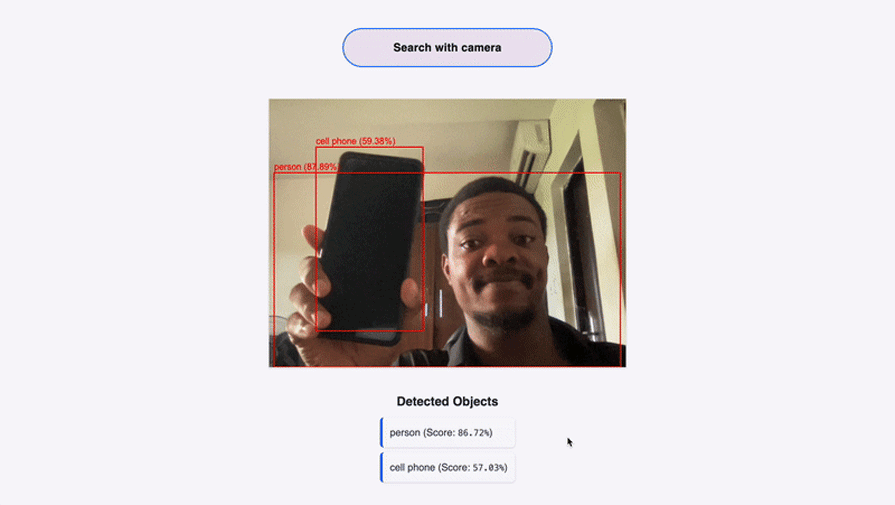
Before moving forward, you should have the following:
The Replay is a weekly newsletter for dev and engineering leaders.
Delivered once a week, it's your curated guide to the most important conversations around frontend dev, emerging AI tools, and the state of modern software.
Object detection has real-world applications across a wide range of industries. Developers building apps for retail, logistics, accessibility, smart homes, fitness, or security often need to detect and identify real-world items in images or video streams.
For example, an e-commerce app could let users scan products with their camera to auto-fill search queries.
In health and fitness, apps can use object detection to recognize body positions, equipment, or form during workouts.
For scientific research, an AI-driven science app could identify lab tools or specimens through a webcam.
By learning how to integrate object detection into a React app, developers can create smarter, more intuitive interfaces powered by computer vision, all running efficiently in the browser.
MediaPipe is one of Google’s most impressive contributions to real-time, on-device AI. The release of the MediaPipe Tasks API makes it possible to add real-time vision models into your web app with a few lines of JavaScript.
MediaPipe’s latest APIs, or MediaPipe Solutions suite, consist of the following:
This offers a simple, cross-platform API for installing typical ML solutions with as little code as possible. It supports gesture recognition and image classification.
This simplifies the customization of pre-trained MediaPipe models using your data.
It makes it possible to fine-tune pre-existing models using comparatively small datasets.
This provides a no-code approach to exploring MediaPipe solutions with your data.
We will be using MediaPipe’s Tasks for object detection in our tutorial.
I used Vite to initialize our app. For this project, I will be using Tailwind CSS with React.
To start, open your terminal and navigate to the desired folder where you want your code to be.
Then run the following command:
npm create vite@latest project_name
Choose JavaScript as your preferred language.
Next, CD into your project directory or folder and then enter this:
npm install tailwindcss @tailwindcss/vite
Open the folder in VS Code or any other text editor you choose.
Next, modify the vite.config.js file and paste in the following code:
import { defineConfig } from "vite";
import react from "@vitejs/plugin-react";
import tailwindcss from "@tailwindcss/vite";

export default defineConfig({
  plugins: [react(), tailwindcss()],
});
Remove all code from the index.css file and paste this:
@import "tailwindcss";
Our React project is set up and ready. Let’s get into installing the required dependencies.
We need to install the MediaPipe Tasks Vision package for this project.
Navigate to your project directory and run:
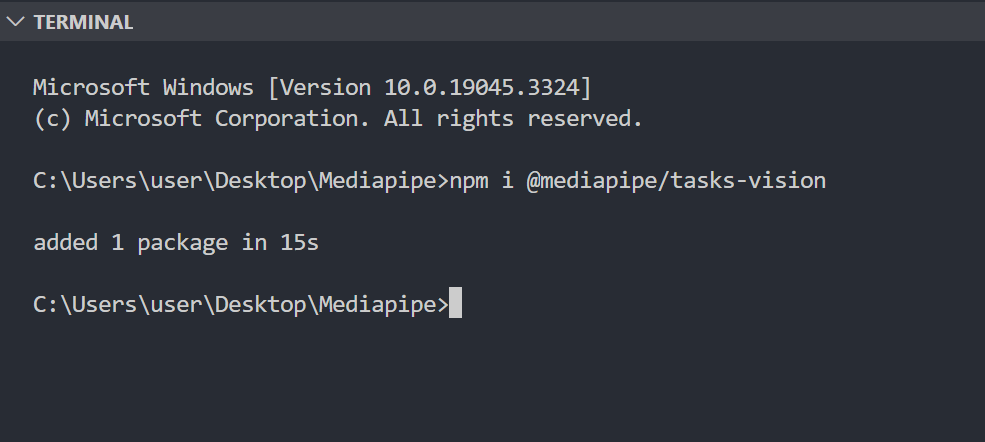
npm i @mediapipe/tasks-vision
If the installation was successful, you will see a screen similar to the one below:
To get started, we are going to create 3 folders for our project:
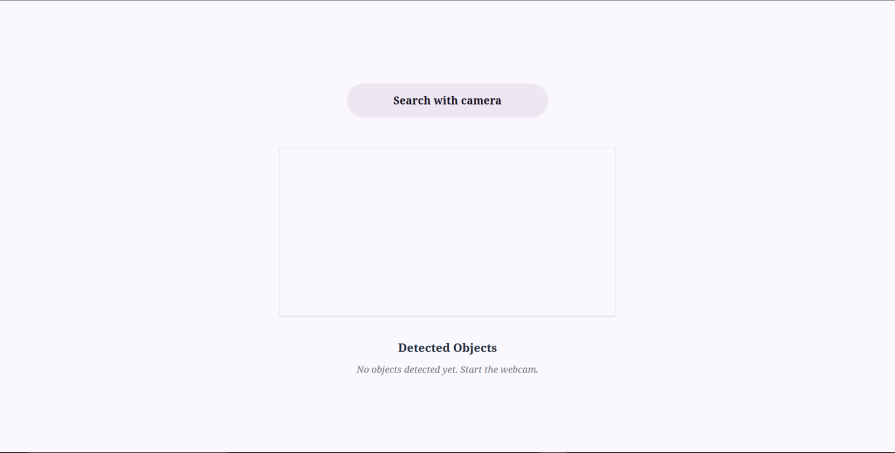
This is what our UI will look like:
We will create four utility functions inside the “utils” folder, each building upon another.
drawDetections.jsinitializeObjectDetector.jsdetectObjectsAndDraw.jscleanupMediaPipeResources.jsIn the “utils” folder, create a drawDetections.js file and paste the following:
// drawDetections.js

export const drawDetections = (context, detections) => {
  detections.forEach(detection => {
    const bbox = detection.boundingBox;
    const category = detection.categories[0];
    context.strokeStyle = 'red';
    context.lineWidth = 2;
    context.strokeRect(bbox.originX, bbox.originY, bbox.width, bbox.height);
    context.fillStyle = 'red';
    context.font = '16px Arial';
    const text = `${category.categoryName} (${(category.score * 100).toFixed(2)}%)`;
    const textX = bbox.originX;
    const textY = bbox.originY > 10 ? bbox.originY - 5 : 10;
    context.fillText(text, textX, textY);
  });
};
The drawDetections.js function is responsible for visualizing the detected objects on the HTML canvas.
It takes the 2D rendering context of the canvas and the MediaPipe detection results as input. For each detected object, it draws a colored box and a text label on the canvas.
Next, create an initializeObjectDetector.js file and populate it with the code below:
// initializeObjectDetector.js
import { ObjectDetector, FilesetResolver } from '@mediapipe/tasks-vision';

export const initializeObjectDetector = async (modelPath, scoreThreshold, maxResults) => {
  const visionFilesetResolver = await FilesetResolver.forVisionTasks(
    '<https://cdn.jsdelivr.net/npm/@mediapipe/tasks-vision@latest/wasm>'
  );
  const objectDetector = await ObjectDetector.createFromOptions(
    visionFilesetResolver,
    {
      baseOptions: {
        modelAssetPath: modelPath,
      },
      runningMode: 'LIVE_STREAM',
      scoreThreshold: scoreThreshold,
      maxResults: maxResults,
    }
  );


  return objectDetector;
};
The initializeObjectDetector function calls on FilesetResolver.forVisionTasks() to load the WebAssembly(WASM) files. Then, it utilizes ObjectDetector.createFromOptions() to combine the loaded files with our AI model and the specified options, returning the ObjectDetector instance.
Next, we will create a detectObjectsAndDraw function.
This function accepts the following props:
videoElementcanvasElementobjectDetectorsetDetectionsCallbackWe’ll create the videoElement and the setDetectionsCallback state in the next section:
//detectObjectsAndDraw.js
import { drawDetections } from "./drawDetections";

export const detectObjectsAndDraw = (
  videoElement,
  canvasElement,
  objectDetector,
  setDetectionsCallback
) => {
  const context = canvasElement.getContext("2d");

  canvasElement.width = videoElement.videoWidth;
  canvasElement.height = videoElement.videoHeight;
  context.clearRect(0, 0, canvasElement.width, canvasElement.height);
  context.drawImage(
    videoElement,
    0,
    0,
    canvasElement.width,
    canvasElement.height
  );

  try {
    const detectionsResult = objectDetector.detectForVideo(
      videoElement,
      performance.now()
    );
    setDetectionsCallback(detectionsResult.detections);
    drawDetections(
      context,
      detectionsResult.detections,
      canvasElement.width,
      canvasElement.height
    );


  } catch (err) {
    console.error("Error during object detection or drawing:", err);
    setDetectionsCallback([]);
    return [];
  }
};
The detectObjectsAndDraw function draws the current video frame onto the canvas. It then runs the objectDetector on this frame to identify objects.
After that, it updates the setDetectionsCallback state with the detected objects.
It finally calls the drawDetections utility to overlay bounding boxes and labels on the canvas.
For this section, we will finally create the cleanupMediaPipeResources.js:
//cleanupMediaPipeResources.js
export const cleanupMediaPipeResources = ({ animationFrameId, videoRef, objectDetectorRef }) => {
  if (animationFrameId.current) {
    cancelAnimationFrame(animationFrameId.current);
    animationFrameId.current = null;
  }


  if (videoRef.current && videoRef.current.srcObject) {
    videoRef.current.srcObject.getTracks().forEach(track => {
      track.stop();
    });
    videoRef.current.srcObject = null;
  }
  if (objectDetectorRef.current) {
    objectDetectorRef.current.close();
    objectDetectorRef.current = null;
  }
};
The cleanupMediaPipeResources.js manages system resources after running our application.
It is responsible for stopping the animation frame loop, releasing the webcam stream, and closing the MediaPipe detector instance to prevent memory leaks and release hardware resources.
In the next section, we will set up our MediaPipe logic.
First, create a useMediaPipeObjectDetection.js file in the “hooks” folder.
Then import useEffect, useRef, useState, and useCallback like so:
import { useEffect, useRef, useState, useCallback } from 'react';
import { detectObjectsAndDraw } from '../utils/detectObjectsAndDraw';
I have also imported detectObjectsAndDraw which we created earlier.
These are the stages our code will follow:
Below is our performDetectionLoop function, together with the supporting useRefs and useState we need for it to work:
 const videoRef = useRef(null);
  const canvasRef = useRef(null);
  const objectDetectorRef = useRef(null);
  const animationFrameId = useRef(null);

 const [detections, setDetections] = useState([]);

  const performDetectionLoop = useCallback(() => {
    if (!videoRef.current || !canvasRef.current || !objectDetectorRef.current) {
      animationFrameId.current = requestAnimationFrame(performDetectionLoop);
      return;
    }
    const video = videoRef.current;
    const canvas = canvasRef.current;
    const detector = objectDetectorRef.current;
    if (video.videoWidth === 0 || video.videoHeight === 0) {
      animationFrameId.current = requestAnimationFrame(performDetectionLoop);
      return;
    }
    detectObjectsAndDraw(video, canvas, detector, setDetections);
    animationFrameId.current = requestAnimationFrame(performDetectionLoop);
  }, [setDetections]);
The performDetectionLoop function checks if video, canvas, and detector are ready.
When they‘re ready, it calls the detectObjectsAndDraw utility function to process the current video frame. It finally updates the detection state through a callback from the detectObjectsAndDraw function.
Your useMediaPipeObjectDetection.js should now look like this:
import { useEffect, useRef, useState, useCallback } from 'react';
import { detectObjectsAndDraw } from '../utils/detectObjectsAndDraw';

const useMediaPipeObjectDetection = () => {

 const videoRef = useRef(null);
  const canvasRef = useRef(null);
  const objectDetectorRef = useRef(null);
  const animationFrameId = useRef(null);

 const [detections, setDetections] = useState([]);

  const performDetectionLoop = useCallback(() => {
    if (!videoRef.current || !canvasRef.current || !objectDetectorRef.current) {
      animationFrameId.current = requestAnimationFrame(performDetectionLoop);
      return;
    }
    const video = videoRef.current;
    const canvas = canvasRef.current;
    const detector = objectDetectorRef.current;
    if (video.videoWidth === 0 || video.videoHeight === 0) {
      animationFrameId.current = requestAnimationFrame(performDetectionLoop);
      return;
    }
    detectObjectsAndDraw(video, canvas, detector, setDetections);
    animationFrameId.current = requestAnimationFrame(performDetectionLoop);
  }, [setDetections]);
};

export default useMediaPipeObjectDetection;
The startWebcam code is below:
 //Start Webcam Function
  const startWebcam = useCallback(async () => {
    if (loading || error) return;

    try {
      const stream = await navigator.mediaDevices.getUserMedia({ video: true });

      if (videoRef.current) {
        videoRef.current.srcObject = stream;

        videoRef.current.onloadedmetadata = () => {
          videoRef.current.play();
          animationFrameId.current =
            requestAnimationFrame(performDetectionLoop);
        };
      }
    } catch (err) {
      console.error("Error accessing webcam:", err);
      setError(err);
    }
  }, [loading, error, performDetectionLoop]);
We also created two states for the startWebcam function:
const [loading, setLoading] = useState(true);
const [error, setError] = useState(null);
In startWebcam function, we made an asynchronous call asking the user’s browser for permission to access their webcam.
If permission is granted, we get the live feed from the camera. We then use the videoRef Hook to get a direct reference to the <video> HTML element. Once we have the MediaStream, we assign it to the srcObject property of the video element, videoRef.current.srcObject = stream. This tells the video element to display the live camera feed.
We use the onloadedmetadata event to listen for when metadata is loaded so that we can play the video
We then use the videoRef.current.play() to start the video playback.
Once the video starts playing and its metadata is available, we start our continuous object detection process.
We do this by calling requestAnimationFrame, passing in the performDetectionLoop function.
initializeDetector uses the useCallback Hook to call the initializeObjectDetector function we created in our“utils” folder.
We first have to import the function from the “utils” folder:
import { initializeObjectDetector } from "../utils/initializeObjectDetector";
Next, copy the code below into your useMediaPipeObjectDetection.js file:
//InitializeDetector Function
  const initializeDetector = useCallback(async () => {
    try {
      setLoading(true);
      setError(null);
      const detector = await initializeObjectDetector(
        modelPath,
        scoreThreshold,
        maxResults
      );
      objectDetectorRef.current = detector;
      setLoading(false);
      console.log("Object Detector initialized!");
    } catch (err) {
      console.error("Failed to initialize Object Detector:", err);
      setError(err);
      setLoading(false);
    }
  }, [modelPath, scoreThreshold, maxResults]);
Next, we have two useEffects that get triggered when components mount and unmount.
The second useEffect Hook calls on the cleanupMediaPipeResources function we created earlier.
We will need to import the cleanupMediaPipeResources function.
First, import it like so:
import { cleanupMediaPipeResources } from "../utils/cleanupMediaPipeResources";
Then copy and paste the code below:
 //Effects
  useEffect(() => {
    initializeDetector();
  }, [initializeDetector]);

  useEffect(() => {
    return () => {
      cleanupMediaPipeResources({
        animationFrameId,
        videoRef,
        objectDetectorRef,
      });
    };
  }, []);
Our completed useMediaPipeObjectDetection.js file now looks like this:
// useMediaPipeObjectDetection.js

import { useEffect, useRef, useState, useCallback } from "react";
import { detectObjectsAndDraw } from "../utils/detectObjectsAndDraw";
import { initializeObjectDetector } from "../utils/initializeObjectDetector";
import { cleanupMediaPipeResources } from "../utils/cleanupMediaPipeResources";

const useMediaPipeObjectDetection = (
  modelPath,
  scoreThreshold = 0.5,
  maxResults = 5
) => {
  const videoRef = useRef(null);
  const canvasRef = useRef(null);
  const objectDetectorRef = useRef(null);
  const animationFrameId = useRef(null);

  const [detections, setDetections] = useState([]);
  const [loading, setLoading] = useState(true);
  const [error, setError] = useState(null);

  // Core Detection Loop Logic
  const performDetectionLoop = useCallback(() => {
    if (!videoRef.current || !canvasRef.current || !objectDetectorRef.current) {
      animationFrameId.current = requestAnimationFrame(performDetectionLoop);
      return;
    }
    const video = videoRef.current;
    const canvas = canvasRef.current;
    const detector = objectDetectorRef.current;
    if (video.videoWidth === 0 || video.videoHeight === 0) {
      animationFrameId.current = requestAnimationFrame(performDetectionLoop);
      return;
    }
    detectObjectsAndDraw(video, canvas, detector, setDetections);
    animationFrameId.current = requestAnimationFrame(performDetectionLoop);
  }, [setDetections]);

  //Start Webcam Function
  const startWebcam = useCallback(async () => {
    if (loading || error) return;

    try {
      const stream = await navigator.mediaDevices.getUserMedia({ video: true });

      if (videoRef.current) {
        videoRef.current.srcObject = stream;

        videoRef.current.onloadedmetadata = () => {
          videoRef.current.play();
          animationFrameId.current =
            requestAnimationFrame(performDetectionLoop);
        };
      }
    } catch (err) {
      console.error("Error accessing webcam:", err);
      setError(err);
    }
  }, [loading, error, performDetectionLoop]);

  //InitializeDetector Function

  const initializeDetector = useCallback(async () => {
    try {
      setLoading(true);
      setError(null);
      const detector = await initializeObjectDetector(
        modelPath,
        scoreThreshold,
        maxResults
      );
      objectDetectorRef.current = detector;
      setLoading(false);
      console.log("Object Detector initialized!");
    } catch (err) {
      console.error("Failed to initialize Object Detector:", err);
      setError(err);
      setLoading(false);
    }
  }, [modelPath, scoreThreshold, maxResults]);

  //Effects for Lifecycle Management
  useEffect(() => {
    initializeDetector();
  }, [initializeDetector]);

  useEffect(() => {
    return () => {
      cleanupMediaPipeResources({
        animationFrameId,
        videoRef,
        objectDetectorRef,
      });
    };
  }, []);
  return { videoRef, canvasRef, detections, loading, error, startWebcam };
};

export default useMediaPipeObjectDetection;
Next, we will work on our app’s user interface.
In this section, we will build out our UI components. We have 4 UI components in total:
VideoCanvasDisplayDetectionResultsObjectDetectionAppAppIn our UI setup, the ObjectDetectionApp renders VideoCanvasDisplay and DetectionResults.
The ObjectDetectionApp component then gets rendered in the App.jsx file like so:
import React from "react";
import ObjectDetectionApp from "./components/ObjectDetectionApp";

function App() {


  const MODEL_PATH =
    "<https://storage.googleapis.com/mediapipe-models/object_detector/efficientdet_lite0/int8/1/efficientdet_lite0.tflite>";

  return (
    <div className="">
      <div>
        <ObjectDetectionApp modelPath={MODEL_PATH} />
      </div>
    </div>
  );
}

export default App;
To make for easy change, we passed in the MODEL_PATH, or the model URL as props to the ObjectDetectionApp.
Navigate inside the “components” folder and create the VideoCanvasDisplay.jsx file.
Then copy and paste the code below:
// VideoCanvasDisplay.jsx
import React from "react";

const VideoCanvasDisplay = ({ videoRef, canvasRef }) => {
  return (
    <div className="relative w-full max-w-xl mx-auto h-auto border border-gray-200 shadow-sm">
      <video
        ref={videoRef}
        className="block w-full h-auto"
        autoPlay
        muted
        playsInline
      ></video>
      <canvas
        ref={canvasRef}
        className="absolute top-0 left-0 w-full h-full"
      ></canvas>
    </div>
  );
};

export default VideoCanvasDisplay;
The component displays video output from the webcam and the HTML canvas on top of the video with some Tailwind CSS styling.
Next is the DetectionResults component. As the name suggests, it displays the object detection results:
// DetectionResults.jsx
import React from 'react';
const DetectionResults = ({ detections }) => {
  return (
    <div>
      <h2 className=" text-center text-xl font-semibold text-gray-800 mb-3">Detected Objects</h2>
      {detections.length > 0 ? (
        <ul className="list-none p-0">
          {detections.map((detection, index) => (
            <li
              key={index}
              className="mb-2 p-3 bg-gray-50 rounded-md border-l-4 border-blue-600 shadow-sm text-gray-700"
            >
              <strong className="font-medium">{detection.categories[0].categoryName}</strong> (Score:{' '}
              <span className="font-mono text-sm">{(detection.categories[0].score * 100).toFixed(2)}%</span>)
            </li>
          ))}
        </ul>
      ) : (
        <p className="text-gray-500 italic">No objects detected yet. Start the webcam.</p>
      )}
    </div>
  );
};

export default DetectionResults;
Finally, there is the ObjectDetectionApp component, which renders the VideoCanvasDisplay and DetectionResultscomponents:
import React from "react";
import useMediaPipeObjectDetection from "../hooks/useMediaPipeObjectDetection";
import VideoCanvasDisplay from "../components/VideoCanvasDisplay";
import DetectionResults from "../components/DetectionResults";

const ObjectDetectionApp = ({ modelPath }) => {
  const { videoRef, canvasRef, detections, loading, error, startWebcam } =
    useMediaPipeObjectDetection(modelPath);

  return (
    <div
      className="relative flex size-full min-h-screen flex-col bg-[#faf8fc]"
      style={{ fontFamily: '"Noto Serif", "Noto Sans", sans-serif' }}
    >
      <div className="px-4 md:px-10 lg:px-40 flex flex-1 justify-center py-5">
        <div className="layout-content-container flex flex-col max-w-[960px] flex-1">
          <div className="flex w-full min-w-72 grow flex-col items-stretch justify-center gap-1 py-4 @xl:px-4">
            <div className=" flex flex-col items-center gap-y-10">
              {loading && !error && (
                <p className="text-center text-gray-600 text-lg">
                  Loading MediaPipe model...
                </p>
              )}
              {error && (
                <div className="text-red-700 bg-red-100 border border-red-500 p-3 rounded-md mb-4">
                  <p className="font-medium">
                    Error:{" "}
                    {error.message || "Failed to initialize object detector."}
                  </p>
                  <p className="text-sm">
                    Please ensure your webcam is accessible
                  </p>
                </div>
              )}

              {!loading && !error && (
                <>
                  <div
                    onClick={startWebcam}
                    disabled={loading}
                    className="flex flex-1 gap-3 flex-wrap px-4 py-3 max-w-[480px] justify-center"
                  >
                    <button className="py-4 px-20  text-lg cursor-pointer items-center justify-center overflow-hidden rounded-full  bg-[#ede7f3] text-[#140e1b] font-bold leading-normal tracking-[0.015em] grow focus:outline-none focus:ring-2 focus:ring-blue-500 focus:ring-opacity-75 transition-colors duration-300 ease-in-out disabled:opacity-50 disabled:cursor-not-allowed">
                      <span className="truncate">Search with camera</span>
                    </button>
                  </div>

                  <VideoCanvasDisplay
                    videoRef={videoRef}
                    canvasRef={canvasRef}
                  />
                  <DetectionResults detections={detections} />
                </>
              )}
            </div>
          </div>
        </div>
      </div>
    </div>
  );
};

export default ObjectDetectionApp;
Now we have all of the pieces together.
Let’s now run our app and see how it works
Start the app with npm run dev :
Notice how the object detection happens in real-time.
Here is the code repository for the final build.
Google MediaPipe provides a way to run object detection right inside the browser and without needing to set up a backend for it or train data for it.
In this tutorial, we covered a brief introduction to the new Mediapipe APIs (MediaPipe Tasks, MediaPipe Model Maker, and MediaPipe Studio. We then set up an object detection app using MediaPipe. We used the React getUserMedia method to get the user’s camera feed, which we fed to the MediaPipe object detector model.
We then nicely showed in real-time the results of the object detection on the screen.
Install LogRocket via npm or script tag. LogRocket.init() must be called client-side, not
server-side
$ npm i --save logrocket

// Code:

import LogRocket from 'logrocket';
LogRocket.init('app/id');
// Add to your HTML:

<script src="https://cdn.lr-ingest.com/LogRocket.min.js"></script>
<script>window.LogRocket && window.LogRocket.init('app/id');</script>

Why the future of DX might come from the web platform itself, not more tools or frameworks.

A hands-on test of Claude Code Review across real PRs, breaking down what it flagged, what slipped through, and how the pipeline actually performs in practice.

CSS art once made frontend feel playful and accessible. Here’s why it faded as the web became more practical and prestige-driven.

Learn how inline props break React.memo, trigger unnecessary re-renders, and hurt React performance — plus how to fix them.
Hey there, want to help make our blog better?
Join LogRocket’s Content Advisory Board. You’ll help inform the type of content we create and get access to exclusive meetups, social accreditation, and swag.
Sign up now

