Editor’s note: This post was updated on 2 June 2023 to provide additional details about packages for unzipping files in Node.js, as well as to provide information on unzipping a buffer to a directory.
As technology has advanced over the years, the need for more memory consumption and portability has grown. Many data compression technologies use underlying algorithms suitable for different operations and file sizes to address this concern. Some standard algorithms include ZIP, BZIP2, 7-ZIP, JPEG, PEG, and more.
Zip is one of the most popular data compression algorithms for reducing file size and increasing portability. When zipping a file, the zipping algorithm compresses the file or folder into a zip, where you can retrieve the file by extracting (unzipping) the original format.
Using zip files in your Node.js project effectively reduce file size while mitigating data loss for data sharing and transportation. In this tutorial, you’ll learn the best methods for zipping and unzipping files in Node.js using the decompress, adm-zip, zlib, unzipper, and jszip packages.
Jump ahead:
The decompress package is an npm package that simplifies archives extraction without blocking code execution using Promises.
To start unzipping with this package, install it with the command below:
npm install decompress
Next, import the package:
const decompress = require("decompress");
The imported decompress method expects three arguments:
.zip fileThe optional configuration object uses array methods, such as map or filter, to perform certain operations on the files before extracting them:
decompress("example.zip", "dist")
  .then((files) => {
    console.log(files);
  })
  .catch((error) => {
    console.log(error);
  });
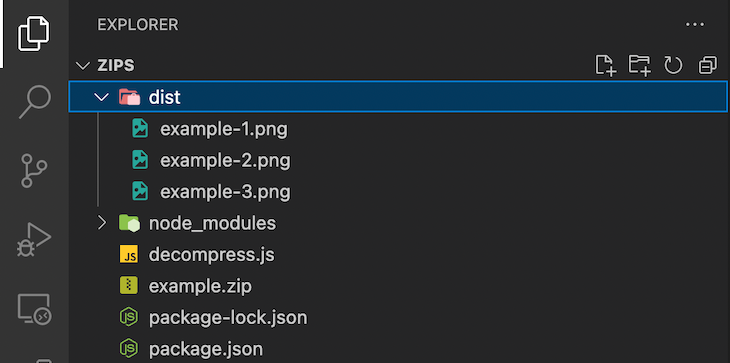
In the code block above, we used decompress to unzip the example.zip file and populate the dist folder with the resulting files.
Successfully running the code block above will populate your dist with the resulting files:
The adm-zip package is an npm package used for zip data compression that allows you to decompress zip files directly to the disk or memory buffers.
To start unzipping with this package, install it by running the command below:
npm install adm-zip
Then, import the package. Like so:
const AdmZip = require("adm-zip");
Next, create an adm-zip instance:
const zip = new AdmZip("./example.zip");
You can instantiate adm-zip with an existing .zip by providing the file path as an argument. Instantiating it with an existing .zip gives it access to the data in the file.
On the other hand, you can also instantiate it without an existing .zip. Thus, creating a new and empty file.
Then, you can extract the files whereadm-zip was instantiated by calling its extractAllTo method. This method takes a file path as an argument and populates the file path with the file’s contents.
Here’s how that works:
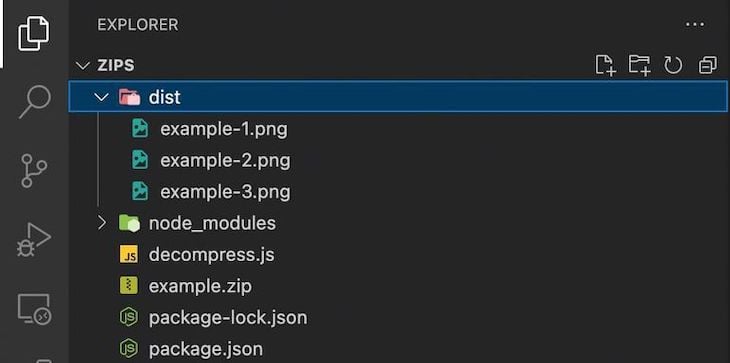
zip.extractAllTo("dist");
The code block above extracts all the files in example.zip and populates the dist folder with the extracted files:
Unlike the previous npm packages, the zlib package is a core Node.js module that provides data compression and decompression functionality using Gzip, Deflate/Inflate, and Brotli.
To unzip a file using this module, import node:zlib, the fs module, and pipeline:
const zlib = require("node:zlib");
const fs = require("fs");
const { pipeline } = require("node:stream");
The pipeline method provides an API to pipe a series of streams easily. This method takes three arguments: a source, a destination, and a callback.
Then, create an unzip instance by calling Zlib’s createUnzip method:
const unzip = zlib.createUnzip();
Next, create an input and output stream. The input stream should be the file path of the .zip and the output stream should be the file path for Zlib to write the exported data:
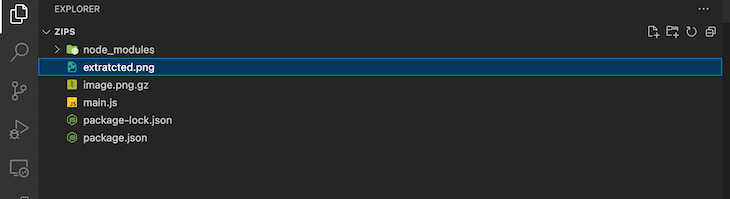
const input = fs.createReadStream("image.png.gz");
const output = fs.createWriteStream("extratcted.png");
Finally, pass your streams and unzip instance into the pipeline in the order below:
pipeline(input, unzip, output, (error) => {
  if (error) console.log(error);
});
The code block above will pipe the input stream through the unzip instance and populate the output streams with the unzipped data, as shown in the image below:
The unzipper package is an NPM package created as a replacement for the unzip package to address some of the package’s notable shortcomings, including its synchronous nature, unreliable triggering of open/close events, and a high memory footprint.
To unzip files using this package, install it by running the command below:
npm install unzipper
Next, import the package and the Node.js fs module:
const unzipper = require("unzipper");
const fs = require("fs");
The unzipper package uses the fs module’s createReadStream method to open and read the contents of a .zip file. The createReadStream takes a file path and a configuration object as arguments and returns an fs.ReadStreamobject.
The returned object is passed to the unzipper package’s Extract method using the Node.js stream’s pipe method.
Extract takes a configuration object specifying the file path where the unzipped files should reside. After the files have been unzipped, pipe emits a close event:
fs.createReadStream("example.zip")
  .pipe(unzipper.Extract({ path: "dist" }))
  .on("close", () => {
    console.log("Files unzipped successfully");
  });
Running the code block above successfully would populate your dist folder with the resulting unzipped files.
The next package we’ll look at is the jszip package. Jszip is an npm package that allows you to create, read, and edit .zip files. This package’s main functionality is making and manipulating .zip files.
Install the jszip package by running the command below:
npm install jszip
Next, import the package and the fs module:
const JsZip = require("jszip")
const fs = require("fs");
To create .zip files using jszip, you have to create a new instance of jszip:
// Initialize the zip file
const zip = new JsZip();
Next, you can add files to your .zip folder by calling the file method. This method takes three arguments: the path to the file, the contents of the file, and an optional information object.
The contents of the file argument can either be a string, Uint8Array, number[], ArrayBuffer, Blob, or a Node.js ReadableStream:
// Create a text file with the text "Hello World"
zip.file("hello.txt", "Hello World");
The code block above will create a hello.txt file in your project’s root directory and populate the file with the string “Hello, World!”
You can also add folders to your .zip file and add files to the folder using the folder method, which takes the folder’s name as an argument and returns a new jszip instance with the given folder as its root directory:
const images = zip.folder("images");
To add files to a created folder, call file directly on the jszip instance with the folder as its root directory:
images.file("image.png", fs.readFileSync("image.png"), {
      base64: true,
  });
To add base64 encoded data like images to your .zip file, the optional information object must have its base64 property set to true.
Next, generate your .zip file’s memory representation and convert it into a Node buffer so you can give it back to users. This process can be achieved using jszip’s generateAsync method, which generates a new archive asynchronously.
This method takes a configuration object that provides information about the type of data saved:
// Convert the zip file into a buffer
const generatedZip = await zip.generateAsync({ type: "nodebuffer" });
Finally, you can send back the created file using the fs module’s writeFileSync method:
// Save the zip file
fs.writeFileSync("generatedZip.zip", generatedZip);
The code block below is a completed example depicting how to create .zip files with the jszip:
(async () => {
  try {
    // Initialize the zip file
    const zip = new JsZip();

    // Create a text file with the text "Hello World"
    zip.file("hello.txt", "Hello World");

    // Make a new folder called images with a picture called images
    const images = zip.folder("images");
    //Add image.png to the images folder
    images.file("image.png", fs.readFileSync("image.png"), {
      base64: true,
    });

    // Convert the zip file into a buffer
    const generatedZip = await zip.generateAsync({ type: "nodebuffer" });

    // Save the zip file
    fs.writeFileSync("generatedZip.zip", generatedZip);
  } catch (error) {
    console.log(error);
  }
})();
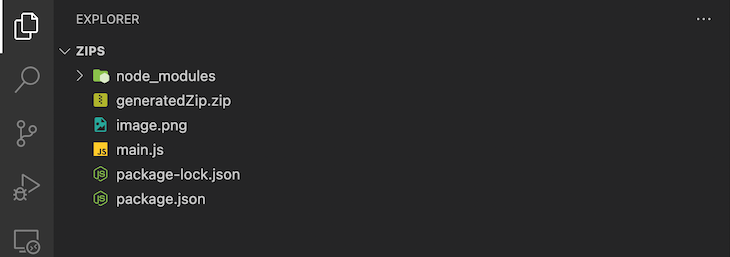
The code block above will generate the generatedZip.zip file:
You can also use jszip to read .zip files using the loadAsync method, which can take a buffered .zip as an argument and returns the contents of the .zip:
// Read a zip file
fs.readFile("generatedZip.zip", (err, data)=> {
  if (err) throw err;
  JsZip.loadAsync(data).then((zip) => {
    // Use zip data
  });
});
In the code block above, we used the fs module’s readFile method to read the contents of generatedZip.zip, giving you access to the data as a buffer. The buffer is then passed into the loadAsync method, which provides you access to the contents of the .zip when resolved.
Each package covered in this article has varying features, advantages, and trade-offs. Choosing a package for your Node.js project should depend on your project’s needs.
Here’s a table comparing the unzipping packages we’ve discussed. We’ll compare them based on developer experience, popularity, type of package, and their asynchronous nature:
| decompress | ADM-Zip | Zlib | unzipper | JsZip | |
|---|---|---|---|---|---|
| Developer Experience | Minimal syntax, easy to use and implement | Very easy to use | Complicated setup, dependency on Node.js streams | Easy to use with the fs module |
It provides a wide array of functionality and is beginner friendly |
| Popularity (NPM) | 2,966,560 weekly downloads | 3,526,251 weekly downloads | N/A | 2,022,298 weekly downloads | 6,197,551 weekly downloads |
| External Dependency | true | true | false | true | true |
| Asynchronous | true | false | true (optional) | false | true |
When conducting complex actions that need random access to the data, buffering content into memory can be beneficial. While using streams is the preferred method for consuming unzipped files, it is often more practical to get the entire buffered contents of each file.
The example below demonstrates how to extract buffer content to a given base folder using unzipper:
Run the following command:
npm install unzipper etl
N.B., ETL package provides a set of functions for extracting data from different sources, transforming and manipulating it to meet specific needs, and loading it into a target system
const unzipper = require("unzipper");
const etl = require("etl")
const fs = require("fs");

fs.createReadStream('examples.zip')
  .pipe(unzipper.Parse())
  .pipe(etl.map(async entry => {
    if (entry.path == "examples/bmw/bmw.jpg") {
      const content = await entry.buffer();
      fs.writeFile('output/data',content, (err) => {
        if (err)
          console.log(err);
        else {
          console.log("File extracted successfully");
        }
      });
    }
    else {
      entry.autodrain();
    }
  }))
Every entry has a buffer() method that consumes it by buffering the contents into storage and returning a promise to the entire buffer. When the above code is executed, a buffered file named data is generated inside an output directory. The output directory should be manually created to avoid throwing an error.
This article covered some of the most popular zip manipulation packages in the Node.js ecosystem and how to manipulate your .zip files using them. Hopefully, this provides a helpful guide for choosing which package suits your needs for your next Node.js project.
 Monitor failed and slow network requests in production
Deploying a Node-based web app or website is the easy part. Making sure your Node instance continues to serve resources to your app is where things get tougher. If you’re interested in ensuring requests to the backend or third-party services are successful, try LogRocket.

LogRocket lets you replay user sessions, eliminating guesswork around why bugs happen by showing exactly what users experienced. It captures console logs, errors, network requests, and pixel-perfect DOM recordings — compatible with all frameworks.
LogRocket's Galileo AI watches sessions for you, instantly identifying and explaining user struggles with automated monitoring of your entire product experience.
LogRocket instruments your app to record baseline performance timings such as page load time, time to first byte, slow network requests, and also logs Redux, NgRx, and Vuex actions/state. Start monitoring for free.

AI tools generate working React code fast, but miss race conditions, empty states, debouncing, and accessibility. Here’s how to catch bugs before production.

Learn how to use Gemini CLI subagents to delegate frontend, backend, testing, and docs tasks to specialized agents with guardrails and clear ownership.

Learn how next-browser gives AI agents runtime context for debugging Next.js apps, including React props, hydration, PPR, forms, and performance.

Build dynamic LLM routing in Next.js with OpenRouter, TanStack AI, task classification, model fallbacks, and cost-aware routing.
Would you be interested in joining LogRocket's developer community?
Join LogRocket’s Content Advisory Board. You’ll help inform the type of content we create and get access to exclusive meetups, social accreditation, and swag.
Sign up now

