
Authorization is the process of granting users access to the different parts and capabilities of a web application. A common way to authorize users is through access control, in which the admin of the site defines what permissions must be granted to users and other entities in order to access what resources.
Authorization must not be confused with authentication, which is the process of validating that a given user is who they claim to be, usually accomplished by providing account credentials. Once the user is authenticated, the authorization process must still be performed on every request, to make sure that the user has access to the requested resource.
What’s the best way to implement access control in GraphQL? In this article, we will find out.
The Replay is a weekly newsletter for dev and engineering leaders.
Delivered once a week, it's your curated guide to the most important conversations around frontend dev, emerging AI tools, and the state of modern software.
When accessing the application via GraphQL, we must validate whether or not the user has access to the requested elements from the schema. Should the authorization logic be coded within the GraphQL layer?
The answer is no. As GraphQL’s documentation makes clear, the authorization logic belongs to the business logic layer, and from there it is accessed by GraphQL. This way, the application can have a single source of truth for authorization, which can then be used for other access points, such as from a REST endpoint:
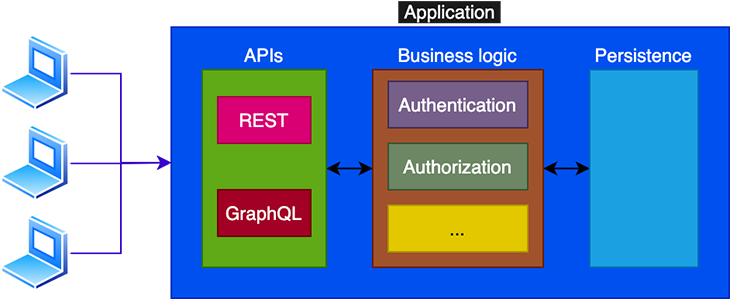
Among the several access control policies we can implement in our application, the two most popular ones are Role-Based Access Control (RBAC) and Attribute-Based Access Control (ABAC).
With Role-Based Access Control, we grant permissions based on roles, and then assign the roles to the users. For instance, WordPress has an administrator role with access to all resources, and the editor, author, contributor, and subscriber roles, which each restrict permissions in varying degrees, such as being able to create and publish a blog post, just create it, or just read it.
With Attribute-Based Access Control permissions are granted based on metadata that can be assigned to different entities, including users, assets, and environment conditions (such as the time of the day or the visitor’s IP address). For instance, in WordPress, the capability edit_others_posts is used to validate whether the user can edit other users’ posts.
In general terms, ABAC is preferable over RBAC because it allows us to configure permissions with fine-grained control, and the permission is unequivocal in its objective.
To use the WordPress example once more, the editor role has the capability edit_others_posts, but we may desire to allow a person with the author role to edit another author’s post. Yet, we can’t quite manage this without also granting them the rest of the permissions that an editor is granted, such as deleting other authors’ posts.
Hence, granting the capability edit_others_posts and checking for this condition is more adequate than checking for the editor role.
As said I earlier, the authorization logic is placed in the business layer, and that is where it will be accessed by the GraphQL layer. So, it’s in the business layer that we will decide which policy to implement for the application: ABAC, RBAC, a combination of them, or another one entirely.
Based on the employed policy, the GraphQL layer will validate whether the user has access to the requested fields from the schema, asking about conditions such as:
The validation can also be placed on the field itself, or be subjected to some environment factor. In this case, the following additional questions can be asked:
When the user does not possess the necessary permissions to access a requested field from the GraphQL schema, what error should be returned?
There are two possibilities, in conformity with the desired visibility for the schema: public or private.
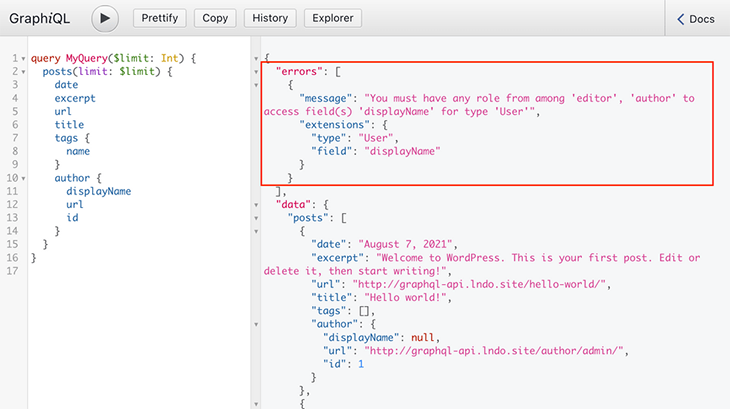
For the public schema, the exposed GraphQL schema is the same one for all users, and every field describes what permissions are required to access it. When requesting an inaccessible field, the error message will explain why the user is not granted access.
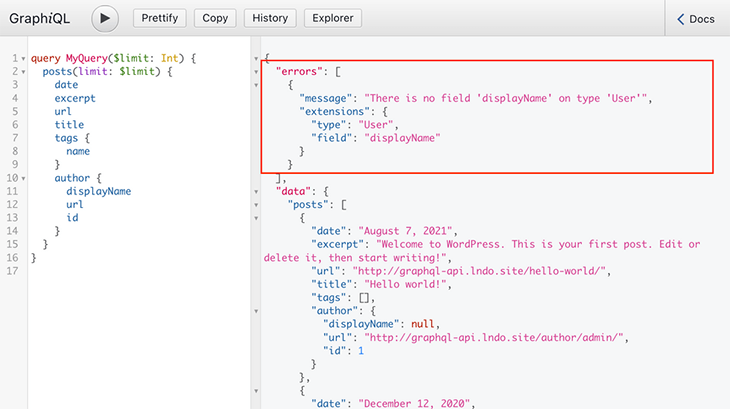
For the private schema, the GraphQL schema is customized to every user, and only those fields they can access will be exposed. When requesting an inaccessible field, the error message will state that the field does not exist.
It is a good idea to avoid tightly coupling the GraphQL layer and the authorization strategy you’ve presently chosen for the application. This is because if a different strategy is introduced in the future, the GraphQL layer can use it immediately, without the need for widespread updates throughout the codebase.
Consider the following example of placing authorization in resolvers using the Apollo server:
const resolvers = {
  users: (root, args, context) => {
    if (!context.user || !context.user.roles.includes('admin')) return null;
    return context.models.User.getAll();
  }
}
With this code, if we switch the access control policy to use capabilities instead of roles in the future, then we will need to update all corresponding fields throughout the codebase.
A better strategy is to keep access control in a specific place, as in this example using GraphQL modules:
// validate-role.ts
export const validateRole = (role) => (next) => (root, args, context, info) => {
  if (context.currentUser.role !== role) {
    throw new Error(`Unauthorized!`);
  }

  return next(root, args, context, info);
};

// articles-module.ts
import { GraphQLModule } from '@graphql-modules/core';

export const articlesModule = new GraphQLModule({
  typeDefs: gql`
    type Mutation {
      publishArticle(title: String!, content: String!): Article!
    }
  `,
  resolvers: {
    Mutation: {
      publishArticle: (root, { title, content }, { currentUser }) =>
        createNewArticle(title, content, currentUser),
    },
  },
});


// resolvers-composition.ts
import { authenticated } from './authenticated-guard';
import { validateRole } from './validate-role';

export const resolversComposition = {
  'Mutation.publishArticle': [authenticated, validateRole],
};
Or, in its further iteration, by using directives to place the restrictions when defining the schema via SDL:
type Mutation {
  publishArticle(title: String!, content: String!): Article!
    @auth
    @protect(role: "EDITOR")
}
In these other examples, when the policy changes, you can update from validateRole to validateCapability or from @protect(role: "EDITOR") to @protect(capability: "CAN_EDIT") in a single place and will still affect the entire GraphQL schema.
If the GraphQL server follows the code-first approach, the access control rules can be completely decoupled from the GraphQL layer, and injected on runtime as configuration via access control lists (ACLs).
This strategy relies on the code-first approach because the GraphQL schema is an artifact from code, so it can be generated and modified on runtime. This is required to define the visibility as private, where different schemas are exposed based on the permissions granted to the user. In contrast, with the SDL-first approach, the schema is already determined and cannot be modified when running the application.
By treating access control as configuration instead of code, the GraphQL layer will immediately reflect the changes of your access control policy, and you won’t need to update any code or recompile the schema.
This is the approach used by the GraphQL API for WordPress. It satisfies access control through the following directives:
@validateIsUserLoggedIn@validateIsUserNotLoggedIn@validateDoesLoggedInUserHaveAnyRole@validateDoesLoggedInUserHaveAnyCapabilityThese directives can be dynamically applied to the schema thanks to the IFTTT via directives strategy. It enables you to specify which directives must be applied to which fields, and what arguments they will receive. The resulting GraphQL schema is assembled on runtime, right before the resolution of the query.
When applied to authorization, deciding which directives are injected to the schema is done through access control lists, which are created and edited via a user interface:
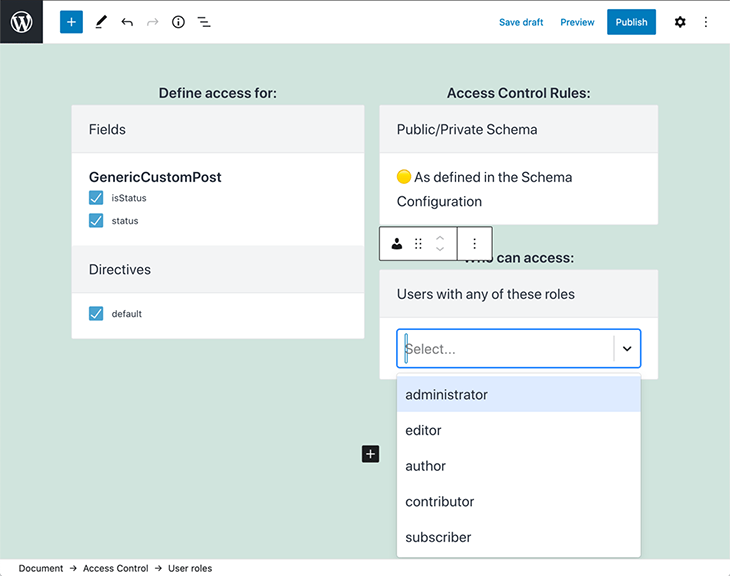
The site admin configures the ACL, selecting:
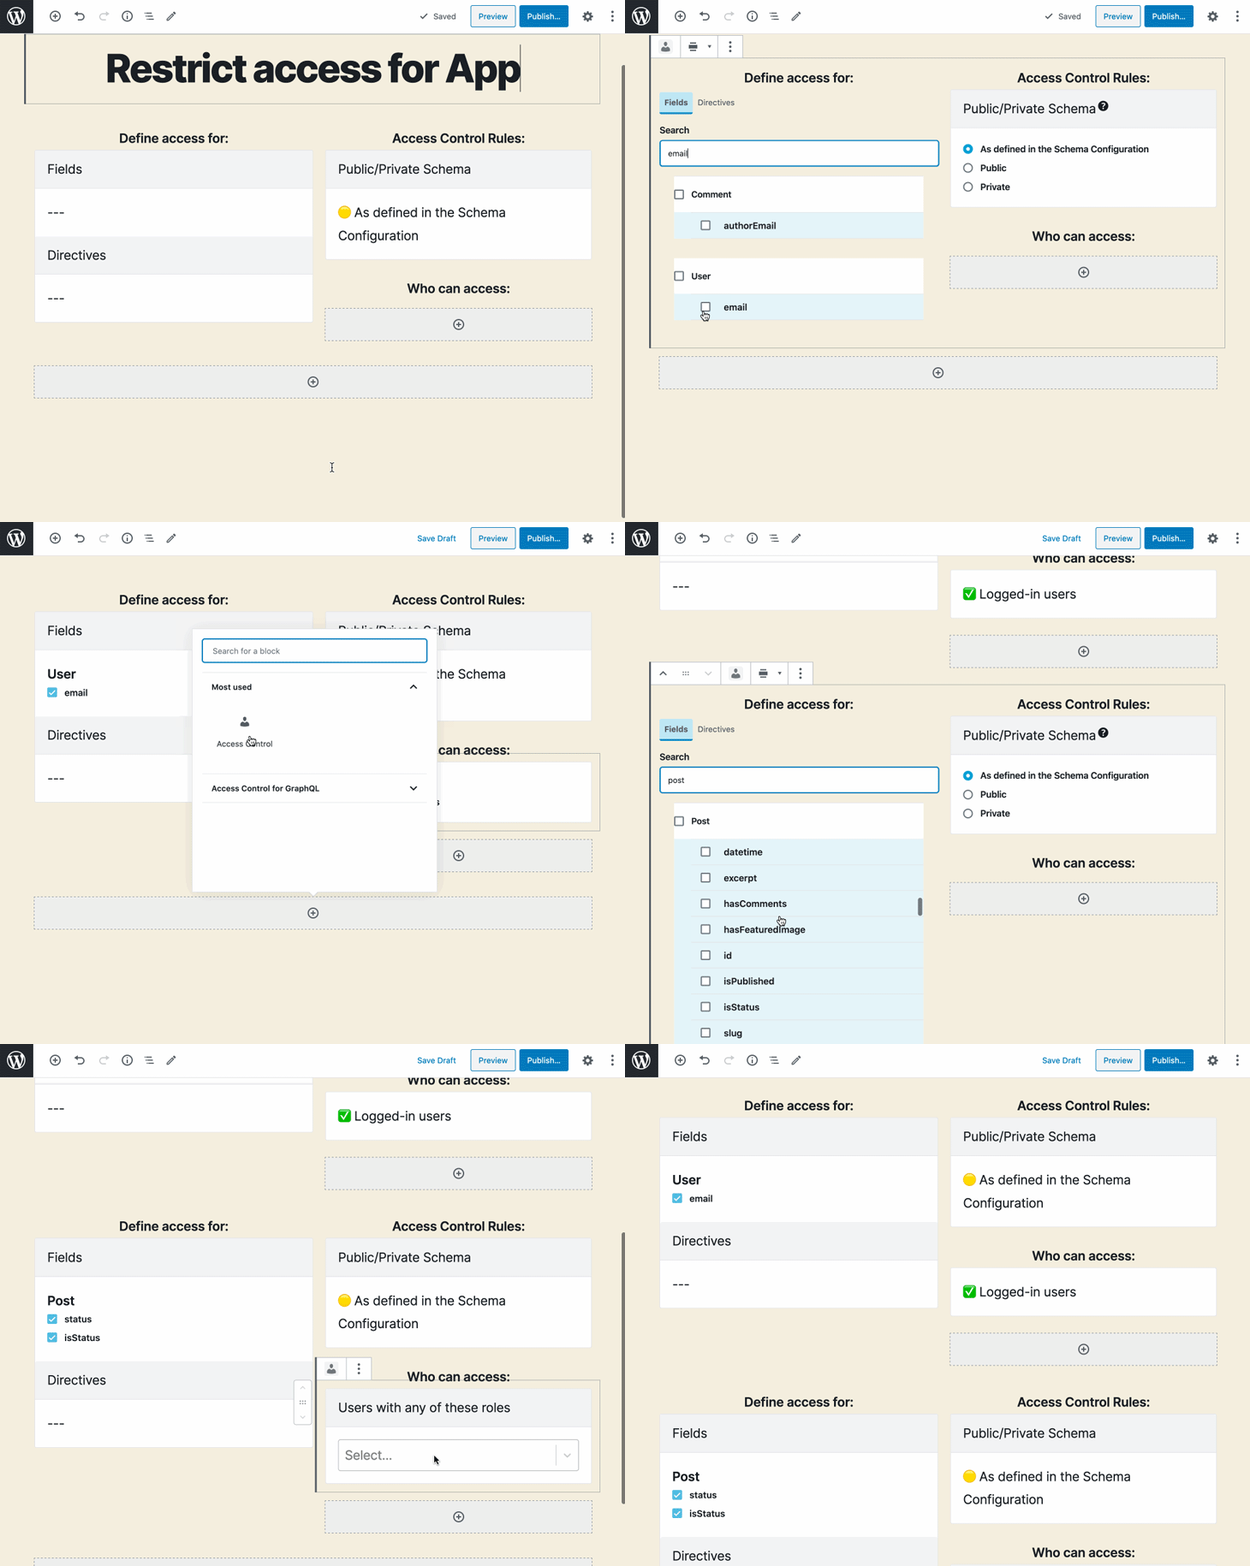
This configuration is then stored on an entry in the database. For instance, the entry below defines that the fields Media.author, Post.title, and MutationRoot.addCommentToCustomPost are accessible only to users with either the contributor role or with any capability from among edit_users, edit_others_posts, and read_private_posts:
 <!-- wp:graphql-api/access-control
{
 "typeFields": [
 "Media.author",
 "Post.title",
 "MutationRoot.addCommentToCustomPost"
 ]
}
-->

<!-- wp:graphql-api/access-control-user-roles
{
 "accessControlGroup": "roles",
 "value": [
   "contributor"
 ]
}
/-->

<!-- wp:graphql-api/access-control-user-capabilities
{
 "accessControlGroup": "capabilities",
 "value": [
   "edit_users",
   "edit_others_posts",
   "read_private_posts"
  ]
}
/-->

<!-- /wp:graphql-api/access-control -->
Finally, an AccessControlGraphQLQueryConfigurator service reads the configuration from the database and applies it to the GraphQL schema on runtime.
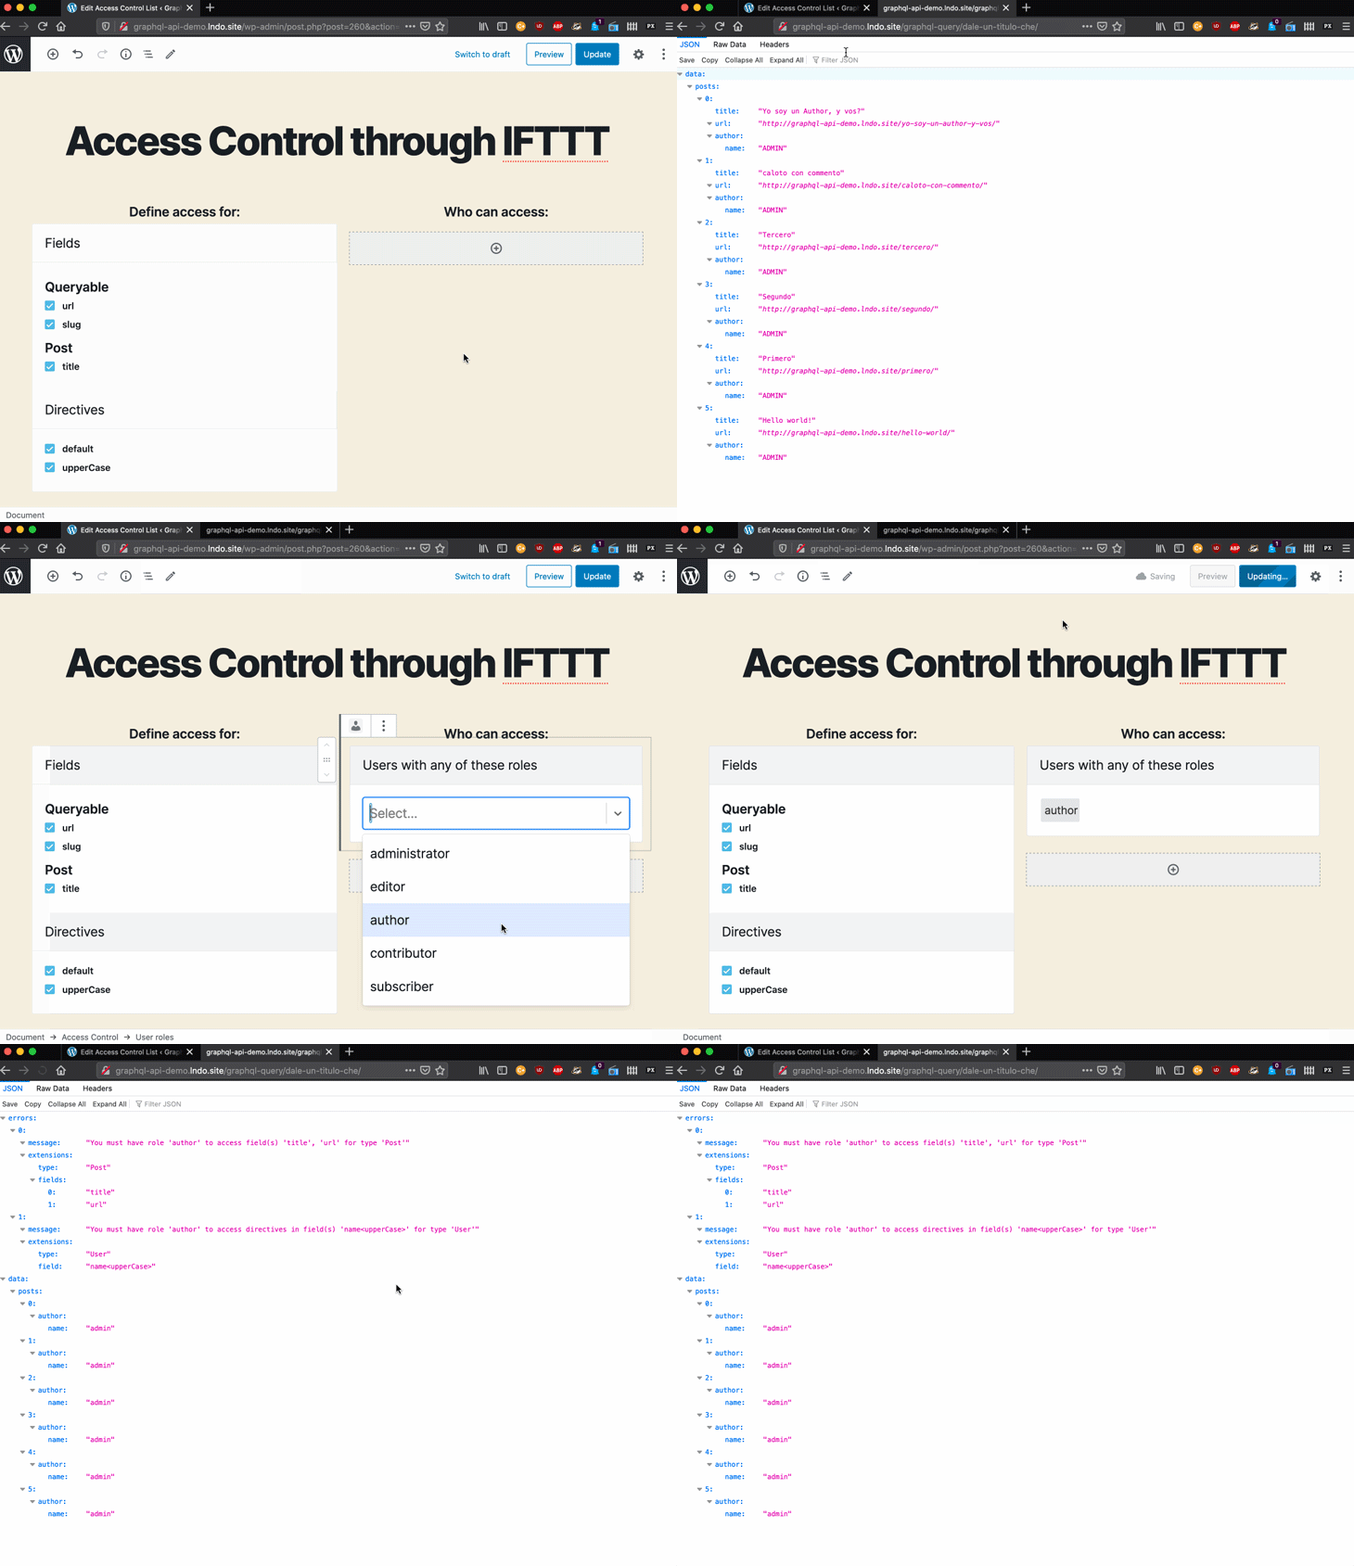
Now, the user can create a new access control rule, click Update, and see the changes applied immediately:
When working with GraphQL, unless the API is completely public, we will need to implement both authentication and authorization, to validate that the user is who they claim to be and to make sure the user has access to the requested resources, respectively.
In this article, we analyzed how to authorize users based on different access control policies, how to structure the application to use the authentication functionality from the business layer, and how to decouple the GraphQL layer from the business layer as to first minimize, and then completely remove, the impact of updating the access control policies.
While GraphQL has some features for debugging requests and responses, making sure GraphQL reliably serves resources to your production app is where things get tougher. If you’re interested in ensuring network requests to the backend or third party services are successful, try LogRocket.


LogRocket lets you replay user sessions, eliminating guesswork around why bugs happen by showing exactly what users experienced. It captures console logs, errors, network requests, and pixel-perfect DOM recordings — compatible with all frameworks.
LogRocket's Galileo AI watches sessions for you, instantly aggregating and reporting on problematic GraphQL requests to quickly understand the root cause. In addition, you can track Apollo client state and inspect GraphQL queries' key-value pairs.

@container scroll-state: Replace JS scroll listeners nowCSS @container scroll-state lets you build sticky headers, snapping carousels, and scroll indicators without JavaScript. Here’s how to replace scroll listeners with clean, declarative state queries.

Explore 10 Web APIs that replace common JavaScript libraries and reduce npm dependencies, bundle size, and performance overhead.

Russ Miles, a software development expert and educator, joins the show to unpack why “developer productivity” platforms so often disappoint.

Discover what’s new in The Replay, LogRocket’s newsletter for dev and engineering leaders, in the February 18th issue.
Hey there, want to help make our blog better?
Join LogRocket’s Content Advisory Board. You’ll help inform the type of content we create and get access to exclusive meetups, social accreditation, and swag.
Sign up now