
In this tutorial, we’ll demonstrate how to develop a Flutter App with Appwrite.

We’ll cover the following:
Throughout the tutorial, we’ll walk through some practical examples by building a demo app so you can see these Appwrite services in action.
The Replay is a weekly newsletter for dev and engineering leaders.
Delivered once a week, it's your curated guide to the most important conversations around frontend dev, emerging AI tools, and the state of modern software.
Appwrite is an open-source, self-hosted backend server that implements all the common, tedious, and repetitive tasks that are required on the backend side for any production-level app.
Appwrite can run on any operating system. It provides the Console UI to manage various services such as user authentication, account management, user preferences, database and storage, and much more.
To show what Appwrite can do, we’ll build an expense tracker app in which users are authenticated via the Appwrite Users service. We’ll store expense data using the Database service and upload the user’s profile picture using the Storage service.
Here’s what our example app will look like when it’s complete:
![]()
Appwrite offers the following services:
The Database API enables you to store app-related data in the form of collection and documents. Although it uses collection and documents, the data is stored in structured form and not the NoSql format.
The Database service allows you to query, filter, and manage the collection and documents. It also enforces read/write permission at the collection level.
The Storage service enables you to upload and download all your app-related files and media. You can also define the permission at the file level to manage who has access to it.
As the name suggests, the Users service is for managing users in your project. It enables you to implement authentication in your app and supports a wide range of OAuth2 providers, including Google, Facebook, Twitter, and GitHub.
With the Users API, you can search, block, and view your users’ information, current sessions, and latest activity logs.
The Functions API allows you to run any backend-related code based on any event. You can trigger a function based on the event supported by Appwrite services.
This service also enables you to run a function in a predefined schedule.
The Locale service allows you to find the user’s location and customize the app accordingly. It also shows you the user’s IP address, phone codes, and local currency.
You can install the Appwrite instance on your local computer or any cloud provider of your choice.
Let’s go over how to install Appwrite on your computer.
First, to run the Appwrite instance on your operating system, you need to install the Docker Desktop app.
Once the Docker app is installed, hit one of the following commands in your terminal, depending on your operating system.
For Mac and Linux:
docker run -it --rm \
    --volume /var/run/docker.sock:/var/run/docker.sock \
    --volume "$(pwd)"/appwrite:/usr/src/code/appwrite:rw \
    --entrypoint="install" \
    appwrite/appwrite:0.10.2
For Windows:
docker run -it --rm ^
    --volume //var/run/docker.sock:/var/run/docker.sock ^
    --volume "%cd%"/appwrite:/usr/src/code/appwrite:rw ^
    --entrypoint="install" ^
    appwrite/appwrite:0.10.2
After hitting the above command, you’ll be asked some questions related to configuring the Appwrite instance, such as setting the port number. You can agree to the default options or you can change them to suit your preferences. For example, you might decide to change the port number to 4003.
After the installation completes, make sure you can access the Appwrite instance by visiting http://localhost:portnumber/.
For our example, it’s:
http://localhost:4003/
Here is how it looks:
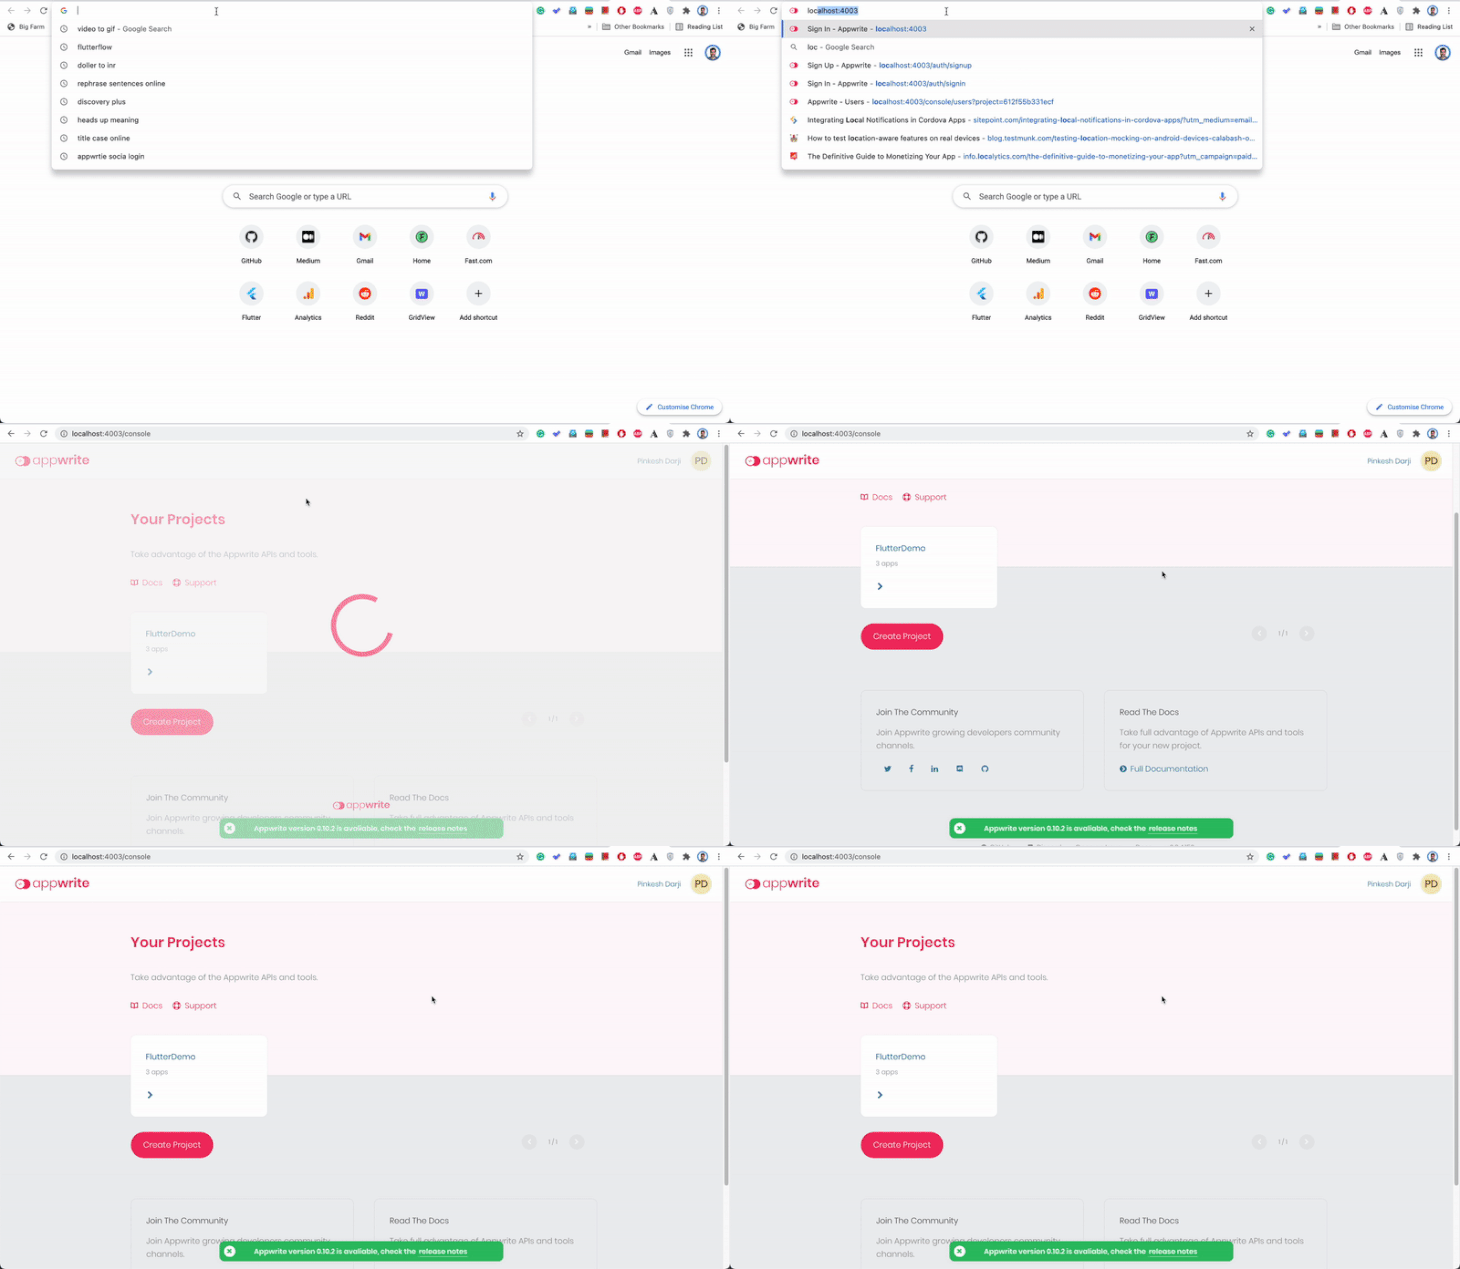
Now it’s time to configure our Appwrite project. The first thing you need is a project created in the console.
To create a project, click the Create Project button at the bottom, enter the project name, and hit Create.
Once the project is created, you should add a platform to the project. The platform simply refers to different apps. If you’re targeting both Android and iOS apps, then you must add two different platforms.
To add a platform:
applicationId in your app-level build.gradle file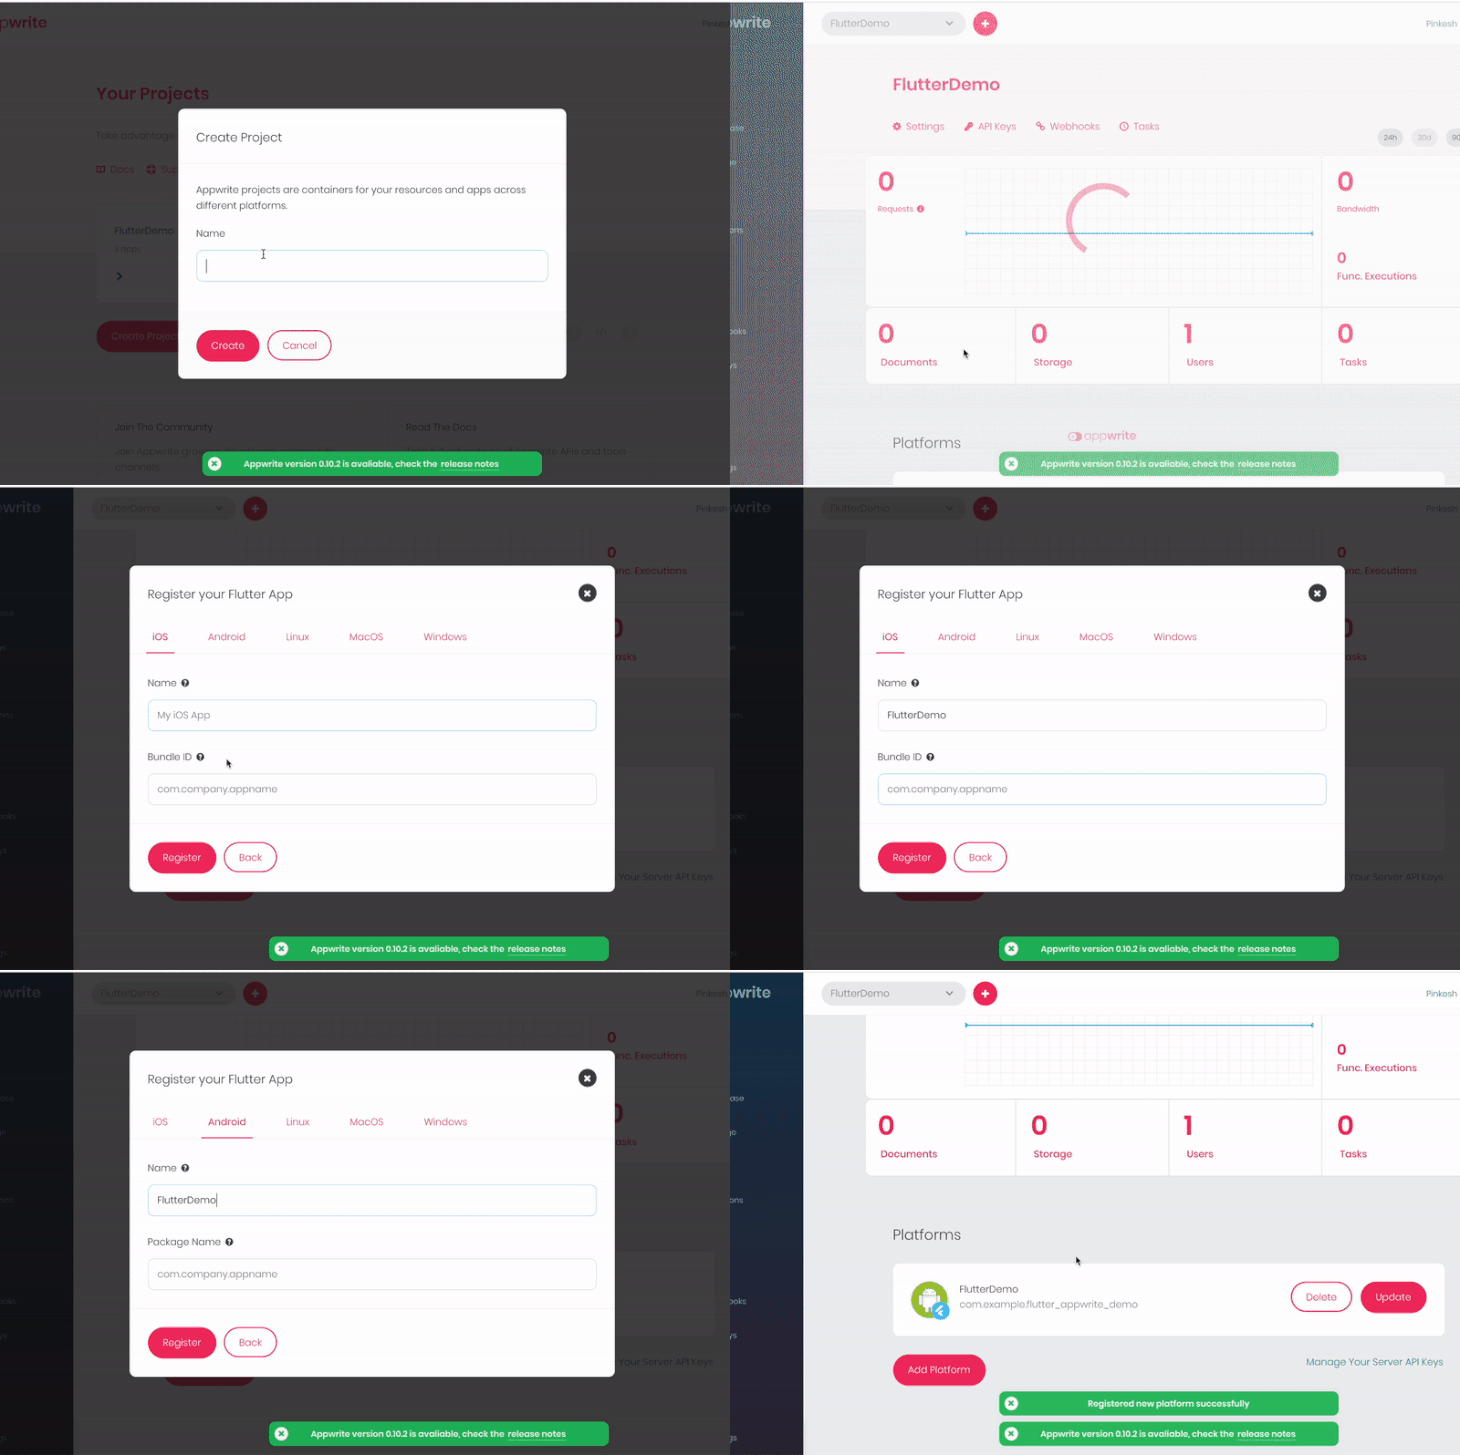
To use any Appwrite service, the most important plugin you need to install is appwrite, which enables the Flutter app to communicate with the Appwrite server.
dependencies:
  flutter:
    sdk: flutter
  cupertino_icons: ^1.0.2
  appwrite: ^1.0.2
Add the appwrite dependency (as shown above) in the pubspec.yaml file and enter the pub get command:
flutter pub get
Now that we have the Appwrite SDK integrated in our Flutter app, let’s create a user’s account from the app.
Before we start communicating with the Appwrite server, first we need to initialize the SDK:
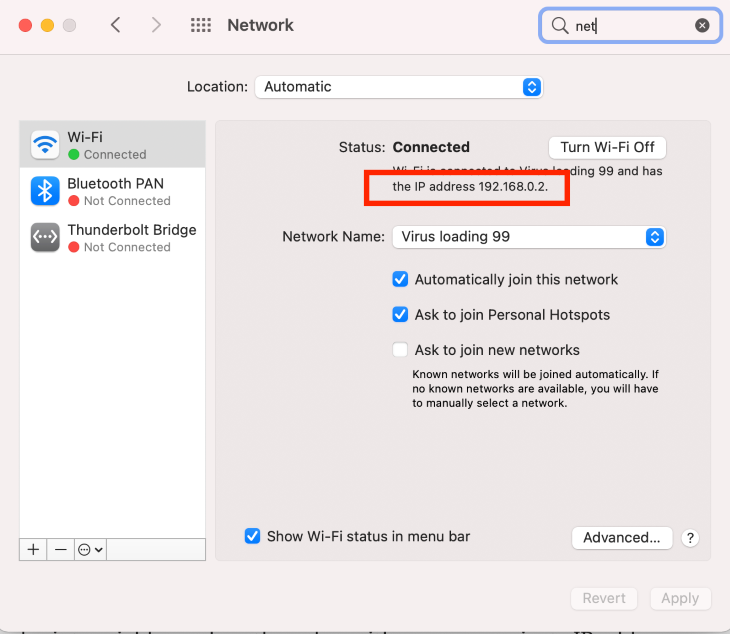
static const String endpoint = "http://192.168.0.2:4003/v1";
static const String projectId = "612f55b331ecf";

Client client = Client();
Account account;
client
    .setEndpoint(AppConstants.endpoint)
    .setProject(AppConstants.projectId);
account = Account(client);
In the endpoint variable, replace the value with your own private IP address. If you have a Mac, you can find it in your network settings.
In the projectId variable, enter your project ID. You can get it from the Settings page of the project (on the left-hand menu)
The code for designing the signup page looks like this:
ListView(
  shrinkWrap: true,
  padding: const EdgeInsets.all(16.0),
  children: <Widget>[
    const SizedBox(height: 20.0),
    TextField(
      controller: _name,
      decoration: InputDecoration(hintText: "name"),
    ),
    const SizedBox(height: 10.0),
    TextField(
      controller: _email,
      decoration: InputDecoration(hintText: "email"),
    ),
    const SizedBox(height: 10.0),
    TextField(
      controller: _password,
      obscureText: true,
      decoration: InputDecoration(
        hintText: "password",
      ),
    ),
    const SizedBox(height: 10.0),
    Center(
      child: ElevatedButton(
        child: Text("Signup"),
        onPressed: () {
          AuthState state =
              Provider.of<AuthState>(context, listen: false);
          state.createAccount(_name.text, _email.text, _password.text);
        },
      ),
    )
  ],
)
Here’s how to make an API call to register a user who clicks the signup button:
createAccount(String name, String email, String password) async {
  try {
    var result =
        await account.create(name: name, email: email, password: password);
    if (result.statusCode == 201) {
      _isLoggedIn = true;
      _user = await _getAccount();
      notifyListeners();
    }
  } catch (error) {
    print(error.message);
  }
}
The account.create method is responsible for making an API call. If the user is created successfully, we set the login flag to true and refresh the state so that it shows the homepage.
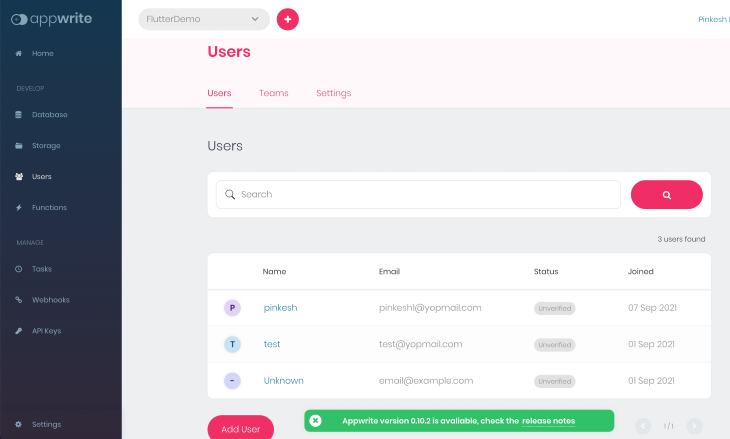
The newly created user will be shown in the Users section in your Appwrite console:
Now let’s use the user we just created to log into the app. The design of the login page looks like this:
ListView(
  shrinkWrap: true,
  padding: const EdgeInsets.all(16.0),
  children: <Widget>[
    const SizedBox(height: 20.0),
    TextField(
      controller: _email,
      decoration: InputDecoration(hintText: "email"),
    ),
    const SizedBox(height: 10.0),
    TextField(
      controller: _password,
      obscureText: true,
      decoration: InputDecoration(
        hintText: "password",
      ),
    ),
    const SizedBox(height: 10.0),
    Center(
      child: ElevatedButton(
        child: Text("Login"),
        onPressed: () {
          AuthState state =
              Provider.of<AuthState>(context, listen: false);
          state.login(_email.text, _password.text);
        },
      ),
    ),
    const SizedBox(height: 20.0),
    TextButton(onPressed: () => Navigator.pushNamed(context, AppRoutes.signup), child: Text("Create account"))
  ],
)
The login page consists of two TextFields for taking the email and password and an ElevatedButton to call the login API.
Here’s the code for implementing the login method:
login(String email, String password) async {
  try {
    Response result =
        await account.createSession(email: email, password: password);
    if (result.statusCode == 201) {
      _isLoggedIn = true;
      _user = await _getAccount();
      notifyListeners();
    }
  } catch (error) {
    print(error.message);
  }
}
The account.createSession method is responsible for logging in the user. If the user has entered valid and correct credentials, we set the login flag to true and refresh the state so that it shows the homepage.
The main feature of the demo app we’re building is the ability to note day-to-day expenses. To add expense data, we first need to create a database in the Appwrite console.
To create a database in Appwrite:
* value in the Read and Write Access input box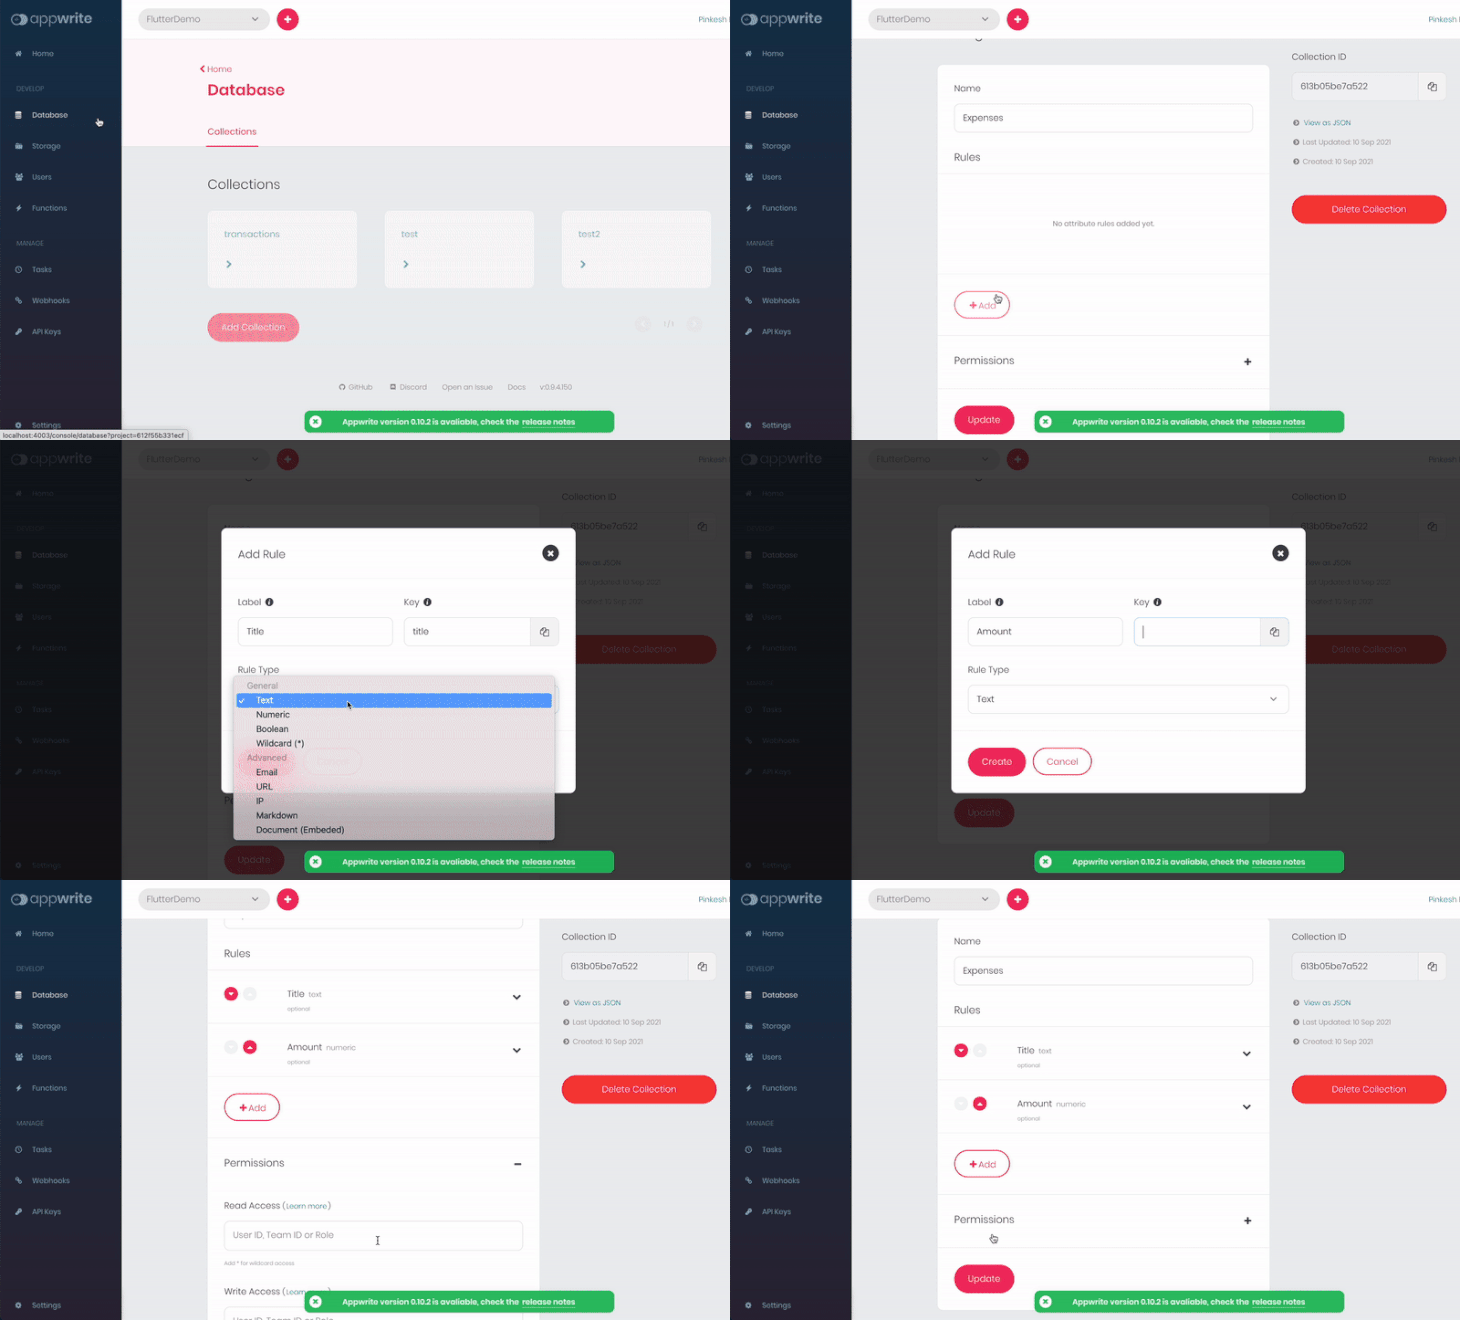
The code for adding an expense entry is as follows:
Client client = Client();
Database db;
client
    .setEndpoint(AppConstants.endpoint)
    .setProject(AppConstants.projectId);
db = Database(client);
final String collectionId = "xyz";
Future addTransaction(Transaction transaction) async {
  try {
    Response res = await db.createDocument(
        collectionId: collectionId,
        data: transaction.toJson(),
        read: ["user:${transaction.userId}"],
        write: ["user:${transaction.userId}"]);
    transactions.add(Transaction.fromJson(res.data));
    notifyListeners();
    print(res.data);
  } catch (e) {
    print(e.message);
  }
}
Replace the xyz with your collection ID, which you can find inside the collection under the Settings tab.
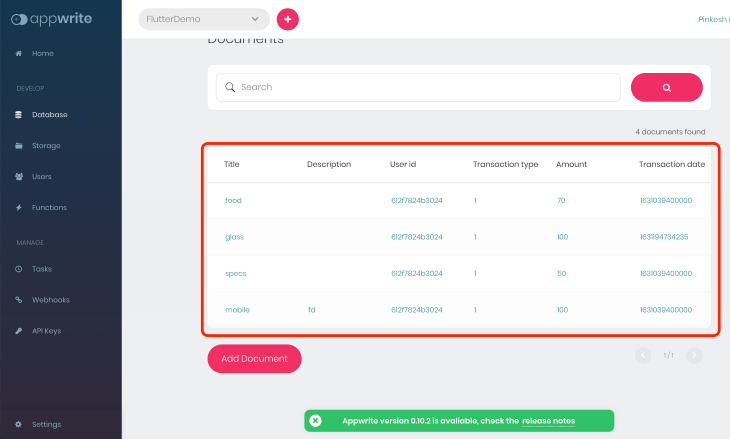
The db.createDocument method is responsible for adding the expense entry as the document in the collection specified.
The newly created expense entry will be shown inside the collection, like this:
Let’s say a user wants to set or change their default profile picture. We’ll use Appwrite’s Storge service to upload and store the user’s photo.
First, enable the onclick event by wrapping the CircleAvtar widget (which shows a default picture) inside the InkWell widget:
InkWell(
  onTap: () => _uploadPic(context),
  child: CircleAvatar(
    radius: 40,
    backgroundImage: file != null ? Image.file(
      file,
      //fit: BoxFit.cover,
    ).image : null,
  ),
)
Now, write a method that actually uploads the image:
_uploadPic(BuildContext context) async {
  XFile image = await ImagePicker().pickImage(source: ImageSource.gallery);
  setState(() {
    file = File(image.path);
  });
  if (file != null) {
    final upfile = await MultipartFile.fromFile(file.path,
        filename: file.path.split('/').last);
    AuthState state = context.read<AuthState>();
    Response res = await state.storage.createFile(
        file: upfile, read: ["*"], write: ["user:${state.user.id}"]);
    if (res.statusCode == 201) {
      String id = res.data["\$id"];

    }
  }
}
The await ImagePicker().pickImage () method from image_picker is used to pick the image from the gallery.
The selected image is set to CircleAvatart widget and then uploaded to the Appwrite server using the await state.storage.createFile method.
Find the full code used in this demo on GitHub.
In this tutorial, we demonstrated how to integrate Appwrite into a Flutter app. We also took a detailed look at how to use various Appwrite services, such as the Users, Database, and Storage APIs, with practical examples.
Install LogRocket via npm or script tag. LogRocket.init() must be called client-side, not
server-side
$ npm i --save logrocket

// Code:

import LogRocket from 'logrocket';
LogRocket.init('app/id');
// Add to your HTML:

<script src="https://cdn.lr-ingest.com/LogRocket.min.js"></script>
<script>window.LogRocket && window.LogRocket.init('app/id');</script>

@container scroll-state: Replace JS scroll listeners nowCSS @container scroll-state lets you build sticky headers, snapping carousels, and scroll indicators without JavaScript. Here’s how to replace scroll listeners with clean, declarative state queries.

Explore 10 Web APIs that replace common JavaScript libraries and reduce npm dependencies, bundle size, and performance overhead.

Russ Miles, a software development expert and educator, joins the show to unpack why “developer productivity” platforms so often disappoint.

Discover what’s new in The Replay, LogRocket’s newsletter for dev and engineering leaders, in the February 18th issue.
Hey there, want to help make our blog better?
Join LogRocket’s Content Advisory Board. You’ll help inform the type of content we create and get access to exclusive meetups, social accreditation, and swag.
Sign up now
One Reply to "Using Appwrite with Flutter: A tutorial with examples"
Awesome… 👍🏾 I’ll give Appwrite a try soon…