Editor’s note: This article was last reviewed and updated by Abiola Farounbi on 5 November 2024.

Angular has various kinds of tests:
Unit tests:
This kind of test focuses on testing small, isolated pieces of code, such as components, services, or pipes, without relying on external resources. Unit tests are quick to execute, straightforward to write, and highly efficient, offering maximum value with minimal effort. As a result, they should form the majority of your testing approach because they focus on particular functional units, ensuring that every component of your application operates as intended when used alone.
Integration tests:
These tests focus on testing how different units or modules of the application work together. Rather than testing individual components in isolation (as in unit tests), integration tests evaluate the interactions between those components to ensure they can function together as a system.
End-to-end (e2e) tests:
This type tests the functionality of an entire application by simulating real user interactions with the system. These tests are designed to ensure that all components, from the end-to-end work as expected. As a result, they are slower and more complex to write but are essential for ensuring that the application behaves correctly from the user’s perspective.
The various testing components are:
Component class testing:
This involves testing the logic and behavior of the component’s class without interacting with the UI or DOM elements. These tests are clean and simple, to validate the component’s methods, properties, and lifecycle hooks in isolation.
Isolated component testing:
This is a form of component testing where the component is tested independently, without its external dependencies like child components or services. Dependencies are typically mocked, allowing the focus to remain on the component’s logic and behavior. This type of testing is particularly useful for verifying the component’s internal methods and state changes.
In this Angular unit testing tutorial, we’ll demonstrate how to build a simple Angular app and then walk through the unit testing process step by step with examples. To follow along with this tutorial, you should have a basic understanding of how to use Angular. You can find the source code for this project in this GitHub repository.
Angular unit testing enables you to test your app based on user behavior. While testing each possible behavior would be tedious, inefficient, and ineffective, writing tests for each coupling block in your application can help demonstrate how these blocks behave.
One of the easiest ways to test the strengths of these blocks is to write a test for each one. You don’t necessarily need to wait until your users complain about how the input field behaves when the button is clicked. By writing a unit test for your blocks (components, services, etc.), you can easily detect when there is a break.
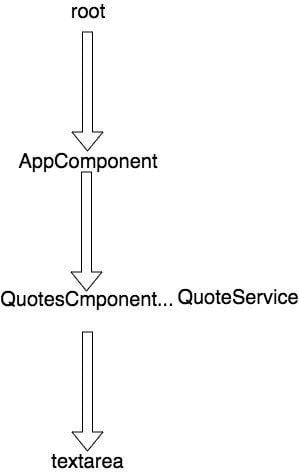
Our example Angular app has a service, a component, and an async task to simulate data being fetched from the server:

When you create a new project with the Angular CLI (ng new appName), a default component and test file are added. Also — if, like me, you’re always looking for a shortcut — a test script is always created alongside any component module (service, component) you create using the Angular CLI. This test script ends with .spec.ts.
By default, Angular runs on Karma, a JavaScript test runner that runs the unit test snippet in Angular. Karma also ensures the test results are printed out either in the console or in the file log. Other test runners include Mocha and Jasmine. Karma provides tools that make it easier to call Jasmine tests while writing code in Angular.
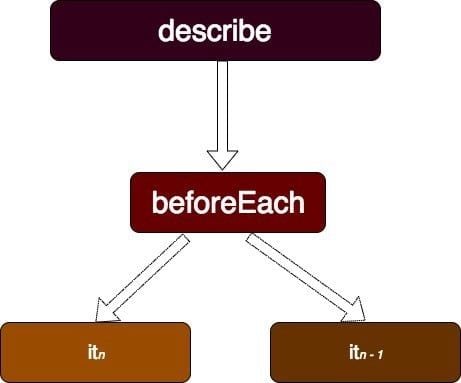
The Angular testing package includes two utilities called TestBed and async. TestBed is the main Angular utility package. The describe container contains different blocks (it, beforeEach, xit, etc.). beforeEach runs before any other block. Other blocks do not depend on each other to run:
From the app.component.spec.ts file in your newly generated Angular project, the first block is the beforeEach inside the container (describe). This is the only block that runs before any other block (it). The declaration of the app module in the app.module.ts file is simulated (declared) in the beforeEach block. The component (AppComponent) declared in the beforeEach block is the main component we want to have in this testing environment. The same logic applies to other test declarations.
The compileComponents object is called to compile your component’s resources like the template, styles, etc. You might not necessarily compile your component if you are using webpack:
beforeEach(async(() => {
   TestBed.configureTestingModule({
      declarations: [
         AppComponent
      ],
   }).compileComponents();
}));
Now that the component has been declared in the beforeEach block, let’s check if the component is created.
fixture.debugElement.componentInstance creates an instance of the class (AppComponent). We will test to see if the instance of the class is truly created or not using toBeTruthy:
it('should create the app', async(() => {
    const fixture = TestBed.createComponent(AppComponent);
    const app = fixture.debugElement.componentInstance;
    expect(app).toBeTruthy();
}));
The third block demonstrates how you can have access to the properties of the created component (AppComponent). The only property added by default is the title. You can easily check if the title you set has changed or not from the instance of the component (AppComponent) created:
it(`should have as title 'angular-unit-test'`, async(() => {
     const fixture = TestBed.createComponent(AppComponent);
     const app = fixture.debugElement.componentInstance;
     expect(app.title).toEqual('angular-unit-test');
}));
The fourth block demonstrates how the test behaves in the browser environment. After creating the component, an instance of the created component (detectChanges) to simulate running on the browser environment is called.
Now that the component has been rendered, you can have access to its child element by accessing the nativeElelment object of the rendered component (fixture.debugElement.nativeElement):
it('should render title in a h1 tag', async(() => {
   const fixture = TestBed.createComponent(AppComponent);
   fixture.detectChanges();
   const compiled = fixture.debugElement.nativeElement;
 expect(compiled.querySelector('h1').textContent).toContain('Welcome to angular-unit-test!');
}));
Now that you have familiarized yourself with the basics of testing a component, let’s test our Angular example application:
Services often depend on other services that Angular injects into the constructor. In many cases, it is easy to create and inject these dependencies by adding providedIn: root to the injectable object, which makes it accessible by any component or service:
import { Injectable } from "@angular/core";
import { QuoteModel } from "../model/QuoteModel";

@Injectable({
  providedIn: "root"
})
export class QuoteService {
  public quoteList: QuoteModel[] = [];

  private daysOfTheWeeks = ["Sun", "Mon", "Tue", "Wed", "Thurs", "Fri", "Sat"];

  constructor() {}

  addNewQuote(quote: String) {
    const date = new Date();
    const dayOfTheWeek = this.daysOfTheWeeks[date.getDate()];
    const day = date.getDay();
    const year = date.getFullYear();
    this.quoteList.push(
      new QuoteModel(quote, `${dayOfTheWeek} ${day}, ${year}`)
    );
  }

  getQuote() {
    return this.quoteList;
  }

  removeQuote(index:number) {
    this.quoteList.splice(index, 1);
  }
}
Here are a few ways to test the QuoteService class:
/* tslint:disable:no-unused-variable */
import { QuoteService } from "./Quote.service";

describe("QuoteService", () => {
  let service: QuoteService;

  beforeEach(() => {
    service = new QuoteService();
  });
In the first block, beforeEach, an instance of QuoteService is created to ensure it is only created once and to avoid repetition in other blocks except for some exceptional cases.
This first block tests if the post model QuoteModel(text, date) is created into an array by checking the length of the array. The length of quoteList is expected to be 1:
it("should create a post in an array", () => {
    const qouteText = "This is my first post";
    service.addNewQuote(qouteText);
    expect(service.quoteList.length).toBeGreaterThanOrEqual(1);
  });
This second block creates a post in an array and removes it immediately by calling removeQuote in the service object. The length of the quoteList is expected to be 0:
it("should remove a created post from the array of posts", () => {
    service.addNewQuote("This is my first post");
    service.removeQuote(0);
    expect(service.quoteList.length).toBeLessThan(1);
  });
In our Angular unit testing example app, the service is injected into the QuoteComponent to access its properties, which will be needed by the view:
import { Component, OnInit } from '@angular/core';
import { QuoteService } from '../service/Quote.service';
import { QuoteModel } from '../model/QuoteModel';

@Component({
  selector: 'app-Quotes',
  templateUrl: './Quotes.component.html',
  styleUrls: ['./Quotes.component.css']
})
export class QuotesComponent implements OnInit {

  public quoteList: QuoteModel[];
  public quoteText: String ="";

  constructor(private service: QuoteService) { }

  ngOnInit() {
    this.quoteList = this.service.getQuote();
  }

  createNewQuote() {
    this.service.addNewQuote(this.quoteText);
    this.quoteText ="";
  }

  removeQuote(index) {
    this.service.removeQuote(index);
  }
}
<div class="container-fluid">
  <div class="row">
    <div class="col-8 col-sm-8 mb-3 offset-2">
      <div class="card">
        <div class="card-header">
          <h5>What Quote is on your mind ?</h5>
        </div>
        <div class="card-body">
          <div role="form">
            <div class="form-group col-8 offset-2">
              <textarea #quote class="form-control" rows="3" cols="8" [(ngModel)]="quoteText" name="quoteText"></textarea>
            </div>
            <div class="form-group text-center">
              <button class="btn btn-primary" (click)="createNewQuote()" [disabled]="quoteText == null">Create a new
                quote</button>
            </div>
          </div>
        </div>
      </div>
    </div>
  </div>

  <div class="row">
    <div class="card mb-3 col-5 list-card" id="quote-cards" style="max-width: 18rem;" *ngFor="let quote of quoteList; let i = index"
      (click)="removeQuote(i)">
      <div class="card-body">
        <h6>{{ quote.text }}</h6>
      </div>
      <div class="card-footer text-muted">
        <small>Created on {{ quote.timeCreated }}</small>
      </div>
    </div>
  </div>
</div>
The first two blocks in the describe container run consecutively. In the first block, FormsModule is imported into the configure test. This ensures the form’s related directives, such as ngModel, can be used.
Also, the QuotesComponent is declared in the configTestMod, similar to how the components are declared in ngModule residing in the appModule file. The second block creates a QuoteComponent and its instance, which will be used by the other blocks:
let component: QuotesComponent;
  let fixture: ComponentFixture<QuotesComponent>;

  beforeEach(() => {
    TestBed.configureTestingModule({
      imports: [FormsModule],
      declarations: [QuotesComponent]
    });
  });

  beforeEach(() => {
    fixture = TestBed.createComponent(QuotesComponent);
    component = fixture.debugElement.componentInstance;
  });
This block tests if the instance of the component that is created is defined:
it("should create Quote component", () => {
    expect(component).toBeTruthy();
  });
The injected service handles the manipulation of all operations (add, remove, fetch). The quoteService variable holds the injected service (QuoteService). At this point, the component is yet to be rendered until the detectChanges method is called:
it("should use the quoteList from the service", () => {
    const quoteService = fixture.debugElement.injector.get(QuoteService);
    fixture.detectChanges();
    expect(quoteService.getQuote()).toEqual(component.quoteList);
  });
Now let’s test whether we can successfully create a post. The properties of the component can be accessed upon instantiation, so the rendered component detects the new changes when a value is passed into the quoteText model.
The nativeElement object gives access to the HTML element rendered, which makes it easier to check if the quote added is part of the texts rendered:
it("should create a new post", () => {
    component.quoteText = "I love this test";
    fixture.detectChanges();
    const compiled = fixture.debugElement.nativeElement;
    expect(compiled.innerHTML).toContain("I love this test");
  });
Apart from having access to the HTML contents, you can also get an element by its CSS property. When the quoteText model is empty or null, the button is expected to be disabled:
it("should disable the button when textArea is empty", () => {
    fixture.detectChanges();
    const button = fixture.debugElement.query(By.css("button"));
    expect(button.nativeElement.disabled).toBeTruthy();
  });
it("should enable button when textArea is not empty", () => {
    component.quoteText = "I love this test";
    fixture.detectChanges();
    const button = fixture.debugElement.query(By.css("button"));
    expect(button.nativeElement.disabled).toBeFalsy();
  });
Just like the way we access an element with its CSS property, we can also access an element by its class name. Multiple classes can be accessed at the same time using By e.g By.css(‘.className.className’).
The button clicks are simulated by calling triggerEventHandler. The event type must be specified which, in this case, is click. A quote displayed is expected to be deleted from the quoteList when clicked on:
it("should remove post upon card click", () => {
    component.quoteText = "This is a fresh post";
    fixture.detectChanges();

    fixture.debugElement
      .query(By.css(".row"))
      .query(By.css(".card"))
      .triggerEventHandler("click", null);
    const compiled = fixture.debugElement.nativeElement;
    expect(compiled.innerHTML).toContain("This is a fresh post");
  });
Inevitably, you’ll eventually need to fetch data remotely. This operation is best treated as an asynchronous task.
fetchQoutesFromServer represents an async task that returns an array of quotes after two seconds:
fetchQuotesFromServer(): Promise<QuoteModel[]> {
    return new Promise((resolve, reject) => {
      setTimeout(() => {
        resolve([new QuoteModel("I love unit testing", "Mon 4, 2018")]);
      }, 2000);
    });
  }
spyOn objects simulate how the fetchQuotesFromServer method works. It accepts two arguments: quoteService, which is injected into the component, and the fetchQuotesFromServer method.
fetchQuotesFromServer is expected to return a promise. spyOn chains the method using and with a fake promise call, which is returned using returnValue. Because we want to emulate how the fetchQuotesFromServer works, we need to pass a promise that will resolve with a list of quotes.
Just as we did before, we’ll call the detectChanges method to get the updated changes. whenStable allows access to the results of all async tasks when they are done:
it("should fetch data asynchronously", async () => {
    const fakedFetchedList = [
      new QuoteModel("I love unit testing", "Mon 4, 2018")
    ];
    const quoteService = fixture.debugElement.injector.get(QuoteService);
    let spy = spyOn(quoteService, "fetchQuotesFromServer").and.returnValue(
      Promise.resolve(fakedFetchedList)
    );
    fixture.detectChanges();
    fixture.whenStable().then(() => {
      expect(component.fetchedList).toBe(fakedFetchedList);
    });
  });
Pipes and directives are key elements in Angular applications, crucial for transforming data and improving user interaction. Pipes allow data to be safely transformed before it’s displayed, ensuring that what users see is well formatted. Directives add behavior to HTML elements, enhancing the user interface. Therefore, testing these components is important to avoid unexpected errors or failures that could negatively impact the user experience.
The most effective way to test your Angular pipes is by isolating them during the testing phase to evaluate how they handle a variety of inputs and edge cases, such as null or undefined values.
Let’s say, in our app, we have an Angular pipe that formats dates before displaying them to the users. We need to write a test that covers a range of inputs to validate consistent and accurate transformations, like in the code snippet below:
import { DateFormatPipe } from './date-format.pipe';

describe('DateFormatPipe', () => {
  const pipe = new DateFormatPipe();

  it('should format "2023-12-15" to "15/12/2023"', () => {
    expect(pipe.transform('2023-12-15')).toBe('15/12/2023');
  });

  it('should handle null input by returning an empty string', () => {
    expect(pipe.transform(null)).toBe('');
  });
});
Adding test cases like this in an Angular pipe will help us ship a performant application that provides values to the users.
To do this, you’ll need to create a host component within your tests that acts as a sandbox, allowing you to apply the directive and observe its impact in a controlled environment. Assuming we have a directive, HighlightQuoteDirective, that changes the background color of a quote when it’s selected.
To ensure it works as expected, your tests have to properly verify that the element’s visibility changes according to the directive’s logic:
import { Component } from '@angular/core';
import { TestBed, ComponentFixture } from '@angular/core/testing';
import { HighlightQuoteDirective } from './highlight-quote.directive';

@Component({
  template: `
    <div [appHighlightQuote]="isSelected" class="quote">Test Quote</div>
  `
})
class TestQuoteComponent {
  isSelected = false;
}

describe('HighlightQuoteDirective', () => {
  let component: TestQuoteComponent;
  let fixture: ComponentFixture<TestQuoteComponent>;

  beforeEach(() => {
    TestBed.configureTestingModule({
      declarations: [TestQuoteComponent, HighlightQuoteDirective]
    });

    fixture = TestBed.createComponent(TestQuoteComponent);
    component = fixture.componentInstance;
  });

  it('should highlight quote when selected', () => {
    component.isSelected = true;
    fixture.detectChanges();
    expect(fixture.nativeElement.querySelector('.quote').style.backgroundColor).toBe('yellow');
  });

  it('should not highlight quote when not selected', () => {
    fixture.detectChanges();
    expect(fixture.nativeElement.querySelector('.quote').style.backgroundColor).toBe('');
  });
});
The above test serves as a blueprint that checks whether the directive correctly applies a style like changing the background color when a quote is selected or not.
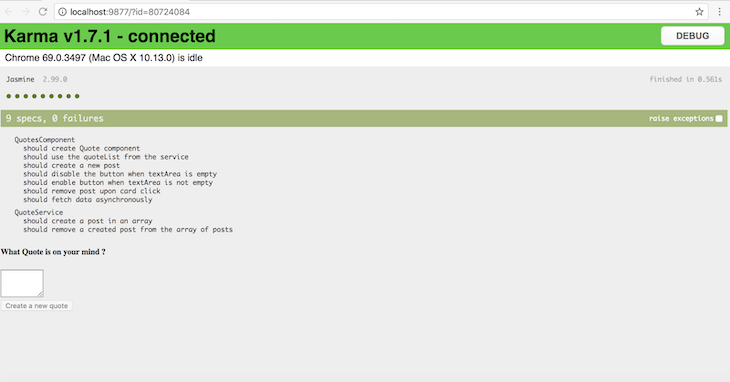
Once your tests are completed to get a better visualization of the test results, Angular ensures that test results are viewed in your browser by running this command.
ng test
When you use the Angular CLI to scaffold a project, it generates unit test specs for the default app component. Following the initial project setup, we’ll need to write test specifications for each component, directive, and more.
In most cases, this will be time-consuming because we will have to write these specifications from the ground up. Fortunately, the Angular ecosystem created the ngentest package to automate the generation of test specs for each component, directive, and others.
Assuming you wrote the code for your component and want to write a test for it, you’ll have to install the ngentest package:
$ npm install ngentest -g
Next, you’ll run the following command to auto-generate the unit test specs for your component:
$ gentest component-name.ts
We can also auto-generate the unit test specs for directives, pipes, and services:
$ gentest directive-name.ts -s # output to directive-name.spec.ts
$ gentest pipe-name.ts # output to pipe-name.test.ts
$ gentest service-name.ts. # output to service-name.test.ts
Mocking dependencies in Angular tests is simply creating a replica of any external dependencies in your code. In this type of test, you’d typically replace the services, functions, or objects that your code interacts with, with a fake version that mimics the original dependencies. Still, they do not need to replicate all their functionalities.
When mocking dependencies in your tests, there are a few important principles you’ll need to follow:
Let me explain this with an example. Assuming our QuoteService depends on a AuthorService, you’ll need to test QuoteService without actually invoking the real AuthorService.
So, you’ll first create a mock version of the AuthorService that will implement the same methods as the real service but with simplified logic suitable for testing purposes:
class MockAuthorService {
  getAuthorDetails(authorId: number): any {
    // Mock implementation
    // Return mock author details based on the authorId
    if (authorId === 1) {
      return { name: 'Mock Author', genre: 'Fiction' };
    }
    return null;
  }
}
Then, you’ll replace the real AuthorService with the mock version when creating an instance of the QuoteService:
let quoteService: QuoteService;
let mockAuthorService: MockAuthorService;

beforeEach(() => {
  mockAuthorService = new MockAuthorService();
  quoteService = new QuoteService(mockAuthorService);
});

it('should retrieve author details for a given quote', () => {
  const authorDetails = quoteService.getAuthorByQuoteId(1);
  expect(authorDetails).toEqual({ name: 'Mock Author', genre: 'Fiction' });
});
In the above code, QuoteService will be tested in isolation, with AuthorService's behavior being controlled and predicted through the mock. This approach allows you to test how QuoteService interacts with AuthorService without relying on the actual implementation of AuthorService.
Unit testing is an important part of the continuous integration and delivery (CI/CD) pipeline. It helps to ensure that applications remain reliable and secure during development and deployment.
In the CI/CD process, all the stages of code from development to production are streamlined and automated, and unit testing is integrated at various stages of this pipeline to ensure that each line of code is functional and error-free.
Every time a new feature or bug fix is added to the code during the CI phase, the process that runs the unit tests is automatically triggered. These tests are made to carefully evaluate individual units of code, functions, components, or services in the application to verify they work as expected.
Then, when a unit of the test fails, a process is halted, and the developer is notified of the issues.
Once the code passes all unit tests in the CI phase, it moves into continuous deployment and must again pass all unit tests. This step serves as a final check to ensure that the code is not only functionally correct but also stable and reliable. It provides a safety net that prevents untested or faulty code from being released to end users.
In this tutorial, we covered the fundamentals of testing Angular components, services, pipes, and directives. We also highlighted the important role unit testing plays in building high-quality Angular applications that are both reliable and scalable.
You can find the source code for this project in this GitHub repository.

LogRocket lets you replay user sessions, eliminating guesswork by showing exactly what users experienced. It captures console logs, errors, network requests, and pixel-perfect DOM recordings — compatible with all frameworks, and with plugins to log additional context from Redux, Vuex, and @ngrx/store.
With Galileo AI, you can instantly identify and explain user struggles with automated monitoring of your entire product experience.
Modernize how you understand your web and mobile apps — start monitoring for free.
Hey there, want to help make our blog better?
Join LogRocket’s Content Advisory Board. You’ll help inform the type of content we create and get access to exclusive meetups, social accreditation, and swag.
Sign up now
Learn how OpenAPI can automate API client generation to save time, reduce bugs, and streamline how your frontend app talks to backend APIs.

Discover how the Interface Segregation Principle (ISP) keeps your code lean, modular, and maintainable using real-world analogies and practical examples.

<selectedcontent> element improves dropdowns

Learn how to implement an advanced caching layer in a Node.js app using Valkey, a high-performance, Redis-compatible in-memory datastore.


5 Replies to "Angular unit testing tutorial with examples"
A great Post! There is only one question in “The button clicks are simulated by calling the triggerEventHandler” code. Why are you still checking toContain(“This is a fresh post”) as it is supposed to be deleted.
Hello, I asked myself the same question.
Very Nice post, It had helped me a lot in understanding the concepts.
I don’t think easy tests are what developers look for. My cat can write ‘simple’ tests if a component exists or not. It’s the REALLY HARD STUFF that needs to be tested. Sadly, no book or tutorial exists that goes passed the basics. It’s up to the seeker to discover the pieces of the puzzle thrown on the floor.
I faced error: No provider for “customFileHandlers” when I run ng test command.
solved by just running npm update