robots.txt file to your Next.js appNext.js offers a wide variety of great features. Whether it’s the way it generates pages (statically or on server request) or updates them with Incremental Static Regeneration, this framework has a lot of exciting options to attract developers. Out of all Next.js’s features, its SEO support stands out as one of its main advantages over other frameworks such as Create React App.

React is a great language for JavaScript developers, but it is unfortunately quite bad for SEO. The reason is that React is client-side rendered. Concretely, when a user requests a page, instead of the server returning HTML, it serves JavaScript, which the browser will then use to construct the page.
As a result, the initial page load in a SPA is typically longer than in an application using server-side rendering. Added to this, for a long time, Google bots didn’t crawl JavaScript properly.
Next.js fixed this issue by not only being based on React but offering developers server-side rendering. This made it easy for developers to migrate their applications.
An essential piece of SEO is having a robots.txt on your website. In this article, you will discover what a robots.txt is and how you can add one to your Next.js application, which isn’t something Next does out of the box.
robots.txt file?A robots.txt file is a web standard file that tells search engine crawlers, like Google bots, which pages they can or cannot crawl. This file is at the root of your host and can therefore be accessed at this URL: yourdomain.com/robots.txt.
As mentioned, this file allows you to tell bots where pages and files are crawlable or not. You might have certain parts of your application that you want inaccessible such as your admin pages.
You can disallow URLs like this:
User-agent: nameOfBot
Disallow: /admin/
Or allow them like this:
User-agent: *
Allow: /
At the end of your file, you should also add a line for the destination to your sitemap like this:
Sitemap: http://www.yourdomain.com/sitemap.xml
N.B., unfamiliar with sitemaps? Don’t hesitate to check out Google’s documentation on the subject.
In the end, your robots.txt would look something like this:
User-agent: nameOfBot
Disallow: /admin/

User-agent: *
Allow: /

Sitemap: http://www.yourdomain.com/sitemap.xml
robots.txt file to your Next.js applicationAdding a robots.txt file to your application is very easy. Every Next.js project comes with a folder called public. This folder allows you to store static assets that will then be accessible from the root of your domain. Therefore, by storing an image like dolphin.jpeg in your public folder, when your project is built, it will be accessible from the URL http://www.yourdomain.com/dolphin.jpeg. The same technique can be used for your robots.txt file.
So, to add a robots.txt file to your application, all you have to do is drop it in your public folder in your application.
There is a way to dynamically generate your robots.txt file. To do so, you can take advantage of two of Next.js’s features: API route and rewrites.
Next.js allows you to define API routes. This means that when a request is done to a specific API endpoint, you can return the correct content for your robots.txt file.
To do so, create a robots.js file in your pages/api folder. This automatically creates a route. Inside this file, add your handler, which will return your robots.txt content:
export default function handler(req, res) {
    res.send('Robots.txt content goes there'); // Send your `robots.txt content here
}
Unfortunately, this is only available at the URL /api/robots and as mentioned above, search engine crawlers will look for the /robots.txt url.
Thankfully, Next.js offers a feature called rewrites. This allows you to reroute a specific destination path to another path. In this particular case, you want to redirect all the requests for /robots.txt to /api/robots.
To do so, go into your next.config.js and add the rewrite:
/** @type {import('next').NextConfig} */
const nextConfig = {
  reactStrictMode: true,
  async rewrites() {
      return [
          {
              source: '/robots.txt',
              destination: '/api/robots'
          }
      ];
  }
}

module.exports = nextConfig
With this in place, every time you access /robots.txt, it will call /api/robots and display the “Robots.txt content goes there” message.
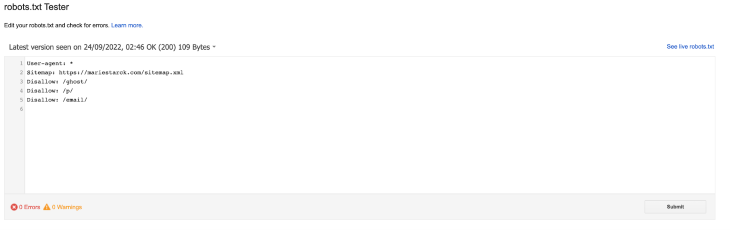
robots.txt file?Once you deploy your application to production, you can validate your robots.txt file thanks to the tester provided by Google Search. If your file is valid, you should see a message saying 0 errors displayed.
To deploy your application on production, I highly recommend Vercel. This platform was created by the founder of Next.js and was built with this framework in mind. LogRocket has a tutorial on how to deploy your Next.js application on Vercel.
SEO is very important for sites that need to be discovered. To have a good page ranking, webpages need to be easily crawlable by search engine crawlers. Next.js makes that easy for React developers by offering inbuilt SEO support. This support includes the ability to add a robots.txt file to your project easily.
In this article, you learned what a robots.txt file was, how to add it to your Next.js application, and how to validate it when your app is deployed.
Once you have your robots.txt file set up, you will also need a sitemap. Thankfully, LogRocket also has an article on how to build a sitemap generator in Next.js.
Debugging Next applications can be difficult, especially when users experience issues that are difficult to reproduce. If you’re interested in monitoring and tracking state, automatically surfacing JavaScript errors, and tracking slow network requests and component load time, try LogRocket.
LogRocket captures console logs, errors, network requests, and pixel-perfect DOM recordings from user sessions and lets you replay them as users saw it, eliminating guesswork around why bugs happen — compatible with all frameworks.
LogRocket's Galileo AI watches sessions for you, instantly identifying and explaining user struggles with automated monitoring of your entire product experience.
The LogRocket Redux middleware package adds an extra layer of visibility into your user sessions. LogRocket logs all actions and state from your Redux stores.


Modernize how you debug your Next.js apps — start monitoring for free.
Hey there, want to help make our blog better?
Join LogRocket’s Content Advisory Board. You’ll help inform the type of content we create and get access to exclusive meetups, social accreditation, and swag.
Sign up now
This guide walks you through creating a web UI for an AI agent that browses, clicks, and extracts info from websites powered by Stagehand and Gemini.

This guide explores how to use Anthropic’s Claude 4 models, including Opus 4 and Sonnet 4, to build AI-powered applications.

Which AI frontend dev tool reigns supreme in July 2025? Check out our power rankings and use our interactive comparison tool to find out.

Learn how OpenAPI can automate API client generation to save time, reduce bugs, and streamline how your frontend app talks to backend APIs.


