
The rise of AI, especially LLM-related innovations, has started automating every task we used to do manually. Now UI/UX designers are changing the traditional manual product design process with AI-powered, automated, agent-driven design flows. They describe the initial idea to AI, let it create the initial prototype, then continuously refine it by instructing AI agents with prompts until they decide it’s ready for handoff. AI-powered design flows create ready-to-develop, well-designed prototypes in seconds, but they all come with the risk of AI prototype drift.

With accumulated AI model and designer-related decision-making issues, every AI-generated prototype can slowly move away from the original product idea, silently dropping essential details, constraints, and UX principles due to AI prototype drift. Uncontrolled AI prototype drift can eventually produce a generalized prototype that mostly looks like the AI model’s training design files, and it’ll never resemble the original product idea.
In this article, I’ll explain what AI prototype drift is, how to recognize it, why it happens in every AI-generated prototype, why we can’t eliminate it, and practical ways to reduce it to create AI-generated prototypes with negligible drift.
Key Takeaways
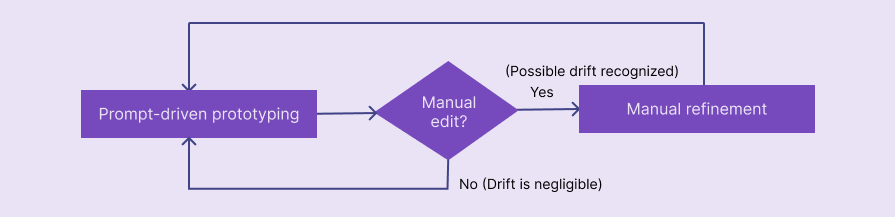
In AI-powered UX design, prototype drift is the gradual divergence of an AI-generated prototype from the original product idea as the prototype evolves. Prototype drift can start with the initial prompt, and it can grow with every subsequent prompt that you use to refine the prototype, creating a generalized or different prototype for handoff with missing constraints, UX principles, user flows, and many design details (elements, signifiers, grouping, adaptivity, etc.) that you imagined with the original product idea, as depicted in the following diagram:
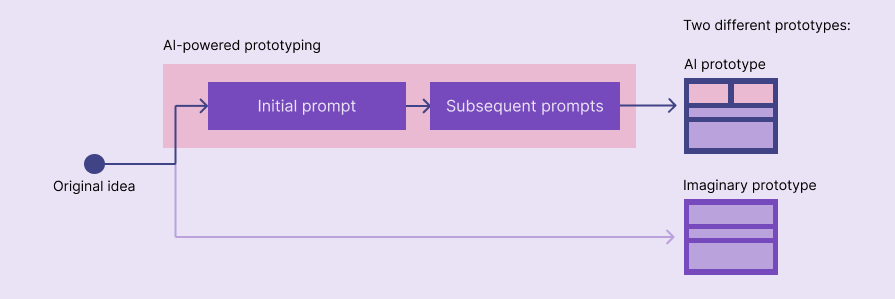
AI prototype drift can be unnoticeable initially but can be destructive as design evolves, similar to design debt. It may start seamlessly in AI-generated prototypes with AI model- and workflow-related issues, but can grow rapidly with design iterations, eventually creating a different product prototype that won’t resemble the original idea.
Uncontrolled prototype drift can affect the whole product design process, the final product, and beyond as follows:
If you already built an AI prototype and started extending it with prompts, test whether it is drifting and act immediately to reduce further AI prototype drift accumulation. You can identify how much your prototype has drifted by following these three simple practical steps:
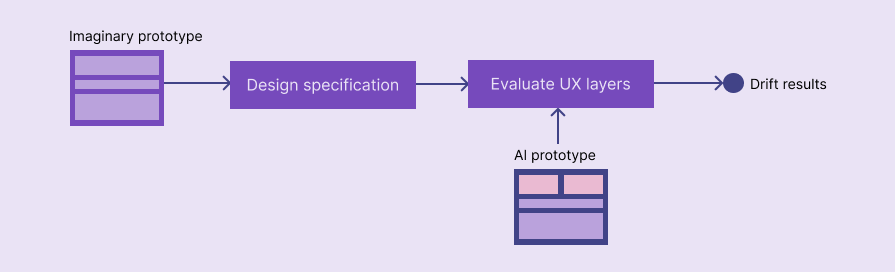
Prepare a summarized document that describes the original product idea. The easiest way to do this is to prepare a list of the original product’s design requirements and categorize them into UX layers: strategy, scope, structure, skeleton, and surface. This requirements list should cover product vision, scope, structure, interaction, information architecture, and UI design details (e.g., design systems, components, states, and style guides).
Evaluate your prototype against each design requirement, starting from the strategy layer and ending with the surface layer. Note down all missing details during evaluation.
Here are some example evaluation notes for each UX layer:
| Product | UX layer | Example note |
|---|---|---|
| Personal assistant | Strategy | The whole prototype looks like a search engine rather than a personal assistant |
| Ride-hailing app | Scope | Motorcycle ride option is not available for customers |
| Ecommerce website | Structure | The checkout flow is different; it doesn’t contain the cart editing screen, the address update flow, and the guest checkout flow |
| Movie search app | Skeleton | Missing search keyword suggestions and recent search tags |
| Hotel booking app | Surface | Booking form and its components don’t adhere to the product style guide |
If you find differences only in higher layers (e.g., skeleton and surface), your prototype has a mild drift that can be easily fixed with higher-level UX layer updates, usually updating the UI without deep UX evaluation intervention. However, if you find differences in lower layers (scope and structure), your prototype has a severe drift that requires a considerable redesign process, which should be initiated with a deep UX evaluation.
Here is the summary of this prototype drift detection process in a diagram:
Using AI itself can cause AI prototype drift, along with AI-first design workflow-related issues, as listed below:
There isn’t a perfect AI model that works perfectly like a human yet. That’s why the AI model competition has started. Each model can have one or more major weaknesses that can cause AI prototype drift:
AI prototype drift can easily accumulate with prompt-based editing as the prototype evolves due to the way designers use AI:
No, you can’t eliminate prototype drift, but you can reduce it effectively. Let me explain.
Both model- and designer workflow-related issues cause prototype drift. Even though designers manage to write optimal, highly specific prompts by giving an effective, well-defined source of truth, model-related issues can make prototype drift unavoidable. There is no perfect AI model that works the same as humans with optimal accuracy. We only have good-enough models that we can use for automation, so the only possible way to eliminate AI prototype drift is by not using AI at all.
So, the goal is to reduce AI prototype drift to a level that the prototype still reliably presents the intended product by improving what we can, usually by fixing designer workflow-related issues.
Practice the following techniques starting from your first prompt to create and maintain AI prototypes that drift negligibly less:
If you don’t explicitly specify colors, font sizes, spacing, alignment, and similar constraints, AI will have to guess them to create high-fidelity prototypes. AI is probabilistic and biased by its training data, so AI may use different constraints based on training data or hallucinate random constraints, resulting in increased prototype drift.
Use explicit constraints within prompts. Let AI automate design generation based on your specific instructions without doing its guesswork based on training data.
AI agents create a generalized or randomly assembled UI segment if constraints are missing:
Prompt:
Create a button

Using constraints will make the result more like you imagined:
Prompt:
Create a sign-in button using #414387 for its background and #EAE3F5 for its label

The more you add constraints and specificity, the more the result will resemble your imagination:
Prompt:
Create a flat button using #414387 for its background and #EAE3F5 for its label. No effects, borders, icons, or radius; just a basic rectangular button with the label “Sign in”

AI does guesswork if it can’t find design details within your prompts or hallucinates if there is no adequate training data to automate a given prompt. You don’t have to write every prompt by filling every atomic design constraint. That’s undoubtedly not productive. Instead, you can create an initialization prompt with a source of truth, including the design system, style guide, and other design rules (e.g., product-specific UX rules, special UX laws defined within the product team), and write short subsequent prompts by referring to available components and design tokens.
If you use a well-known, public design system, you can provide an initial prompt as follows to anchor to the specific design system:
Prompt:
Global constraints: Strictly adhere to the Material Design 3 design system. Use only its components; avoid custom styles
Prompt:
Create a filled button with the label: “Sign in”

If you use your own design system or style guide, define all components, tokens, and rules before letting AI generate any visual output:
Prompt:
Custom design system:
Colors:
– col-primary: #414387
– col-secondary: #EAE3F5
Components:
– Button: A base component for several variants. Border radius is 4px. Font size 14px. Top/bottom padding is 12px, and left/right padding is 20px.
– PrimaryButton: Inherit all properties from Button. Use col-primary for the background color and col-secondary for the text color
Prompt:
Create a PrimaryButton with label “Sign in”

If the AI agent already knows about your design system or style guide, it’ll always use available components, states, tokens, and rules and won’t use custom styles. Just make sure to refer to available components and tokens correctly while writing prompts.
Anchoring to a design system or style guide creates a good foundation to reduce prototype drift; however, it alone can’t create a solid sandbox for AI to prevent AI from using unexpected, unrealistic text, component combinations, unknown states, unfriendly layouts, etc., which happen due to AI model hallucination.
Adding the following rules, along with a design system or style guide, helps prevent AI from creating unexpected, unrealistic design elements:
Assume that you need to add a feedback form to your hotel booking app prototype, and your design system has two components that are suitable to handle rating inputs: a range slider and star rating segment. AI agents may use star rating segments, which you use only to represent hotel star ratings.
Prompt:
Create a simple feedback form for a new AI feature
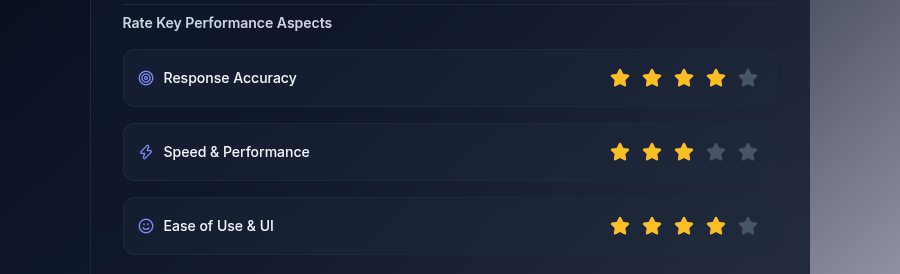
You can explain AI global component usage rules to get the prototype as you imagined:
Prompt:
Component usage rules: Don’t use the star rating component in forms, use it only for hotel star ratings. For rating inputs within forms, always use range sliders
Prompt:
Create a simple feedback form for a new AI feature
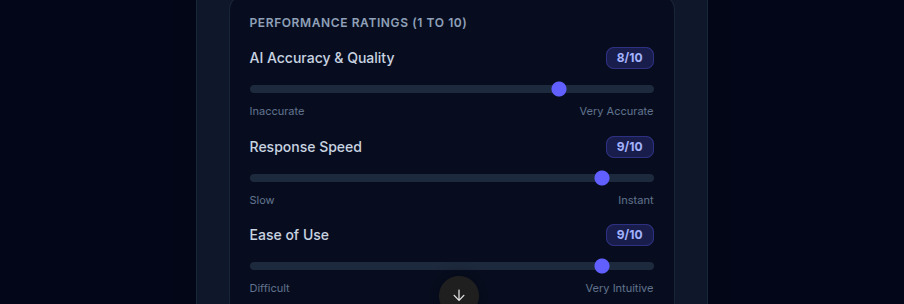
Note: Here we used a generalized prompt for demonstration. A proper prompt to generate a feedback form should include an explicit list of feedback questions
You have control over approving or disapproving AI changes and even collaborating with AI to improve what AI suggests. Review AI-generated changes in your prototype from the following aspects so you don’t have to spend more time fixing AI prototype drift debt later on:
Don’t instantly jump into manual editing mode if you are about to disapprove an AI change, simply adjust your prompt or collaborate with AI with a follow-up discussion till you get exactly what you need:
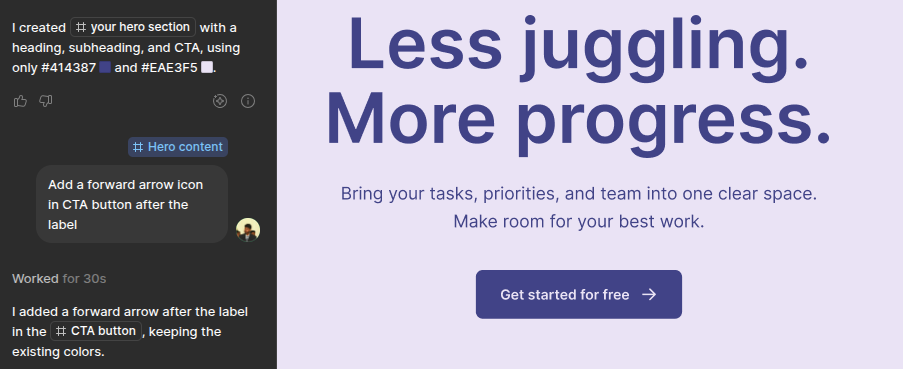
In some AI-powered design tools, you can’t manually edit your design, you’ll have to write prompts for every adjustment, e.g., Open Design. However, most prototyping workflows, including Figma + Claude Code/Gemini/ChatGPT, support manual editing, so you can completely avoid AI prototype drift accumulation for a particular prototype change by editing prototypes manually.
Here are some example scenarios where manual editing avoids prototype drift:
Manual editing is the last resort for unavoidable AI hallucinations or tasks that are so complex and slow to turn into prompts.
Yes, you can build a good-looking, ready-to-develop prototype by describing your product to AI in one short prompt, but you’re most likely to get a highly drifted, generalized prototype. You can get a product-like, zero-drift prototype by describing every screen and element and using AI only for automation, but that’s not a productive way to use AI. We need to balance between these two ends, using AI for prototype generation but keeping core UX control in our hands.
The ideal way is to do this by limiting AI to automate only surface and skeleton layers based on a design system/style guide and rules, while explicitly describing strategy, scope, and structure layer-related details in prompts:
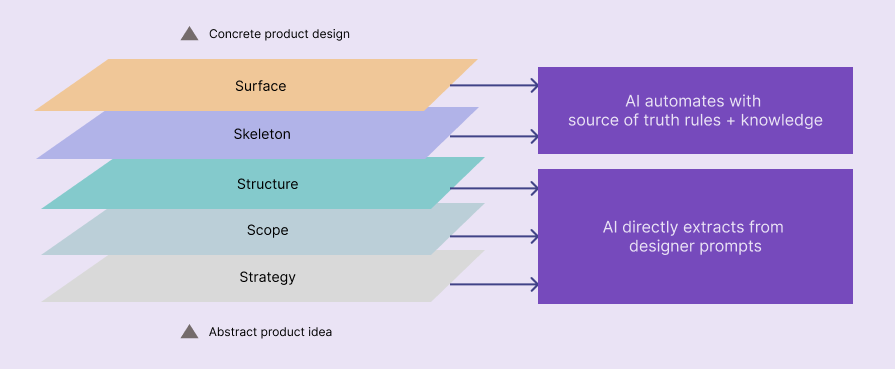
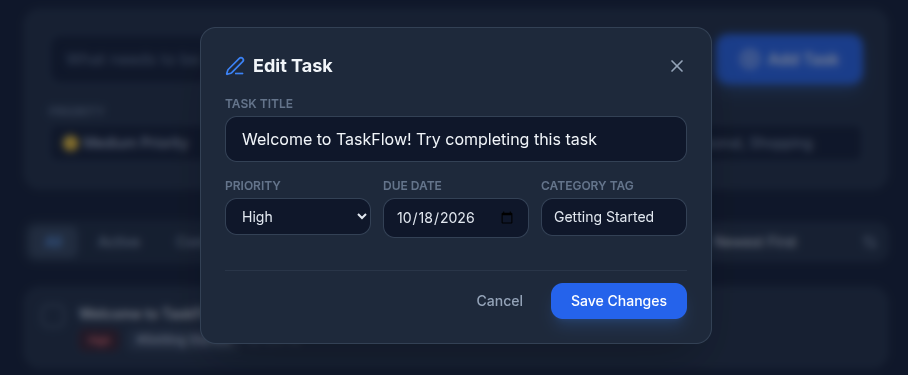
If you let AI automate lower UX layers, AI will update user flows and product foundation based on its predictions, which won’t always resemble your product idea:
Prompt:
Create a to-do app prototype
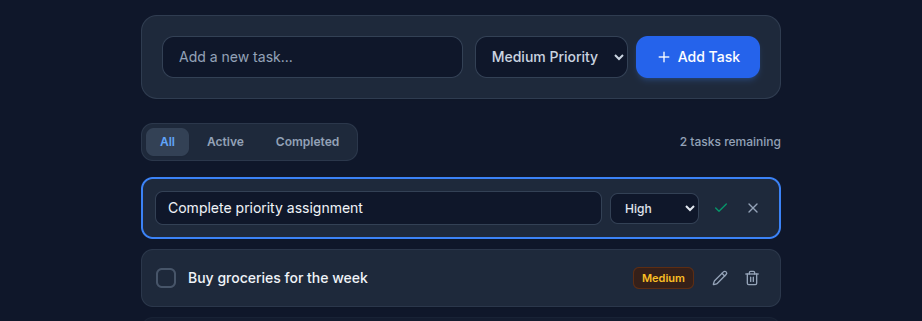
If you describe lower UX layer details (e.g., user flows) in prompts, AI will follow your instructions rather than using suggested details, reducing drift:
Prompt:
Create a simple to-do app prototype. A task has only a title, priority, and completion status, no date or any other detail.
User flow details:
– Task creation: Use a simple form at the top.
– Task editing: Use inline editing activated with an icon.
– Task deletion: Use a delete icon; show a confirmation if the task isn’t marked as completed
Prototype drift isn’t solely an AI-related problem, manual prototypes can drift away from the intended product due to mistakes in UX research (e.g., misinterpreted requirements, information loss, suboptimal research methodologies, etc.), inconsistent design decisions, design tooling limitations, design errors, and a weakly managed source of truth. However, AI-powered prototyping is more prone to drift than manual prototyping for the reasons compared below:
| Comparison factor | Manual prototyping drift | AI prototyping drift |
|---|---|---|
| Designers turning imagination into a prototype | Manually using graphic designing and prototyping features in design tools causes less drift | Turning imaginations into prompts can drop specific details causing higher drift |
| Prototype refinements | Manual precise editing causes less or zero drift | Follow-up prompts can cause higher drift mostly due to AI model issues. Prompt-driven environment doesn’t motivate designers for manual adjustments even if the design tool supports manual editing |
| Anchoring to the source of truth | Natively integrated design systems, style guides in design tools, and designers knowledge causes lesser drift, e.g., creating a component instance in Figma guarantees that the resultant element becomes an instance of the specific component | AI models can easily get detached from source of truth since AI model and prototyping tool are separate entities causing higher drift, e.g., Figma and ChatGPT/Gemini in Figma MCP workflow |
Prototype drift is inevitable regardless of whether you use AI or not, so we should try to make it negligibly less rather than trying to eliminate it, the same as we tend to ship good enough products rather than trying to build perfect ones.
Follow a hybrid prototyping workflow using both AI and manual editing to reduce prototype drift while effectively using AI. Use AI for automation, but do manual edits based on review results:
Vibe prototyping is becoming popular, designers are shifting from the traditional manual design process to prompt-driven AI-powered prototyping. Figma integrated AI and helped designers use a hybrid workflow that combines vibe prototyping and manual prototyping. Using AI for prototyping fastens product design, but causes prototype drift, which severely affects the whole product if it is left unaddressed.
You shouldn’t avoid AI or try to use it as a sort of instruction-to-design mechanism by instructing every atomic design detail in prompts, the idea is to let AI automate surface and skeleton UX layers with a design system or style guide while keeping lower UX layer control in your hand, typically describing how each lower-level UX layer should be constructed in prompts, describing user flows and core UX foundation details.
Ideally, you should keep AI prototype drift negligibly low to deliver the intended prototype for handoff, however, for some projects, a little more drift won’t do more harm and can seamlessly speed up the design process further, so create your own drift-control framework based on your product and team using the drift-reduction techniques discussed above.

LogRocket's Galileo AI watches sessions and understands user feedback for you, automating the most time-intensive parts of your job and giving you more time to focus on great design.
See how design choices, interactions, and issues affect your users — get a demo of LogRocket today.
How four Figma AI plugins fit into a UX workflow, from ideation and wireframing to UX writing and design critique. Compare free limits, account requirements, and data handling.

Learn how to size usability tests, interviews, surveys, and experiments based on the decision, the users you need to cover, and the evidence you need.
Design critiques help teams predict outcomes. UX postmortems connect those predictions with what happened after launch. Learn a six-step framework for reviewing assumptions, combining evidence, identifying surprises, and sharing lessons without adding a heavy process.

Learn how to crop shapes and images in Figma with square and circle crops, frame clipping, boolean subtraction, vector masks, and AI cutouts, with practical examples and troubleshooting tips.


 Learn more →