Modern web development is all about efficiency. We have libraries, frameworks, packages, AI tools, and Hooks. We need to build and ship fast. When React Hooks came into the picture, it was revolutionary. It changed the React game forever.

Now, we know and use built-in Hooks like useState or useEffect, but we also know that there are custom Hooks. React is flexible enough to let developers write and reuse their own Hooks, or share them so that other developers can benefit too.
In this article, we will not go over writing our own Hooks. Instead, we’ll talk about a nice tool called useHooks, and walk through a few examples.
useHooks is a collection of custom React Hooks that’s available via npm. It has a great selection of super useful Hooks that will simplify your web development process and make you a faster, better, more efficient developer.
We will go over the following Hooks, explain what they do, provide a code snippet, and show what they look like in action:
useMediaQuery: Detects if CSS media queries match. Best used for responsive design and conditional rendering based on the viewport.useHover: Reacts when a user hovers over an element. Best used for hover animations and interactive UI elements.useCopyToClipboard: Provides copy-to-clipboard functionality. Recommended for letting users easily copy text, API keys, or codes.useToggle: Manages boolean state switching. Generally used for toggling modals, menus, dark/light modes, and show/hide states.useIdle: Detects when the user becomes inactive. Best used for auto-logout, pausing videos, or saving resources during inactivity.useMeasure: Measures element dimensions. Recommended for dynamic layouts, responsive components, and element sizing feedback.useLocalStorage: Syncs state with localStorage. Best used for persisting user preferences, theme settings, or cached data.useCounter: Manages numeric counter state. Recommended for pagination, rating systems, quantity selectors, and step-based forms.The Replay is a weekly newsletter for dev and engineering leaders.
Delivered once a week, it's your curated guide to the most important conversations around frontend dev, emerging AI tools, and the state of modern software.
As you learn these new Hooks, we recommend that you start a Vite + React project, create components for each Hook, and use them in your App.jsx file.
After creating our project, we will open a new component for each Hook, and will add and test them individually. For instance, this is how my App.jsx file looks after adding all the Hooks (we will get to this point step by step) :
import React from "react";
import "./App.css";
import UseCopyToClipboard from "./components/UseCopyToClipboard";
import UseToggle from "./components/UseToggle";
import UseIdle from "./components/UseIdle";
import UseMeasure from "./components/UseMeasure";
import UseCounter from "./components/UseCounter";
import UseMediaQuery from "./components/UseMediaQuery";
import UseHover from "./components/UseHover";
import UseLocalStorage from "./components/UseLocalStorage";

const App = () => {
  return (
    <div className="app-container">
      <UseCounter />
    </div>
  );
};

export default App;
You see that we are using only one component at a time, because our sole purpose is to see how they work. When we want to see and tweak another component, we would just remove the current one and render the one we desire.
After starting our project, we’ll need to install useHooks with the following command in our project folder:
npm i @uidotdev/usehooks
Note that some of the Hooks require a different installation as they use React’s experimental useEffectEvent. That topic is a bit more complicated, and you might encounter build errors. Use it at your own risk.
Once our installation is completed, we are good to go. So, without further ado, let’s start learning about our first Hook.
useMediaQueryEvery web developer knows that responsive design is a must-have, although it might prove cumbersome from time to time.
useMediaQuery gracefully solves the problem of having to configure responsiveness.
It leverages the window.matchMedia API to subscribe to CSS media query changes, thereby providing real-time responsiveness to dynamic changes in the viewport or screen orientation.
But remember, it will throw an error if you attempt to use it on the server side, as media queries only work in the browser.
We will use this snippet:
import * as React from "react";
import { useMediaQuery } from "@uidotdev/usehooks";

export default function App() {
  const isSmallDevice = useMediaQuery("only screen and (max-width : 768px)");
  const isMediumDevice = useMediaQuery(
    "only screen and (min-width : 769px) and (max-width : 992px)"
  );
  const isLargeDevice = useMediaQuery(
    "only screen and (min-width : 993px) and (max-width : 1200px)"
  );
  const isExtraLargeDevice = useMediaQuery(
    "only screen and (min-width : 1201px)"
  );

  return (
    <section className="p-8">
      <h1 className="text-3xl font-bold mb-4">useMediaQuery</h1>
      <p className="mb-6">Resize your browser window to see changes.</p>
      <article>
        {isSmallDevice && (
          <figure className="bg-blue-500 text-white p-8 rounded-lg text-center">
            <figcaption className="text-2xl font-semibold">
              Small Device
            </figcaption>
            <p className="mt-2">Screen width: ≤ 768px</p>
          </figure>
        )}
        {isMediumDevice && (
          <figure className="bg-green-500 text-white p-8 rounded-lg text-center">
            <figcaption className="text-2xl font-semibold">
              Medium Device
            </figcaption>
            <p className="mt-2">Screen width: 769px - 992px</p>
          </figure>
        )}
        {isLargeDevice && (
          <figure className="bg-purple-500 text-white p-8 rounded-lg text-center">
            <figcaption className="text-2xl font-semibold">
              Large Device
            </figcaption>
            <p className="mt-2">Screen width: 993px - 1200px</p>
          </figure>
        )}
        {isExtraLargeDevice && (
          <figure className="bg-orange-500 text-white p-8 rounded-lg text-center">
            <figcaption className="text-2xl font-semibold">
              Extra Large Device
            </figcaption>
            <p className="mt-2">Screen width: ≥ 1201px</p>
          </figure>
        )}
      </article>
    </section>
  );
}
If we paste this code into our React app and run the server, this is the screen that’ll greet us. As we change the window size, the text will also reflect it: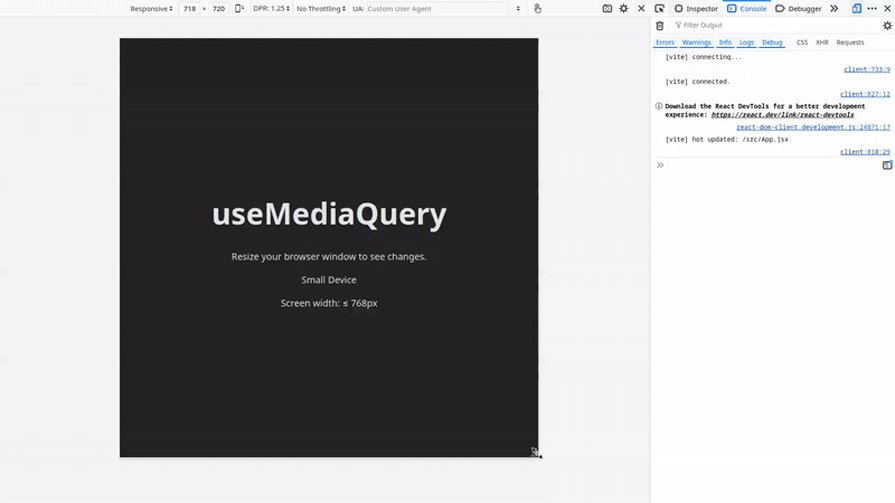
useHoverWorking with CSS animations is a big part of a web developer’s daily routine, whether it’s for getting the user’s attention or designing a catchy animation. useHover Hook makes it super easy. Go ahead and paste this code snippet:
import * as React from "react";
import { useHover } from "@uidotdev/usehooks";

function getRandomColor() {
  const colors = ["#10b981", "#3b82f6", "#a855f7", "#ef4444", "#ec4899"];
  return colors[Math.floor(Math.random() * colors.length)];
}

export default function App() {
  const [ref, hovering] = useHover();

  const backgroundColor = hovering ? getRandomColor() : "#374151";

  return (
    <section className="p-8">
      <h1 className="text-3xl font-bold mb-4">useHover</h1>
      <article
        ref={ref}
        style={{
          backgroundColor,
          width: "300px",
          height: "150px",
          display: "flex",
          alignItems: "center",
          justifyContent: "center",
        }}
        className="rounded-lg text-white text-center text-xl font-semibold transition-colors duration-200 cursor-pointer"
      >
        Hovering? {hovering ? "Yes" : "No"}
      </article>
    </section>
  );
}
Since we’re using a random color within our functionality for this example, each time we hover on the rectangle, we will be presented with a new color: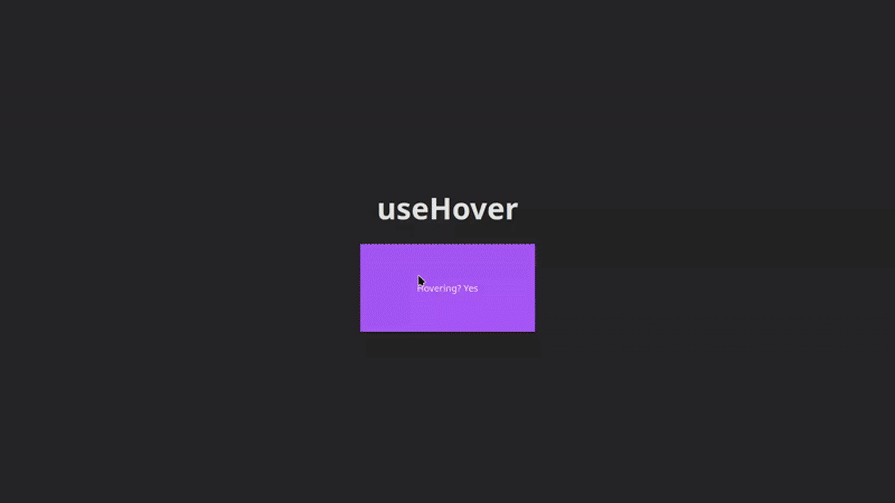
useCopyToClipboardIf our app requires the user to copy a piece of text, instead of nudging them to do it by themselves with the classic CTRL C + CTRL V, we should make this process easier for them. Hence, we add copy-to-clipboard functionalities. The useCopyToClipboard Hook simplifies this process greatly.
This Hook uses the modern navigator.clipboard.writeText method if available, and falls back to the traditional document.execCommand (“copy”) approach if no:
import * as React from "react";
import { useCopyToClipboard } from "@uidotdev/usehooks";

const randomHash = crypto.randomUUID();

export default function App() {
  const [copiedText, copyToClipboard] = useCopyToClipboard();
  const hasCopiedText = Boolean(copiedText);
  return (
    <section>
      <h1>useCopyToClipboard</h1>
      <article>
        <label>Fake API Key</label>
        <pre>
          <code>{randomHash}</code>
          <button
            disabled={hasCopiedText}
            className="link"
            onClick={() => copyToClipboard(randomHash)}
          >
            {hasCopiedText ? "Copied" : "Copy"}
          </button>
        </pre>
      </article>
      {hasCopiedText && (
        <dialog open={hasCopiedText}>
          <h4>
            Copied{" "}
            <span role="img" aria-label="Celebrate Emoji">
              🎉
            </span>
          </h4>
          <textarea placeholder="Paste your copied text" />
        </dialog>
      )}
    </section>
  );
}
This creates an easy, clean experience:
useToggleToggle functionality is paramount in modern web applications. Whether we need to show and hide a modal, show more/less text, or open/close a side menu, we use toggles. This useToggle Hook helps us do that easily:
import * as React from "react";
import { useToggle } from "@uidotdev/usehooks";

function ToggleDemo({ on, toggle }) {
  return (
    <div>
      <label className="toggle">
        <input
          onChange={toggle}
          className="toggle-checkbox"
          type="checkbox"
          checked={on}
        />
        <div className="toggle-switch"></div>
        <span className="toggle-label">{on ? "On" : "Off"}</span>
      </label>
    </div>
  );
}

export default function App() {
  const [on, toggle] = useToggle(true);

  return (
    <section>
      <h1>UseToggle</h1>
      <button disabled={on} className="link" onClick={() => toggle(true)}>
        Turn On
      </button>
      <button disabled={!on} className="link" onClick={() => toggle(false)}>
        Turn Off
      </button>
      <button className="link" onClick={toggle}>
        Toggle
      </button>
      <button className="link" onClick={() => toggle("nope")}>
        (Also toggles)
      </button>
      <ToggleDemo toggle={toggle} on={on} />
    </section>
  );
}
As you can see, we can use separate buttons for toggling on/off, or use a single button: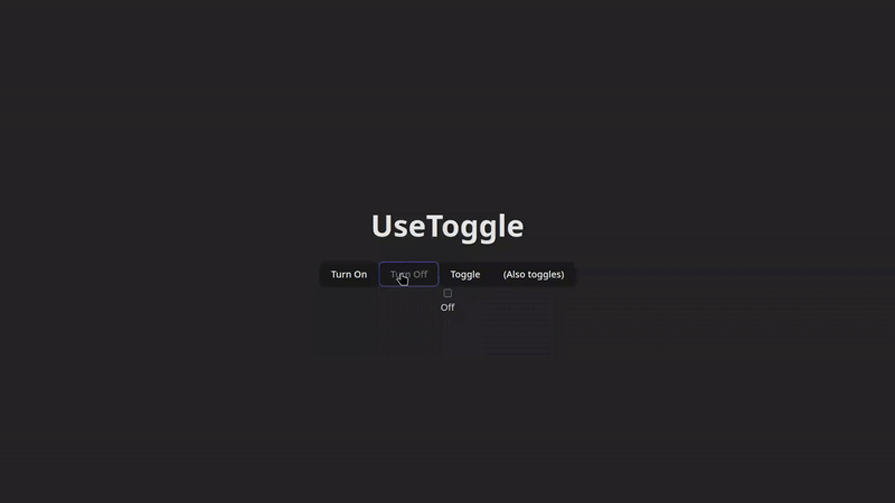
useIdleFrom time to time, we need to do some more advanced UX tinkering. Let’s say that we have a healthcare or banking app, and we want to do some action like logging out the user if they’re inactive for a certain amount of time. Perhaps we want to pause the video in a streaming app, save energy by dimming the UI, or pause background processes when the user is idle.
Here, useIdle Hook helps us to do that easily. Look how little code we need to write to implement such functionality:
import * as React from "react";
import { useIdle } from "@uidotdev/usehooks";

export default function App() {
  const idle = useIdle(5000);
  return (
    <section>
      <h1>useIdle</h1>
      <div>
        <span className={idle ? "idle" : ""} />
        <label>Status: {idle ? "Idle" : "Active"}</label>
      </div>
      {idle ? <p>Time to move your mouse</p> : <p>Hold still and wait</p>}
    </section>
  );
}
If you keep still and don’t move your mouse for five seconds, you will encounter the following screen, reminding you that it is time to move the mouse: 
useMeasureFor CSS wizards out there, there are cases where you want your user to know the exact dimensions of the elements of the webpage. The useMeasure Hook helps with this daunting task gracefully.
This code snippet looks a bit more complicated, but that’s only because we had to use a bit more CSS. But hey, you are a CSS wizard and this scroll isn’t complicated for you!:
import * as React from "react";
import { useMeasure } from "@uidotdev/usehooks";

function UseMeasure({
  color = "blue",
  initialWidth = 250,
  secondColor = "green",
  secondInitialWidth = 150,
}) {
  const [firstRef, { width: firstWidth }] = useMeasure();
  const [secondRef, { width: secondWidth }] = useMeasure();

  const lineStyle = (color, width) => ({
    width: `${width}px`,
    height: "4px",
    backgroundColor: color,
    resize: "horizontal",
    overflow: "auto",
    minWidth: "50px",
    maxWidth: "100%",
    marginBottom: "8px",
  });

  return (
    <div className="mb-8">
      <div ref={firstRef} style={lineStyle(color, initialWidth)} />
      <p className="text-sm font-medium text-gray-700 mb-2">
        First Line: {Math.floor(firstWidth)}px
      </p>

      <div ref={secondRef} style={lineStyle(secondColor, secondInitialWidth)} />
      <p className="text-sm font-medium text-gray-700">
        Second Line: {Math.floor(secondWidth)}px
      </p>
    </div>
  );
}

export default UseMeasure;
You see that it shows how the length of our lines differs exactly:
useLocalStorageSay we want to build a drawing app, or we want the browser to remember the theme (dark/light mode), store auth tokens, user preferences, cache API responses, etc. In these cases, we might want to use local storage. And this Hook, useLocalStorage makes it so easy to do.
In the following code snippet, you’ll find a drawing app. Do not get confused with the code; we’re using Canvas API, and you do not need to know about it to understand how the Hook works to use it effectively:
import * as React from "react";
import { useLocalStorage } from "@uidotdev/usehooks";

export default function App() {
  const [drawing, saveDrawing] = useLocalStorage("drawing", null);
  const ref = React.useRef(null);

  React.useEffect(() => {
    const canvas = ref.current;
    if (!canvas) return;

    const ctx = canvas.getContext("2d");
    let isDrawing = false;

    // Restore saved drawing
    if (drawing) {
      const img = new Image();
      img.src = drawing;
      img.onload = () => ctx.drawImage(img, 0, 0);
    }

    // Set drawing styles
    ctx.strokeStyle = "white";
    ctx.lineWidth = 5; // Increased from default 1.0 for thicker lines
    ctx.lineCap = "round";
    ctx.lineJoin = "round";

    const start = (e) => {
      isDrawing = true;
      ctx.beginPath();
      ctx.moveTo(e.offsetX, e.offsetY);
    };

    const draw = (e) => {
      if (!isDrawing) return;
      ctx.lineTo(e.offsetX, e.offsetY);
      ctx.stroke();
    };

    const end = () => {
      if (!isDrawing) return;
      isDrawing = false;
      saveDrawing(canvas.toDataURL());
    };

    canvas.addEventListener("mousedown", start);
    canvas.addEventListener("mousemove", draw);
    canvas.addEventListener("mouseup", end);
    canvas.addEventListener("mouseout", end);

    return () => {
      canvas.removeEventListener("mousedown", start);
      canvas.removeEventListener("mousemove", draw);
      canvas.removeEventListener("mouseup", end);
      canvas.removeEventListener("mouseout", end);
    };
  }, [drawing, saveDrawing]);

  return (
    <section>
      <header>
        <h1>useLocalStorage</h1>
        <button className="link" onClick={() => window.location.reload()}>
          Reload Window
        </button>
        <button
          className="link"
          onClick={() => {
            window.localStorage.clear();
            window.location.reload();
          }}
        >
          Clear Local Storage
        </button>
      </header>
      <figure>
        <canvas ref={ref} width={800} height={800} />
        <figcaption>(draw something)</figcaption>
      </figure>
    </section>
  );
}
Now go draw something! If you reload the window, you will see that the drawing persists, and is deleted (cleared), only if you click the Clear Local Storage button.
PS: Please do not judge my drawing skills, I was never good at it :):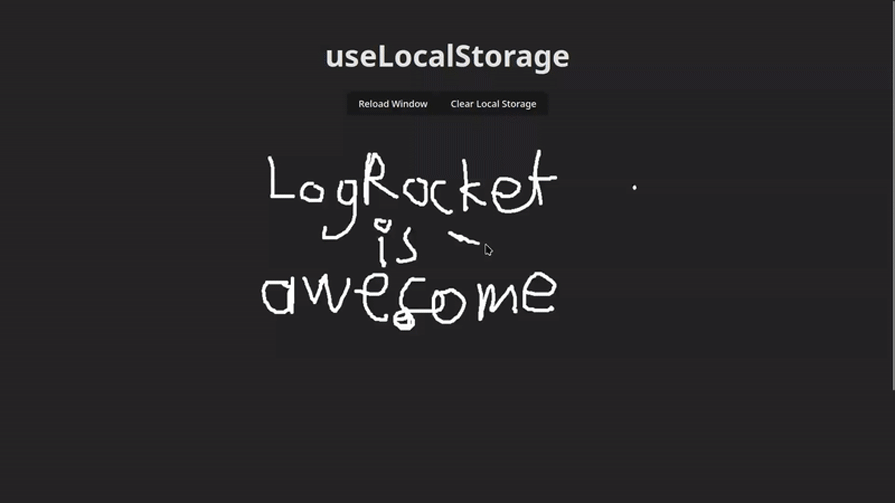
useCounterAs a bonus, here comes the classic React counter! Maybe in our app, we need to add pagination, a step-based form, a rating component, or just inventory quantities.
The useCounter Hook makes it a breeze to work with counter logic. As you can see from the code, we can limit the number of counts we will get:
import * as React from "react";
import { useCounter } from "@uidotdev/usehooks";

export default function App() {
  const [count, { increment, decrement, set, reset }] = useCounter(5, {
    min: 5,
    max: 10,
  });

  return (
    <section>
      <h1>UseCounter</h1>
      <h6>with optional min / max</h6>
      <button disabled={count >= 10} className="link" onClick={increment}>
        Increment
      </button>
      <button disabled={count <= 5} className="link" onClick={decrement}>
        Decrement
      </button>
      <button className="link" onClick={() => set(6)}>
        Set to 6
      </button>
      <button className="link" onClick={reset}>
        Reset
      </button>
      <p>{count}</p>
    </section>
  );
}

In this article, we discussed the useHooks library, how easy these Hooks are to implement, and how efficient they are in our development process.
We’ve gone over 7 + 1 Hooks, seen code snippets, and example images of them in action.
We hope that you’ve enjoyed your journey so far and learned some good stuff that’ll help you ship faster and with more confidence.
See you next time!
Install LogRocket via npm or script tag. LogRocket.init() must be called client-side, not
server-side
$ npm i --save logrocket

// Code:

import LogRocket from 'logrocket';
LogRocket.init('app/id');
// Add to your HTML:

<script src="https://cdn.lr-ingest.com/LogRocket.min.js"></script>
<script>window.LogRocket && window.LogRocket.init('app/id');</script>

Why the future of DX might come from the web platform itself, not more tools or frameworks.

A hands-on test of Claude Code Review across real PRs, breaking down what it flagged, what slipped through, and how the pipeline actually performs in practice.

CSS art once made frontend feel playful and accessible. Here’s why it faded as the web became more practical and prestige-driven.

Learn how inline props break React.memo, trigger unnecessary re-renders, and hurt React performance — plus how to fix them.
Would you be interested in joining LogRocket's developer community?
Join LogRocket’s Content Advisory Board. You’ll help inform the type of content we create and get access to exclusive meetups, social accreditation, and swag.
Sign up now

