Since C# 7.0, many code improvements that help us write less code have been added to the language. This tutorial will focus on six new features that can help us write more concise and readable code and how we can use these features on our C# for Unity.

These are the tutorial sections:
The Replay is a weekly newsletter for dev and engineering leaders.
Delivered once a week, it's your curated guide to the most important conversations around frontend dev, emerging AI tools, and the state of modern software.
The following prerequisites are required to follow along with this tutorial:
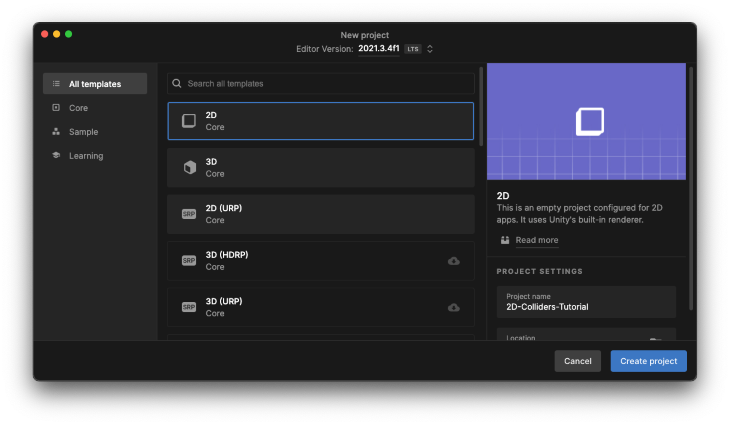
First, we need to create our Unity project. For this tutorial, we’ll use the version 2021.3.4f1, which, at the moment I’m writing, is the newest LTS Unity version.
On the project templates list, choose 2D(core) (the simplest of all), give it a name, and click the Create project button.

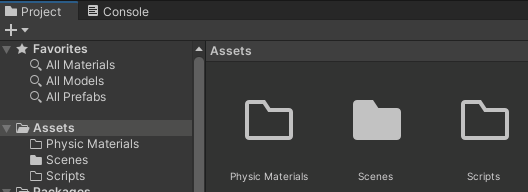
With the project started, create a folder called Scripts inside the Assets folder. We’ll use them to keep our project organized during the tutorial.

For each sample of how to use the new C# feature, we will first look at how it was done before and then how we could write less and more readable code with the new feature.
The classes below are just stubs that are used on all samples throughout the tutorial. You can add them to a script inside the Scripts folder:
// GAME MODE.
public enum GameMode
{
    TimeAttack,
    Survive,
    Points
}

// ENEMIES.
public abstract class Enemy
{
    public bool IsVisible { get; set; }
    public bool HasArmor { get; set; }
}

public class Minion : Enemy { }
public class Troll : Enemy { }
public class Vampire : Enemy { }

public class Zombie : Enemy { }


// WEAPONS.
public abstract class Weapon { }
public class Stake : Weapon { }
public class Shotgun : Weapon { }
In C# versions 8 and 9, a lot of new features were added to the language. You can read the full features list for each version in the links below:
Unity support for C# 8 has started on version 2020.2 and C# 9 has started on version 2021.2.
Be aware that not every C# 8 and 9 feature is supported by Unity, like:
Most of these unsupported features are used in very specific scenarios, like extensible calling conventions for unmanaged function pointers, and some aren’t, like indices and ranges.
Because of this, features like indices and ranges and init only setters will likely be supported in future versions of Unity. However, the chance of an unsupported feature for a very specific scenario gaining Unity support in the future is smaller than a feature like indices and ranges.
Maybe you can find some workarounds to use these unsupported features in Unity, but I discourage you from doing this because Unity is a cross-platform game engine. A workaround in a new feature could lead you to problems quite hard to understand, debug, and resolve.
Fortunately, Unity supports some of the more common patterns and expressions from C# 8 and 9. Let’s review some of the most helpful ones below and see how they can enable us to write cleaner code.
The switch expression can dramatically simplify and reduce the LOC (Lines Of Code) to make a switch, because we can avoid a bunch of boilerplate code, like the case and return statements.
Doc tip: the switch expression provides for switch-like semantics in an expression context. It provides a concise syntax when the switch arms produce a value.
Often, a switch statement produces a value in each of its case blocks. Switch expressions enable you to use more concise expression syntax. There are fewer repetitive case and break keywords and fewer curly braces.
public string GetModeTitleOld(GameMode mode)
{
    switch (mode)
    {
        case GameMode.Points:
            return "Points mode";

        case GameMode.Survive:
            return "Survive mode";

        case GameMode.TimeAttack:
            return "Time Attack mode";

        default:
            return "Unsupported game mode";
    }
}
public string GetModeTitleNew(GameMode mode)
{
    return mode switch
    {
        GameMode.Points => "Points mode",
        GameMode.Survive => "Survive mode",
        GameMode.TimeAttack => "Time Attack mode",
        _ => "Unsupported game mode",
    };
}
The property pattern enables you to match on properties of the object examined in a switch expression.
As you can see in the sample below, using a property pattern, we can transform a series of if statements into a simple list of properties that the object on the switch statement should match.
The _ => has the same meaning as the default on a classic switch.
Doc tip: a property pattern matches an expression when an expression result is non-null and every nested pattern matches the corresponding property or field of the expression result.
public float CalculateDamageOld(Enemy enemy)
{
    if (enemy.IsVisible)
        return enemy.HasArmor ? 1 : 2;

    return 0;
}
public static float CalculateDamageNew(Enemy enemy) => enemy switch
{
    { IsVisible: true, HasArmor: true } => 1,
    { IsVisible: true, HasArmor: false } => 2,
    _ => 0
};
We can use type patterns to check if the runtime type of an expression is compatible with a given type.
The type pattern is almost the same logic as a property pattern but is now used in a context of an object type. We can transform a series of if statements that check an object type into a list of types that the object on the switch statement should match.
public static float GetEnemyStrengthOld(Enemy enemy)
{
    if (enemy is Minion)
        return 1;

    if (enemy is Troll)
        return 2;

    if (enemy is Vampire)
        return 3;

    if (enemy == null)
        throw new ArgumentNullException(nameof(enemy));

    throw new ArgumentException("Unknown enemy", nameof(enemy));
}
public static float GetEnemyStrengthNew(Enemy enemy) => enemy switch
{
    Minion => 1,
    Troll => 2,
    Vampire => 3,
    null => throw new ArgumentNullException(nameof(enemy)),
    _ => throw new ArgumentException("Unknown enemy", nameof(enemy)),
};
Using the type pattern, we go from 16 lines of code to only 8 that have the same result and are quite clear to read and understand.
A constant pattern can be used to test if an expression result equals a specified constant.
Probably the simplest pattern match, it just matches a constant value — for instance, a string — and then returns the result.
public Enemy CreateEnemyByNameOld(string name)
{
    if(name == null)
        throw new ArgumentNullException(nameof(name));

    if (name.Equals("Minion"))
        return new Minion();

    if (name.Equals("Troll"))
        return new Troll();

    if (name.Equals("Vampire"))
        return new Vampire();

    throw new ArgumentException($"Unknown enemy: {name}", nameof(name));
}
public Enemy CreateEnemyByNameNew(string name) => name switch
{
    "Minion" => new Minion(),
    "Troll" => new Troll(),
    "Vampire" => new Vampire(),
    null => throw new ArgumentNullException(nameof(name)),
    _ => throw new ArgumentException($"Unknown enemy: {name}", nameof(name)),
};
A constant pattern can be used with any constant expression, like int, float, char, string, bool, and enum.
A relational pattern will compare an expression result with a constant.
This one could seem the most complex pattern match, but at its core it’s not that complicated. What we can do with a Relational Pattern is directly use logical operators as <, >, <=, or >= to evaluate the object and then provide a result for the switch.
Doc tip: the right-hand part of a relational pattern must be a constant expression.
public string GetEnemyEnergyMessageOld(float energy)
{
    if(energy < 0 || energy > 1)
        throw new ArgumentException("Energy should be between 0.0 and 1.0", nameof(energy));

    if (energy >= 1f)
        return "Healthy";

    if (energy > .5f)
        return "Injured";

        return "Very hurt";
}
public string GetEnemyEnergyMessageNew(float energy) => energy switch
{
    < 0 or > 1 => throw new ArgumentException("Energy should be between 0.0 and 1.0", nameof(energy)),
    >= 1 => "Healthy",
    > .5f => "Injured",
    _ => "Very hurt"
};
Any of the relational operators <, >, <=, or >= can be used on a relational pattern.
We can use the not, and, and or pattern combinators to create logical expressions.
This is like an extension of the relational pattern where you can combine the logical operators not, and, and or to create a more complex and elaborate pattern match.
Doc tip: you use the not, and, and or pattern combinators to create the following logical patterns:
not pattern that matches an expression when the negated pattern doesn’t match the expressionand pattern that matches an expression when both patterns match the expressionor pattern that matches an expression when either pattern matches the expressionpublic float CalculateEnergyLossByStakeOld(Enemy enemy)
{
if (enemy == null)
throw new ArgumentNullException(nameof(enemy));
if (enemy is not Vampire)
return .1f;
return 1f;
}
public float CalculateEnergyLossByStakeNew(Enemy enemy) => enemy switch
{
    null => throw new ArgumentNullException(nameof(enemy)),
    not Vampire => .1f,
    _ => 1f
};
In this tutorial, we’ve learned how to use the switch expression, property pattern, type pattern, constant pattern, relational pattern, and logical pattern to write less and more modern C# code on Unity.
Hopefully, you can use some of these in your next project to spare yourself time while writing cleaner code.
Install LogRocket via npm or script tag. LogRocket.init() must be called client-side, not
server-side
$ npm i --save logrocket

// Code:

import LogRocket from 'logrocket';
LogRocket.init('app/id');
// Add to your HTML:

<script src="https://cdn.lr-ingest.com/LogRocket.min.js"></script>
<script>window.LogRocket && window.LogRocket.init('app/id');</script>

@container scroll-state: Replace JS scroll listeners nowCSS @container scroll-state lets you build sticky headers, snapping carousels, and scroll indicators without JavaScript. Here’s how to replace scroll listeners with clean, declarative state queries.

Explore 10 Web APIs that replace common JavaScript libraries and reduce npm dependencies, bundle size, and performance overhead.

Russ Miles, a software development expert and educator, joins the show to unpack why “developer productivity” platforms so often disappoint.

Discover what’s new in The Replay, LogRocket’s newsletter for dev and engineering leaders, in the February 18th issue.
Hey there, want to help make our blog better?
Join LogRocket’s Content Advisory Board. You’ll help inform the type of content we create and get access to exclusive meetups, social accreditation, and swag.
Sign up now