Editor’s note: This article was last updated on 4 July 2023 to remove outdated Rust deployment libraries and replace them with more popular libraries.
In the recent Stack Overflow developer survey, Rust emerged as the most loved language for the 8th time in a row, thanks in large part to the core team’s penchant for challenging the status quo of existing systems such as C/C++ and the growing community.
Most Rust programmers speak highly of the productivity, efficiency, performance, and reliability of the language, which sets it apart as a premier choice for building mission-critical applications, dev tools, and highly performant applications.
It’s no surprise that companies are scrambling to migrate their web apps and systems to Rust. Deployment can be a major speed bump in this process. In this guide, we’ll introduce you to some deployment libraries and services that are currently available for Rust.
Jump ahead:
The Replay is a weekly newsletter for dev and engineering leaders.
Delivered once a week, it's your curated guide to the most important conversations around frontend dev, emerging AI tools, and the state of modern software.
Software deployment refers to the activities, procedures, and steps that are necessary to make a software system available for the consumption of end users. The word deployment can also mean moving or migrating a software system or app to a remote server. Software deployment can also refer to updates, patches, or new apps with either automated or manual processes, including but not limited to installation, builds, testing, release, and performance monitoring.
Innovation has flourished over the past few decades, with software development teams building new systems, architectures, principles, and patterns for software delivery to improve the speed and accuracy of product release. For example, today a feature could be pushed and instantly made available on production, provided that the code and features pass the deployment phases. This process brings about various deployment options, including infrastructure-as-a-service (IaaS), platform-as-a-service (Paas), virtualization servers, and more.
As Rust grows in popularity, hosting companies and services have been channeling their resources toward supporting Rust for the web. Developers can’t wait to have their full-fledged performance apps on the web.
Before we proceed, it’s important to understand a few key terms we’ve already mentioned:
Now let’s discuss some key criteria to consider when choosing a deployment tool for your Rust app.
When evaluating deployment tools for Rust or any other programming language, it’s essential to consider several key factors. These criteria can help you choose the right tool for your specific needs and ensure that your deployment process is as smooth and efficient as possible:
With that out of the way, let’s explore the popular deployment tools in the Rust community
Shuttle is a Rust deployment platform that allows you to deploy your Rust application to the cloud for free. It’s pretty straightforward to set up and get your Rust application up and running in no time, depending on the complexity of your own application.
To use Shuttle, you’ll first install it by running the following code:
curl -L --proto '=https' --tlsv1.2 -sSf https://raw.githubusercontent.com/cargo-bins/cargo-binstall/main/install-from-binstall-release.sh | bash
This should take less than a minute to complete and then you can run:
cargo binstall cargo-shuttle
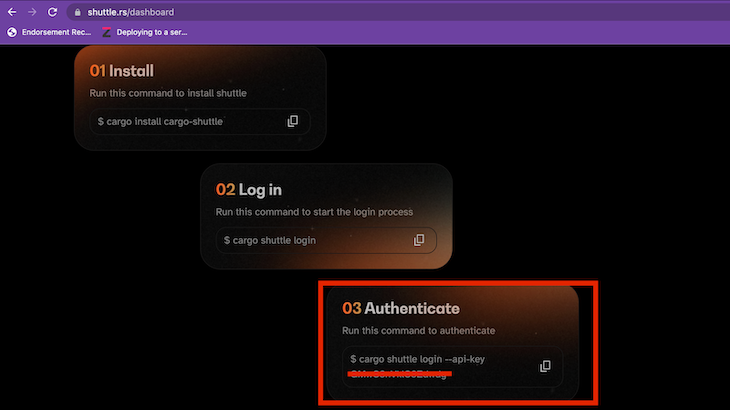
Once that is complete, you should see the version of Shuttle when you run cargo shuttle--version. Then, create an account on the website with your GitHub account. When you are logged in, run cargo shuttle login --api-key {key} to authenticate yourself:
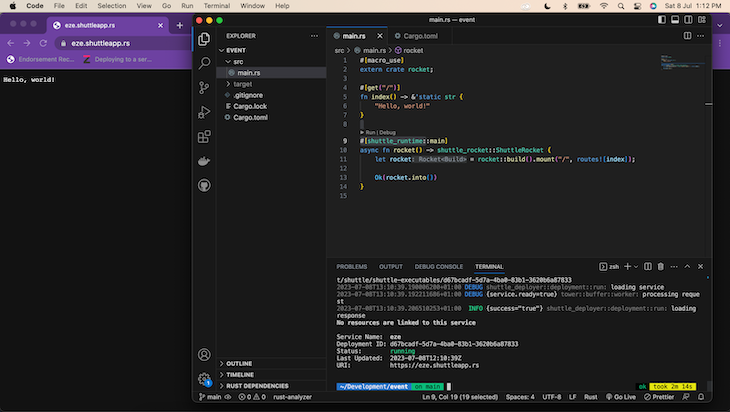
Then, run cargo shuttle project start to add Shuttle to your project and get it ready for deployment. Finally, run cargo shuttle deploy. Here is an example of a Hello World app’s successful deployment:
For more details about working with Shuttle, I suggest you check out the documentation.
Heroku is a cloud PaaS tool that supports the seamless deployment of projects built with different languages, libraries, and frameworks such as PHP, Python, Go, React, Node.js, Scala, etc.
Heroku, however, does not natively support Rust but there are a handful of Heroku buildpacks that make it easy to deploy Rust on Heroku with support for Cargo and Rustup.
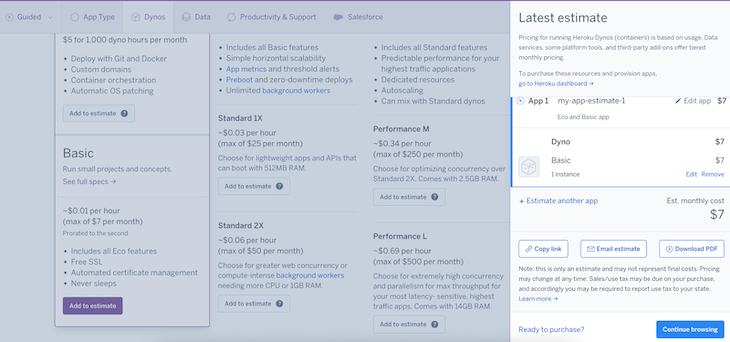
As you can see, the price can go from $7 to $20 per month depending on your system requirements.
For an efficient deployment process, it’s recommended to kick-start by installing the Heroku Command Line Interface (CLI). If you don’t already have it installed, you can run the following commands to install it if you are on Mac:
brew tap heroku/brew && brew install heroku
For Linux:
curl https://cli-assets.heroku.com/install-ubuntu.sh | sh
For Windows users, you can download the installer for your system architecture from the Heroku website. Once your installation is complete, head over to the directory that contains your project and run the command below to add the unofficial Rust buildpack to your project.
Before you run the command below, you must first create an account on the Heroku site and then run heroku login on your terminal. Once your login is complete, you can run the command below:
heroku create --buildpack https://github.com/emk/heroku-buildpack-rust.git
Ensure your project has Git and Cargo initiated. Otherwise, this might not work. Next, create a Procfile, which is technically Heroku’s config file. We’ll use the Procfile to instruct Heroku on where to find our Rust executable:
Create a Procfile in the root of your project and add the following contents to it — the contents might be different based on the name of your project. In this example, the name of my app is app:
web: ./target/release/app
Finally, run the command below to push to GitHub in order to trigger automatic deployment:
git push heroku master
Docker is a PaaS service that uses virtualization to deliver resources such as software, libraries, and other configuration files in packages as containers.
Docker enables you to build and ship any software because it helps you keep track of packages using Dockerfile. The official image has more than 10 million downloads on Docker Hub.
There are several nightly containers/images built for Rust, but the official Docker image is managed by the Rust team. Also, using Docker’s multistage build can help you avoid toolchain compilation, which requires you to copy the app’s compiled binary files to the container.
All you need to do to deploy your Rust app with Docker is to first create a Dockerfile and a Docker Compose file depending on your requirement like every other Docker deployment. Here is a simple Docker file that will deploy a basic Rust application:
# Start from the latest Rust base image
FROM rust:latest as builder
# Set the current working directory in the image
WORKDIR /usr/src/myapp
# Copy the entire project
COPY . .
# Build for release
RUN cargo build --release
# Start a new stage
FROM debian:buster-slim
# Install OpenSSL
RUN apt-get update && \
    apt-get install -y openssl && \
    rm -rf /var/lib/apt/lists/*
# Copy the build artifact from the builder stage and set the executable's permissions
COPY --from=builder /usr/src/myapp/target/release/myapp /usr/local/bin
# Set the startup command to run the binary
CMD ["myapp"]
Each step is well commented on to show what is happening in the build process. However, let’s take a closer look at the steps to make it more clear.
FROM rust:latest as builder: This line is pulling the latest Rust Docker image from Docker Hub and naming this stage of the build process “builder.” This image includes all the tools necessary to compile Rust code.
WORKDIR /usr/src/myapp: This line is setting the working directory inside the Docker image to /usr/src/myapp. Any subsequent commands will be run from this directory.
COPY . .: This line is copying all the files from your local directory, where the Dockerfile is located, into the current directory in the Docker image (/usr/src/myapp).
RUN cargo build --release: This line is running the cargo build --release command inside the Docker image. This command compiles your Rust code in release mode, creating an optimized executable.
FROM debian:buster-slim: This line is starting a new stage of the build process. It’s pulling a slim version of the Debian Buster image from Docker Hub. This image is smaller than the Rust image, which helps to reduce the size of the final Docker image.
The next three lines are updating the package lists for the Debian image, installing OpenSSL (a common dependency for Rust applications), and then removing the package list files to reduce the size of the image:
RUN apt-get update && \
    apt-get install -y openssl && \
    rm -rf /var/lib/apt/lists/*
COPY --from=builder /usr/src/myapp/target/release/myapp /usr/local/bin: This line is copying the compiled Rust application from the “builder” stage into the current stage. The application is placed in /usr/local/bin, which is a common directory for executables and is included in the PATH environment variable by default.
CMD ["myapp"]: This line is setting the default command to run when a container is started from the Docker image. It’s running the Rust application that was copied in the previous step.
That’s all there is to it! Now, you can run the deployment on your server by running the command docker build -t .
Render is a cloud-based PaaS company that offers immense power and scalability and handles apps of all sizes.
Render has full-fledged support for the Rocket and Actix frameworks. It could also be set up using Cargo because it provides easy deployment with simple clicks and minimal configuration.
Essentially, you can deploy to Render in 3 easy steps:
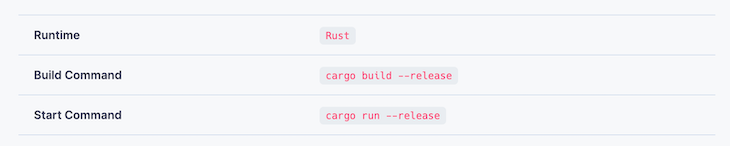
And that’s it. The next time you push to that repo in the beach you set during the configuration, your Rust application will automatically deploy.
NGINX is a popular web server that offers features such as load balancing, reverse proxy, mail proxy, and more.
Deploying Rust using NGINX is as easy as proxy passing the web framework server and creating a system service that monitors the Rust web framework server status. After generating a production release from your Rust project by running cargo build --release, you can choose to run it with PM2. When you are done with that, simply set up NGINX on your server with the following configuration:
server {
    server_name         yourdomain.com www.yourdomain.com;

  location /api/ {
    proxy_pass http://127.0.0.1:{yourport}/api/;
    proxy_http_version 1.1;
    proxy_set_header Connection "upgrade";
    proxy_set_header Host $host;
    proxy_set_header Upgrade $http_upgrade;
    proxy_set_header X-Real-IP $remote_addr;
    proxy_set_header X-Forwarded-For $proxy_add_x_forwarded_for;
  }

}
Finally, restart NGINX and that’s it!
Clever Cloud is a PaaS company based in Europe that offers services closely related to Heroku to help developers deploy and run their apps without hassle. Unlike Heroku, Clever Cloud has native support for Rust.
Clever Cloud simplifies the deployment, building, and scaling of Rust applications. It integrates platform services with Git, eliminating the complexities of buildpacks by managing application builds through an intuitive dashboard interface.
Clever Cloud has comprehensive documentation for how to deploy your Rust application onto their server. However, as an overview, one of their deployment methods uses Git workflow as follows:
Deploying Rust applications is a straightforward process, and the tools we covered in this article make it even more fun. As Rust adoption keeps growing, more deployment options in the Rust community will be made available. Regardless of your budget, there is a deployment tool for you as we’ve seen in this guide. Their usage will largely depend on your project requirements.
Happy hacking!
Debugging Rust applications can be difficult, especially when users experience issues that are hard to reproduce. If you’re interested in monitoring and tracking the performance of your Rust apps, automatically surfacing errors, and tracking slow network requests and load time, try LogRocket.
LogRocket lets you replay user sessions, eliminating guesswork around why bugs happen by showing exactly what users experienced. It captures console logs, errors, network requests, and pixel-perfect DOM recordings — compatible with all frameworks.
LogRocket's Galileo AI watches sessions for you, instantly identifying and explaining user struggles with automated monitoring of your entire product experience.

Modernize how you debug your Rust apps — start monitoring for free.

I had four weeks to build a complete app from scratch using AI tools like OpenCode and Claude Opus: here’s how it went.
Learn how to build a reusable Vue 3 table engine that powers tables, cards, and lists with shared sorting and pagination logic.

Compare the best React chart libraries for 2026, including Recharts, Nivo, visx, Apache ECharts, MUI X Charts, and more.

Claude Code vs. OpenCode in a real Next.js refactor: benchmark results, mistakes, prompts, and when to use each CLI agent.
Would you be interested in joining LogRocket's developer community?
Join LogRocket’s Content Advisory Board. You’ll help inform the type of content we create and get access to exclusive meetups, social accreditation, and swag.
Sign up now

