Mapbox is a technology startup that provides developers and organizations with configurable and high-performance mapping, geospatial, and location-based services. It provides a suite of tools and APIs for developing interactive maps, geocoding, navigation, routing, and other location-based applications.

Mapbox is based on open data and open source software, allowing developers to access and utilize maps, add unique styles, and integrate location features into their apps, websites, and other digital goods. Vector tiles power Mapbox’s maps, allowing for rapid loading and seamless interactions.
In this article, we’ll build a React Native mobile app with a Mapbox integration using the Mapbox Maps SDK for React Native and the popular React Native command-line tool Expo CLI.
I’ll use a Mac for development, however, you could also use either Windows, Linux, or a physical Android or iOS device. However, iOS development and deployment require macOS, so just bear that in mind if you ever plan on publishing apps to the Apple App Store. You can create Android apps on macOS, Windows, and Linux.
Jump ahead:
The Mapbox package requires custom native code, so if you’re developing on iOS, then you’ll need an Apple Developer Account. Apple Developer accounts aren’t free; you have to enroll and pay an annual fee to develop iOS apps; at the time of writing, the fee is less than $100.
Install and set up the following tools and services:
If you plan on developing apps for Android or testing on an Android simulator, then you’ll need to install and set up Android Studio on your computer beforehand. Additionally, testing on an iOS physical device requires Enabling Developer Mode on a device.
Now, let’s set up our project. Navigate into a directory using the command line and then initiate the commands below to scaffold an Expo project:
npx create-expo-app mapbox-app
cd mapbox-app
Next, install the Mapbox package:
npm i @rnmapbox/maps
Open the project in the IDE of your choice and add the following code to the bottom of the app.json file:
{
  "expo": {
    "plugins": [
      [
        "@rnmapbox/maps",
        {
          "RNMapboxMapsImpl": "mapbox",
          "RNMapboxMapsDownloadToken": "sk.ey...qg"
        }
      ]
    ]
  }
}
Now, you’ll need to create an access token that will replace the "sk.ey...qg" string in the json file under the RNMapboxMapsDownloadToken. Sign into your Mapbox account and find the Tokens page in the menu:

Create a token with the configurations in the following image. It’s important that you select DOWNLOADS:READ; when you’re building with Expo, this allows the token to download Mapbox into the Expo project:
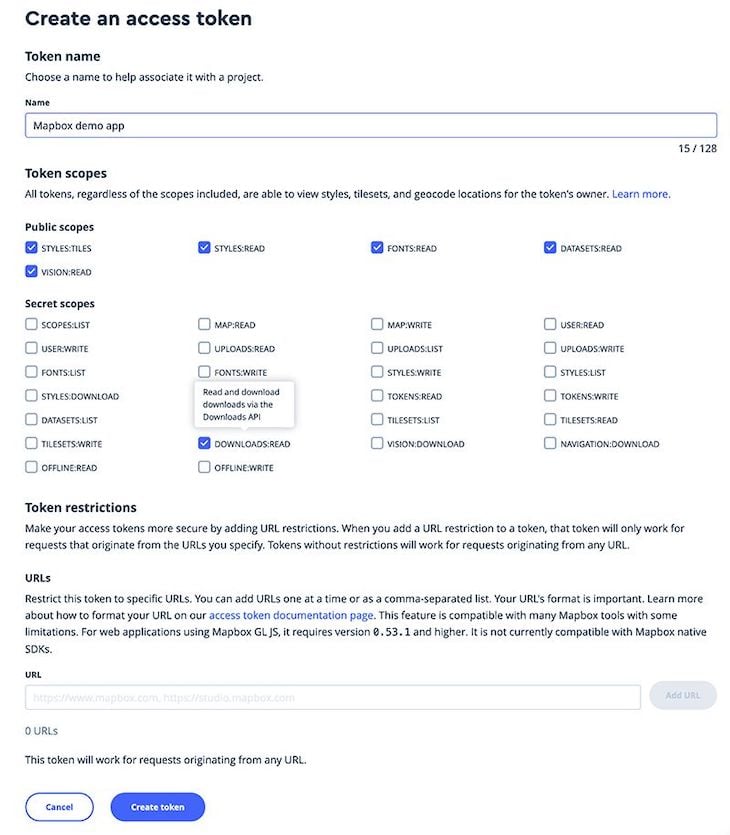
Copy and paste your newly created token in the app.json file in the key-value pair, like in the following example:
{
  "expo": {
    "plugins": [
      [
        "@rnmapbox/maps",
        {
          "RNMapboxMapsImpl": "mapbox",
          "RNMapboxMapsDownloadToken": "put your access token here"
        }
      ]
    ]
  }
}
Now, to see if everything is working and properly configured, we’ll create a simple map in our application. Copy and paste the following code into your app.js file:
import 'expo-dev-client';

import React from 'react';

import { StyleSheet, View } from 'react-native';

import Mapbox from '@rnmapbox/maps';

Mapbox.setAccessToken('put your public access token here');

const App = () => {
  return (
    <View style={styles.page}>
      <View style={styles.container}>
        <Mapbox.MapView style={styles.map} />
      </View>
    </View>
  );
};

export default App;

const styles = StyleSheet.create({
  page: {
    flex: 1,

    justifyContent: 'center',

    alignItems: 'center',
  },

  container: {
    height: 300,

    width: 300,
  },

  map: {
    flex: 1,
  },
});
In our app.js file, we require another access token for Mapbox. Go back to your Mapbox account, copy and paste your default public token, and replace the string in the code in the app.js file:
Mapbox.setAccessToken('put your public access token here');
EAS Build is a hosted service that we can use to build app binaries in Expo and React Native projects.
To manage your native projects, EAS Builds are recommended. EAS Build provides a seamless experience, particularly if you’re unfamiliar with Xcode and Android Studio builds, or you don’t have them installed locally on your PC.
First, we have to set up our project to create development builds. It’s recommended to install the EAS CLI globally as follows:
npm install -g eas-cli
Make sure that you’re inside of the root folder for the mapbox-app project. Run the command below to initialize a development build:
npx expo install expo-dev-client expo-location
Add the following code inside of the newly created eas.json file. We’re adding a new object for the development-simulator:
{
  "build": {
    "development-simulator": {
      "developmentClient": true,
      "distribution": "internal",
      "ios": {
        "simulator": true
      }
    }
  }
}
Run the command below to create the development build on an iOS Simulator, then go through the steps:
eas build --profile development-simulator --platform ios
This step can take a long time to complete while it builds everything. You can check the progress by clicking on the Build details: link in the command line:

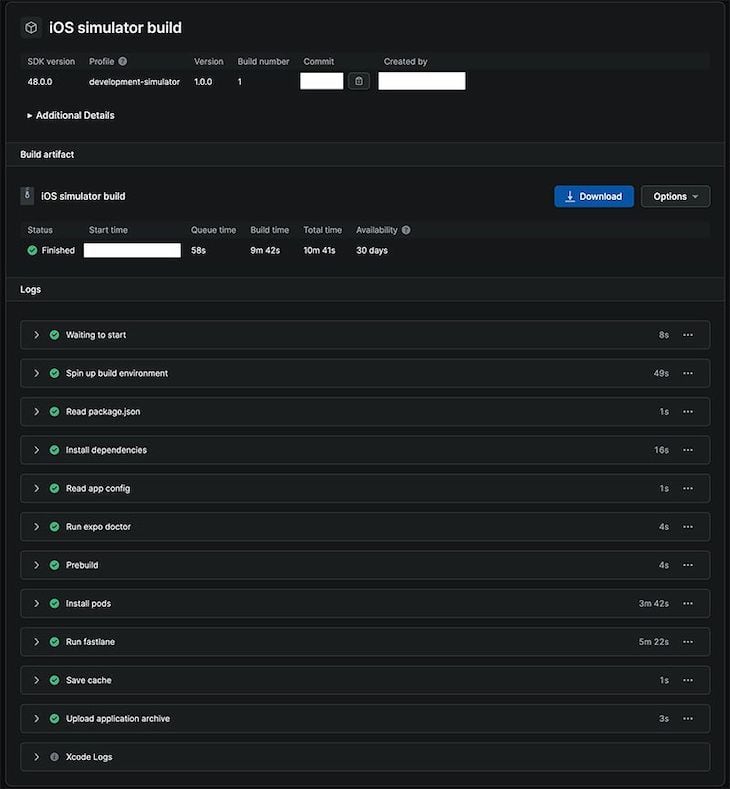
Wait for the build to complete, then start your Expo project with the development server command. Open it with iOS, and you should see the iOS Simulator with a map on the screen:
npx expo start --dev-client
To make your app run on a physical iOS or Android device, you can follow the steps under the On a device section.
We can create custom markers to represent a point on our map. First, let’s learn about three Mapbox structures, MapView, camera, and PointAnnotation.
MapViewMapView is an embeddable map interface that we can use to show all of the map data. In our codebase, we use the Mapbox.MapView class as the main wrapper component.
With Mapbox maps, the camera represents the map’s field of view. The viewport of the camera is governed by numerous elements, including the centre, zoom level, pitch, and bearing.
PointAnnotationPointAnnotation essentially puts a point on our map, which is determined by the coordinates we set in the state value const [coordinates] = useState([-5, 55]);. PointAnnotation uses longitude and latitude to determine where the point should be placed on the map.
Now, replace the code in the App.js file with the following. Don’t forget to save your access token because you’ll need to add it to the new code at the top:
import 'expo-dev-client';

import React, { useState } from 'react';

import { StyleSheet, View } from 'react-native';

import Mapbox from '@rnmapbox/maps';

Mapbox.setAccessToken('put your token here');

const App = () => {
  const [calloutVisible, setCalloutVisible] = useState(false);

  const [coordinates] = useState([-5, 55]);

  const onMarkerPress = () => {
    setCalloutVisible(true);
  };

  const loadAnnotationUK = () => {
    return (
      <Mapbox.PointAnnotation
        key="annotationUK"
        id="annotationUK"
        coordinate={[0.1, 51.5]}
        onSelected={onMarkerPress}
      >
        <View
          style={{
            height: 20,

            width: 20,

            backgroundColor: 'green',

            borderColor: 'black',

            borderWidth: 2,

            borderRadius: 50,
          }}
        ></View>

        <Mapbox.Callout
          title="Welcome to London!"
          contentStyle={{ borderRadius: 5 }}
        ></Mapbox.Callout>
      </Mapbox.PointAnnotation>
    );
  };

  return (
    <View style={styles.page}>
      <View style={styles.container}>
        <Mapbox.MapView style={styles.map}>
          <Mapbox.Camera zoomLevel={4} centerCoordinate={coordinates} />

          <Mapbox.PointAnnotation id="uk" coordinate={coordinates} />

          <View>{loadAnnotationUK()}</View>
        </Mapbox.MapView>
      </View>
    </View>
  );
};

export default App;

const styles = StyleSheet.create({
  page: {
    flex: 1,

    justifyContent: 'center',

    alignItems: 'center',
  },

  container: {
    height: '100%',

    width: '100%',
  },

  map: {
    flex: 1,
  },
});
We create a function for a custom pointer with a callout that is displayed when you click on it. We’ve also made the map full-screen so it is no longer cropped in the middle.
Reload the application by hitting the R button in the command line for the Expo app, and it will update. Now, you should see a full-screen map with a custom pointer marker on London, UK. Clicking on it will bring up a callout box.
It’s very common to display a user’s location inside of a map application, so let’s run through a quick demo. We’ll use the expo-location package to detect a user’s location.
Whenever you install a new package in Expo, you’ll have to rebuild the application over again using the eas build --profile development-simulator --platform iOS command or the Android command. It can be quite time-consuming, however, the steps below outline the build process for developing mobile apps with EAS.
Replace the code in the App.js file with the following code. Like we did before, transfer over your token as well:
import 'expo-dev-client';

import React, { useState, useEffect } from 'react';

import { StyleSheet, View } from 'react-native';

import Mapbox from '@rnmapbox/maps';

import * as Location from 'expo-location';

Mapbox.setAccessToken('put your token here');

const App = () => {
  const [location, setLocation] = useState(null);

  useEffect(() => {
    (async () => {
      const { status } = await Location.requestForegroundPermissionsAsync();

      if (status !== 'granted') {
        console.error('Permission to access location was denied');

        return;
      }

      const currentLocation = await Location.getCurrentPositionAsync({});

      setLocation(currentLocation.coords);
    })();
  }, []);

  return (
    <View style={styles.container}>
      {location && (
        <Mapbox.MapView style={styles.map} styleURL={Mapbox.StyleURL.Street}>
          <Mapbox.Camera
            zoomLevel={15}
            centerCoordinate={[location.longitude, location.latitude]}
            animationMode="flyTo"
            animationDuration={2000}
          />

          <Mapbox.PointAnnotation
            id="userLocation"
            coordinate={[location.longitude, location.latitude]}
            title="Your location"
          />
        </Mapbox.MapView>
      )}
    </View>
  );
};

export default App;

const styles = StyleSheet.create({
  container: {
    flex: 1,

    backgroundColor: '#fff',
  },

  map: {
    flex: 1,
  },
});
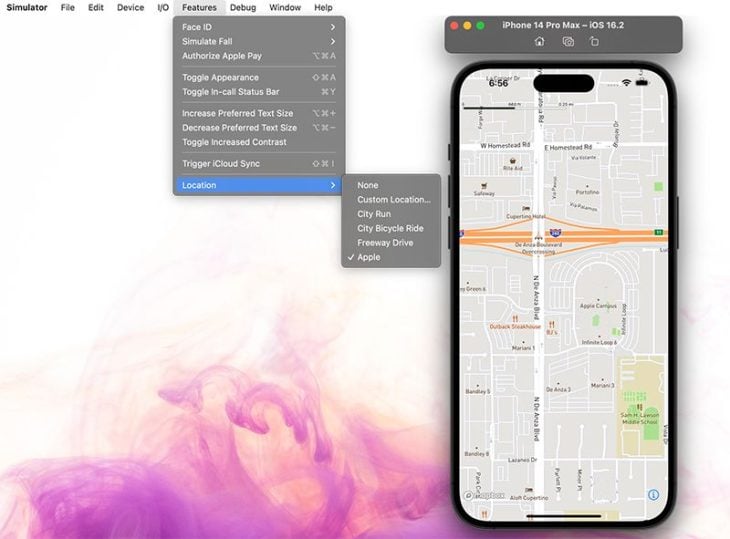
Reload the application, open it again in the iOS Simulator, and you should see a dialogue that asks you to allow "mapbox-app" and use the location. Allow it, and the map should load a location on the simulated iPhone.
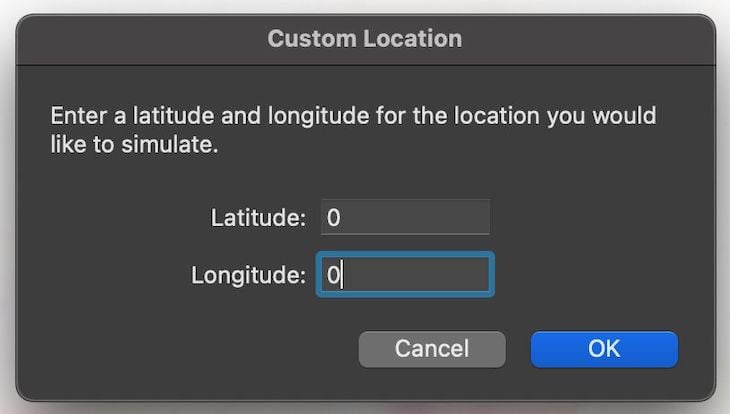
You can choose your own location or use one listed by using the iOS Simulator menu, which lets you handle permissions when requesting a user’s location on iOS. It’s possible to spoof a location and create a virtual one.
See the screenshots below for an example of how to do this. With the help of Google Maps or a search engine, you can find the longitude and latitude of any location on earth:
React Native Mapbox provides a strong and versatile method for introducing interactive and visually appealing maps into your mobile applications. By utilizing Mapbox’s vast ecosystem along with React Native’s cross-platform capabilities, developers can create feature-rich, location-based experiences suited to their specific needs.
In this article, we’ve discussed the advantages of utilizing React Native Mapbox, including its customizability and compatibility with both iOS and Android platforms. By implementing Mapbox APIs, developers can accomplish a seamless integration of mapping services with the React Native environment.
Lastly, don’t forget to take advantage of the thriving development communities that surround both React Native and Mapbox. There are many tools, tutorials, and examples available to assist you in overcoming obstacles and learning best practices for designing custom maps for your applications.
With the strong combination of React Native and Mapbox at your disposal, the possibilities for developing compelling, location-based experiences are nearly unlimited. So, go ahead and let your imagination run wild to create personalized maps that actually stand out and bring value to your users.
I hope you enjoyed this article, and be sure to leave a comment if you have any questions. Happy coding!

LogRocket is a React Native monitoring solution that helps you reproduce issues instantly, prioritize bugs, and understand performance in your React Native apps.
LogRocket also helps you increase conversion rates and product usage by showing you exactly how users are interacting with your app. LogRocket's product analytics features surface the reasons why users don't complete a particular flow or don't adopt a new feature.
Start proactively monitoring your React Native apps — try LogRocket for free.
Hey there, want to help make our blog better?
Join LogRocket’s Content Advisory Board. You’ll help inform the type of content we create and get access to exclusive meetups, social accreditation, and swag.
Sign up now
Build scalable admin dashboards with Filament and Laravel using Form Builder, Notifications, and Actions for clean, interactive panels.

Break down the parts of a URL and explore APIs for working with them in JavaScript, parsing them, building query strings, checking their validity, etc.

In this guide, explore lazy loading and error loading as two techniques for fetching data in React apps.

Deno is a popular JavaScript runtime, and it recently launched version 2.0 with several new features, bug fixes, and improvements […]