Writing unit tests is a critical step in building robust, high quality software. When developing Vue.js applications, it is often helpful to write unit tests that make assertions on components and how they are rendered.
In this article we’ll look at writing unit tests for Vue.js applications using Avoriaz, a testing utility library for Vue.js.
For this piece, Vue refers to Vue.js 2.x versions.
Note that a basic understanding of Vue, with the webpack template is required to follow this guide.
To get started with our project, we will use the Vue-cli . This would help us to skip the process of configuring webpack and all other complicated processes.
If you do not have the Vue-cli installed, we can do so by running the following command:
npm install -g vue-cli
Once we have the vie-cliinstalled, let’s proceed to creating the application. To do that, we run:
vue init webpack unittest
At this stage, you’ll be prompted with a few questions. You can accept the default option for most of them, the only requirement is that you answer YES to including vue-router and YES to setting up unit tests with Karma and Mocha.
Next, Let us take a look at our test\unit\specs\Hello.spec.js . We will notice this block of code:
In the code block above, we will notice:
expect function, which checks to see that the output is equal to what we are expecting.Notice that in the test above, we expected that the text content of the h1 tag under the hello class would be equal to welcome to Your Vue.js App
This explains how simple it is for a Vue test to be written. As simple as this method is, there is a simpler method to write tests in Vue.
Remember i mentioned that there is a simpler method for writing unit test in Vue. Here we are. That simple method is using a package called avorias .
First, we need to install the package. To do that, let us run the following commands.
// change directory to our folder
cd unittest
// install the avorias package
npm install avoriaz
Now let us re-write the default hello test using avoriaz . To do that, let us delete the test\unit\specs\Hello.spec.js file, then create a new file called test\unit\specs\Hello-avorias.spec.js .
After creating this file, let us replace its content with:
Looking at the above code block, we notice the following differences from the default test spec
text() function rather than using the textContent property. This is because avorias gives us a helper function called text()Let us create a new file called Happy.vue in our src\components folder and paste in the following content:
Let’s have a quick explanation of what we have in the code-block above.
h1 tag.them which is looped in the template section.get_themget_them function uses axios to send a GET request to https://restcountries.eu/rest/v2/all. However, we do not use the response. We only use it to fire and async event.them array and returns it. The second computed property returns a string happyNext, we will look at how to test our new component. This means we will test our get_them function, and our computed properties.
Next, we need to update our routes, so we can have a view of the component we have built so far. To do this, let’s open our src\router\index.js and replace it with:
In the code block above, we have imported our happy component and added it to our routes.
If we run npm run dev in our terminal and browse to http://localhost:8080/#/happy we should see the following image:

Now, let us test. If we inspect our method calledget_them , we notice that we had an async call using axios . Because of this, if we attempt to write tests for our component, we will run into various issues such as:
To take care of these issues during testing, we will install two libraries which are:
To install these libraries, we run:
npm install promise moxios
Now we have these libraries installed, let us create a new file called Happy-avorias.spec.js in our test\unit\specs\ folder. Let us add the following code into the file:
Let’s understand what we have done on the code block above:
Moxios for stubbing request.beforeEach and afterEach to handle the installation and un-installation of Moxios . This means Moxios will be installed before all tests defined in this file, and will be uninstalled after each test.moxios.wait to ensure that the promise is resolved before declaring our expect keywordvm.data() to access a data property of our component? This is a helper function provided by avoriashappy one as part of the content in its array, which was assigned to it after the request.Just above, we have seen how to test data, and methods. Here we move into testing computed properties. Testing computed properties with avorias can be a little tricky as this isnt bound to computed properties. Refer to the link below about the issue.
However, fear not. We will cover how to solve this issue while running our own tests on computed properties.
Let us go back to our Happy-avorias.spec.js and replace it with the following content:
In the code block above, we will notice the addition of two new test criteria.
computed_first() property which does nothing with the this keyword.computed() by avorias for checking computed propertiesall_of_them uses the this keyword which avorias does not bind to computed propertyapp.computed().all_of_them() , we expected app.vm.all_of_them to contain computed_oneExplained above is the only difference we need to take into consideration while running computed data. Also, please be informed that the same issue applies to props data.
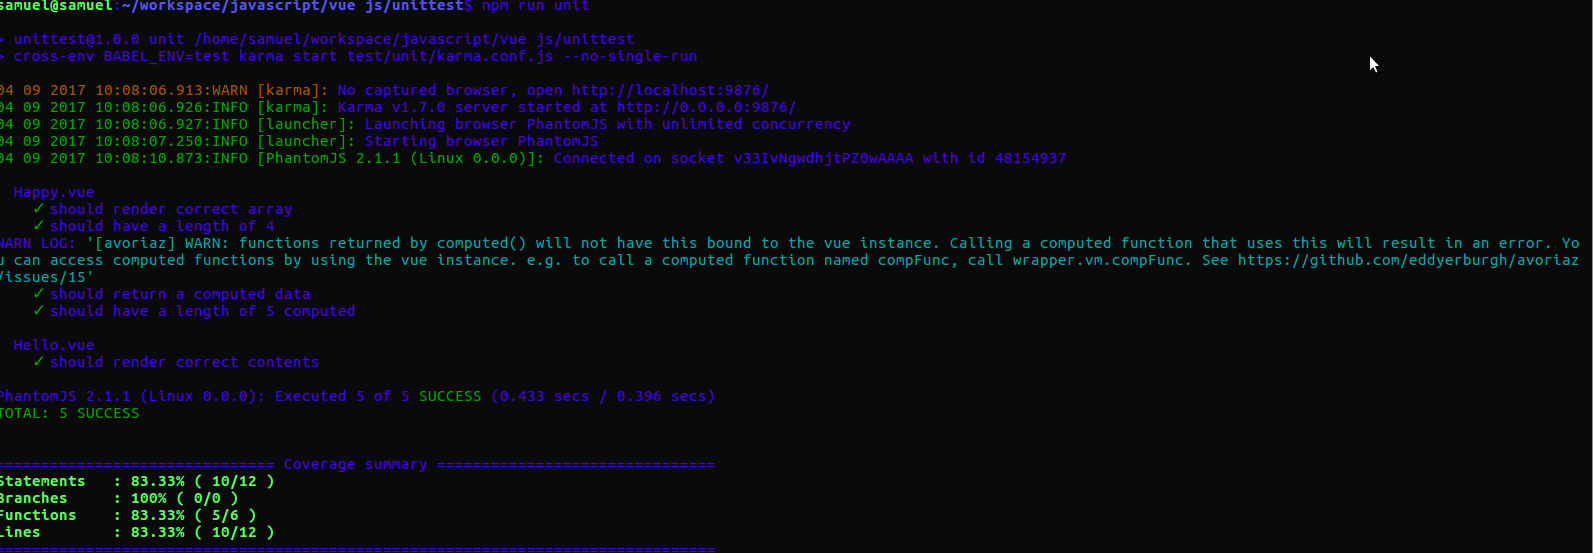
We can run all our tests by running:
npm run unit
we should get the following results:
Writing unit tests in Vue is as essential as writing your application itself. Most users would not return to an application that has bugs. The easiest way to minimize this bugs to the barest minimum is by writing accurate unit tests.
In this little piece, we have gone through how to write unit tests for Vue using the avorias package.
The codebase to this little guide can be found here: samuelayo/vue-unit-test
Debugging Vue.js applications can be difficult, especially when users experience issues that are difficult to reproduce. If you’re interested in monitoring and tracking Vue mutations and actions for all of your users in production, try LogRocket.

LogRocket lets you replay user sessions, eliminating guesswork by showing exactly what users experienced. It captures console logs, errors, network requests, and pixel-perfect DOM recordings — compatible with all frameworks.
With Galileo AI, you can instantly identify and explain user struggles with automated monitoring of your entire product experience.
Modernize how you debug your Vue apps — start monitoring for free.
Hey there, want to help make our blog better?
Join LogRocket’s Content Advisory Board. You’ll help inform the type of content we create and get access to exclusive meetups, social accreditation, and swag.
Sign up now
Discover how to use Gemini CLI, Google’s new open-source AI agent that brings Gemini directly to your terminal.

This article explores several proven patterns for writing safer, cleaner, and more readable code in React and TypeScript.

A breakdown of the wrapper and container CSS classes, how they’re used in real-world code, and when it makes sense to use one over the other.

This guide walks you through creating a web UI for an AI agent that browses, clicks, and extracts info from websites powered by Stagehand and Gemini.


