The use of CSV (comma-separated values) data has become increasingly common over the years due to its simplicity and versatility. CSV is a widely used format for data analysis, data management, and localization. It’s also supported by various software, making it a universal format for data exchange.

However, manually parsing and handling CSV data is cumbersome, especially as datasets grow in size and complexity. This is where Papa Parse comes in; this library makes the process of handling CSV data easier and more efficient.
Papa Parse provides a simple API for parsing CSV files. It can be used to read, write, and manipulate CSV files with ease. It’s also very efficient, making it ideal for processing large datasets. In this article, we’ll explore how to implement CSV functionality into a React application using react-papaparse.
Jump ahead:
This article assumes that you have the following:
Papa Parse is a multithreaded CSV or delimited text (i.e., a plain text file where the data is organized in rows and columns) parser for the browser. It is a feature-rich tool that parses files, both small and very large, without sacrificing performance, privacy, or accuracy.
The library offers a convenient solution for parsing and unparsing CSV or delimited strings, as well as handling files locally and remotely. It effectively addresses security concerns related to file uploads and provides comprehensive error reports for malformed CSV files.
react-papaparse is a specialized wrapper created around the Papa Parse library, tailored specifically for React applications. While Papa Parse can be seamlessly integrated into React projects, react-papaparse goes the extra mile by offering extended functionalities. These include diverse file upload options with drag-and-drop capability, TypeScript compatibility, a user-friendly progress bar, and more.
To begin using react-papaparse in a React project, you must add the package as a dependency in the project. To do so, execute the following command prompt in your terminal:
npm i react-papaparse
If you don’t have a React project set up, you can quickly create one with Vite by running the following command:
create-vite my-react-app --template react
After installing the package, you can start using it by importing one of the following components and functions from react-papaparse into your project components or pages: readString, CSVReader, readRemoteFile, jsonToCSV, and CSVDownloader.
Before moving forward, let’s take a closer look at each of the react-papaparse components to understand their use so we can best determine when to use them.
readStringThe readString function parses CSV data from a string. It takes in two arguments: a CSV data string and a config object, then returns the parsed data in a result array via a callback function of the complete property in the config object.
This function is useful for parsing CSV data stored in a string:
readString(csvData, config);
CSVReaderThe CSVReader component provides a user-friendly file upload interface that allows users to upload CSV files, which are then parsed and converted into an array of objects or an array of arrays:
<CSVReader
  onUploadAccepted={(results) => {
      ...
  }}
  config={{...}}
>
</CSVReader>
The CSVReader component further enhances its capabilities by offering a child as a function, equipped with a set of utility functions and components. These functionalities allow us to display vital information about uploaded CSV files, incorporate a progress bar for visual feedback, and even remove uploaded files:
{({
  getRootProps,
  acceptedFile,
  ProgressBar,
  getRemoveFileProps,
  Remove,
}) => (...)}
Later in this tutorial, we’ll look at how to properly use these utility parameters.
readRemoteFilesAs its name implies, the readRemoteFiles function parses data from a remote file. It fetches (downloads) CSV files from specified URLs and parses the data. The function also takes two arguments – a URL and a configuration object:
readRemoteFile(URL, config);
jsonToCSVThe jsonToCSV function converts JSON data into a CSV format. It takes an array of objects (JSON data) and returns a CSV data string:
jsonToCSV(jsonData, config)
CSVDownloaderThe CSVDownloader component creates a downloadable link for CSV or delimited data. It creates a CSV file from the provided data and allows users to download it through a link or button:
<CSVDownloader ... >
  Download
</CSVDownloader>
Now that we understand the use of each component and function, let’s see how to put them to use in our application.
The most basic operation we can carry out with the react-papaparse library is to convert a delimited text or CSV string into an array or JSON-like data. We can use the readString function to do this.
To get started, let’s import the usePapaparse Hook into our component, and then destructure the readString function from it, like so:
import { usePapaParse } from 'react-papaparse';

export default function ReadString() {
  const { readString } = usePapaParse();
  return(
    ...
  )
}
As previously stated, the function takes in two arguments, a CSV string and a configuration object. The config object defines the settings, behavior, and callbacks that Papaparse uses while parsing data.
Here are some of the common configuration properties that can be passed as options to react-paraparse:
delimiter: Specifies the character used as the delimiter in the CSV data; the default character is a comma (,)header: A Boolean value indicating whether the first row of the CSV data contains headers. If set to true, the parsed result will have an additional data property containing an array of objects with headers as keysnewline: Specifies the character used to specify a new line in the CSV data, the default value is auto-detectworker: A Boolean value indicating whether to use a web worker for parsing. Web workers enable the parsing process to run in the background, separate from the main thread, which can help improve performance and prevent page freeze-up when dealing with large CSV filescomplete: a callback function that is executed when the parsing process is completed successfully. The function receives the parsed result as an argument. This result typically contains an object with data, errors, and other relevant informationstep: A callback function that allows us to process the parsed data row by row as it becomes available. This function is useful when dealing with large CSV files, as it enables us to handle data in a memory-efficient manner, processing one row at a time instead of loading the entire file into memoryN.B., refer to the documentation to learn more about the config object and its properties
We can call the readString function and pass it a CSV string and the config object with the preferred properties based on specific conditions. However, in this example, we’ll trigger the function within another function, invoked by a button click event:
import { usePapaParse } from "react-papaparse";
export default function ReadString() {
const { readString } = usePapaParse();
function handleString() {
readString(CSVString, {
worker: true,
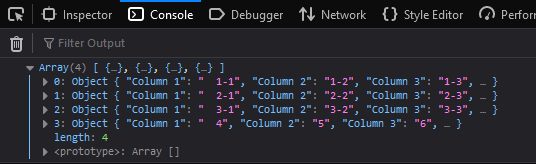
complete: (results) => {
console.log(results);
},
});
}
const CSVString = `Column 1,Column 2,Column 3,Column 4
1-1,1-2,1-3,1-4
2-1,2-2,2-3,2-4
3-1,3-2,3-3,3-4
4,5,6,7`;
return (
<div>
<button onClick={handleString}>Parse</button>
</div>
);
}
In the code above, we use the complete callback function to receive the parsed result and, upon clicking the button, display it in the console:
Logging parsed data to the console is acceptable in development mode, but in a real-world scenario, we’d want to display the parsed data to users, and an HTML table is an excellent way to do so.
To achieve this, we’ll create a state to store the parsed data and then render the data in a table. To ensure a clean presentation in the table, we create an additional state to store the header values for each column. This will help us display the data neatly.
To start, we’ll create two states in our component. You can select any names you like for the states, but for this example, we’ll name them col and val:
const [col, setCol] = React.useState<string[]>([]);
const \[val, setVal] = React.useState<string[\][]>([]);
Next, let’s go to the handleParse function and add the following code within the complete callback:
    interface Idata {
  data: string[][];
  errors: any;
  meta: {
    delimiter: string;
    linebreak: string;
    aborted: boolean;
  };
}


function handleString() {
    readString(CSVString, {
      header: true,
      worker: true,
      complete: (results: Idata) => {
        const value: string[][] = [];
        const column: string[][] = [];

        results.data.map((d) => {
          value.push(Object.values(d));
          column.push(Object.keys(d));
        });

        setCol(column);
        setVal(value);
      },
    });
  }
In this code, we iterate through the returned result data and use the Object.keys() and Object.values() methods to extract the header and row values from the CSV data. Then, we push them to a separate value and columns array, which is subsequently used to update the val and col states, respectively.
We’re performing this iteration because we’ve set the header property in the configuration object to true This tells Papa Parse that the first row of the CSV data contains headers:
header: true,
Papa Parse will, in turn, return an additional data property containing an array of objects with the values of the first-row array (headers) as keys:
In certain instances, it’s advantageous and less tedious to use the following alternative method:
function handleString() {
  readString(CSVString, {
    worker: true,
    complete: (results: Idata) => {
      const value: string[][] = results.data;
      const filtered = value.filter((_, i) => i !== 0);
      setCol(value[0]);
      setVal(filtered);
    },
  });
}
This method filters the headers from the results data and sets them to the col state. Both methods yield the same outcome and structure the data in the desired manner.
Now, let’s proceed to the component’s function body. We’ll create an HTML table structure and then populate the table with the data stored in the val and col states, using an iterator like map():
  return (
    <div>
      <button onClick={handleString}>Parse</button>
      <table>
        <thead>
          <tr>
            {col.length > 0 &&
              col.map((col: string, i: number) => <th key={i}>{col}</th>)}
          </tr>
        </thead>
        <tbody>
          {val.map((val: string[], i: number) => (
            <tr key={i}>
              {val.map((v, i) => (
                <td key={i}>{v}</td>
              ))}
            </tr>
          ))}
        </tbody>
      </table>
    </div>
  );
To make the tabular data more visually appealing, we’ll add some styling:
:root {
  --line-col: rgb(65, 65, 65);
  --row-bg: #96d4d466;
}


tr:nth-child(even) {
  background-color: var(--row-bg);
}

tr{
  outline: 1px solid var(--line-col);

}


td:not(:last-child), th:not(:last-child){
  border-right: solid 1px var(--line-col);
}

td,th{
  padding: 5px 10px;
}
Now, if we go back to the browser, we’ll see our CSV data rendered beautifully on the screen:

CSV data is commonly stored in files with a .csv extension, so it’s probable that users will have local files they wish to parse. We can use the CSVReader component to add file upload functionality into our application. This will enable users to easily upload and parse local CSV files.
As a first step, we import the useCSVReader Hook and its peer dependencies into our component:
import { useCSVReader, formatFileSize } from "react-papaparse";
Next, we destructure the CSVReader component from the useCSVReader Hook, like so:
const { CSVReader } = useCSVReader();
Then, we define the component within the body of our main component and add the following code snippet:
return (
    <CSVReader noDrag>
      {({
        getRootProps,
        acceptedFile,
        ProgressBar,
        getRemoveFileProps,
        Remove,
      }: any) => (
        <>
          <div {...getRootProps()}>
            {acceptedFile ? (
              <>
                <div></div>
              </>
            ) : (
              <button>"Upload CSV file"</button>
            )}
          </div>
        </>
      )}
    </CSVReader>
  );
}
This is a barebones structure of the CSVReader implementation. As previously stated, the component accepts a child as a function with various parameters containing useful functions and components related to file upload:
getRootProps(): This function returns props necessary to create a file drag-and-drop area or trigger file selection using the file dialogacceptedFile: This variable stores the selected file after the user has uploaded it; this variable is used to display information about the fileProgressBar: This component visually renders the progress of the file uploadgetRemoveFileProps: This function returns props that are required for removing an uploaded file and for canceling the upload processremove: This component renders a remove or cancel icon that indicates where the user can click to remove or cancel the upload processIn the below code, we use the acceptedFile variable to check if a file is selected, then we render an empty div; otherwise, we render an upload button that opens the file dialog when clicked:
<div {...getRootProps()}>
  {acceptedFile ? (
    <>
      <div></div>
    </>
  ) : (
    <button>"Upload CSV file"</button>
  )}
</div>
The noDrag prop on the CSVReader component instructs the component to use a file selection dialog with an upload button, instead of drag-and-drop:
<CSVReader noDrag> ... </CSVReader>
N.B., to learn about available upload options, refer to the documentation
We can successfully upload files using the CSVReader component, but without a function in place to retrieve the parsed results, we won’t receive any response after the file is selected.
To address this, we’ll use the component’s onUploadAccepted prop and assign it a callback function with the same content as the one we previously created for fetching parsed data. This way, we can effectively retrieve the parsed data from the component:
const [col, setCol] = useState<string[]>([]);
const \[val, setVal] = useState<string[\][]>([]);

   ...

<CSVReader
  onUploadAccepted={(results: any) => {
    const value: string[][] = results.data;
    const filtered = value.filter((_, i) => i !== 0);
    setCol(value[0]);
    setVal(filtered);
  }}
  noDrag
>

   ...

</CSVReader>
To prevent our browser tab from freezing up when uploading large files, let’s pass a config prop with the worker property set to the component:
config={{ worker: true }}
Now, let’s go back to the browser and upload a file. The parsed data renders nicely to the screen:

To make the results even more user friendly, we can display details about the uploaded files, indicating the upload progress, and adding a remove icon. To include these features, we’ll add the acceptedFile variable and the ProgressBar and remove components into the empty div we created earlier.
The acceptedFile variable is an object with file-related information. It has properties like name and size that hold the name and size of the selected file. To use it, all we have to do is reference these properties using dot notation, like so:
<div>
   <p>{acceptedFile.name}</p>
   <span>{formatFileSize(acceptedFile.size)}</span>
</div>
formatFileSize is a function that we previously imported alongside the useCSVReader Hook. The function takes in the size of the selected file, which is in bytes, as an argument and formats it into a more readable form, such as KB, MB, or GB.
Next, we’ll use the ProgressBar component to display the upload progress of a selected file:
 <div>
   <ProgressBar />
 </div>
Lastly, we will add the remove icon using the `getRemoveFileProps()` function and the `remove` component:
<div {...getRemoveFileProps()}>
   <Remove />
</div>
Now, let’s go back to our browser and select a file. Here’s our result, showing the upload file button, and the upload progress of a selected file:

We can add some styling to further improve the appearance of the upload file progress indicator:
.info-container{
  position: relative;
  max-width: 180px;
  margin: 0 auto;
  aspect-ratio: 3/2;
  background-color: #f3f3f3;
  border-radius: 10px;
  padding: 10px;
  color: #808080;
}

div > span{
  font-weight: 900;
}

.info__remove{
  position: absolute;
  top: -10px;
  right: -10px;
  cursor: pointer;
}

Here’s our final component code:
import { useCSVReader, formatFileSize } from "react-papaparse";

export default function Reader() {
  const { CSVReader } = useCSVReader();

  const [col, setCol] = useState<string[]>([]);
  const \[val, setVal] = useState<string[\][]>([]);

  return (
    <CSVReader
      onUploadAccepted={(results: any) => {
        const value: string[][] = results.data;
        const filtered = value.filter((_, i) => i !== 0);
        setCol(value[0]);
        setVal(filtered);
      }}
      config={{ worker: true }}
      noDrag
    >
      {({
        getRootProps,
        acceptedFile,
        ProgressBar,
        getRemoveFileProps,
        Remove,
      }: any) => (
        <>
          <div {...getRootProps()}>
            {acceptedFile ? (
              <>
                <div className="info-container">
                  <div>
                    <p>{acceptedFile.name}</p>
                    <span>{formatFileSize(acceptedFile.size)}</span>
                  </div>
                  <div className="info__progress">
                    <ProgressBar />
                  </div>
                  <div {...getRemoveFileProps()} className="info__remove">
                    <Remove color={"red"} />
                  </div>
                </div>
              </>
            ) : (
              <button>Upload file</button>
            )}
          </div>
          <table>
            <thead>
              <tr>
                {col.length > 0 &&
                  col.map((col: string, i: number) => <th key={i}>{col}</th>)}
              </tr>
            </thead>
            <tbody>
              {val.map((val: string[], i: number) => (
                <tr key={i}>
                  {val.map((v, i) => (
                    <td key={i}>{v}</td>
                  ))}
                </tr>
              ))}
            </tbody>
          </table>
        </>
      )}
    </CSVReader>
  );
}
Parsing remote data is a relatively straightforward process, similar to parsing CSV strings with the readString function. The readRemoteFile function, like its counterpart, only accepts two arguments: the URL of the CSV to download and the configuration object.
To use the readRemoteFile function, we simply replace the readString function in our code, pass it a URL argument instead of a CSV string, and then set a download property in the configuration object:
  const link = "https://react-papaparse.js.org/static/csv/normal.csv";

  function handleString() {
    readRemoteFile(link, {
      header: true,
      worker: true,
      download: true,
      complete: (results: Idata) => {
        const value: string[][] = [];
        const column: string[][] = [];

        results.data.map((d) => {
          value.push(Object.values(d));
          column.push(Object.keys(d));
        });
readstr
        console.log(results.data);

        setCol(column);
        setVal(value);
      },
    });
  }
Before we can use the readRemoteFile function, we first need to destructure it from the usePapaparse Hook:
const { readString, readRemoteFile } = usePapaParse();
Now, the code will function as expected. It will download the CSV file from the specified URL and then display it in a table:

An example of a practical use case of the readRemoteFile function is to use it to create a feature that allows users to enter a URL as an input element. The function then parses and displays the file’s contents in the table, like so:

CSV files with large amounts of data tend to freeze up the main thread regardless of whether the worker property is configured. The best way to handle this type of file is to stream its data incrementally using the step or chunk configuration properties.
These properties are callback functions that return bits or chunks of the parsed data via the results parameter:
config={{
        worker: true,
        header: true,
        step: (results: any) => {
          console.log(results.data);
        },
         //OR
        chunk: (results: any) => {
          console.log(results.data);
        },
The difference between the step or chunk properties lies in their behavior. The step property streams each row of data individually, while the chunk property streams a designated chunk of the file (e.g., 10MB out of 20MB) at a time:
When either of these properties is set in the configuration file, Papa Parse ignores the complete property and instead prioritizes step or chunk as the primary sources for the parsed data.
N.B., the step and chunk properties don’t compile the result after streaming; you’ll have to take the parts you need as they come in or manually assemble them
We can use the JsonToCSV function to convert parsed delimited or CSV strings back to their original format. Much like its counterpart, readString, which converts CSV data into an array or JSON-like data, the JsonToCSV function operates in the reverse direction, converting JSON data into CSV format (i.e., delimited strings).
The function works similarly to the readString function, it takes in two arguments — an array of objects or an array of arrays:
jsonToCSV(jsonData, config)
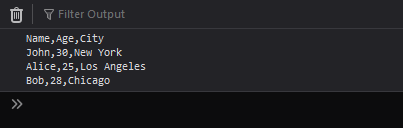
However, the jsonToCSV function differs from the readString function in that it doesn’t return the result data using the complete configuration property. Instead, it directly stores the CSV-formatted data in a variable:
 const { jsonToCSV } = usePapaParse();

 const jsonData = [
    { Name: 'John', Age: 30, City: 'New York' },
    { Name: 'Alice', Age: 25, City: 'Los Angeles' },
    { Name: 'Bob', Age: 28, City: 'Chicago' },
  ];


    const CSVData = jsonToCSV(jsonData, {
        header: true,
        delimiter: ","
    })
We can use the CSVDownloader component to unparse and compile CSV data into a .csv file format and generate downloadable links that enable users to conveniently download the files onto their devices.
The component takes in a number of props, including:
type: Specifies the type of element, like a link or a button, that users can interact with to download the filefilename: Specifies the name of the filebom: Specifies the Unicode encoding of the text filedata: The JSON data or array to be unparsed and stored in a text fileconfig: The configuration object for the functionTo use the CSVDownloader component, let’s first import the useCSVDownloader Hook from react-papaparse and then destructure the CSVDownloader component and the Type object from it:
const { CSVDownloader, Type } = useCSVDownloader();
Next, we’ll declare the component and provide it with the required props:
  const data = [
    {
      "Column 1": "1-1",
      "Column 2": "1-2",
      "Column 3": "1-3",
      "Column 4": "1-4",
    },
    {
      "Column 1": "2-1",
      "Column 2": "2-2",
      "Column 3": "2-3",
      "Column 4": "2-4",
    },
    {
      "Column 1": "3-1",
      "Column 2": "3-2",
      "Column 3": "3-3",
      "Column 4": "3-4",
    },
    {
      "Column 1": 4,
      "Column 2": 5,
      "Column 3": 6,
      "Column 4": 7,
    },
  ];

  return (
    <div>
      <CSVDownloader
        type={Type.Button}
        bom={true}
        filename={"unparsed_csv_string"}
        delimiter={";"}
        data={data}
      >
        Download
      </CSVDownloader>
    </div>
  );
}
Here, we set the type to Button so that the component will render a Download button that users can click to download their files.
That’s all there is to the CSVDownloader component. Now, let’s return to the browser and click on the Download button. Our browser initiates the download of a CSV file with the name passed to the filename prop:

Papa Parse provides a very intuitive and declarative method for handling errors. The results parameter returns two other properties alongside the data properties: errors and meta. Papa Parse automatically captures any errors that arise during the data parsing process and stores them in the errors property:
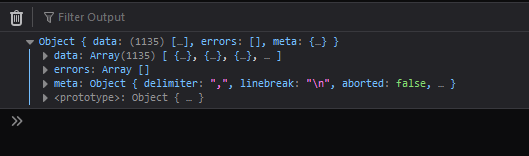
The errors property returns an array of objects; each object has one of the following properties:
type: Indicates the error type, either Quotes, Delimiter, or FieldMismatchcode: Indicates the error codemessage: Indicates human-readable detailsrow: Indicates the row index where the error occurredWith these properties, we can effectively handle errors related to Papa Parse in our applications.
Papa Parse may seem basic when you first start using it, but as you explore its features further, you’ll discover the extensive capabilities it offers. This article covers a lot of Papa Parse’s functionalities, there’s more to investigate beyond what we’ve discussed here.
We did manage to cover some important aspects, though, like parsing CSV strings and files, handling remote file parsing, streaming parsed data, unparsing data, and error handling. If you’re curious to learn more about react-papaparse, I recommend visiting the documentation to discover more about this fantastic library. Happy hacking!
Install LogRocket via npm or script tag. LogRocket.init() must be called client-side, not
server-side
$ npm i --save logrocket

// Code:

import LogRocket from 'logrocket';
LogRocket.init('app/id');
// Add to your HTML:

<script src="https://cdn.lr-ingest.com/LogRocket.min.js"></script>
<script>window.LogRocket && window.LogRocket.init('app/id');</script>
Hey there, want to help make our blog better?
Join LogRocket’s Content Advisory Board. You’ll help inform the type of content we create and get access to exclusive meetups, social accreditation, and swag.
Sign up now
Not sure if low-code is right for your next project? This guide breaks down when to use it, when to avoid it, and how to make the right call.

Compare Firebase Studio, Lovable, and Replit for AI-powered app building. Find the best tool for your project needs.

Discover how to use Gemini CLI, Google’s new open-source AI agent that brings Gemini directly to your terminal.

This article explores several proven patterns for writing safer, cleaner, and more readable code in React and TypeScript.


