macOS Big Sur, the next major release of Apple’s operating system, will ship this fall with lots of amazing new features for both users and developers, including streamlined apps, a sleeker dock, and revamped notification center.
One of the most exciting features of Big Sur is the upgraded Safari web browser, which is the official browser for Apple devices. In this guide, we’ll zoom in on changes to Safari web extensions and how they affect the developer experience.
Extensions are small pieces of software that users can install to enhance and customize the browsing experience. They provide additional functionalities that browsers are not shipped with.
For instance, have you ever needed to translate the content of a webpage? There are extensions for that, such as Microsoft Translator. Other common types of extensions include password managers (e.g., LastPass), bookmarking tools (e.g., Evernote Web Clipper), and proofreading apps (Grammarly for Safari). The list goes on and on.
Safari supports extensions, but the ecosystem is relatively small compared to other popular browsers such as Mozilla Firefox and Google Chrome due to differences in the technology stack and issues with OS compatibility. To bridge this gap, Apple will provide additional support for web extensions in Safari.
Safari browsers will now consume extension APIs just like other browsers. For users, this will lead to a wider and more robust range of extensions available for Safari. For developers, it enables them to create Safari web extensions using HTML, CSS, and JavaScript.
One of the most important changes related to Safari web extensions is the introduction of Xcode 12, which enables developers to build Universal apps by default to support Mac with Apple Silicon without changing any code.
If you want to build and deploy an extension for Safari, you’ll need to use Xcode to package and test them. You must be a member of the Apple Developer Program to distribute them to the App Store.
Xcode is shipped with tons of amazing features that enable you to do much more than just build new Safari extensions. For instance, you can convert existing browser extensions into Safari extensions to use across all Apple devices and share in the App Store. Even more exciting is the command line tool that simplifies this process.
The command line tools package enables you to execute commands from the terminal. It can be downloaded and installed separatley. Fortunately, Xcode comes shipped with it, so if you have Xcode installed, you have access to the command line and you don’t need to install it separately.
You can test, build, query, analyze, and archive operations while building an Xcode project from the command line. Let’s look at a few specific commands you can execute from the terminal (command line tool) to speed up and streamline the developer experience.
To get started, navigate to the directory containing your project. The following command will list all schemes in your workspace.
xcodebuild -list -workspace <your_workspace_name>.xcworkspace
Replace <your_workspace_name> with your actual workspace name.
The above command will result in the following.
$ cd /Users/username/Desktop/MyApplication

$ xcodebuild -list -workspace MyApplication.xcworkspace

Information about workspace "MyApplication":

    Schemes:

        iOSApp

        tvOSApp

        macOSApp

        iOSWithWatchApp

        iOSWithWatchApp WatchKit App
The follow command list all targets, build configurations, and schemes used in a project.
xcodebuild -list -project <your_project_name>.xcodeproj
The output would look like this:
$ cd /Users/username/Desktop/MyProject

$ xcodebuild -list -project MyProject.xcodeproj

Information about project "MyProject":

    Targets:

        iOS

        iOSTests

        iOSUITests

        watchOS App

        watchOS App Extension

        tvOS

        tvOSTests

        tvOSUITests

        macOS

        macOSTests

        macOSUITests


    Build Configurations:

        Debug

        Release
If no build configuration is specified and -scheme is not passed, then Debug is used.
    Schemes:

        iOS

        watchOS App

        tvOS

        macOS
You could build a scheme in your project using the command line by running the following command in the terminal.
xcodebuild -scheme <your_scheme_name> build
The result would look like this:
$ xcodebuild -scheme tvOS  build

=== BUILD TARGET tvOS OF PROJECT MyProject WITH CONFIGURATION Debug ===

...
You can also create a new Safari extension and share it in the App Store using Xcode’s built-in template and repackage it to work with other browsers. For more details, check the documentation.
Start by creating a project for your app using Xcode. Before creating a project in Xcode, you need to provide Xcode with a few important details to authenticate your application and organization:
com.example. followed by the name of your organization and remeber to replace it before you distribute your appWhen Xcode is launched, click “Create a new Xcode project” in the “Welcome to Xcode” window or choose File > New > Project. On the next display screen, select the target operating system and fill in other relevant information.
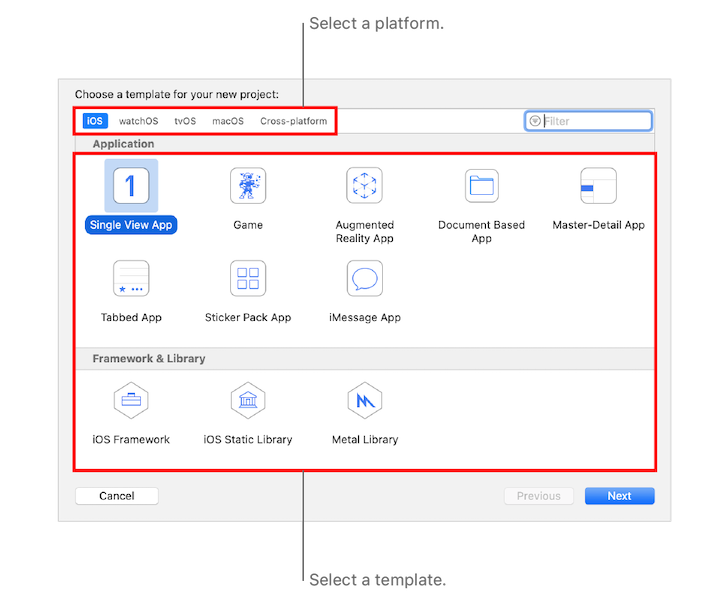
The bundle identifier used to identify your application throughout the system is generated using the product name and organization identifier. You cannot continue building your application without providing these details. If you do not belong to an organization, enter your name.
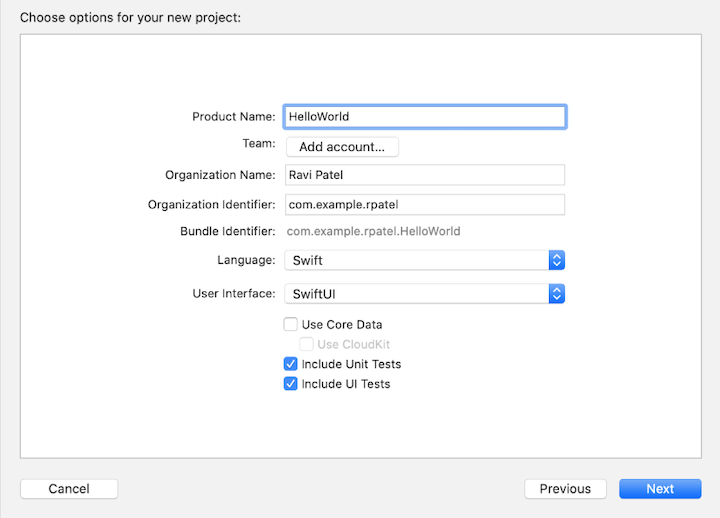
Before you click “Next,” choose SwiftUI as the user interface. This enables you to develop for all platforms and see an interactive preview of your layout.
The main window shows the files and resources for required to develop your app. The interface appears when you create a project or open an existing project.
You can access different parts of your project from the navigator area in the main window. Use the project navigator to select files you want to edit in the editor area. For example, when you select a Swift file in the project navigator, the file opens in the source editor, where you can modify the code and set breakpoints.
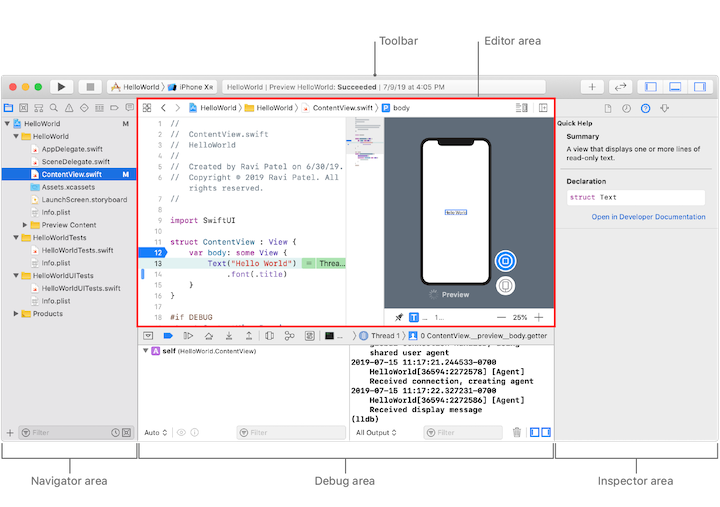
The interface has an inspector area where you can select the attributes inspector to edit properties of a file or user interface element. You can hide and show the inspector to create more room for the editor. Just click the icon in the upper-right corner of the toolbar to toggle. For iOS apps, choose the app target and a simulator or device from the run destination menu in the toolbar, then click “Run.”
For macOS devices, the process is slightly different. To run the app, just click “Run.” This will also open the debug area where you can control the execution of your application and inspect variables. When the app stops at the break point, use the controls in the debug area to step through the code or continue execution. To stop the app when you’re done, click the “Stop” button in the toolbar.
For Swift users, the SwiftUI provides and interactive preview of the user interface while creating an app. All changes you make while using Xcode are kept in the source file, the canvas on the right, and the inspector in sync. You can use the controls in the preview to run the app with the debugger. For more details, see the documentation.
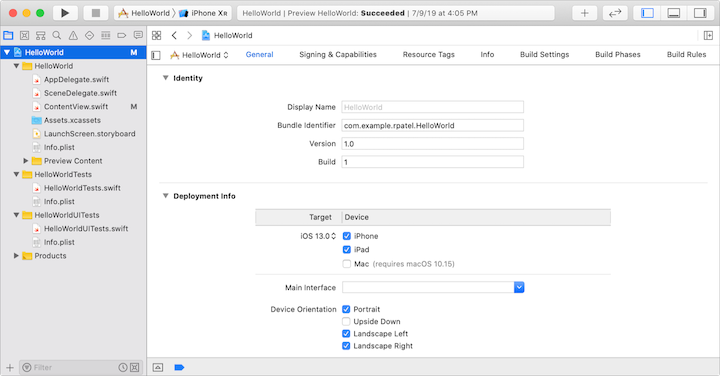
To change the properties you entered when creating your project, select the project name in the project navigator that appears at the top. This will open the project editor in the editor area. Most of the properties you entered will appear on the general pane of the project editor.
Big Sur will help users complete common online tasks more quickly and efficiently with the availability of more and more browser extensions for Safari. If you’re a developer looking to create your own web extensions for Safari and other browsers, Xcode makes the development process a lot less stressful with features such as:
For further reading on Xcode, check the official documentation.
Install LogRocket via npm or script tag. LogRocket.init() must be called client-side, not
server-side
$ npm i --save logrocket

// Code:

import LogRocket from 'logrocket';
LogRocket.init('app/id');
// Add to your HTML:

<script src="https://cdn.lr-ingest.com/LogRocket.min.js"></script>
<script>window.LogRocket && window.LogRocket.init('app/id');</script>
Would you be interested in joining LogRocket's developer community?
Join LogRocket’s Content Advisory Board. You’ll help inform the type of content we create and get access to exclusive meetups, social accreditation, and swag.
Sign up now
Learn how OpenAPI can automate API client generation to save time, reduce bugs, and streamline how your frontend app talks to backend APIs.

Discover how the Interface Segregation Principle (ISP) keeps your code lean, modular, and maintainable using real-world analogies and practical examples.

<selectedcontent> element improves dropdowns

Learn how to implement an advanced caching layer in a Node.js app using Valkey, a high-performance, Redis-compatible in-memory datastore.