The Graph is an indexing protocol for organizing blockchain data. It uses a GraphQL API to provide easier access to on-chain information than the traditional method of sending an RPC call.
The network organizes the data with subgraphs; open-source APIs that are created by the community and are used for retrieving data from Indexers, Curators, and Delegators.
In this article, we’re going to be taking a look at how you can use The Graph and subgraphs for Web3 data querying.
The Replay is a weekly newsletter for dev and engineering leaders.
Delivered once a week, it's your curated guide to the most important conversations around frontend dev, emerging AI tools, and the state of modern software.
Indexers operate the nodes of the network, which index data and serve the queries.
Since the Graph Network uses a proof-of-stake algorithm, indexers stake Graph Tokens (GRT) to provide indexing and query processing services. In turn, Indexers can earn query fees and indexing rewards.
They select subgraphs to index based on the subgraph’s curation signal. Applications that consume the Indexers’ data can set parameters for which Indexers they want to process their queries, along with their preferences for query fee pricing.
Curators organize data from the subgraphs by signaling the subgraphs that should be indexed by the Graph Network.
They do this using Graph Curation Shares (GCS), which allow them to place the equivalent of an investment on a subgraph.
Curators stake GRT, which allows them to mint GCS. Each subgraph has a bonding curve that determines the relationship between the price of GRT and the number of shares that can be minted.
According to the Graph’s documentation, curating is considered risky and should only be performed after thoroughly researching and investigating the trade-offs involved.
Delegators stake GRT to one or more Indexers to help secure the network without having to run a node themselves.
Delegators earn portions of the Indexer’s query fees and rewards, which are dependent on the Indexer’s and Delegator’s stake, along with the price the Indexer charges for each query.
Allocating more stake to an Indexer allows more potential queries to be processed. The Graph’s documentation claims that being a Delegator carries less risk than being a Curator because they are not exposed to fluctuations in the price of GRT, due to burning shares of GCS.
The Graph is developed and maintained by The Graph Foundation. To make sure the network and larger community continue to improve, the foundation distributes grants (called Graph Grants) to community members working on protocol infrastructure, tooling, dApps, subgraphs, and community building.
There are three different ways to interact with the Graph if you are not hosting your own subgraph:
The hosted service does not require a crypto wallet and can be used with a GitHub account. The Graph Explorer and Subgraph Studio will both ask you to connect a wallet such as MetaMask or Coinbase.
After creating an account on the hosted service, click “My Dashboard” on the navigation bar to see your dashboard.

Click “Add Subgraph” to create a subgraph.
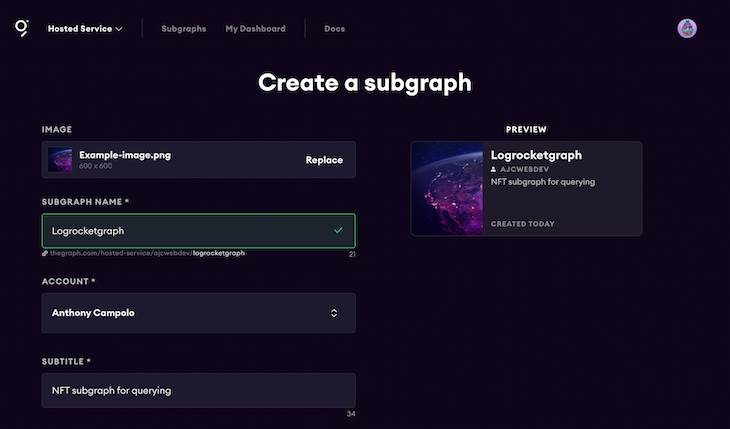
Add a name and subtitle for your subgraph. Once you’ve filled in your subgraph’s information, scroll down to the bottom of the page and click “Create subgraph”.
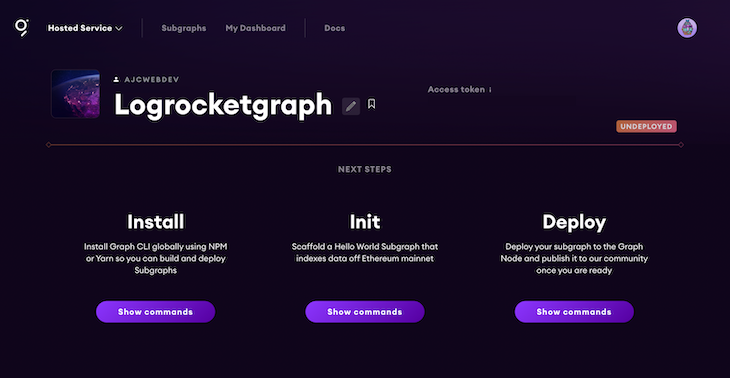
With our subgraph setup on the hosted service, we can create our project files. Create a new directory, initialize a package.json, and install dependencies.
mkdir graphrocket
cd graphrocket
yarn init -y
yarn add -D @graphprotocol/graph-cli @graphprotocol/graph-ts
Copy the access token available on your project dashboard on Hosted Service. Paste the token after the yarn graph auth --product hosted-service command.
yarn graph auth --product hosted-service YOURTOKEN
Create configuration files for TypeScript and Git.
echo '{"extends": "@graphprotocol/graph-ts/types/tsconfig.base.json"}' > tsconfig.json
echo '.DS_Store\nnode_modules' > .gitignore
Smart contracts on the Ethereum blockchain expose an application binary interface (or ABI) as an interface between client-side applications and the Ethereum blockchain. We will need this for our subgraph.
Download the contract’s ABI with cURL and save it to a file called Token.json.
curl "http://api.etherscan.io/api?module=contract&action=getabi&address=0xe7c29cba93ef8017c7824dd0f25923c38d08065c&format=raw" > Token.json
Create three project files including:
token.ts for AssemblyScript code that translates Ethereum event data into the entities defined in the schemesubgraph.yaml for a YAML configuration of the subgraph’s manifestschema.graphql for a GraphQL schema defining the data stored for the subgraph and how to query it via GraphQLecho > token.ts echo > schema.graphql echo > subgraph.yaml
Token and User entitiesIn schema.graphql we’ve defined two types, Token and User.
# schema.graphql

type Token @entity {}
type User @entity {}
The Token has a name and other information such as when it was created, the content URI, and the IPFS file path. It also includes information about the creator and owner.
# schema.graphql

type Token @entity {
  id: ID!
  tokenID: BigInt!
  contentURI: String
  tokenIPFSPath: String
  name: String!
  createdAtTimestamp: BigInt!
  creator: User!
  owner: User!
}
The creator and owner are User types. They have an id, an array of tokens they own, and an array of tokens they’ve created.
# schema.graphql

type User @entity {
  id: ID!
  tokens: [Token!]! @derivedFrom(field: "owner")
  created: [Token!]! @derivedFrom(field: "creator")
}
@derivedFrom enables reverse lookups, which means we do not store both sides of the relationship to improve indexing and query performance. For one-to-many relationships, the relationship should be stored on the “one” side with the “many” side derived from it.
The subgraph.yaml file will contain the definition of our subgraph. Start with the version of the specification used and a file path to the entity types in schema.graphql.
# subgraph.yaml

specVersion: 0.0.4
schema:
  file: ./schema.graphql
Next is the network containing our data sources. dataSources.source needs the address and ABI of the smart contract.
# subgraph.yaml

dataSources:
  - kind: ethereum
    name: Token
    network: mainnet
    source:
      address: "0x3B3ee1931Dc30C1957379FAc9aba94D1C48a5405"
      abi: Token
      startBlock: 11648721
dataSources.mapping.entities defines the entities that the data source writes to the store and is specified by the schema in schema.graphql.
# subgraph.yaml

mapping:
  kind: ethereum/events
  apiVersion: 0.0.5
  language: wasm/assemblyscript
  entities:
    - Token
    - User
dataSources.mapping.abis takes the name and file location of the ABI for the source contract.
# subgraph.yaml

abis:
  - name: Token
    file: ./Token.json
dataSources.mapping.eventHandlers lists the smart contract events the subgraph reacts to and the handlers in the mappings that transform these events into entities in the store.
# subgraph.yaml

eventHandlers:
  - event: TokenIPFSPathUpdated(indexed uint256,indexed string,string)
    handler: handleTokenIPFSPathUpdated
  - event: Transfer(indexed address,indexed address,indexed uint256)
    handler: handleTransfer
file: ./token.ts
Complete subgraph.yaml file:
# subgraph.yaml

specVersion: 0.0.4
schema:
  file: ./schema.graphql
dataSources:
  - kind: ethereum
    name: Token
    network: mainnet
    source:
      address: "0x3B3ee1931Dc30C1957379FAc9aba94D1C48a5405"
      abi: Token
      startBlock: 11648721
    mapping:
      kind: ethereum/events
      apiVersion: 0.0.5
      language: wasm/assemblyscript
      entities:
        - Token
        - User
      abis:
        - name: Token
          file: ./Token.json
      eventHandlers:
        - event: TokenIPFSPathUpdated(indexed uint256,indexed string,string)
          handler: handleTokenIPFSPathUpdated
        - event: Transfer(indexed address,indexed address,indexed uint256)
          handler: handleTransfer
      file: ./token.ts
Generate AssemblyScript types for the ABI and the subgraph schema.
yarn graph codegen
Import the generated types and generated schema and create two functions: handleTransfer and handleTokenURIUpdated.
When a new token is created, transferred, or updated, an event is fired and the mappings save the data into the subgraph.
// token.ts

import {
  TokenIPFSPathUpdated as TokenIPFSPathUpdatedEvent,
  Transfer as TransferEvent,
  Token as TokenContract,
} from "./generated/Token/Token"
import {
  Token, User
} from './generated/schema'

export function handleTransfer(event: TransferEvent): void {}

export function handleTokenURIUpdated(event: TokenIPFSPathUpdatedEvent): void {}
handleTransfer loads the tokenId and sets the owner.
// token.ts

export function handleTransfer(event: TransferEvent): void {
  let token = Token.load(event.params.tokenId.toString())
  if (!token) {
    token = new Token(event.params.tokenId.toString())
    token.creator = event.params.to.toHexString()
    token.tokenID = event.params.tokenId

    let tokenContract = TokenContract.bind(event.address)
    token.contentURI = tokenContract.tokenURI(event.params.tokenId)
    token.tokenIPFSPath = tokenContract.getTokenIPFSPath(event.params.tokenId)
    token.name = tokenContract.name()
    token.createdAtTimestamp = event.block.timestamp
  }
  token.owner = event.params.to.toHexString()
  token.save()

  let user = User.load(event.params.to.toHexString())
  if (!user) {
    user = new User(event.params.to.toHexString())
    user.save()
  }
}
handleTokenURIUpdated updates the tokenIPFSPath anytime it changes.
// token.ts

export function handleTokenURIUpdated(event: TokenIPFSPathUpdatedEvent): void {
  let token = Token.load(event.params.tokenId.toString())
  if (!token) return
  token.tokenIPFSPath = event.params.tokenIPFSPath
  token.save()
}
Build your project for deployment:
yarn graph build
Include your own GitHub username followed by the name of your subgraph:
yarn graph deploy --product hosted-service USERNAME/logrocketgraph
The terminal will return a URL with an explorer for the subgraph and an API endpoint for sending queries.
Deployed to https://thegraph.com/explorer/subgraph/ajcwebdev/logrocketgraph

Subgraph endpoints:
Queries (HTTP):     https://api.thegraph.com/subgraphs/name/ajcwebdev/logrocketgraph
You will need to wait for your subgraph to sync with the current state of the blockchain. Once the syncing is complete, run the following query to show the first two tokens ordered by id in descending order.
{
  tokens(first: 2, orderBy: id, orderDirection: desc) {
    id
    tokenID
    contentURI
    tokenIPFSPath
  }
}
This will output the following:
{
  "data": {
    "tokens": [
      {
        "id": "99999",
        "tokenID": "99999",
        "contentURI": "https://ipfs.foundation.app/ipfs/QmdDdmRAw8zgmN9iE23oz14a55oHGWtqBrR1RbFcFq4Abn/metadata.json",
        "tokenIPFSPath": "QmdDdmRAw8zgmN9iE23oz14a55oHGWtqBrR1RbFcFq4Abn/metadata.json"
      },
      {
        "id": "99998",
        "tokenID": "99998",
        "contentURI": "https://ipfs.foundation.app/ipfs/QmZwZ5ChjHNwAS5rFDGkom2GpZvTau6xzr8M7gro5HqQhB/metadata.json",
        "tokenIPFSPath": "QmZwZ5ChjHNwAS5rFDGkom2GpZvTau6xzr8M7gro5HqQhB/metadata.json"
      }
    ]
  }
}
Here’s the query for the first user and their associated content:
{
  users(first: 1, orderBy: id, orderDirection: desc) {
    id
    tokens {
      contentURI
    }
  }
}
This will output the following:
{
  "data": {
    "users": [
      {
        "id": "0xfffff449f1a35eb0facca8d4659d8e15cf2f77ba",
        "tokens": [
          {
            "contentURI": "https://ipfs.foundation.app/ipfs/QmVkXqo2hmC2j18udhZG1KavxaTGrnEX7uuddEbghPKCUW/metadata.json"
          },
          {
            "contentURI": "https://ipfs.foundation.app/ipfs/QmTSEgtJmptBCpEJKubK6xDZFiCMEHgGQjhrUAsJSXwzKZ/metadata.json"
          },
          {
            "contentURI": "https://ipfs.foundation.app/ipfs/QmPzSJGhheyyA7MZMYz7VngnZWN8TinH75PTP7M1HAedti/metadata.json"
          },
          {
            "contentURI": "https://ipfs.foundation.app/ipfs/QmeroC2cWfdN31hLd3JpBQMbbWqnQdUdGx94FGUR4AGBUP/metadata.json"
          },
          {
            "contentURI": "https://ipfs.foundation.app/ipfs/QmQVkhqEsZvsstfDp6QAPXB4TkxFnpeAc9BWu2eQo6QvZD/metadata.json"
          },
          {
            "contentURI": "https://ipfs.foundation.app/ipfs/QmRax3fw4skHp95i2v3BzroMoKQVHqAkwbov8FyPdesk3j/metadata.json"
          },
          {
            "contentURI": "https://ipfs.foundation.app/ipfs/QmViGRnvHFBZ6CWHoxZGJoU9iwnoGwZfqj2vgDN3dgsGv4/metadata.json"
          },
          {
            "contentURI": "https://ipfs.foundation.app/ipfs/QmdRBPxDF1tUzm1Pczyme24vguUjW28cLwM4n9MvtxAWX6/metadata.json"
          }
        ]
      }
    ]
  }
}
The query for the two most recently created NFTs.
{
  tokens(
    first: 2,
    orderBy: createdAtTimestamp,
    orderDirection: desc
  ) {
    id
    tokenID
    contentURI
    createdAtTimestamp
  }
}
This will output the following:
{
  "data": {
    "tokens": [
      {
        "id": "133012",
        "tokenID": "133012",
        "contentURI": "https://ipfs.foundation.app/ipfs/QmSmk85TjpaegCmHDRWZQqMz18vJtACZdugVx5a1tmfjpv/metadata.json",
        "createdAtTimestamp": "1656792769"
      },
      {
        "id": "133011",
        "tokenID": "133011",
        "contentURI": "https://ipfs.foundation.app/ipfs/QmU6RFcKFDteUTipg5tg4NFkWKApdVbo9oq9UYMtSmcWVe/metadata.json",
        "createdAtTimestamp": "1653825764"
      }
    ]
  }
}
You can also use the HTTP endpoint and send GraphQL queries directly with cURL.
curl \
  --header 'content-type: application/json' \
  --url 'https://api.thegraph.com/subgraphs/name/ajcwebdev/logrocketgraph' \
  --data '{"query":"{ tokens(first: 1) { contentURI tokenIPFSPath } }"}'
In this article, we have seen how to create a GraphQL endpoint that exposes certain information contained on the Ethereum blockchain. By writing a schema containing our entities, we defined the information that will be indexed by the subgraph.
The quantity and diversity of blockchain networks continue to proliferate in Web3. Having a standardized and widely adopted query language will enable developers to iterate and test their applications with greater efficiency.
Client-side issues that impact users’ ability to activate and transact in your apps can drastically affect your bottom line. If you’re interested in monitoring UX issues, automatically surfacing JavaScript errors, and tracking slow network requests and component load time, try LogRocket.

LogRocket lets you replay user sessions, eliminating guesswork around why bugs happen by showing exactly what users experienced. It captures console logs, errors, network requests, and pixel-perfect DOM recordings — compatible with all frameworks.
LogRocket's Galileo AI watches sessions for you, instantly identifying and explaining user struggles with automated monitoring of your entire product experience.
Modernize how you debug web and mobile apps — start monitoring for free.

I had four weeks to build a complete app from scratch using AI tools like OpenCode and Claude Opus: here’s how it went.
Learn how to build a reusable Vue 3 table engine that powers tables, cards, and lists with shared sorting and pagination logic.
Compare the best React chart libraries for 2026, including Recharts, Nivo, visx, Apache ECharts, MUI X Charts, and more.

Claude Code vs. OpenCode in a real Next.js refactor: benchmark results, mistakes, prompts, and when to use each CLI agent.
Would you be interested in joining LogRocket's developer community?
Join LogRocket’s Content Advisory Board. You’ll help inform the type of content we create and get access to exclusive meetups, social accreditation, and swag.
Sign up now

