We’ve entered a new era of design-to-code. Thanks to generative AI tools, transforming design images into working code is now possible. You can easily feed a screenshot into Lovable or Replit and have a functional app built within minutes! The problem, however, is that an image alone doesn’t give an AI model enough context to produce a pixel-perfect result. These models often generate layouts that stray from the original design system. As a developer, I can tell this is the fastest way to trigger any designer you work with.
So, how can we get better, more accurate code generation directly from Figma designs? The answer is Model Context Protocol (MCP). MCP is an open protocol that allows AI agents access to external tools and data outside their range, through a supporting MCP provider. This standardized protocol lets us connect any AI application to external systems. It has famously been called the USB-C for AI apps.
Figma recently rolled out its MCP Server (beta), which lets AI coding agents use Figma’s custom AI tools to fetch live design data directly from artboards. It has the full context of your design layout. With Figma MCP, AI coding agents can now read native Figma properties like variables, design tokens, components, variants, auto layout rules, and more. These properties are then used as data inputs (context) for AI agents like Cursor, Copilot, and Claude Code to accurately implement your designs.
The traditional designer-to-developer handoff is now evolving into a designer-to-agent handoff, where the priority is structuring design files in a way that is easily interpreted by AI agents for successful code generation.
For designers, this new wave changes what it means to prepare a design for development. The focus is no longer just on creating visually appealing designs, but on creating AI-compatible design files. In this article, we’ll explore how Figma’s new MCP server works and how to optimize your design files for agent handoff.
To follow along, you’ll need:
I still remember my first experience with Figma. It’s always been great at creating website designs. But as a developer, I couldn’t help but wish that these designs I made or collaborated on could be directly translated into usable source code. That wish started to materialize when Figma started to let us copy CSS styles from designs.
At first, this feature was underwhelming. The generated CSS was filled with absolute positioning and rigid padding and margin values that made no sense in a real project. But over time, the software has gotten better.
The handoff process evolved. Figma introduced ways to export design tokens as JSON, allowing colors, typography, and spacing values to stay version-controlled and in sync with code.
Tools like Storybook came on the scene to help design and development teams collaborate on their design systems.
Now, we’re entering the MCP era that enables designer-to-agent handoff. With Figma MCP, a developer can connect a design file to an agent that calls special Figma AI tools to grab design data and translate it directly to code. This workflow allows for near pixel-perfect implementation and faster design iterations.
As mentioned earlier, using the official Figma MCP server requires a Figma subscription with a Dev seat. However, there’s another option, which is a community-run MCP server from Framelink.ai named Framelink MCP for Figma. There are tradeoffs, of course.
Figma’s MCP server is built to integrate tightly with other native Figma features and also has Code Connect. Framelink, on the other hand, uses Figma’s API and other methods to read data about your layout and pass that design context to coding agents. Let’s take a closer look.
The official Figma MCP Server brings Figma directly into your workflow by providing rich design context to AI agents that generate code from Figma design files. It exposes several tools that coding agents can leverage, including get_design_context, get_screenshot, get_variable_defs, and more. The MCP Server supports Code Connect, which allows you to map Figma components to their corresponding components in your codebase. The coding agent can then use the get_code_connect_map tool to generate code that stays consistent with your component library and codebase standards.
In short, the official server gives first-class support for understanding your design file by integrating tightly with Figma’s native features.
Framelink’s MCP for Figma is an open-source MCP server that provides Figma layout information to coding agents. Because it’s open-source, it’s free and works with any Figma account. All you need to do is create a Figma access token that has adequate permissions (select all) and a reasonable lifespan. Save this token as you will be needing it later on. Framelink’s MCP server for Figma provides two tools that fetch data via the Figma API. get_figma_data (to pull the structure, styling, and layout) and download_figma_images (to fetch image assets). Framelink can also generate design tokens (e.g., JSON of colors, typography) and a design system doc, but it doesn’t have a built-in Code Connect feature. The tradeoff is that it may not be as “aware” of your custom component library as the official Figma server.
Here’s a deeper comparison between the two:
| Features | Figma’s official MCP server | Framelink MCP for Figma |
|---|---|---|
| AI coding agent tools | Multiple: 5 tools and 18 prompt resources engineered to guide agents. Tools: get_design_context(code), get_screenshot(image), get_variable_defs, get_metadata, get_code_connect_map, create_design_system_rules. | Fewer: mainly get_figma_data (layout & styling JSON) and download_figma_images for assets. It also offers token generation tools. |
| Code Connect | Yes. Has built-in support (get_code_connect_map) to map Figma nodes to your React components, ensuring use of the right components. | No. Code Connect is a paid Figma feature. |
| Design-system and token awareness | High. Honors Figma Variables and tokens; can extract colors/spacing exactly and align output with your design tokens. | Medium. Can extract raw style info, but you may need to supply context. Relies on the JSON it returns. |
| Setup / Access | Official, but in beta. Requires a Dev seat (Pro or Org plan) for now. Works in Dev Mode (desktop app) or remote beta. | Community-built (npm). Free; works with any personal or team Figma file (just need an API token) |
Now that we’ve covered the tradeoffs, let’s look at how to structure Figma files for better AI code generation.
I find it poetic that design habits like thoughtful layer naming, consistent use of components, auto layout, and mapping text, color, and spacing values to local variables have become the very foundations that enable coding agents to accurately implement our designs. It emphasizes that these practices aren’t “luxuries” but necessities to improve our workflows.
To try out the Figma MCP server, we’ll work with this Figma file that contains a simple design for a sign-up page. It’s set up with Figma variables, components, and auto layout, and is ready to be consumed by a coding agent:
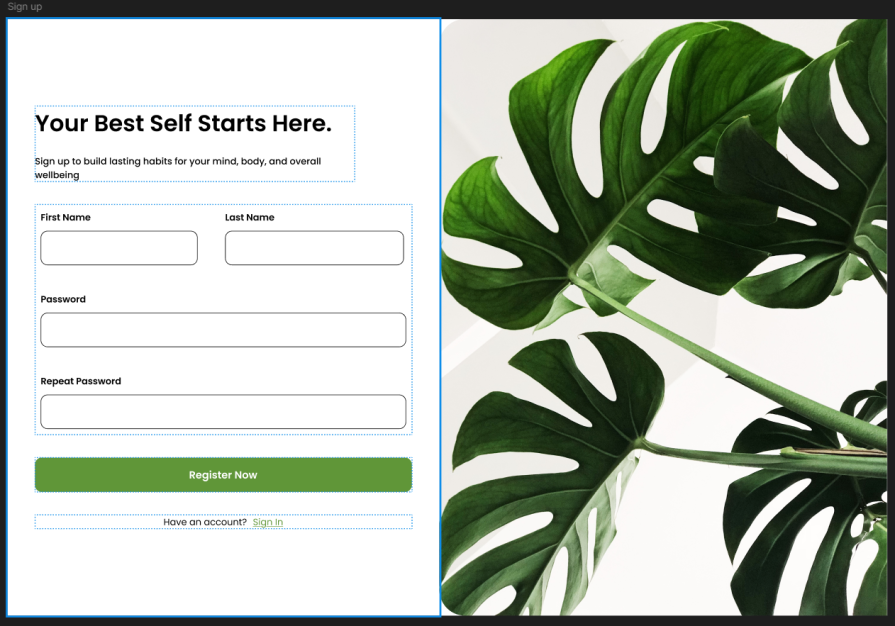
Let’s work through the core parts of the design:
Figma variables are crucial for creating consistent design systems. We can use them to store values for spacing, colors, typography, and a lot more. Updating a variable in one place updates it everywhere else.
The reference design has primitive variables for colors, spacing, border radius, and typography, making up its design system. It also uses design tokens, which are semantic names that use the primitive variables underneath — think of them as Tailwind classes that use the primitive variables, which are defined in :root.
Now we need a way to export our design system into a file that a coding agent can understand. I’m making use of the Open Variable Visualizer plugin, which lets you export your Figma variables in a JSON file along with a resolver utility file.
After running the extension, download the two files by clicking the two links shown below:
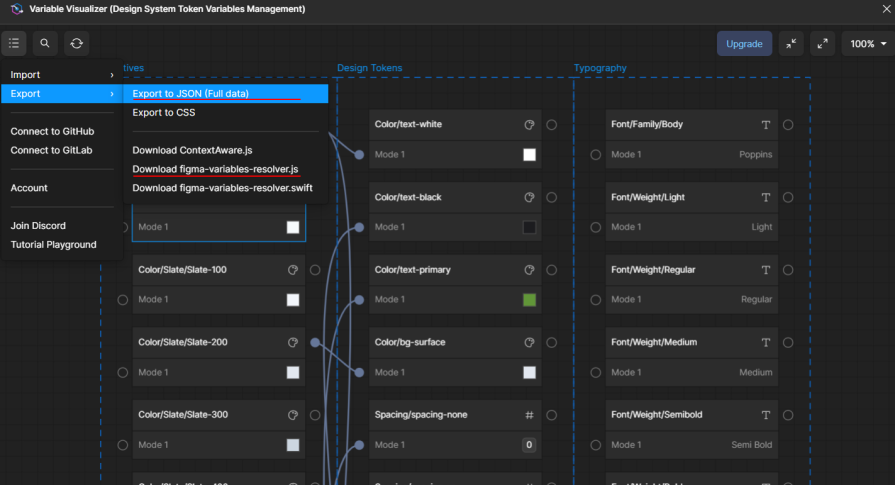
Now you have config files for your design system that any coding agent will understand.
Auto layout is what makes our designs flexible and adaptive. It ensures that when elements resize, text changes, or new items are added, the layout adjusts automatically. This is our best bet for achieving a pixel-perfect output.
In the signup page, every section from the form container to individual input fields and buttons uses auto layout. This ensures consistent spacing and alignment regardless of screen size or content changes.
If you know CSS Flexbox or Grid, you’ll notice the similarities. Direction, alignment, padding, and gap all map directly to flex properties. This structure is what allows a coding agent (or developer) to easily translate the design into production-ready code.
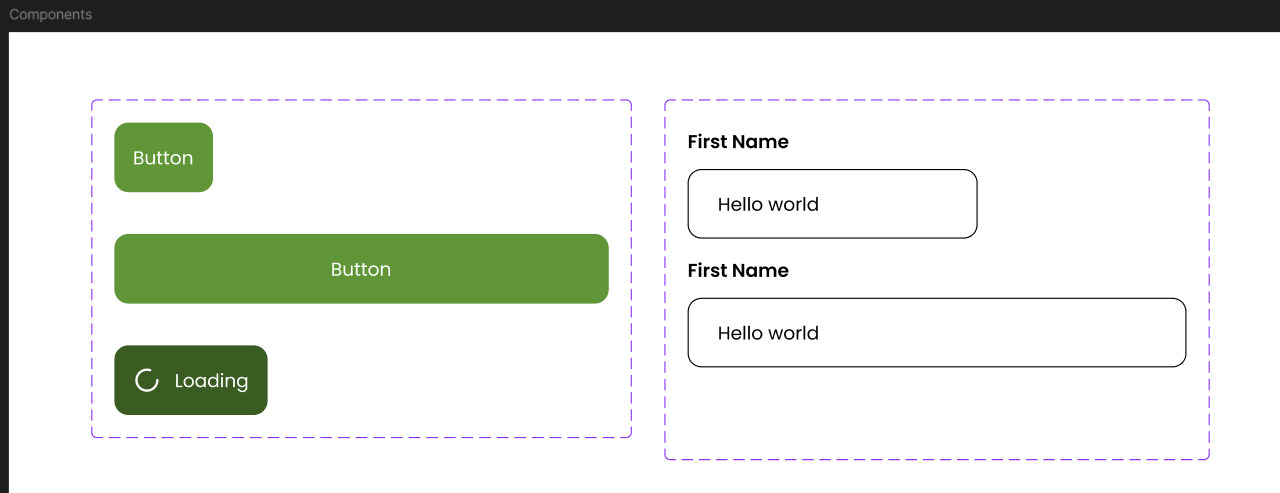
Components are what make a design system reusable and scalable. Instead of recreating the same button or input field across multiple frames, we define one source component and reuse it everywhere. All modern frontend frameworks share this same ideology.
In this design, the button component includes variants for three different states: default, full-width, and loading. Each shares the same structure, spacing, typography, and colors referenced by the design tokens defined earlier.
After you prompt the agent, you’d see clearly how components and variants map to a logical UI state in a codebase:
Finally, layers are named clearly and grouped by hierarchy. This helps both designers and agents in navigating your file. If you have a messy Figma file, Figma AI and community plugins like Rename It can help batch-rename layers and tidy up your structure. Consistent naming is a powerful part of handoff readiness.
Let’s start vibe coding this design!
We’ll set up a development environment to test the two Figma MCP servers discussed earlier. At this point, you should have Cursor IDE installed on your device.
Start by connecting to the official, remote Figma MCP server. Use this deep link to add it to Cursor. This opens Cursor’s MCP settings and displays a dialog like this:
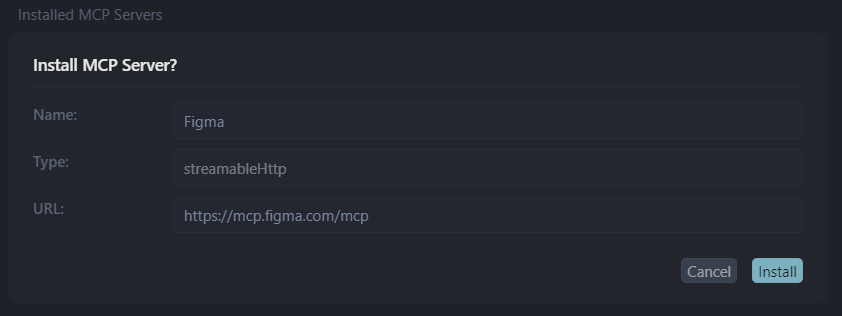
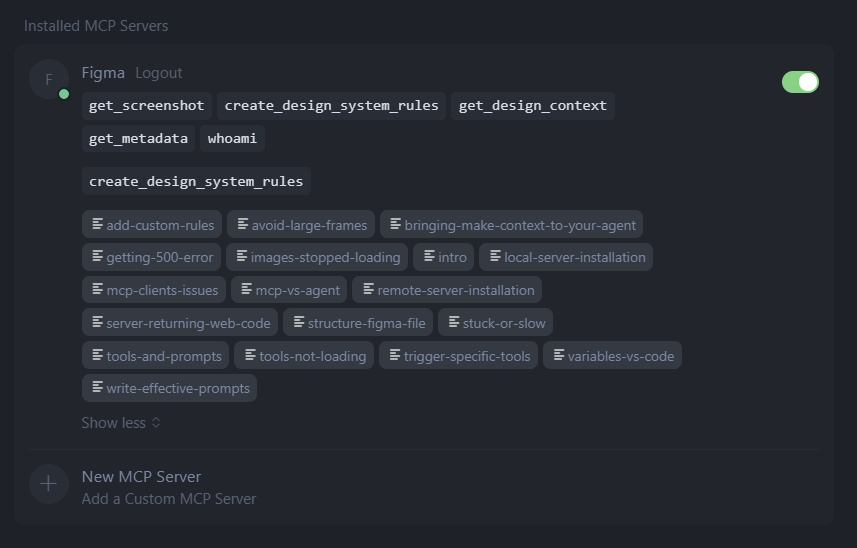
Click Install to add the server. You’ll be prompted to authenticate your Figma account in the browser. Once complete, the MCP server should appear active in green:
Next, add Framelink’s MCP server. Click Add a Custom MCP Server to open Cursor’s mcp.json file. Here, you’ll see the existing configuration for the official Figma server. Grab your Figma access token and add the Framelink MCP:
{
  "mcpServers": {
    "Figma": {
      "url": "https://mcp.figma.com/mcp",
      "headers": {}
    },
    "Framelink MCP for Figma": {
      "command": "cmd", /* use "npx" for mac */
      "args": [
        "/c",
        "npx",
        /* remove the two commands above for mac */
        "-y",
        "figma-developer-mcp",
        "--figma-api-key=YOUR-KEY",
        "--stdio"
      ]
    },
  }
}
You now have both Figma MCP servers ready. Make sure to turn one off when working, as running both can confuse your agent and produce inconsistent results:

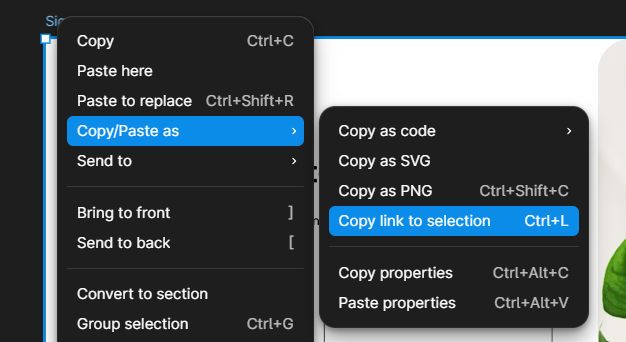
To achieve this, we’ll provide the agent with the Figma frame URL and the two exported files containing our design system variables. First, select the sign-up page frame in Figma and right-click. Select Copy/Paste as → Copy link to selection to get the URL:
Open Cursor, select Agent mode, and switch the AI model from Auto to any Claude model, preferably Claude 4.5. This model usually gives more accurate and structured results when generating code. Here is an abridged version of the prompt I used (you can find the full version here):
I need you to build a React application using Vite that implements the design from this Figma file: [PASTE_FIGMA_URL_HERE]
I’m providing you with two critical files that contain the design system variables from Figma:
[Attach Variables.JSON file from Variable Visualizer] – Contains all design tokens (colors, typography, spacing, etc.) exported from Figma [Attach figma-variables-esolver.js file from Variable Visualizer] – A resolver utility to access and use these variables programmatically.
Requirements: Setup: Create a new React + Vite project with the appropriate template
….
After running this prompt, the agent generated a complete sign-up page on the first try! I only had to fix a few small import errors in the console:
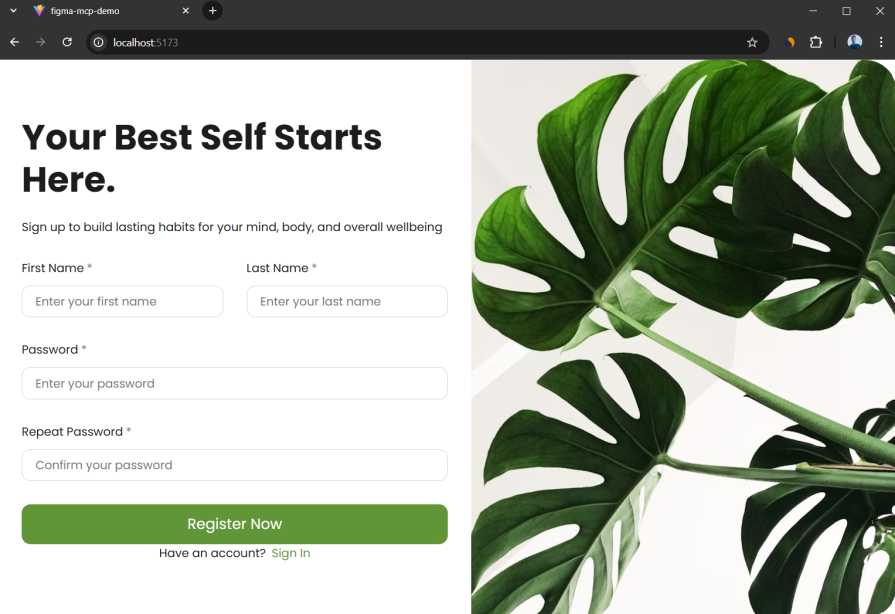
Honestly, I was impressed! It’s not perfect, though — notice how the corner radii that were originally on the left of the image have been moved to the right.
I went through the code, and while the structure isn’t my style, the implementation is still almost pixel-perfect. I just had to prompt the agent to hide the image on mobile screens to keep the layout responsive.
With further prompting, especially through Code Connect, you could get better results that align directly with your code base’s structure.
Getting strong results from design-to-code agents largely depends on the context you provide. Here are a few ways to help the model produce better output:
To quote the Figma dev team, “Code connect is the #1 way to get consistent component reuse in code. Without it, the model is guessing”.
Publishing your components with Code Connect also helps an agent understand your folder structure and UI library. For example, if your button or input components live in a src/components/ui folder, the agent can place new code in the same structure instead of generating everything from scratch. This keeps your project organized and makes the AI’s code easier to integrate.
Figma MCP marks a shift from static design handoffs to intelligent, context-rich design-to-code workflows. We’re advancing on the no-code community here. By structuring your files with variables, auto layout, and components, you give AI coding agents the context they need to deliver near-production-quality results. Whether you use Figma’s official MCP server or Framelink’s open-source option, the goal is the same — to bridge design and development with clarity, structure, and precision.
As AI-driven workflows mature, the line between designer, developer, and agent continues to blur. The teams that learn to design for AI collaboration will set the standard for the next generation of digital product development.

LogRocket's Galileo AI watches sessions and understands user feedback for you, automating the most time-intensive parts of your job and giving you more time to focus on great design.
See how design choices, interactions, and issues affect your users — get a demo of LogRocket today.

AI has accelerated design execution, but speed can come at the expense of intentionality. Learn how UX teams can preserve product thinking and judgment.

UX testing is not limited to layouts, copy, and visual design. Full-stack and server-side experiments help teams evaluate how backend logic, APIs, algorithms, and product flows affect the overall user experience.
In A/B, A/B/n, or multivariate testing scenarios, using p-value with traditional null-hypothesis-based statistical analysis is so common, and most designers […]
Traditional A/B testing splits traffic evenly, but multi-armed bandits dynamically send more users to the better-performing version. Here’s how the method works, where it helps, and when UX teams should use it over classic A/B testing.


