We all know that one of the most impressive features of the blockchain is its immutability property. But it is not advantageous in all cases.
Imagine a deployed smart contract that holds user funds having a vulnerability. Developers should fix the bug as early as possible, like what they can do in the Web2 applications. But in terms of Web3 development, it’s not the same case.
Traditional smart contract patterns don’t allow such hot fixes. Instead, the developers need to deploy a new contract every time they want to add a feature or fix a bug. While it doesn’t seem like a big issue in the beginning, it’ll be a huge overhead when the codebase grows. And every time, the data needs to be migrated from the old contract to a new contract to reflect the current state of the protocol.
To solve this problem, various upgradability patterns have been introduced. Among them, the proxy pattern is considered the truest form of upgradability.
When we speak about upgradability, it means that the client always interacts with the same contract (proxy), but the underlying logic can be changed (upgraded) whenever needed without losing any previous data.
N.B., one can argue that via upgradable proxies, a protocol can even change the underlying logic for their needs (even without the knowledge of their community). There are various methods to prevent that, as DAOs follow timelocks. But, it’s beyond the scope of the article and that itself is a topic for another day.
Here’s a summary of what we’ll cover in this article:
The Replay is a weekly newsletter for dev and engineering leaders.
Delivered once a week, it's your curated guide to the most important conversations around frontend dev, emerging AI tools, and the state of modern software.
Currently, there are three types of proxy patterns:
In a nutshell, a diamond pattern is an upgradeable proxy pattern in which there are multiple logic contracts (facets) instead of one. Whenever a function is called in the diamond proxy contract, it checks the hash table (mapping) to see which facet has the function defined and then delegates the call to that facet. This delegatecall occurs in the proxy’s fallback() method. We can add or remove any number of methods from any facet in a single transaction using a method called diamondCut(). In order to avoid storage collisions, this pattern uses the DiamondStorage technique. It also allows the developers to implement logic in facets, independent of other facets.
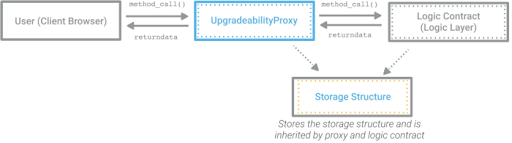
As mentioned previously, to implement an upgradeable smart contract, the logic layer (i.e., the implementation contract) is separated from the storage layer (i.e., the proxy contract) and all calls to the proxy contract are delegated to the logic contract.
This method worked just fine until It was fine until a malicious backdoor, proxy selector clashing, was identified and addressed. Proxy selector clashing occurs when two or more methods have identical function signatures in the proxy and logic contract. This can lead to smart contract exploits.
To resolve the clashing, OpenZeppelin introduced the transparent proxy pattern. This pattern allows identical function signatures to exist in the proxy and logic contract, but the delegatecall to the logic contract only occurs if the caller is not a contract admin. Otherwise, the function is invoked in the proxy contract itself if it exists or reverts if not.
The UUPS proxy pattern is similar to the transparent proxy pattern, except the upgrade is triggered via the logic contract rather than from the proxy contract.
There is a unique storage slot in the proxy contract to store the address of the logic contract that it points to. Whenever the logic contract is upgraded, that storage slot is updated with the new logic contract address. The function to upgrade the contracts should be a protected function to avoid unauthorized access. Also, this provides the ability to go completely non-upgradeable gradually as the logic contract can completely remove the upgradeTo() method in the new implementation if needed.
The below table compares the pros and cons of the diamond, transparent, and UUPS proxy patterns:
| Proxy pattern | Pros | Cons |
|---|---|---|
| Transparent proxy pattern | Comparatively easy and simpler to implement; widely used | Requires more gas for deployment, comparatively |
| Diamond proxy pattern | Helps to battle the 24KB size limit via modularity; incremental upgradeability | More complex to implement and maintain; uses new terminologies that can be harder for newcomers to understand; as of this writing, not supported by tools like Etherscan |
| UUPS proxy pattern | Gas efficient; Flexibility to remove upgradeability | Not as commonly used as it is fairly new; extra care is required for the upgrade logic (access control) as it resides in the implementation contract |
OpenZeppelin suggests using the UUPS pattern as it is more gas efficient. But the decision of when to use UUPS is really based on several factors like the business requirements of the projects, and so on.
The original motivation for UUPS was for deploying many smart contract wallets on the mainnet. The logic could be deployed once. The proxy could be deployed hundreds of times for each new wallet, without spending much gas.
As the upgrade method resides in the logic contract, the developer can choose UUPS if the protocol wants to remove upgradeability completely in the future.
Enough of the introduction and theory. Let’s set up and deploy an upgradable Pizza contract using the UUPS proxy pattern, leveraging Hardhat and OpenZeppelin’s UUPS library contracts.
We’ll deploy a simple smart contract called Pizza and upgrade it to PizzaV2 using the UUPS proxy pattern.
As we’ll be using Hardhat for development purposes, you’ll need to have NodeJS and NPM installed in your machine.
Once Node.js is installed and set up, you can install Hardhat globally in your machine from your command line by running the command npm install hardhat -g.
Once Hardhat is installed, you can create new Hardhat projects easily!
Let’s create a fresh new directory for our project:
mkdir uups-demo && cd uups-demo
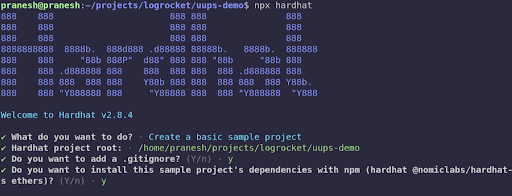
Initialize a new Hardhat project by running npx hardhat and choosing the initial config for the project.
Now Hardhat will install some of the required libraries. Other than that, we’ll require some additional npm modules as well for the UUPS pattern. Run the following command to install the modules.
npm i @openzeppelin/contracts-upgradeable @openzeppelin/hardhat-upgrades @nomiclabs/hardhat-etherscan dotenv --save-dev
Once everything has been installed, the initial directory structure will look something like this:
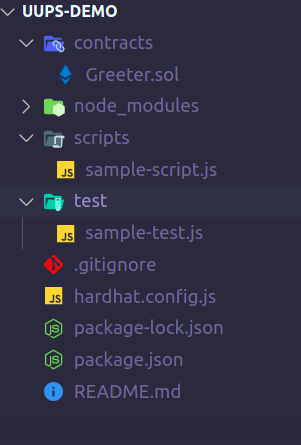
N.B., the file names and the contents will be modified as we proceed.
Create a new file called Pizza.sol inside the contracts directory and add the following code:
// SPDX-License-Identifier: MIT
pragma solidity ^0.8.10;

// Open Zeppelin libraries for controlling upgradability and access.
import "@openzeppelin/contracts-upgradeable/proxy/utils/Initializable.sol";
import "@openzeppelin/contracts-upgradeable/proxy/utils/UUPSUpgradeable.sol";
import "@openzeppelin/contracts-upgradeable/access/OwnableUpgradeable.sol";

contract Pizza is Initializable, UUPSUpgradeable, OwnableUpgradeable {
   uint256 public slices;

      ///@dev no constructor in upgradable contracts. Instead we have initializers
    ///@param _sliceCount initial number of slices for the pizza
   function initialize(uint256 _sliceCount) public initializer {
       slices = _sliceCount;

      ///@dev as there is no constructor, we need to initialise the OwnableUpgradeable explicitly
       __Ownable_init();
   }

   ///@dev required by the OZ UUPS module
   function _authorizeUpgrade(address) internal override onlyOwner {}

   ///@dev decrements the slices when called
   function eatSlice() external {
       require(slices > 1, "no slices left");
       slices -= 1;
   }
}
This is a simple Pizza contract that has three methods:
initialize() : Upgradable contracts should have an initialize method in place of constructors, and also the initializer keyword makes sure that the contract is initialized only once_authorizeUpgrade() : This method is required to safeguard from unauthorized upgrades because in the UUPS pattern the upgrade is done from the implementation contract, whereas in the transparent proxy pattern, the upgrade is done via the proxy contract_eatSlice() : A simple function to reduce the slice count whenever calledNow let’s compile and deploy the Pizza contract.
Before doing that, we have to update the hardhat.config.js file with the following contents:
require("@nomiclabs/hardhat-ethers");
require("@openzeppelin/hardhat-upgrades");
require("@nomiclabs/hardhat-etherscan");

require("dotenv").config();

module.exports = {
 solidity: "0.8.10",
 networks: {
   kovan: {
     url: `https://kovan.infura.io/v3/${process.env.INFURA_API_KEY}`,
     accounts: [process.env.PRIVATE_KEY],
   },
 },
 etherscan: {
   apiKey: process.env.ETHERSCAN_API_KEY,
 },
};
Create a new file called .env and add the following contents:
PRIVATE_KEY = <<DEPLOYER_PRIVATE_KEY>>
ETHERSCAN_API_KEY = <<ETHERSCAN_API_KEY>>
INFURA_API_KEY=  <<INFURA_API_KEY>>
The PRIVATE_KEY is the private key of the deployer wallet. You can grab the INFURA_API_KEY from here and ETHERSCAN_API_KEY from here.
Once the .env file is created, you can compile the contracts by running npx hardhat compile in your terminal.
Now let’s deploy our contract. Inside the scripts directory, create a new file called deploy_pizza_v1.js and add the following contents:
const { ethers, upgrades } = require("hardhat");

const SLICES = 8;
async function main() {
 const Pizza = await ethers.getContractFactory("Pizza");

 console.log("Deploying Pizza...");

 const pizza = await upgrades.deployProxy(Pizza, [SLICES], {
   initializer: "initialize",
 });
 await pizza.deployed();

 console.log("Pizza deployed to:", pizza.address);
}

main();
Save the file.
Now you can deploy the contracts by running the following command in the terminal:
npx hardhat run ./scripts/deploy_pizza_v1.js –network kovan
You should see something like this. The address will be different!
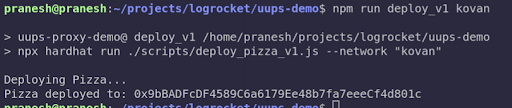
The address displayed in the console is the address of the proxy contract. If you visit Etherscan and search the deployer address, you’ll see two new contracts created via two transactions. The first one is the actual Pizza contract (the implementation contract), and the second one is the proxy contract.
In my case, the Pizza contract address is 0x79928a69ada394ad454680d3c4bd2197ad9f7a94.
The proxy contract address is 0x9bBADFcDF4589C6a6179Ee48b7fa7eeeCf4d801c.
You can copy the address of the Pizza contract from Etherscan and verify it by running the command below:
npx hardhat verify –network kovan <<CONTRACT_ADDRESS>>
The output should be something like this:

N.B., after deployment, if you’re confused which contract is the proxy or implementation, the proxy contract source code will be already verified on Etherscan (in most cases). The unverified will be the implementation contract!
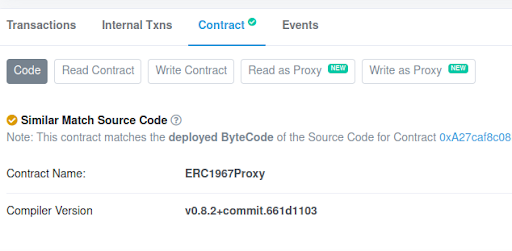
Once verified, your Etherscan transactions will look like this:
![]()
If you check the Pizza contract in Etherscan, the values like owner, slices, etc. will not be set or initialized because in the proxy pattern, everything is stored and executed in the context of the proxy contract.
So in order to interact with the Pizza contract, you should do it via the proxy contract. To do that, first we need to inform Etherscan that the deployed contract is actually a proxy.
In the Contract tab of the proxy contract, there’ll be a small dropdown above the source code section (on the right side).
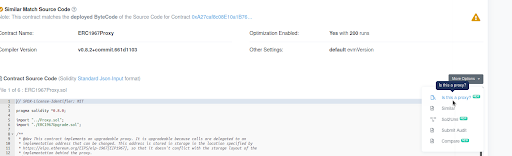
Choose “Is this a proxy?” option from the dropdown and then Verify.
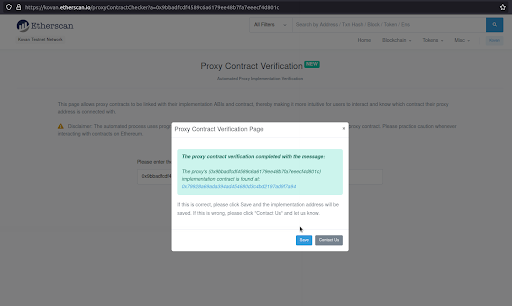
You can see Read as Proxy and Write as Proxy options in the Contract tab of the proxy contract.
Now you can interact with the Pizza contract using those options!
After some time passes, let’s say we have to include additional functionality to our Pizza contract. For example, let’s make a simple function to refill slices and a function to return the current contract version.
We can create our PizzaV2 contract. Inside the contracts folder, create a new file called PizzaV2.sol, add the following contents, and save the file:
// SPDX-License-Identifier: MIT
pragma solidity ^0.8.10;

import "./Pizza.sol";

contract PizzaV2 is Pizza {
   ///@dev increments the slices when called
   function refillSlice() external {
       slices += 1;
   }

   ///@dev returns the contract version
   function pizzaVersion() external pure returns (uint256) {
       return 2;
   }
}
N.B., the PizzaV2 contract inherits from the Pizza contract. So all the functions including the two newer functions will be present in the V2 contract.
Once the file is saved, now we can upgrade our Pizza contract to PizzaV2. Inside the scripts directory, create a new file upgrade_pizza_v2.js, add the following contents, and save the file. It is responsible for upgrading the deployed contract:
const { ethers, upgrades } = require("hardhat");

const PROXY = <<REPLACE_WITH_YOUR_PROXY_ADDRESS>>;

async function main() {
 const PizzaV2 = await ethers.getContractFactory("PizzaV2");
 console.log("Upgrading Pizza...");
 await upgrades.upgradeProxy(PROXY, PizzaV2);
 console.log("Pizza upgraded successfully");
}

main();
You can run the following command to execute the upgrade:
npx hardhat run ./scripts/upgrade_pizza_v2.js –network kovan

N.B., if you face any errors when running the above command, retry it two or three times. It should work.
If you check Etherscan, you can see there’ll be another two transactions from the deployer wallet. The first one is the deployment of the PizzaV2 contract and the second transaction will be the upgradeTo call in the Pizza contract to perform an upgrade. This makes sure that the proxy contract points to the newly deployed PizzaV2 contract.
You can verify the PizzaV2 contract from the terminal by running:
npx hardhat verify –network kovan <<PIZZA_V2_ADDRESS>>
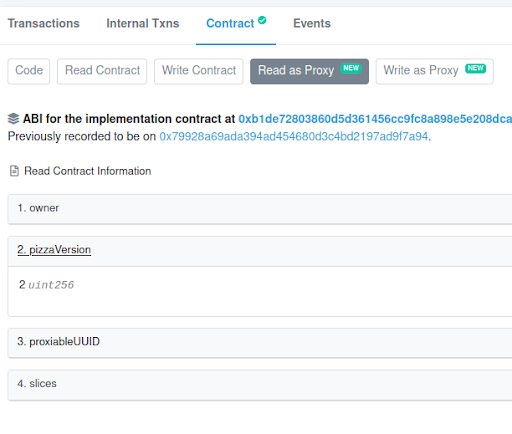
If you check the Write as Proxy tab inside the Contract tab of the proxy contract in Etherscan, you can see the newly created view method — refillSlice() — along the older methods. Also, there will be a pizzaVersion() method in the Read as Proxy tab, which confirms that the upgrade is successful!
Whoa. 🎉 🎉 We’ve successfully deployed and upgraded contracts using the UUPS proxy pattern!
Though there are several advantages to the UUPS pattern, and the recommended proxy pattern is currently the UUPS pattern, there are some caveats that we should be aware of before implementing this into a real-world project.
One of the main caveats is that because the upgrades are done via the implementation contract with the help of upgradeTo method, there’s a higher risk of newer implementations to exclude the upgradeTo method, which may permanently kill the ability to upgrade the smart contract. Also, this pattern is a bit complex to implement when compared to other proxy patterns.
Despite the warnings, UUPS is a very gas-efficient proxy pattern that has several advantages. The code for this project along with some unit tests can be found in the GitHub repo here. Feel free to play around with the code.
Happy coding! 🎊
Client-side issues that impact users’ ability to activate and transact in your apps can drastically affect your bottom line. If you’re interested in monitoring UX issues, automatically surfacing JavaScript errors, and tracking slow network requests and component load time, try LogRocket.

LogRocket lets you replay user sessions, eliminating guesswork around why bugs happen by showing exactly what users experienced. It captures console logs, errors, network requests, and pixel-perfect DOM recordings — compatible with all frameworks.
LogRocket's Galileo AI watches sessions for you, instantly identifying and explaining user struggles with automated monitoring of your entire product experience.
Modernize how you debug web and mobile apps — start monitoring for free.

useEffect breaks AI streaming responses in ReactSee why useEffect breaks AI streaming in React, and how moving stream state outside React fixes flicker and stale updates.

A real-world debugging session using Claude to solve a tricky Next.js UI bug, exploring how AI helps, where it struggles, and what actually fixed the issue.

CSS wasn’t built for dynamic UIs. Pretext flips the model by measuring text before rendering, enabling accurate layouts, faster performance, and better control in React apps.

Why do real-time frontends break at scale? Learn how event-driven patterns reduce drift, race conditions, and inconsistent UI state.
Hey there, want to help make our blog better?
Join LogRocket’s Content Advisory Board. You’ll help inform the type of content we create and get access to exclusive meetups, social accreditation, and swag.
Sign up now

