Editor’s note: This article was last updated by Taofiq Aiyelabegan on 4 April 2024 to add information about advanced SQLite commands like how to use create table if not exists or the INSERT OR REPLACE functions for data updates, as well as to provide some information about common SQLite errors.

It’s very common for developers to use SQLite, a C-language library, as the datastore in mobile applications. SQLite is especially useful for offline applications, and many platforms include support for SQLite out of the box, making it straightforward to install.
In this article, we’ll use SQLite in a React Native application to set up a simple to-do list application that will show us how all the CRUD operations work. We’ll also use TypeScript for its advantages, including code quality and maintainability.
This tutorial assumes that you have a basic understanding of React and React Native, as well as some familiarity with TypeScript.
We’ll create a to-do list application that includes the following:
useState calls, one for keeping a to-do list, and one for tracking new to-do itemsWe’ll also use a set of functional components and several hook APIs to achieve state management.
Let’s start by creating a React Native app using TypeScript:
npx react-native init MyApp --template react-native-template-typescript
You can clone the React application and work along as you read through the article. You’ll see that there are two branches in the repository: start and main. We’ll begin with the start branch.
Let’s introduce SQLite to our application. To connect with SQLite, we are going to use the react-native-sqlite-storage library.
To install SQLite, run the following code in your terminal:
npm install --save react-native-sqlite-storage
If you’re using iOS, run the command below to install the necessary React Native packages:
cd ios && pod install && cd ..
If you’re running React Native version 0.59 or lower, you have two options to install React Native packages, depending on whether you’re using CocoaPods.
If you’re running CocoaPods, add the code below to your pod file:
pod 'React', :path => '../node_modules/react-native'
pod 'react-native-sqlite-storage', :path => '../node_modules/react-native-sqlite-storage'
Run pod install or pod update.
If you’re not running CocoaPods, you have to use react-native link. If you run into any errors, you’ll have to open the project from Xcode and manually add dependencies. For more details, please refer to the library documentation.
If you’re using your device’s SQLite in React Native v.60 or above, you don’t have to take any extra steps.
However, if you’re using SQLite bundled with the react-native-sqlite-storage library, you can add the code below to your react-native.config.js file:
module.exports = {
  ...,
  dependencies: {
    ...,
    "react-native-sqlite-storage": {
      platforms: {
        android: {
          sourceDir:
            "../node_modules/react-native-sqlite-storage/platforms/android-native",
          packageImportPath: "import io.liteglue.SQLitePluginPackage;",
          packageInstance: "new SQLitePluginPackage()"
        }
      }
    }
    ...
  }
  ...
};
If you’re running an older version of React Native, you have to manually update the Gradle files. For full configuration, refer to the library documentation.
Now, we’re all set to implement a datastore service. We’ll introduce a new .ts file called db-service.ts where we can add all our db operations. First, let’s create a method to get a db connection.
Because we’re using TypeScript, we can install @types/react-native-sqlite-storage to use the included types. If you stick to JavaScript, you don’t have to install this library.
Add the db connection method using the code below:
import {openDatabase} from 'react-native-sqlite-storage';

export const getDBConnection = async () => {
  return openDatabase({name: 'todo-data.db', location: 'default'});
};
If a table does not already exist when we start the application, we need to create one. You can create a table using the create table if not exists statement to ensure that your database schema has been correctly initialized before performing data operations. This statement is written such that you can create a table without causing an error if the table already exists.
Using this command, your application can safely initialize its database schema without you having to manually check if the table already exists:
export const createTable = async (db: SQLiteDatabase) => {
  // create table if not exists
  const query = `CREATE TABLE IF NOT EXISTS ${tableName}(
        value TEXT NOT NULL
    );`;

  await db.executeSql(query);
};
Because we are using promise-based APIs in the library, it’s important to add the code below to our db-service.ts file:
enablePromise(true);
Next, we’ll add methods to save, delete, and get our to-do items. After adding these methods, our db service file will look like the code block below:
import { enablePromise, openDatabase, SQLiteDatabase } from 'react-native-sqlite-storage';
import { ToDoItem } from '../models';

const tableName = 'todoData';

enablePromise(true);

export const getDBConnection = async () => {
  return openDatabase({ name: 'todo-data.db', location: 'default' });
};

export const createTable = async (db: SQLiteDatabase) => {
  // create table if not exists
  const query = `CREATE TABLE IF NOT EXISTS ${tableName}(
        value TEXT NOT NULL
    );`;

  await db.executeSql(query);
};

export const getTodoItems = async (db: SQLiteDatabase): Promise<ToDoItem[]> => {
  try {
    const todoItems: ToDoItem[] = [];
    const results = await db.executeSql(`SELECT rowid as id,value FROM ${tableName}`);
    results.forEach(result => {
      for (let index = 0; index < result.rows.length; index++) {
        todoItems.push(result.rows.item(index))
      }
    });
    return todoItems;
  } catch (error) {
    console.error(error);
    throw Error('Failed to get todoItems !!!');
  }
};

export const saveTodoItems = async (db: SQLiteDatabase, todoItems: ToDoItem[]) => {
  const insertQuery =
    `INSERT OR REPLACE INTO ${tableName}(rowid, value) values` +
    todoItems.map(i => `(${i.id}, '${i.value}')`).join(',');

  return db.executeSql(insertQuery);
};

export const deleteTodoItem = async (db: SQLiteDatabase, id: number) => {
  const deleteQuery = `DELETE from ${tableName} where rowid = ${id}`;
  await db.executeSql(deleteQuery);
};

export const deleteTable = async (db: SQLiteDatabase) => {
  const query = `drop table ${tableName}`;

  await db.executeSql(query);
};
We added a deleteTable method, which will be useful when developing our application. Later, we’ll add a feature for users that clears all the data using the deleteTable method.
We can use rowid, which comes with SQLite, as the primary key. We updated our to-do items to have an ID and a value instead of a simple string so that we can easily delete items.
We also used the INSERT OR REPLACE statement, which manages data updates by either inserting a new record or updating the existing record if there is a conflict on a UNIQUE index or PRIMARY KEY. For example, say we have a products table in our database that looks like this:
| product_id | name | price |
|---|---|---|
| 1 | Haribo | 48.99 |
Here, product_id is the PRIMARY KEY. If we want to update the price of this item with the product_id of 1, we’d run the following code:
INSERT OR REPLACE INTO products (product_id, name, price, quantity)
VALUES (1, 'Haribo', 69.99, 80);
This statement targets the row with product_id of 1 and because there is conflict, i.e., the row already exists, SQLite will replace the existing row with the new values provided:
| product_id | name | price |
|---|---|---|
| 1 | Haribo | 69.99 |
All the fields in the row are replaced with the new values provided in the INSERT OR REPLACE command.
Note: Because this command completely replaces the initial data with the new one, you should include all relevant fields in the INSERT OR REPLACE statement to avoid losing data. Also, suppose you need to do a partial update. In that case, you can use the UPDATE statement, which allows you to update specific columns of existing rows based on the condition you specify without replacing the entire row.
Next, we’ll add a model for our ToDoItem type. Add the following code in a file named index.ts in another folder called models:
export type ToDoItem = {
  id: number;
  value: string;
};
db serviceWe have to use our db service in App.tsx. Follow these four steps:
ToDoItem component and the App Component to use the new ToDoItem typedbdbFirst, let’s finish setting up our db, then we’ll have a look at the final result of the App.tsx and ToDoItem.tsx files.
To load the data in our application, we’ll use the useEffect and useCallback Hooks:
const loadDataCallback = useCallback(async () => {
    try {
      const initTodos = [{ id: 0, value: 'go to shop' }, { id: 1, value: 'eat at least a one healthy foods' }, { id: 2, value: 'Do some exercises' }];
      const db = await getDBConnection();
      await createTable(db);
      const storedTodoItems = await getTodoItems(db);
      if (storedTodoItems.length) {
        setTodos(storedTodoItems);
      } else {
        await saveTodoItems(db, initTodos);
        setTodos(initTodos);
      }
    } catch (error) {
      console.error(error);
    }
  }, []);

  useEffect(() => {
    loadDataCallback();
  }, [loadDataCallback]);
In the code snippet above, we’re reading data from the db. If we have any to-do items stored, we initialize the app with those. If not, we’ll persist the initial values to the db and initialize the app using that data.
To add a to-do item, run the following code:
const addTodo = async () => {
    if (!newTodo.trim()) return;
    try {
      const newTodos = [...todos, {
        id: todos.reduce((acc, cur) => {
          if (cur.id > acc.id) return cur;
          return acc;
        }).id + 1, value: newTodo
      }];
      setTodos(newTodos);
      const db = await getDBConnection();
      await saveTodoItems(db, newTodos);
      setNewTodo('');
    } catch (error) {
      console.error(error);
    }
  };
Lastly, run the code below to delete a to-do item:
const deleteItem = async (id: number) => {
    try {
      const db = await getDBConnection();
      await deleteTodoItem(db, id);
      todos.splice(id, 1);
      setTodos(todos.slice(0));
    } catch (error) {
      console.error(error);
    }
  };
Our final App.tsx file should look like the code below:
/**
 * Sample React Native App
 * https://github.com/facebook/react-native
 *
 * Generated with the TypeScript template
 * https://github.com/react-native-community/react-native-template-typescript
 *
 * @format
 */
import React, { useCallback, useEffect, useState } from 'react';
import {
  Button,
  SafeAreaView,
  ScrollView,
  StatusBar,
  StyleSheet,
  Text,
  TextInput,
  useColorScheme,
  View,
} from 'react-native';
import { ToDoItemComponent } from './components/ToDoItem';
import { ToDoItem } from './models';
import { getDBConnection, getTodoItems, saveTodoItems, createTable, clearTable, deleteTodoItem } from './services/db-service';
const App = () => {
  const isDarkMode = useColorScheme() === 'dark';
  const [todos, setTodos] = useState<ToDoItem[]>([]);
  const [newTodo, setNewTodo] = useState('');
  const loadDataCallback = useCallback(async () => {
    try {
      const initTodos = [{ id: 0, value: 'go to shop' }, { id: 1, value: 'eat at least a one healthy foods' }, { id: 2, value: 'Do some exercises' }];
      const db = await getDBConnection();
      await createTable(db);
      const storedTodoItems = await getTodoItems(db);
      if (storedTodoItems.length) {
        setTodos(storedTodoItems);
      } else {
        await saveTodoItems(db, initTodos);
        setTodos(initTodos);
      }
    } catch (error) {
      console.error(error);
    }
  }, []);
  useEffect(() => {
    loadDataCallback();
  }, [loadDataCallback]);
  const addTodo = async () => {
    if (!newTodo.trim()) return;
    try {
      const newTodos = [...todos, {
        id: todos.length ? todos.reduce((acc, cur) => {
          if (cur.id > acc.id) return cur;
          return acc;
        }).id + 1 : 0, value: newTodo
      }];
      setTodos(newTodos);
      const db = await getDBConnection();
      await saveTodoItems(db, newTodos);
      setNewTodo('');
    } catch (error) {
      console.error(error);
    }
  };
  const deleteItem = async (id: number) => {
    try {
      const db = await getDBConnection();
      await deleteTodoItem(db, id);
      todos.splice(id, 1);
      setTodos(todos.slice(0));
    } catch (error) {
      console.error(error);
    }
  };
  return (
    <SafeAreaView>
      <StatusBar barStyle={isDarkMode ? 'light-content' : 'dark-content'} />
      <ScrollView
        contentInsetAdjustmentBehavior="automatic">
        <View style={[styles.appTitleView]}>
          <Text style={styles.appTitleText}> ToDo Application </Text>
        </View>
        <View>
          {todos.map((todo) => (
            <ToDoItemComponent key={todo.id} todo={todo} deleteItem={deleteItem} />
          ))}
        </View>
        <View style={styles.textInputContainer}>
          <TextInput style={styles.textInput} value={newTodo} onChangeText={text => setNewTodo(text)} />
          <Button
            onPress={addTodo}
            title="Add ToDo"
            color="#841584"
            accessibilityLabel="add todo item"
          />
        </View>
      </ScrollView>
    </SafeAreaView>
  );
};
const styles = StyleSheet.create({
  appTitleView: {
    marginTop: 20,
    justifyContent: 'center',
    flexDirection: 'row',
  },
  appTitleText: {
    fontSize: 24,
    fontWeight: '800'
  },
  textInputContainer: {
    marginTop: 30,
    marginLeft: 20,
    marginRight: 20,
    borderRadius: 10,
    borderColor: 'black',
    borderWidth: 1,
    justifyContent: 'flex-end'
  },
  textInput: {
    borderWidth: 1,
    borderRadius: 5,
    height: 30,
    margin: 10,
    backgroundColor: 'pink'
  },
});
export default App;
Lastly, our final ToDoItem.tsx file should look like the following code block:
import React from 'react';
import {
  Button,
  StyleSheet,
  Text,
  View,
} from 'react-native';
import { ToDoItem } from '../models';
export const ToDoItemComponent: React.FC<{
  todo: ToDoItem;
  deleteItem: Function;
}> = ({ todo: {id, value}, deleteItem }) => {
  return (
    <View style={styles.todoContainer}>
      <View style={styles.todoTextContainer}>
        <Text
          style={styles.sectionTitle}>
          {value}
        </Text>
      </View>
      <Button
        onPress={() => deleteItem(id)}
        title="done"
        color="#841584"
        accessibilityLabel="add todo item"
      />
    </View>
  );
};
const styles = StyleSheet.create({
  todoContainer: {
    marginTop: 10,
    paddingHorizontal: 24,
    backgroundColor: 'deepskyblue',
    marginLeft: 20,
    marginRight: 20,
    borderRadius: 10,
    borderColor: 'black',
    borderWidth: 1,
  },
  todoTextContainer: {
    justifyContent: 'center',
    flexDirection: 'row',
  },
  sectionTitle: {
    fontSize: 20,
    fontWeight: '400',
  }
});
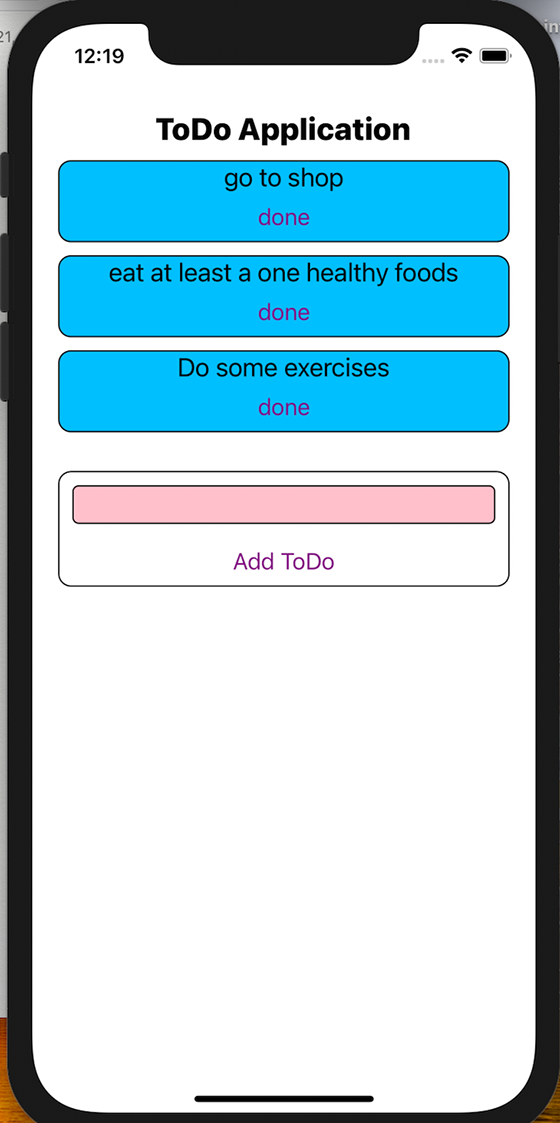
There you have it! Our finished React Native to-do application should look like the image below:
WHERE and using variablesIf you’re interested in filtering query results from our to-do list, you can use the WHERE clause, which allows for filtering query results based on specific columns. When the WHERE statement is combined with variable binding in React Native, it provides security by preventing SQL injection attacks and efficiency by running your queries quickly. Let’s see how this works:
const query = `SELECT * FROM users WHERE email = ?`;
db.transaction((tx) => {
    tx.executeSql(query, ['[email protected]'], (tx, results) => {
        // other processes
    });
});
The query defined tells SQLite to select all columns (*) from the rows in the users table. Then the WHERE email = ? statement filters the rows to be selected by the defined condition that the email column has to match a specific value, in this case, it has to match [email protected]. The ? is a placeholder for a parameterized query, which helps prevent SQL injection attacks by separating the query structure from the data values.
One of the most common errors you might encounter when integrating SQLite with React Native is the better-sqlite3 command failed, which is mostly caused when trying to install better-sqlite3 in incompatible environments or due to environment misconfigurations.
To resolve this error, ensure Node.js and npm on your machine are up to date. You can check here for the specific requirements of the better-sqlite3 package for the Node.js version. better sqlite3 relies on node-gyp for native dependency compilation, so you should also ensure that node-gyp is correctly installed and configured on your machine.
Other React Native-specific SQLite issues include asynchronous execution, which is a process of performing database operations without blocking the main execution thread. To handle this issue, use the async/await syntax to manage asynchronous database operations.
Finally, to handle database locking, which serves as a concurrency control mechanism to prevent multiple threads/processes from mutating the same data at the same time, always confirm that you are not concurrently accessing the database from multiple threads or processes.
In this article, we integrated SQLite with a React Native application, using the react-native-sqlite-storage library for efficient data management. We built a demo to-do app using TypeScript to demonstrate how SQLlite manages data and performs CRUD operations.
Happy coding!

LogRocket's Galileo AI watches sessions for you and and surfaces the technical and usability issues holding back your React Native apps.
LogRocket also helps you increase conversion rates and product usage by showing you exactly how users are interacting with your app. LogRocket's product analytics features surface the reasons why users don't complete a particular flow or don't adopt a new feature.
Start proactively monitoring your React Native apps — try LogRocket for free.

Chrome’s Modern Web Guidance embeds modern web platform skills into AI coding agents, helping them choose native HTML, CSS, and browser APIs over legacy patterns.

Learn how to use Fallow to analyze AI-generated code, detect dead code, duplicate logic, and complexity issues, and integrate automated code quality checks into your AI-assisted development workflow.

Learn how to protect full-stack projects from NPM supply chain attacks with a practical security checklist.

Explore 15 essential MCP servers for web developers to enhance AI workflows with tools, data, and automation.
Hey there, want to help make our blog better?
Join LogRocket’s Content Advisory Board. You’ll help inform the type of content we create and get access to exclusive meetups, social accreditation, and swag.
Sign up now

