There has been a continuous shift in the way frontend developers build web applications. Nowadays, you don’t need to know about managing servers to build and ship an application. That’s what serverless is all about.

Let’s say you’re building a contact form on your portfolio site. Typically, you would want your visitors to send you an email when they’re interested in your services. You might want to write an API that connects to your preferred mail service provider and then spin up a server to run your API.
Is there anything wrong with this approach? No. However, a server works 24/7 and it’s always prepared for requests. For a portfolio site contact form, this approach is cost-ineffective and a waste of server resources. A use case like this is where serverless really comes in handy.
The Replay is a weekly newsletter for dev and engineering leaders.
Delivered once a week, it's your curated guide to the most important conversations around frontend dev, emerging AI tools, and the state of modern software.
Serverless doesn’t mean there’s no server; it just means you’re using a third-party service, such as AWS, to manage and set up servers so you only have to provide autonomous functions. These are popularly called serverless functions. This way, your serverless “server” is only spun whenever there’s a request and you’re only charged for the resources used during that period.
To show how serverless functions work, we’ll build a contact form with Nuxt.js and Netlify Functions. A demo of the complete application is available here.
To follow along with this tutorial, you’ll need the following.
Let’s start by creating a new Nuxt.js application. To style the app, we’ll use Chakra UI, a simple modular and accessible component library that provides the building blocks to build Vue.js applications with speed.
yarn create nuxt-app serverless-contact-form
When prompted for a UI framework, select Chakra UI. For Nuxt.js modules, select Axios.
Once that’s done, start the application.
cd serverless-contact-form
yarn dev
For the rest of the tutorial, we’ll assume the app is running.
To keep things simple and straightforward, we’ll place the contact form directly on the home page. So let’s update the index.vue file inside the pages directory.
Start by updating the template section, as shown below.
// pages/index.vue

<template>
  <div class="container">
    <CBox
      v-bind="mainStyles[colorMode]"
      d="flex"
      w="100vw"
      h="100vh"
      flex-dir="column"
      justify-content="center"
    >
      <CHeading text-align="center" mb="4">
        Serverless contact form
      </CHeading>

      <CFlex justify="center" direction="column" align="center">
        <CBox mb="3">
          <CIconButton
            mr="3"
            :icon="colorMode === 'light' ? 'moon' : 'sun'"
            :aria-label="`Switch to ${
              colorMode === 'light' ? 'dark' : 'light'
            } mode`"
            @click="toggleColorMode"
          />
        </CBox>

        <CBox text-align="left" width="50%">
          <form @submit.prevent="sendContactToLambdaFunction">
            <CFormControl>
              <CFormLabel for="name">
                Name
              </CFormLabel>
              <CInput id="name" v-model="form.name" type="text" aria-describedby="name" />
            </CFormControl>

            <CFormControl>
              <CFormLabel for="email">
                Email
              </CFormLabel>
              <CInput id="email" v-model="form.email" type="email" aria-describedby="email-helper-text" />
              <CFormHelperText id="email-helper-text">
                We'll never share your email.
              </CFormHelperText>
            </CFormControl>

            <CFormControl>
              <CFormLabel for="message">
                Message
              </CFormLabel>
              <CTextarea v-model="form.message" placeholder="Type your message" />
            </CFormControl>

            <CBox mt="12" d="flex" flex-dir="column" align="center">
              <CButton type="submit" right-icon="arrow-forward" width="20%" variant-color="vue" variant="outline">
                Submit
              </CButton>
            </CBox>
          </form>
        </CBox>
      </CFlex>
    </CBox>
  </div>
</template>
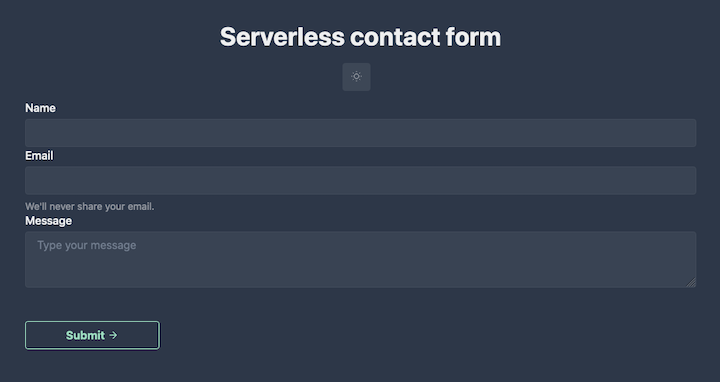
The contact form contains three fields: name, email, and message. Once the form is submitted, a sendContactToLambdaFunction(), which handles sending the message, is called.
Let’s update the script section as well.
// pages/index.vue

<script lang="js">
  import {
    CBox,
    CButton,
    CIconButton,
    CFlex,
    CHeading,
    CTextarea,
    CFormControl,
    CFormLabel,
    CInput,
    CFormHelperText
  } from '@chakra-ui/vue'

export default {
  name: 'App',
  inject: ['$chakraColorMode', '$toggleColorMode'],
  components: {
    CBox,
    CButton,
    CIconButton,
    CFlex,
    CHeading,
    CTextarea,
    CFormControl,
    CFormLabel,
    CInput,
    CFormHelperText
  },
  data () {
    return {
      mainStyles: {
        dark: {
          bg: 'gray.700',
          color: 'whiteAlpha.900'
        },
        light: {
          bg: 'white',
          color: 'gray.900'
        }
      },
      form: {
        name: '',
        email: '',
        message: ''
      }
    }
  },
  computed: {
    colorMode () {
      return this.$chakraColorMode()
    },
    theme () {
      return this.$chakraTheme()
    },
    toggleColorMode () {
      return this.$toggleColorMode
    }
  },
  methods: {
    async sendContactToLambdaFunction () {
      try {
        const response = await this.$axios.$post('/.netlify/functions/contact-mail', {
          name: this.form.name,
          email: this.form.email,
          message: this.form.message
        })

        this.$toast({
          title: 'Mail sent',
          description: response,
          status: 'success',
          duration: 10000,
          isClosable: true
        })

        this.form.name = ''
        this.form.email = ''
        this.form.message = ''
      } catch (error) {
        this.$toast({
          title: 'An error occured',
          description: error,
          status: 'error',
          duration: 10000,
          isClosable: true
        })
      }
    }
  }
}
</script>
When triggered, the async sendContactToLambdaFunction() makes an API request to our Netlify function (we’ll get to that in the next section).
If we get to the browser, we should see something like this:
At this stage, we have our UI and logic ready but we don’t have any API endpoint. In the last section, we’ll be making calls to /.netlify/functions/contact-mail, which doesn’t exist yet.
Before we do that, let’s take a moment to understand what Netlify Functions are.
The most popular serverless architecture — or function-as-a-service (FaaS) — provider is AWS Lambda. But AWS isn’t suitable for small-scale apps. Netlify lets you deploy serverless Lambda functions without an AWS account, and management is handled directly within Netlify.
Netlify also provides a way to test your serverless functions locally with Netlify Dev. Let’s make sure we have it installed.
// NPM
npm install netlify-cli -g

// Yarn
yarn add global netlify-cli
Now let’s create an netlify.toml file in the project’s root directory. This configuration file tells Netlify how to build and deploy the project.
We’ll also require it for our local development environment.
// netlify.toml

[dev]
   command = "yarn dev"
[build]
  command = "yarn generate"
  publish = "dist"
  functions = 'functions'  # directs netlify to where your functions directory is located

[[headers]]
  # Define which paths this specific [[headers]] block will cover.
  for = "/*"
    [headers.values]
    Access-Control-Allow-Origin = "*"
Create the Netlify function by running the command below.
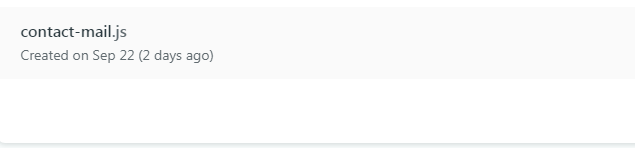
netlify functions:create contact-mail
Then, select the [hello-world] basic function that shows async/await usage and response formatting option. This command will create a functions directory in the project’s root directory and a contact-mail.js file.
To test this function locally, run:
netlify dev
This will start up the development server.
Then:
netlify functions:invoke contact-mail --no-identity
You should get something like this:
{"message":"Hello World"}
To handle the sending of emails, we’ll use Mailgun, which provides a sandbox domain for testing.
Grab your sandbox domain as well as your API key from your account dashboard. Under Sending > Domains, you should see a sandbox domain. Select API and copy the API key, API BASE URL, and sandbox domain.
Next, install the necessary dependencies:
yarn add dotenv mailgun-js
We’ll use dotenv to access our local environment variable. When our app is deployed, it will configure Netlify to use the appropriate details in production. mailgun-js is a Node.js module for interacting with Mailgun API.
Create an .env file in the root directory and plug in the correct values:
// .env

MG_API_KEY=YOUR_API_KEY
MG_DOMAIN=YOUR_SANDBOX_DOMAIN
MG_HOST=YOUR_API_BASE_URL
TO_EMAIL_ADDRESS=ADDRESS_EMAIL_WILL_BE_SENT_TO
Now, let’s move on to the actual function logic. Paste the following snippet inside contact-mail.js.
// functions/contact-mail.js

require('dotenv').config()

const { MG_API_KEY, MG_DOMAIN, MG_HOST, TO_EMAIL_ADDRESS } = process.env
const mailgun = require('mailgun-js')({ apiKey: MG_API_KEY, domain: MG_DOMAIN, url: MG_HOST})

exports.handler = async (event) => {
  if (event.httpMethod !== 'POST') {
    return {
      statusCode: 405,
      body: 'Method Not Allowed',
      headers: { 'Allow': 'POST' }
    }
  }

  const data = JSON.parse(event.body)

  if (!data.message || !data.name || !data.email) {
    return { statusCode: 422, body: 'Name, email, and message are required.' }
  }

  const mailgunData = {
    from: data.email,
    to: TO_EMAIL_ADDRESS,
    'h:Reply-To': data.email,
    subject: `New mail from ${data.name}`,
    html: `
    <h4> Email from ${data.name} ${data.email} </h4>
    <p> ${data.message}</p>
    `
  }

  try {
    await mailgun.messages().send(mailgunData)

    return {
      statusCode: 200,
      body: 'Your message was sent successfully!'
    }
  } catch (error) {
      return {
        statusCode: 422,
        body: `Error: ${error}`
      }
  }
}
Let’s go through the moving parts of this function. First, require('dotenv').config() gives us the ability to access environment variables via process.env. Next, we instantiate the Mailgun module with the required parameters.
Then, we perform some validation for the incoming requests. First, the incoming request has to be a POST request. If any of the fields are empty, the server should return status code 422 (unprocessable entity).
Next, we construct the email body. Mailgun accepts to, from, subject, HTML and text parts, attachments, etc.
Finally, we pass the object to mailgun.messages.send() and return error or success messages from Mailgun.
Now we can run:
netlify dev
This will spin up the development server for the function and the Nuxt.js application. You don’t have to worry about how the frontend and API endpoint work together; Netlify handles those details for you.
You’ll notice that the function runs on port 8888 while the Nuxt.js app runs on port 3000. Netlify Dev will merge them and run it on port 8888 in the browser.
It’s time to test what we’ve been building. You can use Postman or any other HTTP client, but we’ll use Netlify Dev since it enables us to perform POST requests.
Run the following command.
netlify functions:invoke contact-mail --no-identity --payload '{"email": "[email protected]", "name": "Chioma", "message": "hello this function works fine!"}'
You should get a response like the one below, both in the terminal and in your mailbox.
Your message was sent successfully! We'll be in touch.
Of course, you can test it out directly with the app in the browser.
Finally, let’s deploy our static app. Run the command below to generate the dist directory.
yarn generate
The next step is to create a brand new site on Netlify.
netlify init
Go to your site dashboard on Netlify, click the Function tab, and you should see your contact-mail.js function.
Before we wrap up, let’s add the environmental variables on Netlify. Go to Settings > Build & Deploy > Environment and add in the environmental variables in your .env.
Finally, redeploy the app for the changes to take effect.
In this tutorial, we explored serverless by building a static app with Nuxt.js and setting up the API endpoint with Netlify Functions. We discussed the benefits of this approach as opposed to working with traditional servers. Finally, we walked through how to use Netlify Dev to build and deploy serverless applications simply and quickly.
To learn more, check out the official Netlify Functions docs.
The source code for this project is available on GitHub.

When should you move API logic out of Next.js? Learn when Route Handlers stop scaling and how ElysiaJS helps.

Explore how Dokploy streamlines app deployment with Docker, automated builds, and simpler infrastructure compared to traditional CI/CD workflows.

A side-by-side look at Astro and Next.js for content-heavy sites, breaking down performance, JavaScript payload, and when each framework actually makes sense.

AI-generated tests can speed up React testing, but they also create hidden risks. Here’s what broke in a real app.re
Hey there, want to help make our blog better?
Join LogRocket’s Content Advisory Board. You’ll help inform the type of content we create and get access to exclusive meetups, social accreditation, and swag.
Sign up now

