Editor’s note: This post was last updated on 12 August 2021. It may still contain information that is out of date.

RxJS is a framework for reactive programming that uses Observables, making it really easy to write asynchronous code.
According to the official documentation, RxJS is a reactive extension to JavaScript with better performance, better modularity, and better debuggable call stacks, while staying mostly backward-compatible, with some breaking changes that reduce the API surface.
It is the official library used by Angular to handle reactivity, converting pull operations for callbacks into Observables.
To follow through in this article’s demonstration, you should have the following:
To begin, run the following command:
// run the command in a terminal
ng version
Confirm that you are using the latest version and update if you are not.
Next, download this tutorial’s starter project here to follow through the demonstration.
Then, unzip the project and initialize the node modules in your terminal with this command:
npm install
Observables are the foundation of reactive programming in RxJS and operators are the best way to consume or utilize them. Operators are methods you can use to manipulate, filter, or change Observables and subjects in a specified manner into a new Observable.
They provide a platform for complex logic to run on Observables and give the developer total control of the Observables’ output. It is important to note, however, that operators do not change the initial Observable, they just edit it and output an entirely new Observable.
According to the official RxJS documentation, there are two types of operators: pipeable operators and creation operators.
Pipeable operators are operators that can be piped to existing Observables using the pipe syntax:
observableInstance.pipe(operator())
They are called on existing Observables and they do not change the Observable instance, rather, they return a new Observable with a subscribe method based on the initial Observable.
Creation operators on the other hand, create an Observable with either a predefined behavior or by joining more than one Observable together. They can be referred to as standalone methods that create new Observables.
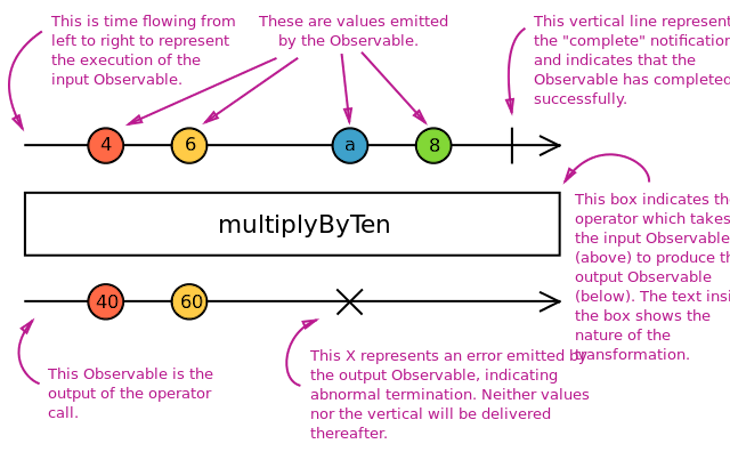
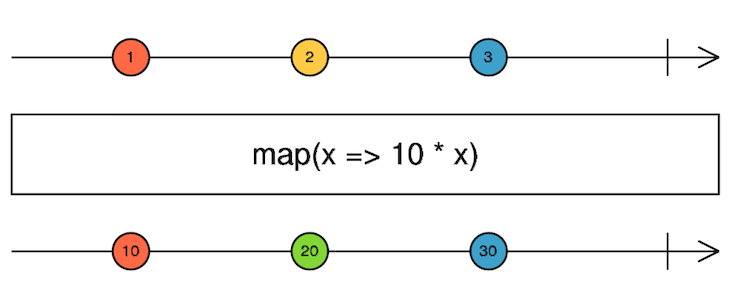
The marble diagram shows a visual representation of how operators work. It is always a left-to-right and top-down progression.
The Observable is first created and emits some values then at completion by the complete parameter, the defined operator takes the emitted values as input and then modifies them to give a brand new Observable.
There are over 100 operators in RxJS that can be classified into various categories, including creation, transformation, filtering, joining, multicasting, error handling, and utility.
If you followed this post from the start, you will have a starter project opened up in Visual Studio Code to follow up with these illustrations. In this section you’ll learn how to use a few popular RxJS operators in your Angular workflow:
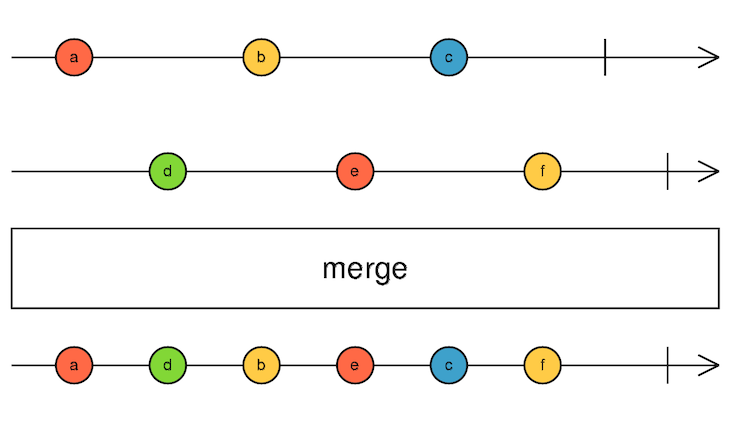
merge() operatorThe merge() operator is a join creation operator that merges one observable with another observable, returning the combination of them both as one Observable.
To do this, open the app.component.ts file and copy in the code block below:
import { Component, OnInit } from '@angular/core';
import { Observable, merge} from 'rxjs';
@Component({
selector: 'my-app',
templateUrl: './app.component.html',
styleUrls: ['./app.component.css']
})
export class AppComponent implements OnInit {
ngOnInit() {
const observable1 = Observable.create((observer: any) => {
observer.next('I am Observable 1');
});
const observable2 = Observable.create((observer: any) => {
observer.next('I am Observable 2');
});
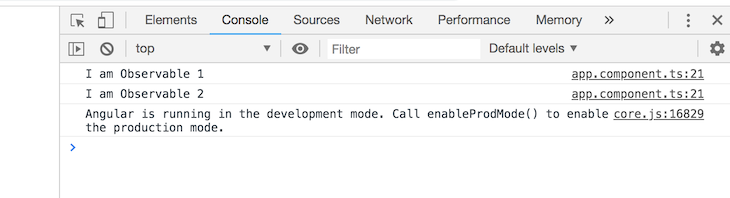
const observable3 = merge(observable1, observable2);
observable3.subscribe(data => console.log(data));
}
}
Your browser console should look like this:
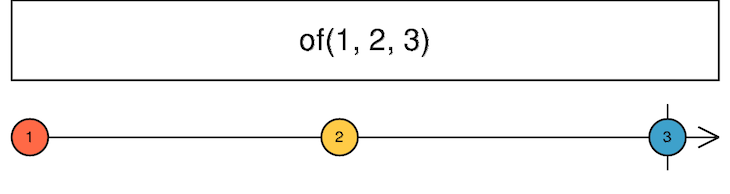
of() operatorThis is creation operator creates Observables from any kind of data, be it a string, array, object, or even a promise.
Test it out with this code block below:
import { Component, OnInit } from '@angular/core';
import { of } from 'rxjs';

@Component({
  selector: 'my-app',
  templateUrl: './app.component.html',
  styleUrls: ['./app.component.css']
})
export class AppComponent implements OnInit {
  ngOnInit() {
    const observable1 = of(1, 2, 3).subscribe(data => console.log(data));
  }
}
map() operatorThis map() operator is defined in a pipe where you can modify the content of emitted values from one observable to form another new observable.
In your app.component.ts file, copy in the code block below:
import { Component, OnInit } from '@angular/core';
import { of } from 'rxjs';
import { map } from 'rxjs/operators';

@Component({
  selector: 'my-app',
  templateUrl: './app.component.html',
  styleUrls: ['./app.component.css']
})
export class AppComponent implements OnInit {
  ngOnInit() {
    const observable1 = of('my name is lotanna');
    observable1
      .pipe(map(data => data.toUpperCase()))
      .subscribe(data => console.log(data));
  }
}
Inside the pipe, you can add your modification logic; in this case, it converts the emitted values to uppercase.
fromEvent() operatorThe fromEvent() operator takes any DOM element and an event name as props and creates a new observable with it.
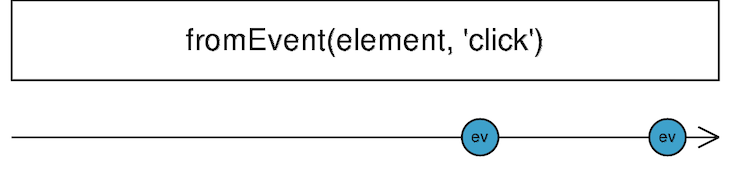
A simple document click operator will look like this:
import { Component, OnInit } from '@angular/core';
import { fromEvent} from 'rxjs';

@Component({
  selector: 'my-app',
  templateUrl: './app.component.html',
  styleUrls: ['./app.component.css']
})
export class AppComponent implements OnInit {
  ngOnInit() {
    const observable1 = fromEvent(document, 'click').subscribe(() =>
      console.log('You clicked the page!')
    );
  }
}
pluck() operatorJust as the name implies, the pluck() operator plucks a single property from an array that has multiple properties.
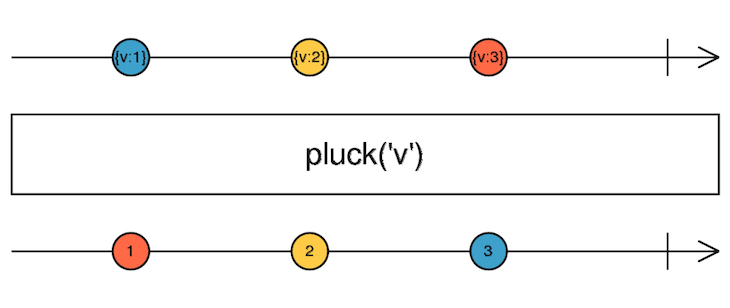
Here is a quick example:
import { Component, OnInit } from '@angular/core';
import { from } from 'rxjs';
import { pluck } from 'rxjs/operators';

@Component({
  selector: 'my-app',
  templateUrl: './app.component.html',
  styleUrls: ['./app.component.css']
})
export class AppComponent implements OnInit {
  ngOnInit() {
    from([
      { brand: 'iPhone', model: 'Xmax', price: '$1000' },
      { brand: 'Samsung', model: 'S10', price: '$850' }
    ])
      .pipe(pluck('price'))
      .subscribe(data => console.log(data));
  }
}
take()operatorThe take() operator takes the very occurrence of emitted events in an observable.
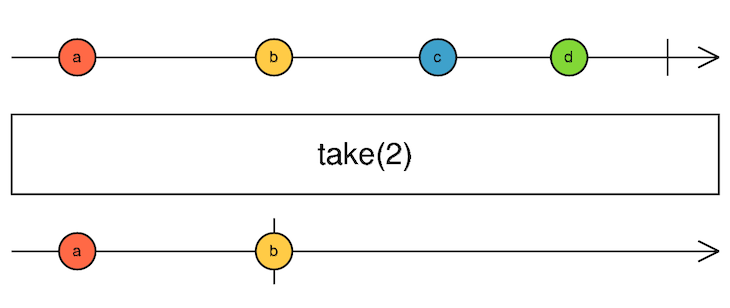
So, for instance, we already worked on a fromEvent() operator for a page click. With the take() operator, the new observable can only record the very first click:
import { Component, OnInit } from '@angular/core';
import { fromEvent } from 'rxjs';
import { take } from 'rxjs/operators';

@Component({
  selector: 'app-root',
  templateUrl: './app.component.html',
  styleUrls: ['./app.component.css']
})
export class AppComponent implements OnInit {
  ngOnInit() {
    const observable1 = fromEvent(document, 'click')
      .pipe(take(2))
      .subscribe(() => console.log('You clicked the page!'));
  }
}
This records only the first two clicks on the page as expected.
This article introduces RxJS operators as the main character in reactive programming. Observables are the foundation and the operators are the methods that help us consume Observables properly. We also looked at categories of operators and how to use some of the very popular ones. Happy hacking!
Install LogRocket via npm or script tag. LogRocket.init() must be called client-side, not
server-side
$ npm i --save logrocket

// Code:

import LogRocket from 'logrocket';
LogRocket.init('app/id');
// Add to your HTML:

<script src="https://cdn.lr-ingest.com/LogRocket.min.js"></script>
<script>window.LogRocket && window.LogRocket.init('app/id');</script>

Learn how to build smooth staggered animations in CSS using modern features like sibling-index(), complete with practical examples, fallbacks, and accessibility tips.

Compare the top AI development tools and models of July 2026. View updated rankings, feature breakdowns, and find the best fit for you.

Learn how to detect unused and ghost dependencies in JavaScript projects using Knip, a project-level linter that keeps your dependency graph accurate.

Learn how Storybook MCP enables AI agents to understand your component library, generate accurate UI, and validate code using documentation, stories, and automated tests.
Hey there, want to help make our blog better?
Join LogRocket’s Content Advisory Board. You’ll help inform the type of content we create and get access to exclusive meetups, social accreditation, and swag.
Sign up now

