As Rust continues to grow rapidly, so does its ecosystem of tools. One relatively new tool in this ecosystem is Leptos, a modern, full-stack web framework for building declarative and fast UIs with Rust and WebAssembly (Wasm).

Leptos uses a fine-grained reactivity system to efficiently update the DOM directly without the overhead of a virtual DOM like React’s. Additionally, its isomorphic design simplifies development by allowing you to build both server-side rendered (SSR) and client-side rendered (CSR) applications with a single codebase.
If you’re coming from the JavaScript world, Leptos is similar to SolidJS, but with the added benefits of Rust’s type safety, performance, and security, along with the portability and performance of Wasm.
In this guide, we will explore how to build UIs with Leptos. We’ll create a demo to-do app to explore this web framework for Rust in detail — you can find the full source code on GitHub. Let’s start by setting up our development environment.
The Replay is a weekly newsletter for dev and engineering leaders.
Delivered once a week, it's your curated guide to the most important conversations around frontend dev, emerging AI tools, and the state of modern software.
Since Leptos is a Rust framework, we need to have Rust installed first. Install Rust with Rustup using the command below for Unix systems:
curl --proto '=https' --tlsv1.2 -sSf https://sh.rustup.rs | sh
If you’re on a Windows machine, you’ll need to install the Windows Rustup installer for your system architecture.
To verify that Rust is installed correctly, run the following command in your terminal:
rustc --version
The expected output should look like this:
rustc 1.75.0-nightly (75b064d26 2023-11-01)
Now that we have Rust installed, let’s set up Leptos. There are two ways to do this, depending on whether you want to build a full-stack SSR app or a CSR app.
In this guide, we’ll focus on building a client-side rendered application with Leptos and Trunk, is a zero-config Wasm web application bundler for Rust. Install Trunk system-wide by running the following command:
cargo install trunk
Next, initialize a Rust binary application with the command below:
cargo init todo-app
Move into the new Rust application directory you just created and install Leptos as a dependency, with the CSR feature enabled:
cargo add leptos --features=csr
Once that is complete, your app directory structure should look like this:
├── Cargo.lock
├── Cargo.toml
├── src
│ └── main.rs
Next, create an index.html file in the root directory and add the following basic HTML structure to it because Trunk needs a single HTML file to facilitate all asset building and bundling:
<!DOCTYPE html>
<html>
  <meta charset="UTF-8">
  <head></head>
  <body></body>
</html>
Before we continue, make sure you have the wasm32-unknown-unknown Rust compilation target installed. This target allows you to compile Wasm code that will run on different platforms, such as Chrome, Firefox, and Safari.
If you don’t have this target installed, you can install it with the following command:
rustup target add wasm32-unknown-unknown
Our setup is now complete. The project structure should look like this:
.
├── Cargo.lock
├── Cargo.toml
├── index.html
├── src
│   └── main.rs
Next, let’s construct our first component.
Components are the building blocks of Leptos applications. They’re reusable, composable, reactive, and named in PascalCase. Leptos components are like UI components in other frontend frameworks like React and SolidJS — there are building blocks for creating complex user interfaces.
Leptos components take props as arguments, which we can use to configure and render the component. They must also return a View, which represents the UI element that the component will render.
Here is an example of a Leptos component:
#[component]
fn Button(text: Text) -> impl IntoView {
    view!{
        <button>{text}</button>
    }
}
In most cases, you’ll need to add the #[component] attribute to the component function. However, this is not necessary if you’re returning the view directly in a closure in the main function, as shown in the following example:
use leptos::*;

fn main() {
    mount_to_body(|| view! { <p>"Hello, todo!"</p> })
}
Otherwise, we’ll have to mount the component like so:
fn main() {
    mount_to_body(Button);
}
Now that we understand how components work in Leptos, let’s get started with our demo Rust app.
Now that we have a good idea of how the component should be, let’s go ahead and build the components for our to-do application. We’ll need three components:
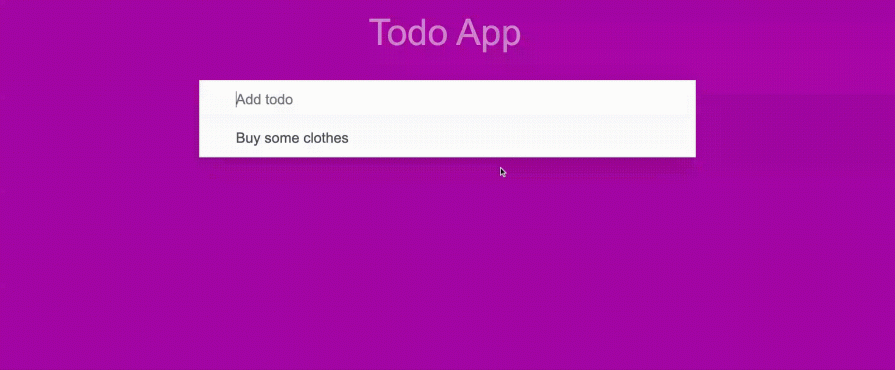
App — The entry componentInputTodo — To accept user inputs and add them to the TodoListTodoList — Will render all the to-dos in the to-do listThe application will allow you to add new to-do items, view them in a list, and delete the to-dos like so:

App componentThe App component will be the root component that we’ll use to compose other components declaratively. It will contain the TodoInput and the TodoList components, and we’ll pass the todos props to it.
Now, copy the code below and add it to the main.rs file. This will be the starting point for the entire application:
#[component]
fn App() -> impl IntoView {
    let todos = create_signal(vec![]);
    view! {
        <div class="todo-app">
            <h1>"Todo App"</h1>
            <TodoInput initial_todos={todos} />
            <TodoList todos={todos} />
        </div>
    }
}

fn main() {
    leptos::mount_to_body(App);
}
The code above might throw a lot of errors because we haven’t defined the TodoInput and TodoList components yet.
If you look carefully, you’ll notice the create_signal function at the beginning of the App function. Leptos uses signals to create and manage the app state, so be prepared to see this function a lot.
Signals are functions that we can call to get or set their associated component value. When a signal’s value changes, all of its subscribers are notified and their associated components are updated. Essentially, signals are the heart of the reactivity system in Leptos:
let todos: (ReadSignal<Vec<TodoItem>>, WriteSignal<Vec<TodoItem>>) = create_signal(vec![]);
The create_signal() function returns a getter ReadSignal<T> and setter WriteSignal<T> pair for a signal. The setter allows you to update the component’s state and the getter allows you to read the state.
We also passed along the todos signal to the TodoInput and TodoList components as props. This means that the todos signal will be required as a prop when creating those components.
Still in that same code above, we’ve passed a vector of TodoItem structs. That means that the state will be a list of TodoItem structs. Of course, the state can be of any type, but we’re using a struct format because it allows us to store multiple items effectively.
So, let’s define the TodoItem struct with an id and the content of the todo as shown below:
#[derive(Debug, PartialEq, Clone)]
struct TodoItem {
    id: u32,
    content: String,
}
TodoInput componentNext, let’s go ahead to create the TodoInput component. Copy the code below into your main.rs file:
#[component]
fn TodoInput(
    initial_todos: (ReadSignal<Vec<TodoItem>>, WriteSignal<Vec<TodoItem>>),
) -> impl IntoView {
    let (_, set_new_todo) = initial_todos;
    let (default_value, set_default_value) = create_signal("");
    }
}
In the code above, the TodoInput component takes a todos props as an argument. This will allow us to update the to-do list when a user inputs some text and hits the Enter key. Next, we destructure the initial_todos and get the set_new_todo method, which allows us to update the state.
In addition to props, we can also create in-component signals to manage the state directly within the component.
For instance, we created a signal named default_input_value to control the default value of the input field. This signal enables us to clear the input field after adding a new to-do, ensuring that the input field is ready for the next item.
Next, let’s create the input field and add some properties to it. Add the following code after the second let statement in the TodoInput component:
    view! {
        <input
        type="text"
        class= "new-todo"
        autofocus=true
        placeholder="Add todo"
        on:keydown= move |event| {
            if event.key() == "Enter" && !event_target_value(&event).is_empty() {
                let input_value = event_target_value(&event);
                let new_todo_item = TodoItem { id: new_todo_id(), content: input_value.clone() };
                set_new_todo.update(|todo| todo.push(new_todo_item));
                set_default_value.set("");
            }}
            prop:value=default_value
        />
You can add virtually any valid HTML attribute to the input field, including events. Leptos uses a colon : as a separator for events, unlike vanilla HTML, which doesn’t have a separator. For instance, the onclick event in HTML becomes on:click in Leptos code.
In our case, we need to track when the on:keydown down event is fired and handle it. To get the value of a text input field, Leptos provides a special method event_target_value(&event); that allows you to get the value of the typed input:
let input_value = event_target_value(&event);
Then, we want to update the state when the user hits the Enter button. Leptos provides two primary methods for updating the state and triggering reactivity:
.update() method when you need to perform additional checks, manipulations, or calculations before updating the state. This method accepts a callback function that receives the current state value and allows you to modify it before the update is applied.set() method when you want to directly assign a new value to the state without any additional logic. This method is more concise and efficient for simple state updatesIn our example code, we used the .update() method — set_new_todo.update — because we’re dealing with an array of structs.
Adding an item to an array also requires the push() method, which involves more than just assigning a new value. The .update() method allows us to perform the push() operation within the callback function to ensure the array is updated correctly.
Finally, you can update the value of the field with the prop:value property. This is equivalent to the value property in vanilla HTML.
Now, we have a TodoInput component fully set up. When we run the application, the output should look like so:

TodoList componentNext, we’ll construct the TodoList component, which is responsible for rendering the entire TodoList element. Leptos offers two distinct approaches for declaratively rendering lists of items: static rendering and dynamic rendering.
Static list rendering involves rendering a list of items from a Vec<T>. This method is suitable for scenarios where the list items are fixed and known beforehand. Here’s an example:
let todos = vec!["Eat Dinner", "Eat Breakfast", "Prepare lunch"];
view! {
  <p>{values.clone()}</p>
  <ul>
      {values.into_iter()
          .map(|n| view! { <li>{n}</li>})
          .collect::<Vec<_>>()}
  </ul>
}
Considering the code above, all it takes to render the static list is to iterate over it and return it in a view using the view! macro. In comparison, dynamic list rendering is specifically designed to be reactive and utilize Leptos’ signal system. For this purpose, Leptos provides a dedicated <For/> component.
Given this information, you’ve probably guessed that we’ll be using dynamic list rendering for our TodoList component. When we add a new to-do item, we need the list to be updated and re-rendered.
The code below represents how our TodoList component will look. Copy and append it into your main.rs file:
#[component]
fn TodoList(todos: (ReadSignal<Vec<TodoItem>>, WriteSignal<Vec<TodoItem>>)) -> impl IntoView {
    let (todo_list_state, set_todo_list_state) = todos;
    let my_todos = move || {
        todo_list_state
            .get()
            .iter()
            .map(|item| (item.id, item.clone()))
            .collect::<Vec<_>>()
    };
    view! {
        <ul class="todo-list">
        <For
            each=my_todos
            key=|todo_key| todo_key.0
            children=move |item| {
                view! {
                    <li class="new-todo" > {item.1.content}
                        <button
                        class="remove"
                            on:click=move |_| {
                                set_todo_list_state.update(|todos| {
                                    todos.retain(|todo| &todo.id != &item.1.id)
                                });
                            }
                        >
                        </button>
                    </li>
                }
            }
        />
    </ul>
    }
}
Let’s examine the code above. The <For/> component has three important attributes:
each: Takes any function that returns an iterator, typically a signal or derived signal. If the iterator is not reactive, simply use the static rendering method instead of using the <For/> componentkey: Specifies a unique and stable key for each row in the list. In the <For /> component, we are just reading the id we already created initially when we added the to-do item to the listchildren: Receives each item from the each iterator and returns a view. This is where you define the HTML markup for each item in the list. In our to-do list code, we render each to-do item’s content and provide a remove button that triggers the deletion of the corresponding to-do itemIt’s advisable to use unique ids for component keys. You could use the rand library function to generate random ids. Here’s an example function that uses the rand library to generate a new id and passes it to the function that creates new to-dos:
fn new_todo_id() -> u32 {
    let mut rng = rand::thread_rng();
    rng.gen()
}

let new_todo_item = TodoItem { id: new_todo_id(), content: input_value.clone() };
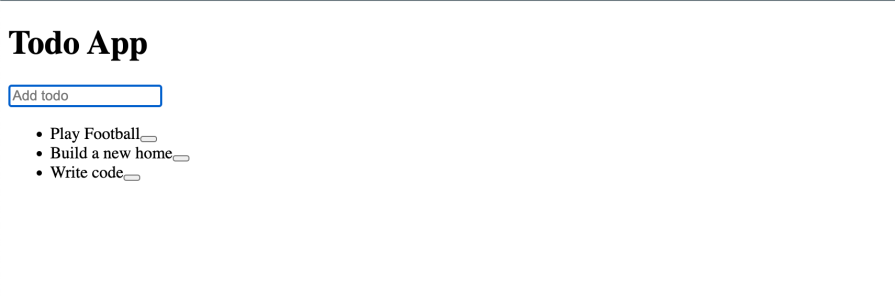
The output of the TodoList component code will look like so:

That’s all there is to it. We now have a fully functional to-do application. You can find the full code on GitHub.
However, as you can see, our app doesn’t look very pretty. Of course, this is because there’s no CSS yet. Let’s take a look at how to add CSS to your Leptos application.
Leptos has no opinion about how you add CSS to your Leptos application. It allows you to use any strategy or CSS framework that you prefer.
For example, you could add an inline style like so: <input style="background:red" />. This should change the background of the input to red.
You can also add your CSS to the <head> element using the <style> element in the index.html file. For example:
<!DOCTYPE html>
<html>
  <meta charset="UTF-8">

<head>
  <style>
    .todo-list li:hover .remove {
      display: block;
    }
  </style>
</head>
<body></body>
</html>
Leptos also seamlessly integrates with Tailwind CSS, enabling you to utilize Tailwind’s utility classes directly in your HTML markup. For example, to create a heading with the p-6 and text-4xl classes, you would write:
<h2 class="p-6 text-4xl">"Welcome to Leptos with Tailwind"> Hello World!</h2>
In our example, we’ll keep it simple and just add the CSS in the <head> of the index.html file. There’s a lot of code, so I’ll strip most of it to show you a simple example:
<!DOCTYPE html>
<html>
  <meta charset="UTF-8">
  <head>
    <style>
      html,
      body {
        font: 13px 'Arial', sans-serif;
        line-height: 1.5em;
        background: #a705a4;
        color: #4d4d4d;
        min-width: 399px;
        max-width: 799px;
        margin: 0 auto;
        font-weight: 250;
      }
    </style>
</head>
<body></body>
</html>
You can get the complete CSS we used to style the to-do app from the GitHub repository.
Now that we’ve added the CSS, we’re ready to replicate the demo to-do application we saw earlier.
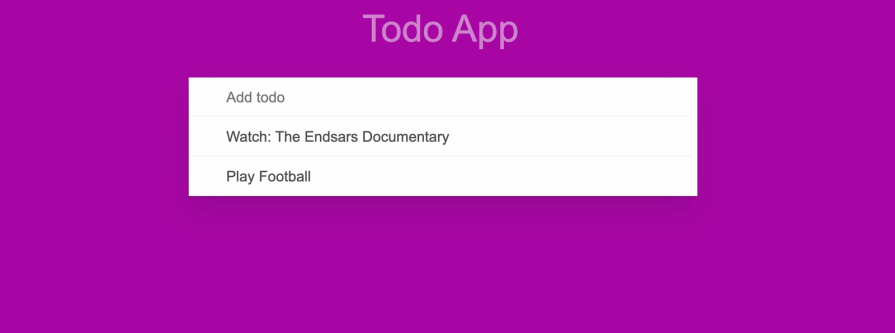
To run the app, simply execute the command trunk serve --open. This will compile the application and open it in your default browser on port 8080. The output should resemble the following:

I’ve tried at least five different Rust frontend web frameworks, and in my opinion, Leptos stands out as an excellent choice.
Leptos is relatively easy to learn and uses fine-grained reactivity, which sets it apart from frameworks like Dioxus. Focusing on fine-grain reactivity rather than the virtual DOM also aligns with the latest trends in frontend development and offers significant performance advantages.
Here is a comparison table for similar Rust frontend web frameworks:
| Framework | GitHub stars | Virtual DOM | Server-side rendering (SSR) | Rendering method | Architecture |
|---|---|---|---|---|---|
| Dioxus | 14.5K | Yes | Yes | HTML | React/Redux |
| Egui | 17.1K | No | No | Canvas | ImGUI |
| Iced | 21K | No | No | Canvas | TEA |
| Leptos | 12.6K | No | Yes | HTML | FRP |
| MoonZoon | 1.6K | No | No | HTML | FRP |
| Sauron | 1.8K | No | Yes | HTML | FRP |
| Perseus | 2K | No | Yes | HTML | FRP |
Leptos is an amazing Rust web frontend framework. It was built on the premise of scalability and making it a lot easier to build declarative UIs without sacrificing performance.
We’ve really just scratched the surface of Leptos with this tutorial. There is a lot more you can do with Leptos — I recommend visiting the Leptos documentation for more ideas.
You can check out the GitHub repository that contains all the examples in this tutorial as a reference. If you have any questions, feel free to comment them below.
Happy hacking.
Debugging Rust applications can be difficult, especially when users experience issues that are hard to reproduce. If you’re interested in monitoring and tracking the performance of your Rust apps, automatically surfacing errors, and tracking slow network requests and load time, try LogRocket.
LogRocket lets you replay user sessions, eliminating guesswork around why bugs happen by showing exactly what users experienced. It captures console logs, errors, network requests, and pixel-perfect DOM recordings — compatible with all frameworks.
LogRocket's Galileo AI watches sessions for you, instantly identifying and explaining user struggles with automated monitoring of your entire product experience.

Modernize how you debug your Rust apps — start monitoring for free.

@container scroll-state: Replace JS scroll listeners nowCSS @container scroll-state lets you build sticky headers, snapping carousels, and scroll indicators without JavaScript. Here’s how to replace scroll listeners with clean, declarative state queries.

Explore 10 Web APIs that replace common JavaScript libraries and reduce npm dependencies, bundle size, and performance overhead.

Russ Miles, a software development expert and educator, joins the show to unpack why “developer productivity” platforms so often disappoint.

Discover what’s new in The Replay, LogRocket’s newsletter for dev and engineering leaders, in the February 18th issue.
Would you be interested in joining LogRocket's developer community?
Join LogRocket’s Content Advisory Board. You’ll help inform the type of content we create and get access to exclusive meetups, social accreditation, and swag.
Sign up now