It wasn’t too long ago that webpages worked entirely on static data. If you visited a webpage, it would load, and all of its data would only update when you refreshed the page in question.

These days, such an approach is hardly sufficient. Your users expect to be notified in real-time and won’t tolerate waiting seconds or minutes between page loads to be updated on something happening. Instant messaging, price checkers, and many other tools rely on real-time notifications.
Fortunately, if you’re a .NET developer with some Angular knowledge, implementing real-time messaging can be a fairly straightforward exercise. So, let’s explore how to use real-time data in Angular with SignalR. The full code for our demo app is available on GitHub.
.NET is a mature and stable server-side solution with many benefits. For example, it:
Likewise, Angular is also a stable and mature framework, but for the frontend. Microsoft has moved into this space with Blazor, but many developers still prefer Angular — or learned it before Blazor came on the scene. Angular also has excellent frontend UI frameworks like Angular Material.
Angular has also added new functionality recently by way of Signals, which can help with the reactivity of our application. There’s the possibility of confusion between signals in Angular and SignalR in .NET, so we’ll need to delineate between both technologies, as we will do in this article.
SignalR works by using a variety of real-time connection methods to deliver notifications to applications.
Before SignalR, if you were a .NET developer and wanted to utilize real-time messaging, you had to decide whether you wanted to use WebSockets, server-side events, or HTTP long polling. If a client didn’t support one, you would have to implement it yourself. This added a lot of developmental burden.
SignalR automatically chooses a connection method for you based on what the client supports. Normally, it will favor WebSockets, but can fall back to server-side events or HTTP long polling. SignalR also supports automatic reconnections, so even if your connection is flaky, it will handle reconnections for you.
Real-time messaging has a raft of possible uses. But today, we’re going to use it to write a simple app meant for use by staff in a restaurant.
In a restaurant, some staff attend to the front of the house, where the customers are, while others work in the kitchen. The waitstaff needs to put orders through while the kitchen staff needs to see those orders. At the same time, the kitchen staff should be able to update orders as they progress through the kitchen and out onto the table.
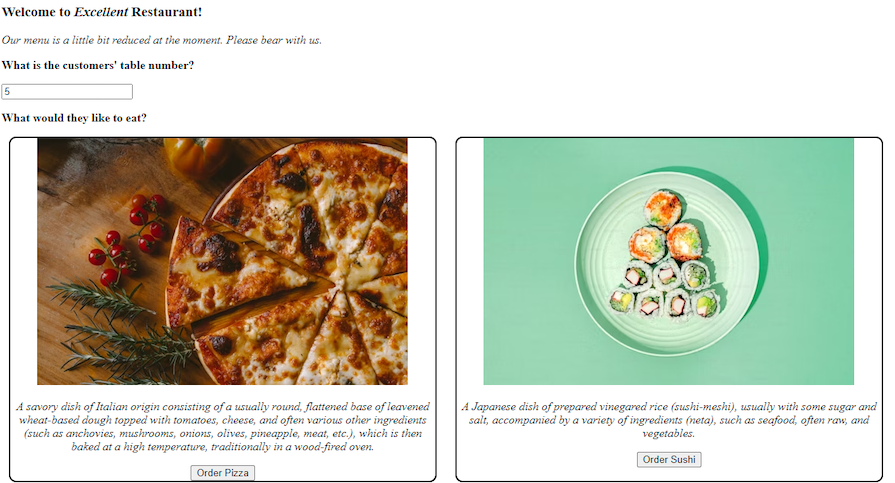
Our finished product will look like this for the waitstaff:
Meanwhile, the kitchen staff will be able to look at their specific kitchen page to see what orders have come through:
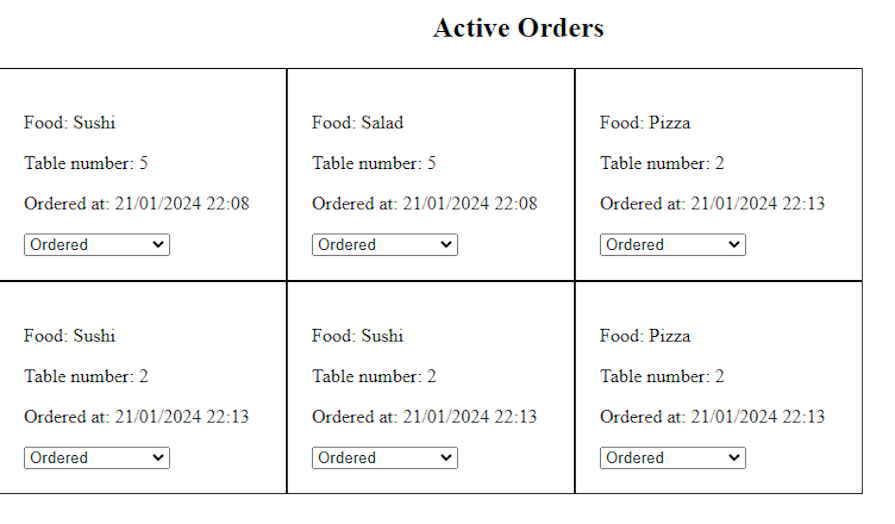
Visually, the app is extremely underwhelming. It almost hurts me to produce something that looks this drab. But real-time messaging is a complex topic in itself! So we really need to focus on that and leave aesthetics at the door.
Okay, let’s dig in.
The first thing we’ll need to do is create a new .NET app that uses the webapi template. Open up the folder where you’ll be working and type the following command:
dotnet new webapi -n FoodOrdering
After a few moments, your new project should be created.
First up, we’ll need to install some NuGet packages to our project to support what we’re doing. Install the following NuGet packages:
Microsoft.EntityFrameworkCore.Design
Microsoft.EntityFrameworkCore.Sqlite
Next, we need to create an appropriate data model to house our food orders. Our orders will be transferred in real-time from server to client, but they will also be stored. This means if our app crashes or restarts, all of the orders will be stored for reuse when the app starts up again.
Within the Model/FoodItem.cs file, our model will look like this:
public class FoodItem
{
    public int ID { get; set; }
    public string Name { get; set; }
    public string Description { get; set; }
    public string ImageUrl { get; set; }
}

public class FoodList
{
    public List<FoodItem> Items { get; set; }
}
Also, we’ll need a model to define what our food orders look like. This time, we’ll set up this model in the Model/Order.cs file:
public class Order
{
    public int Id { get; set; }
    public int TableNumber { get; set; }
    public int FoodItemId { get; set; }
    public FoodItem FoodItem { get; set; }
    public DateTimeOffset OrderDate { get; set; }
    public OrderState OrderState { get; set; }
}

[JsonConverter(typeof(JsonStringEnumConverter))]
public enum OrderState
{
    Ordered,
    Preparing,
    AwaitingDelivery,
    Completed
}
Now would be a good time to create a context in which to store the food and orders. Let’s create a data context for our application that will be used by Entity Framework in the Contexts/DataContext.cs file:
public class DataContext : DbContext
{
    public DataContext(DbContextOptions<DataContext> options): base(options)
    {

    }
    public DbSet<FoodItem> FoodItems { get; set; }
    public DbSet<Order> Orders { get; set; }
}
Next, run the dotnet ef migrations add initial command within our project to produce our initial set of database migrations. We won’t apply these just yet, however.
Our application isn’t of much use to us right now. If we start it up, we’ll see that it has zero food items in it, so we can’t order anything or test that it works. We could manually load data into the test database, but this would prove irritating over time.
Instead, let’s create a simple worker that runs with our app, ensures our database is in a useful state, and also populates it with some useful data. In our case, it will be a BackgroundService that we’ll call on a little later on.
For now, our background service in the Workers/SeedingWorker.cs file looks like this:
public class SeedingWorker : BackgroundService
{
    private readonly IServiceScopeFactory _scopeFactory;

    public SeedingWorker(IServiceScopeFactory scopeFactory)
    {
        _scopeFactory = scopeFactory;
    }

    protected override async Task ExecuteAsync(CancellationToken stoppingToken)
    {
        await SeedDataAsync();
    }

    private async Task SeedDataAsync()
    {
        using var scope = _scopeFactory.CreateScope();
        await using var context = scope.ServiceProvider.GetRequiredService<DataContext>();
        await context.Database.EnsureDeletedAsync();
        await context.Database.MigrateAsync();
        var foodItems = new List<FoodItem>
        {
            new FoodItem
            {
                Name = "Pizza",
                Description =
                    "A savory dish of Italian origin consisting of a usually round, flattened base of leavened wheat-based dough topped with tomatoes, cheese, and often various other ingredients (such as anchovies, mushrooms, onions, olives, pineapple, meat, etc.), which is then baked at a high temperature, traditionally in a wood-fired oven.",
                ImageUrl = "https://images.unsplash.com/photo-1513104890138-7c749659a591?q=80&w=500&auto=format&fit=crop&ixlib=rb-4.0.3&ixid=M3wxMjA3fDB8MHxwaG90by1wYWdlfHx8fGVufDB8fHx8fA%3D%3D"
            },
            new FoodItem
            {
                Name = "Sushi",
                Description =
                    "A Japanese dish of prepared vinegared rice (sushi-meshi), usually with some sugar and salt, accompanied by a variety of ingredients (neta), such as seafood, often raw, and vegetables.",
                ImageUrl = "https://plus.unsplash.com/premium_photo-1670333291474-cb722ca783a5?q=80&w=500&auto=format&fit=crop&ixlib=rb-4.0.3&ixid=M3wxMjA3fDB8MHxwaG90by1wYWdlfHx8fGVufDB8fHx8fA%3D%3D"
            },
            new FoodItem
            {
                Name = "Hamburger",
                Description =
                    "A sandwich consisting of one or more cooked patties of ground meat, usually beef, placed inside a sliced bread roll or bun. The patty may be pan fried, grilled, or flame broiled. Hamburgers are often served with cheese, lettuce, tomato, onion, pickles, bacon, or ketchup, mayonnaise, mustard, and other condiments.",
                ImageUrl = "https://images.pexels.com/photos/1639565/pexels-photo-1639565.jpeg?auto=compress&cs=tinysrgb&w=500&h=750&dpr=1"
            },
            new FoodItem()
            {
                Name = "Salad",
                Description = "The most amazing salad that has ever passed your lips.",
                ImageUrl = "https://images.pexels.com/photos/1059905/pexels-photo-1059905.jpeg?auto=compress&cs=tinysrgb&w=500&h=750&dpr=1"
            }
            // Add more food items as needed
        };

        await context.FoodItems.AddRangeAsync(foodItems);
        await context.SaveChangesAsync();
        Console.WriteLine("Seeding complete!");
    }
}
To support the functions of the kitchen staff and the waitstaff, we’ll create two controllers in the Controllers directory. We’ll use FoodController.cs and KitchenController.cs as the names for our controller files.
Why do we even need controllers in a SignalR application? It’s a good question. SignalR can emit data in real-time, which has its use. However, we also need to retrieve data when the web page loads. In that context, it makes sense to get the list of items from the API, and then receive future updates to the data via SignalR.
Our food controller will just get a list of food items, like so:
[ApiController]
[Route("api/[controller]/[action]")]
public class FoodItemsController : ControllerBase
{
    private readonly DataContext _context;

    public FoodItemsController(DataContext context)
    {
        _context = context;
    }

    [HttpGet]
    public async Task<IActionResult> GetFoodItems()
    {
        var foodItems = await _context.FoodItems.ToListAsync();
        return Ok(foodItems);
    }
}
Our kitchen controller will return a list of orders that are currently not completed, like so:
[ApiController]
[Route("api/[controller]/[action]")]
public class KitchenController
{
    private readonly DataContext _context;

    public KitchenController(DataContext context)
    {
        _context = context;
    }

    [HttpGet]
    public List<Order> GetExistingOrders()
    {
        var orders = _context.Orders.Include(x => x.FoodItem).Where(x => x.OrderState != OrderState.Completed);
        return orders.ToList();
    }
}
SignalR runs on the idea of hubs. Clients can connect to these hubs to receive real-time information. The basic concept is that you can define functions on the hub that your client can invoke, but your server can also invoke functions on the client.
Mentally mapping out what calls what and where can quickly become taxing. In these times, it pays to step through what we’re trying to accomplish before diving in. In the case of food orders, it can look something like this:
Let’s make this hub a reality in the Hubs/FoodHub.cs file:
public class FoodHub : Hub<IFoodOrderClient>
{
    private readonly DataContext _context;

    public FoodHub(DataContext context)
    {
        _context = context;
    }

    public async Task OrderFoodItem(FoodRequest request)
    {
        _context.Orders.Add(new Order()
        {
            FoodItemId = request.foodId,
            OrderDate = DateTimeOffset.Now,
            TableNumber = request.table,
            OrderState = OrderState.Ordered,
        });

        await _context.SaveChangesAsync();
        await EmitActiveOrders();
    }

    public async Task UpdateFoodItem(int orderId, OrderState state)
    {
        var order = await _context.Orders.FindAsync(orderId);
        if (order != null)
        {
            order.OrderState = state;
        }

        await _context.SaveChangesAsync();
        await EmitActiveOrders();
    }

    public async Task EmitActiveOrders()
    {
        var orders = _context.Orders.Include(x => x.FoodItem).Where(x => x.OrderState != OrderState.Completed).ToList();

        await Clients.All.PendingFoodUpdated(orders);
    }

    public override async Task OnConnectedAsync()
    {
        Console.WriteLine(Context.ConnectionId);
        await base.OnConnectedAsync();
    }

    public override async Task OnDisconnectedAsync(Exception ex)
    {
        Console.WriteLine(Context.ConnectionId);
        await base.OnDisconnectedAsync(ex);
    }
}

// These are the RPC calls on the client
public interface IFoodOrderClient
{
    Task PendingFoodUpdated(List<Order> orders);
}
The IFoodOrderClient interface feels weird on the Hub method here, considering we don’t implement anything from this interface. However, these are the functions that we can call on the client, which we’ll see a little later on.
Program.cs fileNow, let’s go ahead and set up our application for startup in the Program.cs file:
var builder = WebApplication.CreateBuilder(args);

builder.Services.AddEndpointsApiExplorer();
builder.Services.AddSwaggerGen();
builder.Services.AddDbContext<DataContext>(options => options.UseSqlite("Data Source=mydatabase.sqlite"));
// Add the seeding worker
builder.Services.AddHostedService<SeedingWorker>();
// Configure the pipeline to accept enums as strings, instead of just numbers
builder.Services.AddMvc().AddJsonOptions(x =>
{
    x.JsonSerializerOptions.Converters.Add(new JsonStringEnumConverter());
});
// Add SignalR
builder.Services.AddSignalR();

var app = builder.Build();

// Configure the HTTP request pipeline.
if (app.Environment.IsDevelopment())
{
    app.UseSwagger();
    app.UseSwaggerUI();
}

app.UseHttpsRedirection();
app.UseRouting();
app.MapControllers();
// Configure our SignalR hub
app.MapHub<FoodHub>("/foodhub");

app.Run();
Here, we integrate a SQLite database to manage our order data, Swagger to simplify API documentation and testing, and SignalR to enable live updates.
Our client app will be written in Angular 17. This version of Angular brings exciting changes, such as control flow syntax and real-time messaging systems such as Signals. To get started, navigate to a folder that’s just one level up from your .NET project, and type the following command:
ng new FoodOrderingClient
Because our project will need to receive food items that align with what we have on the server, we’ll first need to create our data model. In the model/data.ts file, we can set up our data model accordingly:
export interface FoodItem {
  id: number;
  name: string;
  description: string;
  imageUrl: string;
}

export interface FoodList {
  items: FoodItem[];
}

export interface Order {
  id: number;
  tableNumber: number;
  foodItemId: number;
  foodItem: FoodItem;
  orderDate: Date; // Using Date for DateTimeOffset
  orderState: OrderState;
}

export enum OrderState {
  Ordered = 'Ordered',
  Preparing = 'Preparing',
  AwaitingDelivery = 'AwaitingDelivery',
  Completed = 'Completed'
}

export interface FoodRequest{
  table: number,
  foodId: number,
}
Now, let’s create our real-time service, which will be responsible for connecting to our SignalR instance and reconnecting to the SignalR hub if the connection is dropped. It‘s also responsible for mapping the responses out of SignalR into something that makes more sense to Angular, like a standard observable.
This part of the setup can get a little tricky, so we’ll take it slow and explain how it works. First, run the following command to get the Angular CLI to produce a service for us to use:
ng generate service RealtimeClient
Next, let’s configure it to work in our project. Our service will contain three properties:
SubjectObservable that other parts of our application can subscribe toLet’s set these up now:
private hubConnection: signalR.HubConnection;
private pendingFoodUpdatedSubject = new Subject<Order[]>();
ordersUpdated$: Observable<Order[]> = this.pendingFoodUpdatedSubject.asObservable();
Our constructor for this service will be responsible for starting the connection to the hub on the SignalR server, logging an error if the connection fails, and also retrying the connection if it drops out for any reason.
Also, remember the functions we defined in the IFoodOrderClient in the Web API project? We also listen to when these functions are invoked on the server and handle the output here. When the PendingFoodUpdated function is called, the newly ordered food is submitted to the pendingFoodUpdatedSubject:
constructor() {
  this.hubConnection = new signalR.HubConnectionBuilder()
    .withUrl('http://localhost:4200/foodhub') // Replace with your SignalR hub URL
    .build();

  this.hubConnection
    .start()
    .then(() => console.log('Connected to SignalR hub'))
    .catch(err => console.error('Error connecting to SignalR hub:', err));

  this.hubConnection.on('PendingFoodUpdated', (orders: Order[]) => {
    this.pendingFoodUpdatedSubject.next(orders);
  });
}
Finally, we’ll write two functions that invoke the SignalR functions to handle new orders being placed and updated accordingly. We can’t generate these invocations automatically, so we have to be careful to use the right parameters and types when we invoke these functions:
async orderFoodItem(foodId: number, table: number) {
  console.log("ordering");
  await this.hubConnection.invoke('OrderFoodItem', {
    foodId,
    table,
  } as FoodRequest);
}

async updateFoodItem(orderId: number, state: OrderState) {
  await this.hubConnection.invoke('UpdateFoodItem', orderId, state);
}
customers pageNow, we can create a customers page that the customer or waitstaff can see.
The function is fairly simple: we want it to accept a table number and then allow the user to click on what items they would like to order. It’s also possible to view orders that are currently in, bearing in mind that completed orders will not be shown.
Here’s the code:
<h3>Welcome to <i>Excellent</i> Restaurant!</h3>
<i>Our menu is a little bit reduced at the moment. Please bear with us.</i>
<p>
  <b>What is the customers' table number?</b></p>
<input placeholder="Table Number" [(ngModel)]="tableNumber" type="number">
<p>
  <b>What would they like to eat?</b>
</p>

<div style="width: 100%; height: 100%; display: flex; flex-wrap: wrap; gap: 5px; padding-bottom: 100px">
  @for (food of availableFood(); track food.id) {
    <div style="width: 45%; margin: 0 10px; text-align: center; border: black 2px solid; border-radius: 10px"><img [src]="food.imageUrl" [alt]="food.description">
      <p>
        <i>{{ food.description }}</i>
      </p>
      <button [disabled]="!tableNumber" (click)="sendOrder(food.id, tableNumber!)">Order {{food.name}}</button>
    </div>
  }
</div>

@if (showActiveOrders){
<div style="position: fixed; background-color: rgba(59,189,168,0.3); top: 0; left: 0; right: 0; bottom: 0; z-index: 10">
  <div style="margin: 15%; background-color: white; height: 40%; width: 60%; border: black 2px solid; border-radius: 15px">
    <h3 style="text-align: center">Active orders</h3>
    <ul>
      @for (order of activeOrders(); track order){
        <li>{{order.foodItem.name}} for table {{order.tableNumber}}. Status: {{order.orderState}}</li>
      }
    </ul>
    <button (click)="showActiveOrdersToggle()">Hide Orders</button>
  </div>
</div>
}

<div style="height: 50px; background-color: rgba(86,157,238,0.8); width: 100%; position:fixed; bottom: 0; left:0; right: 0; display: flex; justify-content: center; align-content: center">
  <button (click)="showActiveOrdersToggle()">Show Active Orders</button>
</div>
Within the code for this component, we’ll have two dependencies: RealtimeClientService and HttpClient. The reason for this is that we want to receive real-time updates when they occur, but we also want to receive a list of static data, such as what food is available to order.
We’ll also create two signals: one to contain the list of food that we can order and another that will update when the orders in the system have been updated:
availableFood = signal<Array<FoodItem>>([]);
activeOrders = signal<Array<Order>>([]);
activeOrdersSubscription?: Subscription;

constructor(private realtime: RealtimeClientService, private http: HttpClient) {
}
Within our initialization function, we retrieve all available items to order from the API, along with all current orders from the API. We then subscribe to our real-time service to receive updates when order statuses have been updated:
async ngOnInit() {
  let food = await firstValueFrom(this.http.get<Array<FoodItem>>('http://localhost:4200/api/FoodItems/GetFoodItems'));
  this.availableFood.set([...food]);

  let orders = await firstValueFrom(this.http.get<Array<Order>>('http://localhost:4200/api/Kitchen/GetExistingOrders'));
  this.activeOrders.set([...orders]);

  this.activeOrdersSubscription = this.realtime.ordersUpdated$.subscribe(orders => {
    this.activeOrders.set([...orders]);
  });
}
We also call the real-time service from our function that places the order:
async sendOrder(foodId: number, tableNumber: number) {
  await this.realtime.orderFoodItem(foodId, tableNumber);
}
kitchen componentOur kitchen component is responsible for showing the list of orders, but it also has a critical role to play in this real-time opera. Namely, we want to enable kitchen staff to update order progress through the kitchen, and when orders are completed, we want to remove them from the display entirely.
Create a new component and call it kitchen. The template will just iterate through a list of orders and show their current state. When the dropdown box is changed, however, we’ll trigger an event in our component to update the state appropriately, which we’ll see in a moment:
<h2 style="text-align: center">Active Orders</h2>
<div style="width: 100%; height: 100%; flex-direction: row; display: flex; flex-wrap: wrap">
  @for (order of foodItems(); track order.id) {
    <div style="width: 200px; padding: 20px; border: solid 1px black">
      <p>
        Food: {{ order.foodItem.name }}
      </p>
      <p>
        Table number: {{ order.tableNumber }}
      </p>
      <p>
        Ordered at: {{ order.orderDate | date:'dd/MM/yyyy H:mm' }}
      </p>
      <select (change)="updateState(order.id, $event)">
        @for (state of foodStates; track state) {
          <option [value]="state">{{ state }}</option>
        }
      </select>
    </div>
  }
</div>
Within the component, we want to first receive a list of existing orders at initialization and use that list to populate the screen. Once we have this static data, we want to receive subsequent updates to this screen:
async ngOnInit() {
  // Load exisiting orders (static data)
  let existingOrders = await firstValueFrom(this.http.get<Array<Order>>('http://localhost:4200/api/Kitchen/GetExistingOrders'));
  this.orders.set([...existingOrders]);
  /// Subscribe to future order updates
  this.orderSubscription = this.realtime.ordersUpdated$.subscribe(orders => this.orders.set([...orders]));
}
Finally, once the state of the order has been updated, we want to send that updated state to the server. This occurs when the updateState dropdown box is changed in the layout.
async updateState(id: number, $event: Event) {
  let value = ($event.target as HTMLSelectElement)?.value; // Get the text from the control
  await this.realtime.updateFoodItem(id, value as OrderState); // Set the new enum value
}
We’re so close to seeing how this works, but first, we have to set up routing and configure the development proxy. Within our app.routes.ts, we just want to route the customers to the customers component and the kitchen to the kitchen component:
export const routes: Routes = [
  { path: 'customers', component: CustomersComponent },
  { path: 'kitchen', component: KitchenComponent },
];
Within our angular.json file, we also want to configure our serve statement to load some configuration that will proxy our requests so our setup works in our local environment. Remember, JSON doesn’t have comments, so my comments here are just showing you where to look and should not be copied into your angular.json file:
"serve": { // Look for the "serve" entry
  "options": { // Add options if it doesn't exist
    "proxyConfig": "proxy.conf.json" // Finally, set to proxy.conf.json
  },
The contents of our proxy.conf.json will redirect API or SignalR requests that occur within our app to the .NET app that we’ve made.
If we tried to call the API directly without this proxy, our request would fail with a CORS error, as we tried to access a resource on a different host to our current app. We could work around this on the .NET end by permitting all CORS requests, but that could introduce a security problem.
Let’s configure our proxy.conf.json like so:
{
  "/foodhub": {
    "target": "http://localhost:5054",
    "secure": false,
    "changeOrigin": true,
    "logLevel": "debug",
    "ws": true
  },
  "/api":{
    "target": "http://localhost:5054",
    "secure": false,
    "changeOrigin": true,
    "logLevel": "debug"
  }
}
The main point of interest here is that, for our hub (which is SignalR), we need to tell the Angular CLI proxy to also proxy WebSocket requests so that SignalR still works correctly.
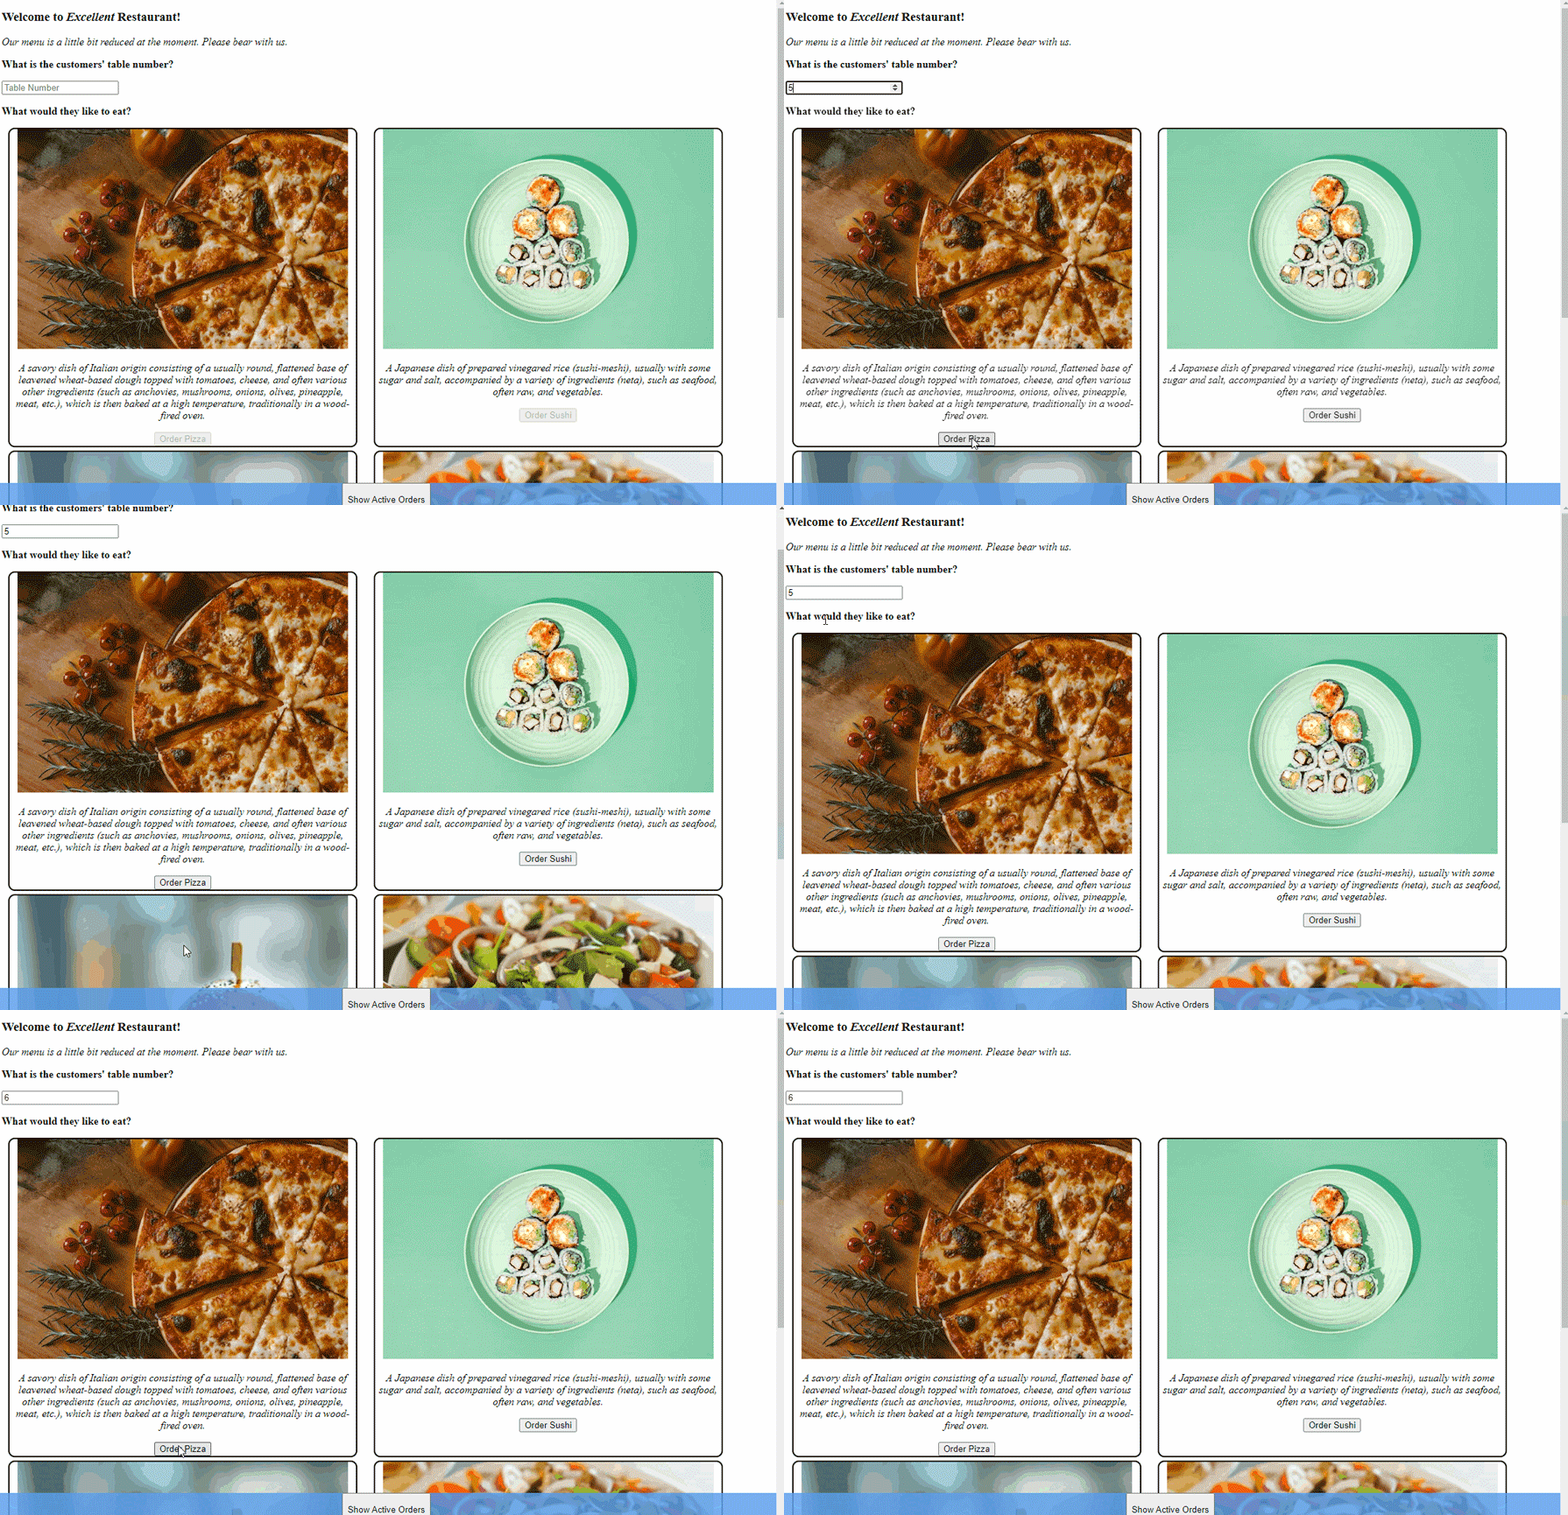
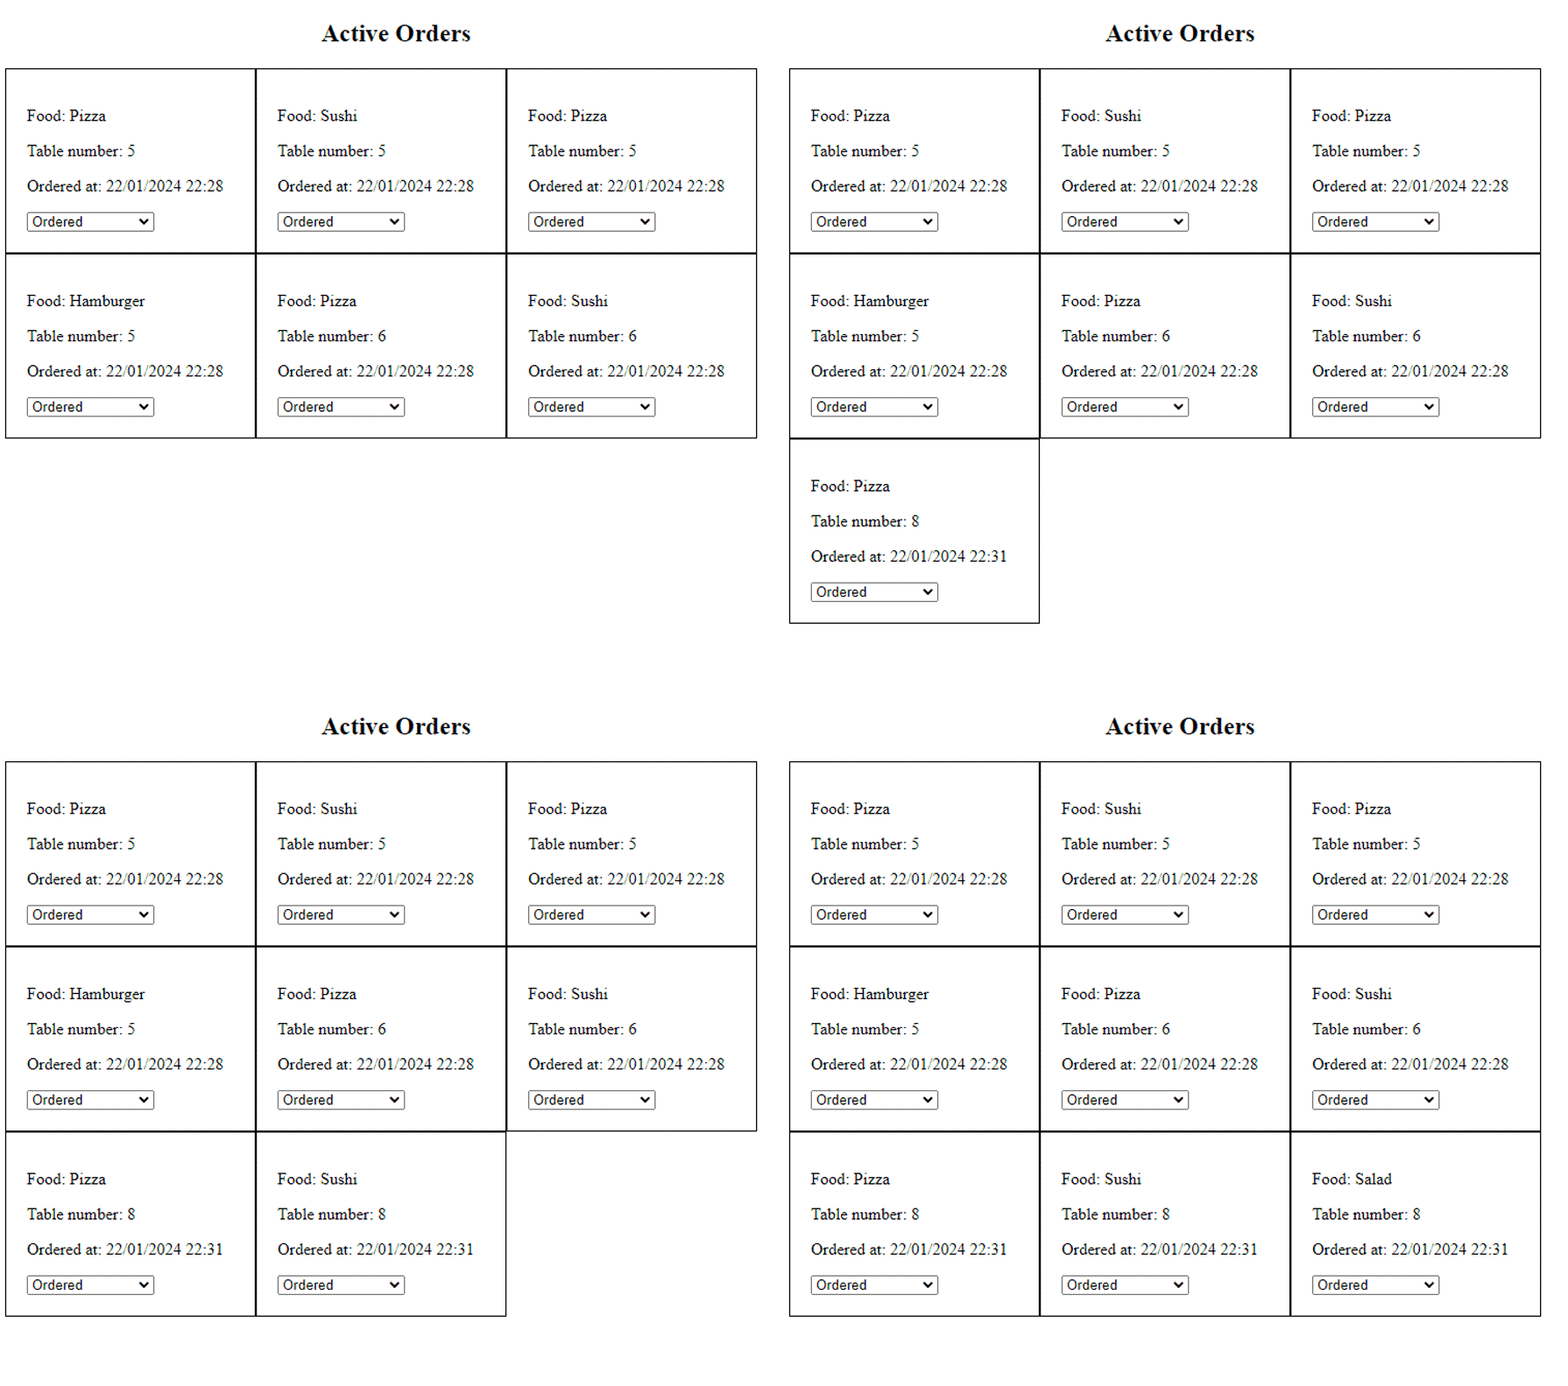
Now, let’s run our .NET app, and then run our Angular client app. Within our Angular app, let’s put in some orders for the people at table five:
Now, if we navigate to the kitchen link, we can see that the orders are there, waiting for our kitchen staff to act on:
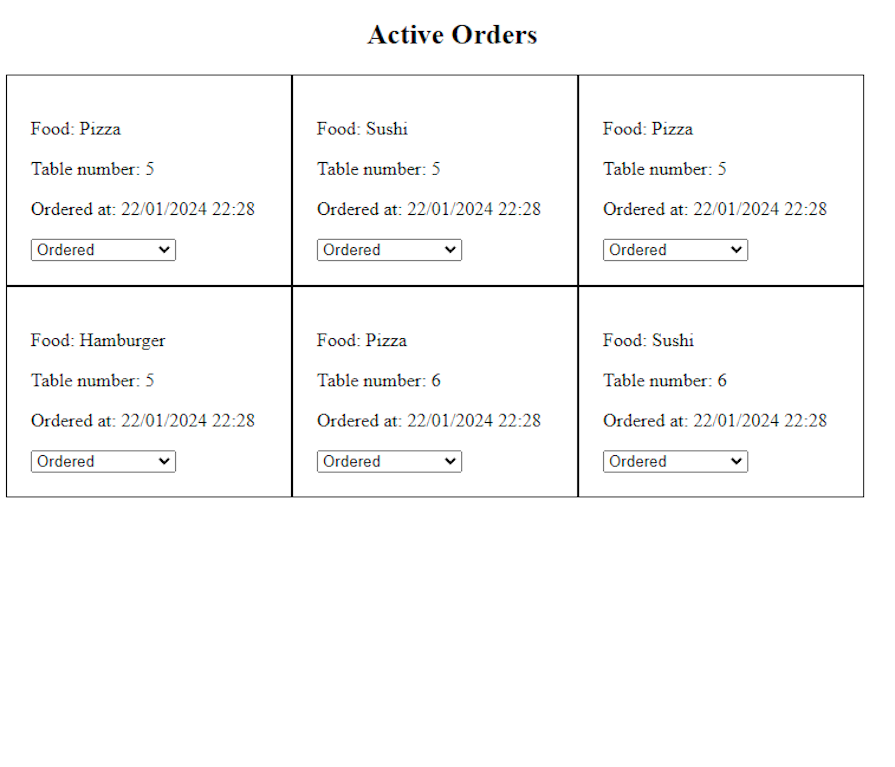
However, if more orders are added on the customers page, the orders come through automatically:
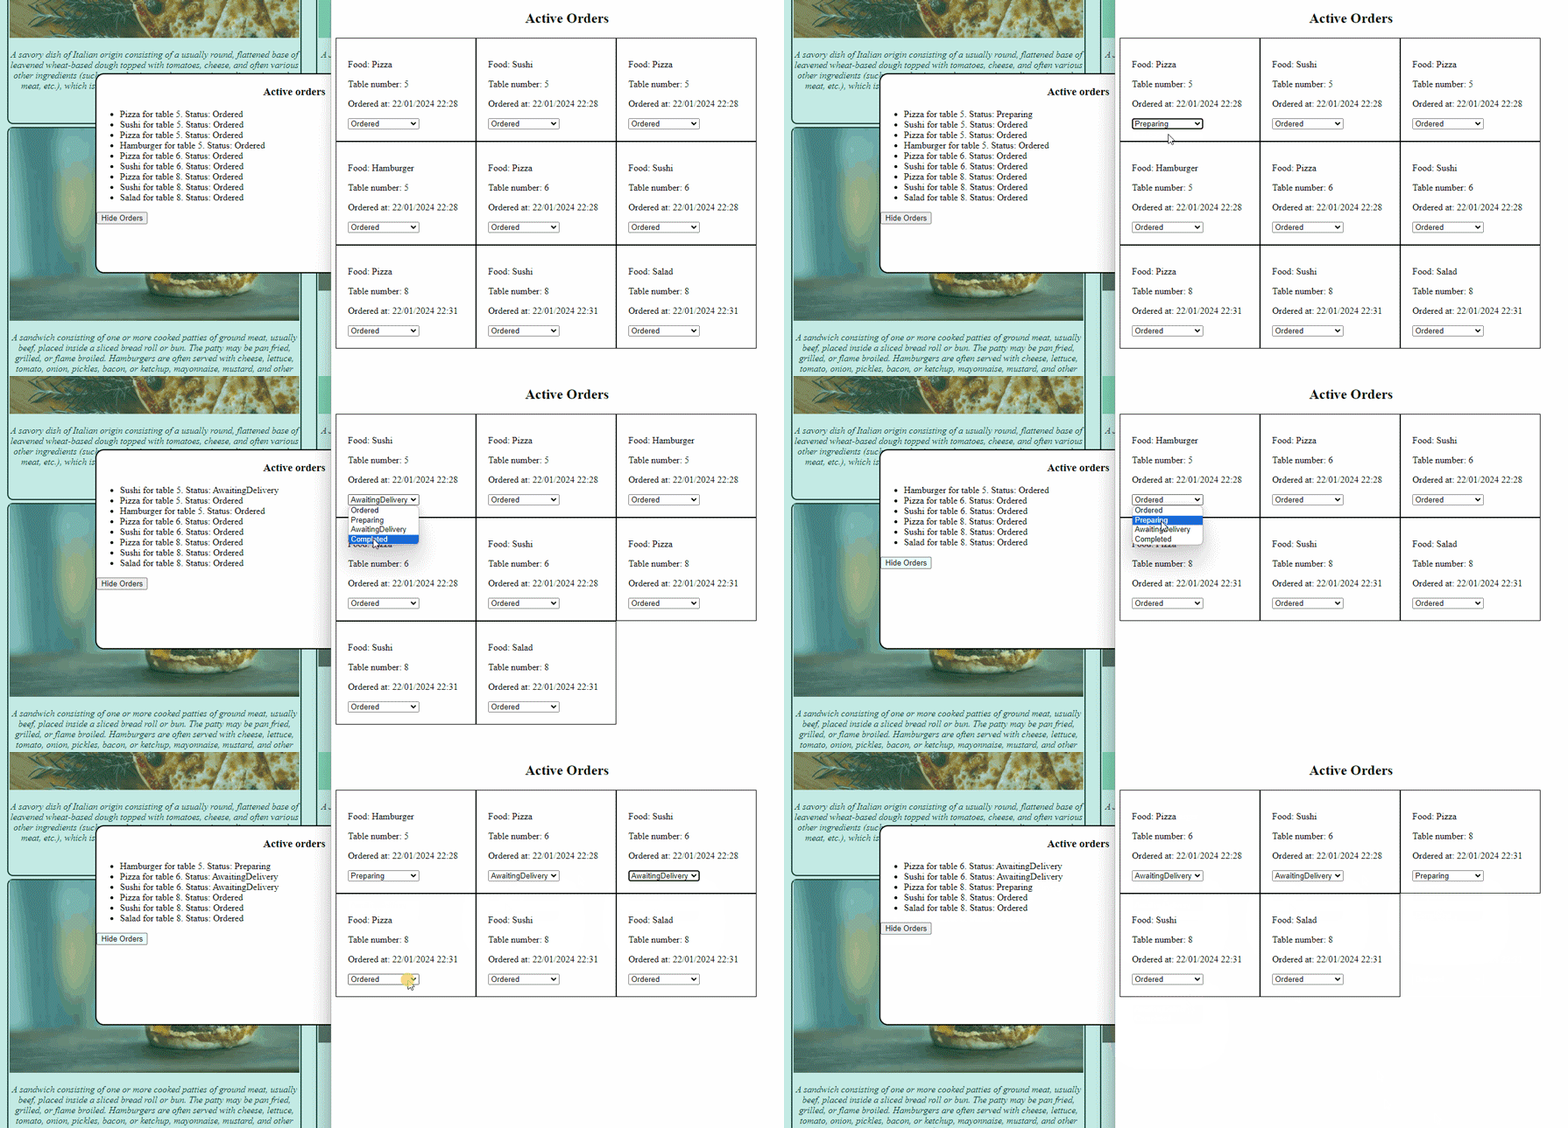
Finally, if the kitchen updates the state, the state is also updated on the customer-facing screen. In the image below, the customer screen is on the left and the kitchen screen is on the right:
And just like that, our orders are traveling from the server to our database, but are also being published over SignalR! 🎉🎉
There are countless methods of authentication available to use for web apps these days. However, in our demo app, we could use the example of making a simple token available in the HTTP header to permit access to the API.
If our app were in use by a real restaurant, the kitchen page would be on a computer in the kitchen, and would not need to be secured. However, the customer ordering screen could be more within reach to the general public — so let’s secure that side of the food ordering app.
Even for our simple example, there are a few steps we need to follow. We need to provision a JWT token to people logging in, and then use that token in our Web API requests as well as our SignalR hub. We can use the same token for both, although it does require a little bit of massaging to get working.
First up, add an AuthenticationController.cs to our controllers. The responsibility of this controller is to take requests, and if they have a username of admin and a password of password, issue a token accordingly:
[ApiController]
[Route("api/[controller]/[action]")]
public class AuthenticationController : ControllerBase
{
    private readonly IConfiguration _configuration;

    public AuthenticationController(IConfiguration configuration)
    {
        _configuration = configuration;
    }

    [HttpPost]
    public async Task<IActionResult> Login(Authentication authentication)
    {
        if (authentication.Username == "admin" && authentication.Password == "password")
        {
            // Generate JWT token
            var claims = new List<Claim>
            {
                new Claim(ClaimTypes.Name, authentication.Username)
            };
            var token = GenerateJwtToken(claims);

            return Ok(new { token });
        }
        else
        {
            return Unauthorized();
        }
    }

    private string GenerateJwtToken(List<Claim> claims)
    {
        var issuer = _configuration["Jwt:Issuer"];
        var audience = _configuration["Jwt:Audience"];
        var signingKey = Encoding.UTF8.GetBytes(_configuration["Jwt:SigningKey"]);

        var token = new JwtSecurityToken(
            issuer: issuer,
            audience: audience,
            claims: claims,
            expires: DateTime.UtcNow.AddMinutes(30),
            signingCredentials: new SigningCredentials(new SymmetricSecurityKey(signingKey), SecurityAlgorithms.HmacSha256Signature)
        );

        var tokenHandler = new JwtSecurityTokenHandler();
        return tokenHandler.WriteToken(token);
    }
}
We’re reading from our appsettings.json file here, so we’ll need to add the following details to that file:
... other configuration ...
"Jwt": {
  "Issuer": "FoodOrdering",
  "Audience": "FoodOrderingClient",
  "SigningKey": "$3cr3tkey$3cr3tkey$3cr3tkey$3cr3tkey$3cr3tkey$3cr3tkey$3cr3tkey$3cr3tkey$3cr3tkey"
}
The signing key has to be of a certain length, hence why it’s so long in this example.
Adding JWT token validation to our app makes the app startup quite a bit more complicated. Apart from adding authentication and authorization to our services, we also need to configure the authentication middleware to accept and utilize the provided tokens.
Let’s load the provided configuration and use it to configure what tokens our app would accept:
var configuration = builder.Configuration;
var jwtIssuer = configuration.GetValue<string>("Jwt:Issuer");
var jwtAudience = configuration.GetValue<string>("Jwt:Audience");
var jwtSigningKey = configuration.GetValue<string>("Jwt:SigningKey");

// Configure JWT bearer authentication
builder.Services.AddAuthentication(options =>
{
    options.DefaultAuthenticateScheme = JwtBearerDefaults.AuthenticationScheme;
    options.DefaultChallengeScheme = JwtBearerDefaults.AuthenticationScheme;
}).AddJwtBearer(options =>
{
    options.TokenValidationParameters = new TokenValidationParameters
    {
        ValidateIssuer = true,
        ValidIssuer = jwtIssuer,

        ValidateAudience = true,
        ValidAudience = jwtAudience,

        ValidateIssuerSigningKey = true,
        IssuerSigningKey = new SymmetricSecurityKey(Encoding.UTF8.GetBytes(jwtSigningKey)),

        RequireExpirationTime = true,
        ValidateLifetime = true,
        ClockSkew = TimeSpan.Zero // Adjust if needed for server clock differences
    };
});
With that, our API access is done. But there’s a small wrinkle: we also use SignalR, and SignalR will tend to use WebSockets if it can. WebSockets don’t really behave like normal HTTP requests, and they can’t really have a header authorization value updated.
Fortunately, we can configure the JWT events manually, pass the token via a query string, and then load that into our hub for authorization:
    options.Events = new JwtBearerEvents
    {
        OnMessageReceived = context =>
        {
            var accessToken = context.Request.Query["access_token"];

            // If the request is for our hub...
            var path = context.HttpContext.Request.Path;
            if (!string.IsNullOrEmpty(accessToken) &&
                (path.StartsWithSegments("/foodhub")))
            {
                // Read the token out of the query string
                context.Token = accessToken;
            }
            return Task.CompletedTask;
        }
    };
With this small change, we can now set [Authorize] attributes for all the controllers we want to secure. In our case, we’ll be securing the FoodController controller, so the list of food isn’t loaded without authentication. We’ll also secure the OrderFoodItem method on the SignalR hub.
We have a few changes to make in our client application. We need to handle the user logging in, and if login is successful, set the token to be used within our application on subsequent requests. We can do this by setting up an interceptor to “intercept” HTTP requests and attach the token as required.
The actual workings of this are fairly simple. Retrieve the token, and then set the Authorization header to the retrieved value:
@Injectable()
export class AuthenticationInterceptor implements HttpInterceptor {
  intercept(req: HttpRequest<any>, next: HttpHandler): Observable<HttpEvent<any>> {
    const token = sessionStorage.getItem('token');
    const bearerToken = `Bearer ${token}`;
    const authReq = req.clone({
      headers: req.headers.set('Authorization', bearerToken),
    });
    return next.handle(authReq);
  }
}
For our app, we want the interceptor to be used all the time. So, it makes sense to update our app.config.ts file to include this interceptor:
export const appConfig: ApplicationConfig = {
  providers: [provideRouter(routes),
    // Add the HTTP Client with interceptor
    provideHttpClient(withInterceptorsFromDi()),
    {
      provide: HTTP_INTERCEPTORS,
      useClass: AuthenticationInterceptor,
      multi: true
    }]
}
Because we can’t connect our SignalR hub when the app starts now, we have to connect it when the user has logged in. That means we have to move our main hub startup logic into a connect method that we can call after login. We also have to retrieve the token from storage and set it, if it has been set:
connect(){
  this.hubConnection = new signalR.HubConnectionBuilder()
    .withUrl('http://localhost:4200/foodhub', {
      withCredentials: sessionStorage.getItem('token') != null,
      accessTokenFactory: () => {
        let token = sessionStorage.getItem('token');
          return token ?? '';
      },
      skipNegotiation: true,
      transport: signalR.HttpTransportType.WebSockets,
    }) // Replace with your SignalR hub URL
    .build();

  this.hubConnection
    .start()
    .then(() => console.log('Connected to SignalR hub'))
    .catch(err => console.error('Error connecting to SignalR hub:', err));

  this.hubConnection.on('PendingFoodUpdated', (orders: Order[]) => {
    this.pendingFoodUpdatedSubject.next(orders);
  });
}
If the user isn’t logged in, we want to show the login dialog. Once they have logged in, we want to store the token, and allow them to interact with the app.
Within the customers component, we can design a simple login dialog for the user:
@if (needsLogin){
  <div class="overlay">
    <div class="overlay-inner" style="display: flex; flex-direction: column; gap: 10px; padding: 20px;">
      <h3>
        Login
      </h3>
      <input [(ngModel)]="login">
      <input [(ngModel)]="password" type="password">
      <button (click)="doLogin(login, password)">Login</button>
    </div>
  </div>
}
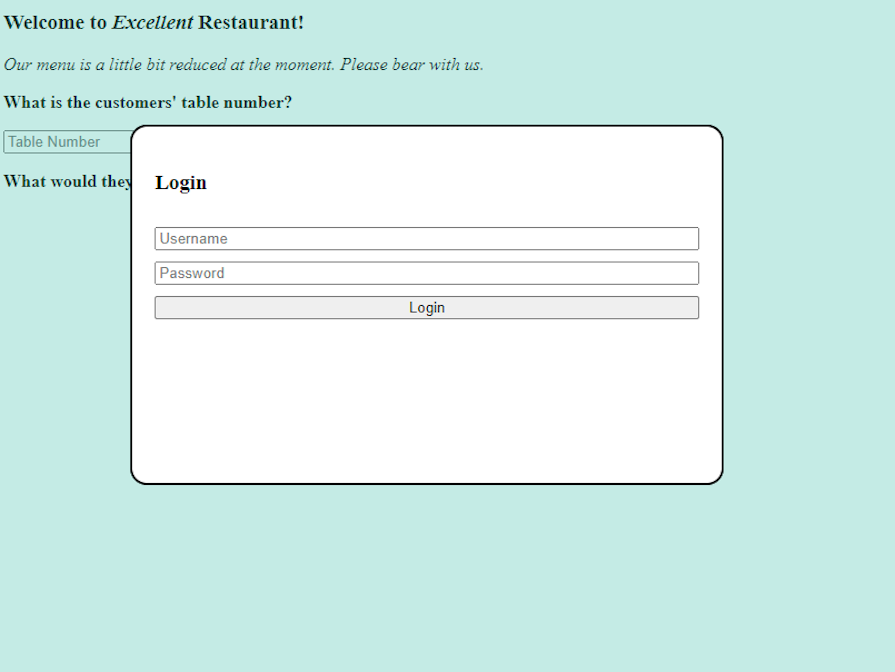
This login dialog should look like so:
When the Login button is pressed, the credentials will be checked against the server. If they match, a token will be stored. Otherwise, the user will be told to try again:
async doLogin(login?: string, password?: string) {
  if (login && password) {
    try {
      let response = await firstValueFrom(this.http.post<AuthenticationResponse>('http://localhost:4200/api/Authentication/Login', {
        username: login,
        password: password
      }));
      // debugger;
      sessionStorage.setItem("token", response.token);
      this.needsLogin = false;
      // Authentication successful, continue to load the food menu and connect the SignalR hub.
      await this.loadOrders();
      this.realtime.connect();
    } catch (e) {
      alert("Incorrect username/password");
    }
  }
}
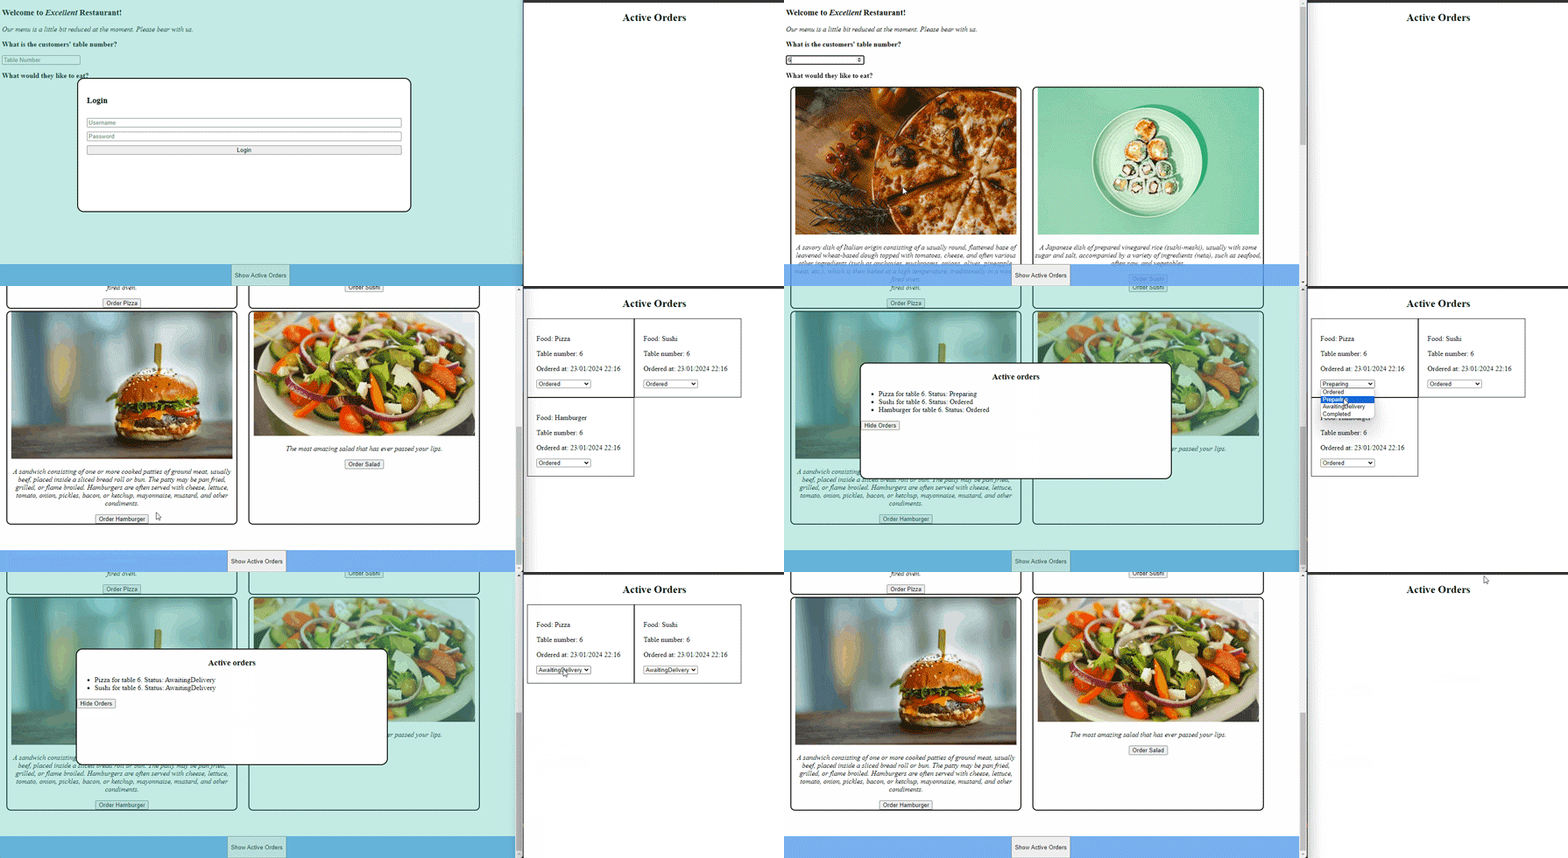
So, let’s see how this looks by launching the app across two browsers. As we set up, the user can log in to place orders, and orders are still sent to the kitchen, where users are not required to log in:
Real-time messaging techniques like SignalR, when paired with excellent frontend frameworks like Angular, can help developers create some high-quality apps that are reactive to user inputs.
Recent developments in Angular such as Signals only aid in how easy it can be to make a responsive app. Some configuration aspects can be non-intuitive, like how to set up authentication, but hopefully, this guide has helped you down the right path.
The full code sample is available on GitHub. Happy real-time app development!
Debugging Angular applications can be difficult, especially when users experience issues that are difficult to reproduce. If you’re interested in monitoring and tracking Angular state and actions for all of your users in production, try LogRocket.
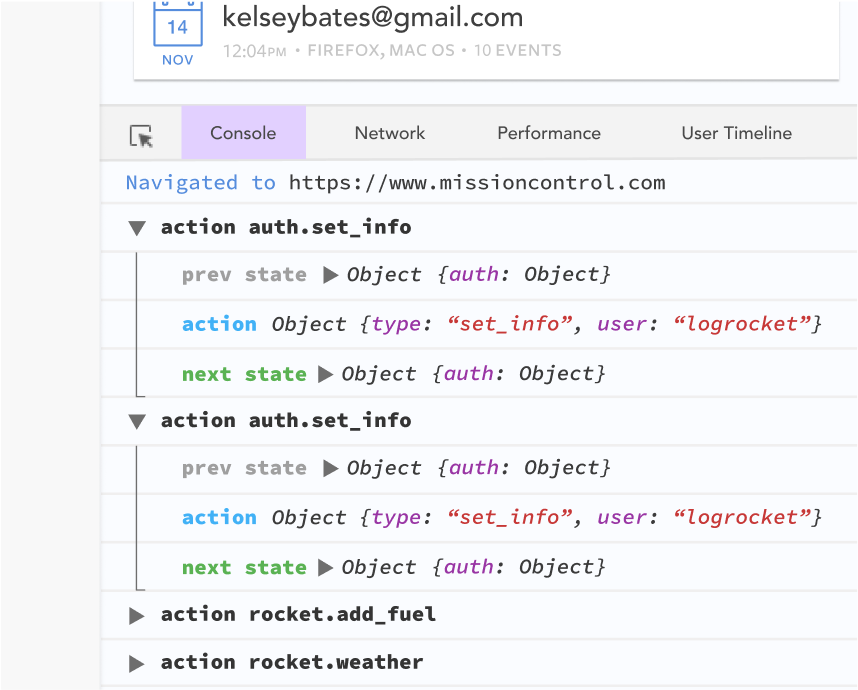
LogRocket lets you replay user sessions, eliminating guesswork by showing exactly what users experienced. It captures console logs, errors, network requests, and pixel-perfect DOM recordings—compatible with all frameworks.
With Galileo AI, you can instantly identify and explain user struggles with automated monitoring of your entire product experience.
The LogRocket NgRx plugin logs Angular state and actions to the LogRocket console, giving you context around what led to an error, and what state the application was in when an issue occurred.
Modernize how you debug your Angular apps — start monitoring for free.
Would you be interested in joining LogRocket's developer community?
Join LogRocket’s Content Advisory Board. You’ll help inform the type of content we create and get access to exclusive meetups, social accreditation, and swag.
Sign up now
Not sure if low-code is right for your next project? This guide breaks down when to use it, when to avoid it, and how to make the right call.

Compare Firebase Studio, Lovable, and Replit for AI-powered app building. Find the best tool for your project needs.

Discover how to use Gemini CLI, Google’s new open-source AI agent that brings Gemini directly to your terminal.

This article explores several proven patterns for writing safer, cleaner, and more readable code in React and TypeScript.
One Reply to "Using real-time data in Angular with SignalR"
thanks, very very best example