Implementing application authentication from scratch can be a huge headache for developers. And, if it’s not implemented correctly, the authentication process can lead to vulnerabilities within a system.

In this article, we will implement authentication in a Node.js application using the Passport library and MongoDB.
The Replay is a weekly newsletter for dev and engineering leaders.
Delivered once a week, it's your curated guide to the most important conversations around frontend dev, emerging AI tools, and the state of modern software.
Passport is a popular, modular authentication middleware for Node.js applications. With it, authentication can be easily integrated into any Node- and Express-based app. The Passport library provides more than 500 authentication mechanisms, including OAuth, JWT, and simple username and password based authentication.
Using Passport makes it easy to integrate more than one type of authentication into the application, too. We are going to use the mongoose-local strategy in this article to implement the authentication.
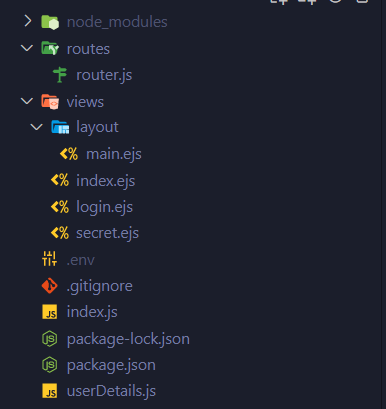
First, let’s create specific folders for our files, like so:

Here, the routes folder contains the file for all the routes. The views folder contains the ejs files that will be displayed, and the layout folder contains the ejs layout code.
Other than that, we have a .env file to store keys, an index.js file as an app starting point, and a userDetails.js file for Mongoose schema.
Building an authentication system with Passport, passport-local-mongoose, and MongoDB is extremely simple, but before moving forward to building the application, we will need a MongoDB cluster.
You can use your self-hosted version of MongoDB, or you can use MongoDB Atlas. In either case, create a MongoDB database first and store the SRV URI in the .env file.
Once we are done creating a database, let’s initialize the folder with npm. Create a new folder and initialize it with npm init -y.
Next, install the dependencies. Here is a list of them:
express: we will use the Express framework for our web applicationmongoose: the MongoDB driver for Node.js will be used to connect with MongoDBejs: our templating engineexpress-ejs-layouts: this will be used for layoutsdotenv: this package loads the environment variables from a file called .env to process.envconnect-ensure-login: this protects the pages that require authenticationpassport and passport-local-mongoose: for implementing authenticationexpress-session: to create and manage the sessionsInstall this package with:
npm i express mongoose ejs express-ejs-layouts dotenv connect-ensure-login passport passport-local-mongoose express-session
We will use the nodemon dev dependency. Install the dev dependency using npm i -D nodemon, then change the scripts section of the package.json file with these two lines:
"scripts": {
    "start": "node index.js",
    "dev": "nodemon index.js"
  }
Because we are going to use ejs as the templating engine, we are using the express-ejs-layouts package to build our default layout.
Although installing this plugin is optional, it’s handy when working with a large project. First, create a folder called views in the root directory, then create a folder called layout inside the views directory.
Create a file called main.ejs inside the layout directory. I am using Bootstrap CSS to style the web pages in this application, so I won’t need to write any CSS. I am not going to explain the HTML files here, as they are pretty straightforward and can be understood easily. Here is the code for the main.ejs file:
<!DOCTYPE html>
<html lang="en">

<head>
    <meta charset="UTF-8">
    <meta http-equiv="X-UA-Compatible" content="IE=edge">
    <meta name="viewport" content="width=device-width, initial-scale=1.0">
    <link href="https://cdn.jsdelivr.net/npm/[email protected]/dist/css/bootstrap.min.css" rel="stylesheet"
        integrity="sha384-EVSTQN3/azprG1Anm3QDgpJLIm9Nao0Yz1ztcQTwFspd3yD65VohhpuuCOmLASjC" crossorigin="anonymous">
    <script src="https://cdn.jsdelivr.net/npm/[email protected]/dist/js/bootstrap.bundle.min.js"
        integrity="sha384-MrcW6ZMFYlzcLA8Nl+NtUVF0sA7MsXsP1UyJoMp4YLEuNSfAP+JcXn/tWtIaxVXM"
        crossorigin="anonymous"></script>
    <title>
        <%- title %>
    </title>
</head>

<body>
    <%- body %>
</body>

</html>
In the header section, we have imported Bootstrap CSS and JavaScript using CDN. The text inside the title tag and the body will be changed for each view.
Because of this, we are using <%- title %> and <%- body %> literals. We will pass the title from our routes file, and the body will render the HTML body.
This is all that is needed to add to the main.ejs file. Let me show you the code for the other three pages.
index.ejs<div class="px-4 py-5 my-5 text-center">
<img class="d-block mx-auto mb-4" src="https://uilogos.co/img/logomark/u-mark.png" alt="" width="auto" height="150">
<h1 class="display-5 fw-bold">Your Login Page</h1>
<div class="col-lg-6 mx-auto">
<p class="lead mb-4">Lorem ipsum dolor sit amet consectetur, adipisicing elit. Quod, quidem. Distinctio,
natus, recusandae nostrum beatae provident aut quasi sequi eos nemo et quia dolor ipsum reprehenderit
molestiae id facere sunt.</p>
<div class="d-grid gap-2 d-sm-flex justify-content-sm-center">
<a type="button" class="btn btn-primary btn-lg px-4 gap-3 me-2" href="/login">Log In</a>
</div>
</div>
</div>
Here’s what it will look like when we render it:

login.ejs<div class="px-4 py-5 my-5 text-center">
<img class="d-block mx-auto mb-4" src="https://uilogos.co/img/logomark/u-mark.png" alt="" width="auto" height="150">
<h1 class="display-5 fw-bold">Login Here</h1>
<div class="col-lg-3 mx-auto">
<form action="/login" method="POST">
<div class="mb-2">
<label for="username" class="form-label">Username</label>
<input type="text" class="form-control" name="username" placeholder="Username" required>
</div>
<div class="mb-2">
<label for="password" class="form-label">Password</label>
<input type="password" class="form-control" name="password" placeholder="Password" required>
</div>
<button type="submit" class="btn btn-primary mt-2">Submit</button>
</form>
</div>
</div>
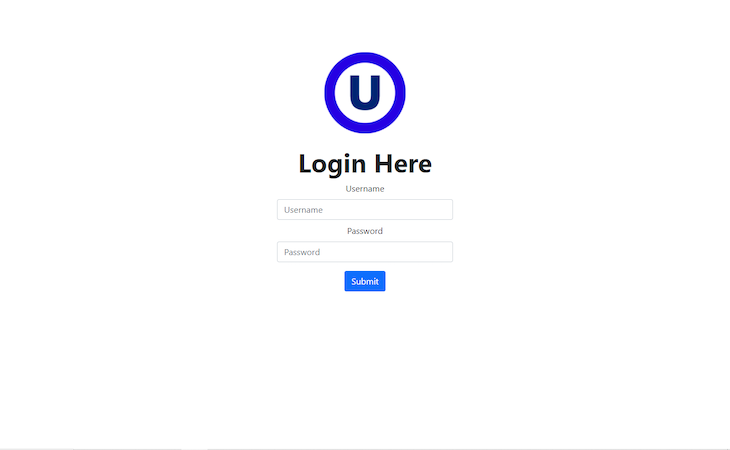
The only thing to notice here is that we are hitting the login route using the POST method in the form action. Other than that, it is a simple HTML form with labels. The login page will look like this:

secret.ejs<div class="px-4 py-5 my-5 text-center">
<img class="d-block mx-auto mb-4" src="https://uilogos.co/img/logomark/u-mark.png" alt="" width="auto" height="150">
<h1 class="display-5 fw-bold">Welcome to the Secret Page</h1>
<div class="col-lg-6 mx-auto">
<p class="lead mb-4">You've Successfully Entered the Secret Page</p>
</div>
<div class="d-grid gap-2 d-sm-flex justify-content-sm-center">
<a href="/logout" type="button" class="btn btn-danger btn-lg px-4 gap-3">Log Out</a>
</div>
</div>
The secret page will look like this:

This page contains a button called logout that will log out the users.
However, none of these pages will render yet because we haven’t set up our server. Let’s do that now.
Let’s import the packages in the index.js file.
// Requiring Modules
const express = require('express');
var expressLayouts = require('express-ejs-layouts');
const app = express();

// set up view engine and layout
app.use(expressLayouts);
app.set('layout', './layout/main');
app.set('view engine', 'ejs');

app.use(express.urlencoded({ extended: false }));

const PORT = process.env.PORT || 3000;

// Set up express server
const server = app.listen(PORT, () => {
  console.log(`Listening on port ${PORT}`);
});
Here, we import the express and the express-ejs-layouts package. After that, we initialize express and express-ejs-layouts with const app = express() and app.use(expressLayouts).
The app.set('layout', './layout/main') is setting up the main file as the layout, and app.set('view engine', 'ejs') is setting ejs as the templating engine. app.use(express.urlencoded({ extended: false })) works as the body parser. And finally, we are creating our server on port 3000.
Now, let’s create a new folder called routes, and inside the folder, create a new file called router.js.
const express = require('express');
const router = express.Router();
const connectEnsureLogin = require('connect-ensure-login');
const passport = require('passport');

// GET Routes
router.get('/', (req, res) => {
  res.render('index', { title: 'Home' });
});

router.get('/login', (req, res) => {
  res.render('login', { title: 'Login' });
});

router.get('/secret', connectEnsureLogin.ensureLoggedIn(), (req, res) =>
  res.render('secret', { title: 'Secret Page' })
);

router.get('/logout', (req, res) => {
  req.logout();
  res.redirect('/');
});

// POST Routes
router.post(
  '/login',
  passport.authenticate('local', {
    failureRedirect: '/login',
    successRedirect: '/secret',
  }),
  (req, res) => {
    console.log(req.user);
  }
);

module.exports = router;
As you can see from the above code, we have three GET routes and one POST route. First, we have added the necessary packages.
The connectEnsureLogin.ensureLoggedIn() middleware in the secret route ensures that the user is prohibited from entering the page without logging in.
Inside the POST route, the passport.authenticate middleware authenticates the user with local strategy, and, if the user succeeds in logging in, it’ll redirect to the secret route. Otherwise, it’ll redirect to the login route.
We are also passing the title of the pages through the title variable. The req.logout() is a passport method that logs out the user. Finally, we are exporting the router.
Create a new file in the root directory named userDetails.js.
const mongoose = require('mongoose');
const passportLocalMongoose = require('passport-local-mongoose');
require('dotenv').config();

// Connecting Mongoose
mongoose.connect(process.env.MONGODB_URI, {
  useNewUrlParser: true,
  useUnifiedTopology: true,
});

// Setting up the schema
const User = new mongoose.Schema({
  username: String,
  password: String,
});

// Setting up the passport plugin
User.plugin(passportLocalMongoose);

module.exports = mongoose.model('User', User);
We require mongoose to connect with MongoDB, and passport-local-mongoose makes it extremely easy to integrate username and password authentication with MongoDB.
We set up the dotenv package to use the environment variables in the next line.
Then, we’re connecting to the database using mongoose. The User variable is holding the mongoose schema. The User.plugin(passportLocalMongoose) method generates and stores the hash, salt, and username in the database for every user. Finally, we export the schema.
We are almost done. We just need to set up our index.js file.
Let’s import the Passport and express-session modules, router.js, and the userDetails.js file. Then, set up the session using the express-session package:
const passport = require('passport');
const session = require('express-session');
const UserDetails = require('./userDetails');
const routes = require('./routes/router');
require('dotenv').config();

// Set up session
app.use(
  session({
    secret: process.env.SECRET,
    resave: false,
    saveUninitialized: true,
  })
);
The secret is stored in the .env file, and it signs the session ID cookie. If the resave flag is set to true, the session data will be forcibly stored. We don’t want this because the saveUninitialized will forcibly save uninitialized sessions when set to true. You can read in detail about the package here.
Now, set up Passport by adding the following lines:
// Set up Passport
app.use(passport.initialize());
app.use(passport.session());
We are initializing Passport and the session authentication middleware first. Once this is done, we have to set up the local authentication.
passport.use(UserDetails.createStrategy());
passport.serializeUser(UserDetails.serializeUser());
passport.deserializeUser(UserDetails.deserializeUser());
The above code adds local authentication to our Node app. First, we are setting the local strategy on the UserDetails model by calling the createStrategy method.
Then, the serializeUser method serializes the passed user instance on authentication, and the deserializeUser instance is called on every subsequent request to de-serialize the user.
Now add this code in your index file and run index.js only once:
UserDetails.register({username:'nemo', active: false}, '123');
The above line will register a user with username nemo with password 123. If you check your MongoDB database now, you’ll see the user.
The final index.js file will look like this:
// Requiring Modules
const express = require('express');
var expressLayouts = require('express-ejs-layouts');
const app = express();
const passport = require('passport');
const session = require('express-session');
const UserDetails = require('./userDetails');
const routes = require('./routes/router');
require('dotenv').config();

// Set up view engine and layout
app.use(expressLayouts);
app.set('layout', './layout/main');
app.set('view engine', 'ejs');

// Set up session
app.use(
  session({
    secret: process.env.SECRET,
    resave: false,
    saveUninitialized: true,
  })
);

app.use(express.urlencoded({ extended: false }));

// Set up Passport
app.use(passport.initialize());
app.use(passport.session());

passport.use(UserDetails.createStrategy());
passport.serializeUser(UserDetails.serializeUser());
passport.deserializeUser(UserDetails.deserializeUser());

app.use(routes);

// Set up Express server
const server = app.listen(3000, () => {
  console.log(`Listening on port ${server.address().port}`);
});

UserDetails.register({ username: 'nemo', active: false }, '123');
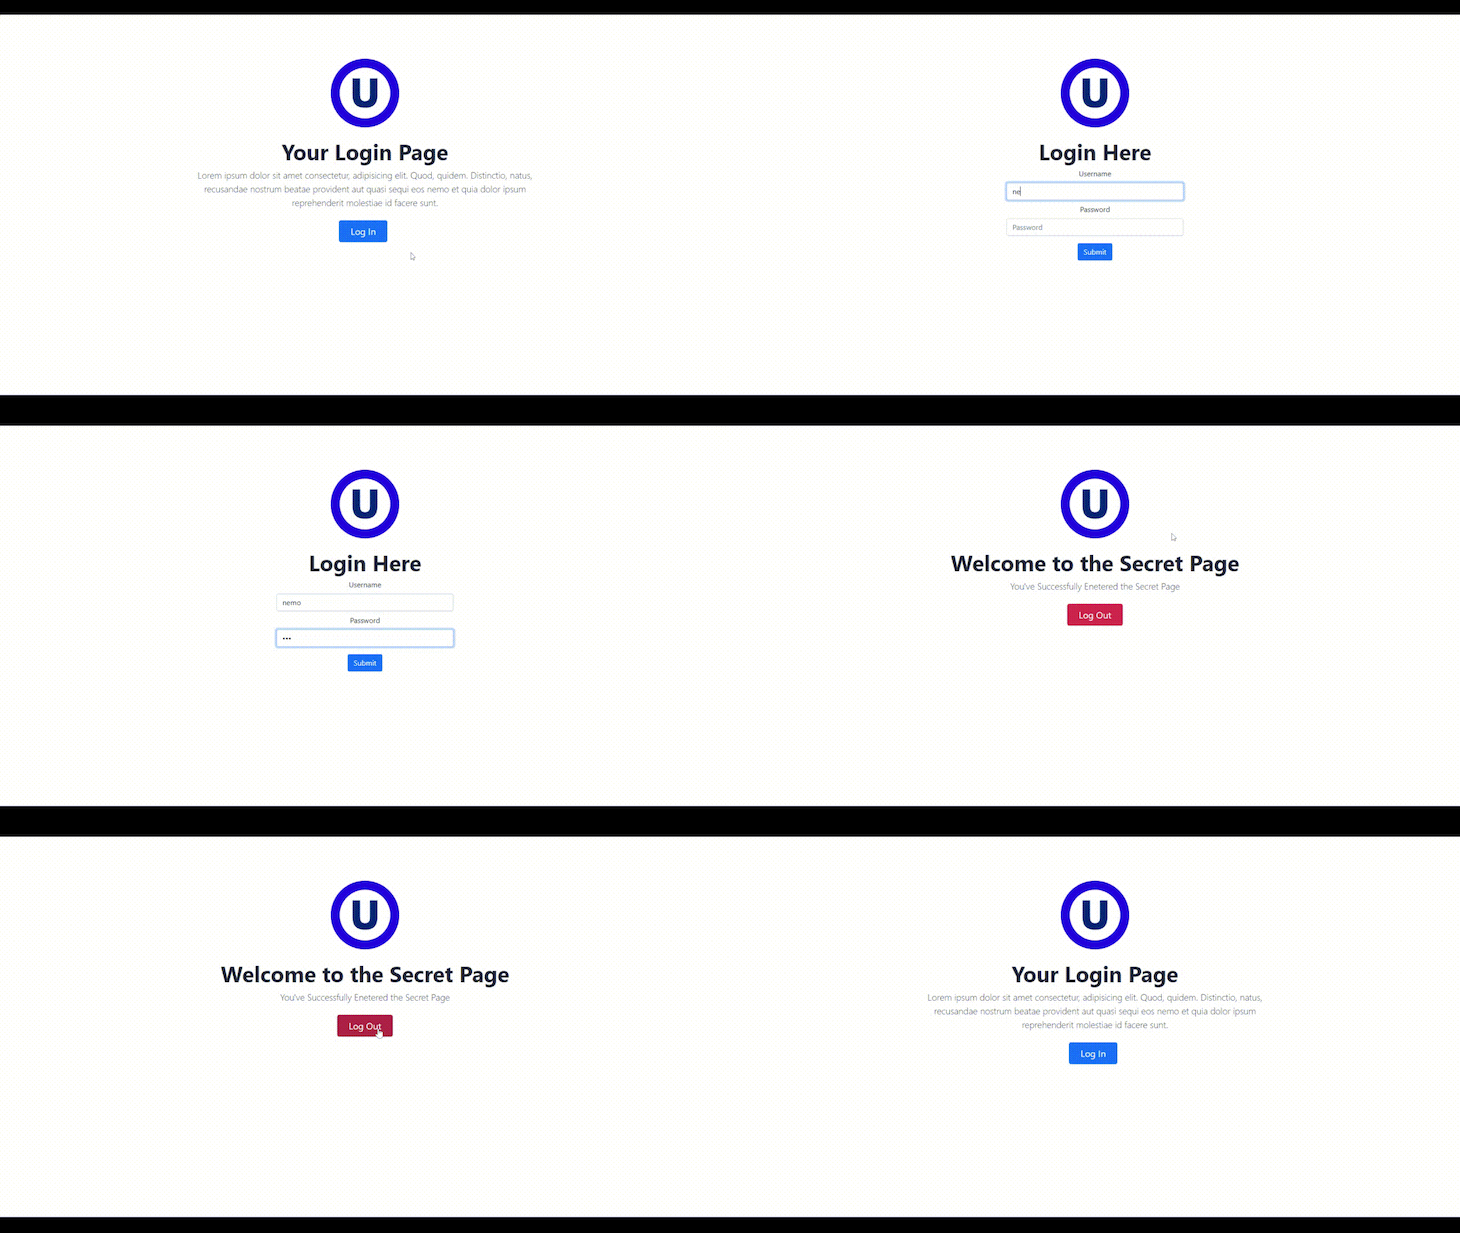
This completes the authentication. Check the below GIF to see it in action.

Authentication is an important and integral part of many web applications. This article covered how to integrate authentication to a Node.js application using the Passport library and MongoDB.
You can also check out the Passport Docs for more authentication strategies to implement in your application. I hope you enjoyed the read. The complete code can be found in this GitHub repo.
 Monitor failed and slow network requests in production
Deploying a Node-based web app or website is the easy part. Making sure your Node instance continues to serve resources to your app is where things get tougher. If you’re interested in ensuring requests to the backend or third-party services are successful, try LogRocket.

LogRocket lets you replay user sessions, eliminating guesswork around why bugs happen by showing exactly what users experienced. It captures console logs, errors, network requests, and pixel-perfect DOM recordings — compatible with all frameworks.
LogRocket's Galileo AI watches sessions for you, instantly identifying and explaining user struggles with automated monitoring of your entire product experience.
LogRocket instruments your app to record baseline performance timings such as page load time, time to first byte, slow network requests, and also logs Redux, NgRx, and Vuex actions/state. Start monitoring for free.

@container scroll-state: Replace JS scroll listeners nowCSS @container scroll-state lets you build sticky headers, snapping carousels, and scroll indicators without JavaScript. Here’s how to replace scroll listeners with clean, declarative state queries.

Explore 10 Web APIs that replace common JavaScript libraries and reduce npm dependencies, bundle size, and performance overhead.

Russ Miles, a software development expert and educator, joins the show to unpack why “developer productivity” platforms so often disappoint.

Discover what’s new in The Replay, LogRocket’s newsletter for dev and engineering leaders, in the February 18th issue.
Would you be interested in joining LogRocket's developer community?
Join LogRocket’s Content Advisory Board. You’ll help inform the type of content we create and get access to exclusive meetups, social accreditation, and swag.
Sign up now