In this blog post, I’ll introduce users to end-to-end testing and developers to Nightwatch.js, a popular end-to-end test framework. We’ll set it up, explain how it works under the hood, and further show how it could help ship products faster by integrating with a Continuous Integration pipeline such as circleCI.

End-to-end testing tests the application from a user’s perspective so you can determine how well the business use case of an application is being satisfied.
This process involves using a browser-based automated testing tool such as Nightwatch, as well as Cypress to test our application in the browser. Then, you can make assertions based on your test results.
End-to-end testing involves testing every feature of the application from, well, end-to-end — meaning from the frontend components and building blocks to the backend features and functionalities. It tests how well they integrate with each other to meet the goal of the application.
Nightwatch is an end-to-end testing library written in Node.js, which leverages the W3C webdriver API to interact with web browsers, give commands, and perform assertions based on commands given.
Nightwatch offers many benefits right out of the box, including:
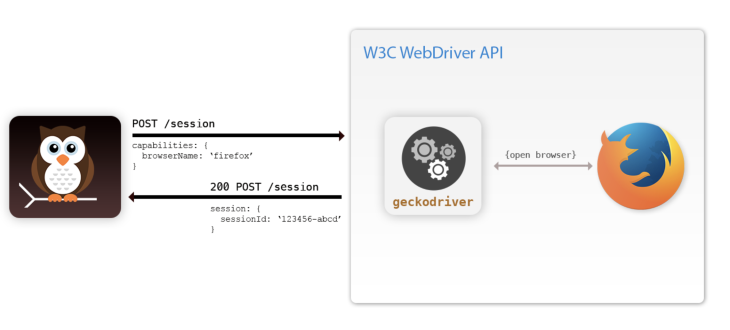
A webdriver is a general purpose library for automating web browsers, and all browsers have a specific webdriver server implementation. Nightwatch communicates via a restful API with the browser webdriver server by making HTTP calls. These protocols are defined by W3C Webdriver spec.
Nightwatch sends a minimum of two requests to the webdriver server in order to perform a command or assertion:
This approach to Nightwatch interacts with one browser and performs an automated test.
Alternatively, Nightwatch is going to test our browsers in parallel using the Selenium Server (Selenium Grid). The Grid enables us to create sessions with multiple browsers and test them in parallel to ensure that our web app is compatible with various browsers.
The Selenium Server acts as a proxy between your Nightwatch test script (written with the WebDriver API) and the browser driver (controlled by the WebDriver protocols).
The server forwards commands from scripts in Nightwatch to the driver and returns responses from the driver to your script upon which assertions are being made. The Selenium Server can handle multiple scripts in different languages and can both start up and manage multiple browsers in different versions and implementations.
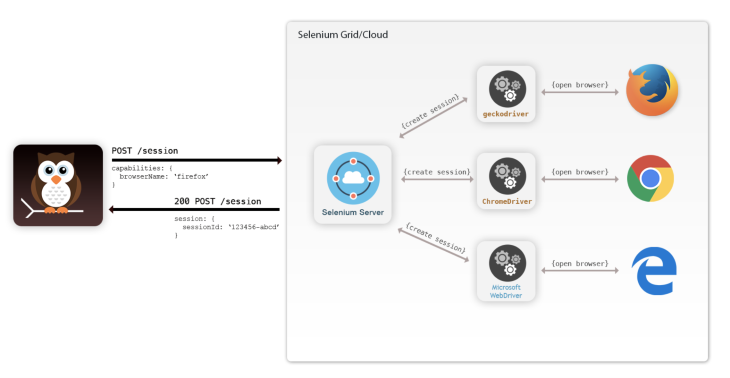
It’s possible to host our selenium server locally or remotely (via Sauce Labs or BrowserStack), or as an external infrastructure, depending on our preference and use case.
First, bootstrap a new react application using create-react application
- npx create-react-app my-app
Now, install your browser web drivers of choice. For this article, we’ll run our test on Chrome and FireFox, so let’s install both drivers:
- npm install geckodriver --save-dev
- npm install chromedriver --save-dev
Install Selenium Server locally:
- npm install selenium-server --save-dev
Let’s now download the Selenium Server: Selenium-server-standalone-4.0.0-alpha-2.zip.
Extract the file and create a bin folder in the root of your project and move the selenium-server-4.0.0-alpha-2.jar into it.
Next, download Java. Because the Selenium Server is a Java app, you’ll need to have Java installed on your machine. Check if you already have it installed by running java -version.
Now, let’s Install Node Selenium Server package Selenium-server. This package exports a path string that contains the path to the Selenium Server binary/executable previously saved.
Create a nightwatch.conf.js file in the root of your project, then add the following configuration:
module.exports = {
    src_folders: ['e2e'],
    test_settings: {
      default: {
        selenium_port: 4444,
        selenium_host: "localhost",
        silent: true,
        screenshots: {
          enabled: false,
          path: "",
        },
        globals: {
          abortOnAssertionFailure: false,
          waitForConditionPollInterval: 300,
          waitForConditionTimeout: 10000,
          retryAssertionTimeout: 5000,
        },
        selenium : {
          start_process : true,
          server_path: require("selenium-server").path
        }
      },
      selenium: {
        selenium: {
          start_process: true,
          port: 4444,
          server_path: require("selenium-server").path,
          cli_args: {
            "webdriver.chrome.driver": require("chromedriver").path,
            "webdriver.gecko.driver": require("geckodriver").path
          },
        },
        webdriver: {
          start_process: false,
        },
      },
      "chrome": {
        extends: "selenium",
        desiredCapabilities: {
          browserName: "chrome",
          chromeOptions: {
            w3c: false,
          },
        },
      },

      "firefox": {
        extends: "selenium",
        desiredCapabilities: {
          browserName: "firefox",
        },
      },
    },
  }
src_folders:
Here, we specified that the default path to store our tests should be a folder named e2e. This property is an array, i.e., it can accept several entities where our test runner would look for tests to run.
Let’s dive into the major sections.
test_settings
An object in which we define the test environment. It consists of a default object as shown below.
default
This property under test_settings defines the environment in which other environments inherit from. Here, we defined the Selenium Server as local, as well as its port. Below are configurations made under default in the above file:
default: {
        selenium_port: 4444,
        selenium_host: "localhost",
        silent: true,
        screenshots: {
          enabled: true,
          path: "tests_output",
        },
        globals: {
          abortOnAssertionFailure: false,
          waitForConditionPollInterval: 300,
          waitForConditionTimeout: 10000,
          retryAssertionTimeout: 5000,
        },
        selenium : {
          start_process : true,
          server_path: require("selenium-server").path
        }
      }
Let’s explain the above code even further:
selenium_port: The port number Selenium is accepting connectionsselenium_host: The host IP address in which Selenium Server is accepting connectionsscreenshots: This configuration allows us to enable screenshots and sets the default directory screenshots of the test to be saved whenever we request them by using the save screenshot commandglobals: These are global configurations that are needed to ensure test flexibility. Let’s highlight a few:
abortOnAssertionFailure: This control is to abort test execution when assertion fails and skip the restwaitForConditionTimeout: This overwrites the default polling interval which is (500ms) for waitFor commandswaitForConditionTimeout: This overwrites the default timeout the waitFor command and default waitFor valueretryAssertionTimeout: Automatically retrying failed assertions until timeout is reached before the test runner gives upselenium: Object containing Selenium Server related configuration options. If Selenium is not used, webdriver options should be set insteadserver_path: This is the path where the Selenium driver downloaded previously is referenced; thus the need for the selenium_server node package.Now, let’s cover the Selenium Server settings.
selenium: {
        selenium: {
          start_process: true,
          port: 4444,
          server_path: require("selenium-server").path,
          cli_args: {
            "webdriver.chrome.driver": require("chromedriver").path,
            "webdriver.gecko.driver": require("geckodriver").path
          },
        },
        webdriver: {
          start_process: false,
        },
      }
To break it down further:
start_process: This determines whether or not to manage selenium process automaticallyServer_path: This is the location of the server path. Here we used the node selenium_server path to resolve our server pathPort: Refers to the port that the Selenium Server listens to and Nightwatch connects toCli_args: These involve a list of CLI arguments to be passed to the Selenium process. Above, we specify different drivers based on the type of browsers we want to run out tests. This was why we installed the following previously:
- npm install geckodriver --save-dev
- npm install chromedriver --save-dev
Because we want to run our test parallel in Firefox and Chrome, we decided to go with these two alone.
The above packages have been set up to fetch and run their respective browser drivers for the platforms they are installed, identified by node (Linux, macOs, Windows )
The following code consists of an individual configuration for the web browsers (Firefox and Chrome) that would be managed by the Selenium Server:
 "chrome": {
        extends: "selenium",
        desiredCapabilities: {
          browserName: "chrome",
          chromeOptions: {
            w3c: false,
          },
        },
      },

      "firefox": {
        extends: "selenium",
        desiredCapabilities: {
          browserName: "firefox",
        },
      },
    },
  }
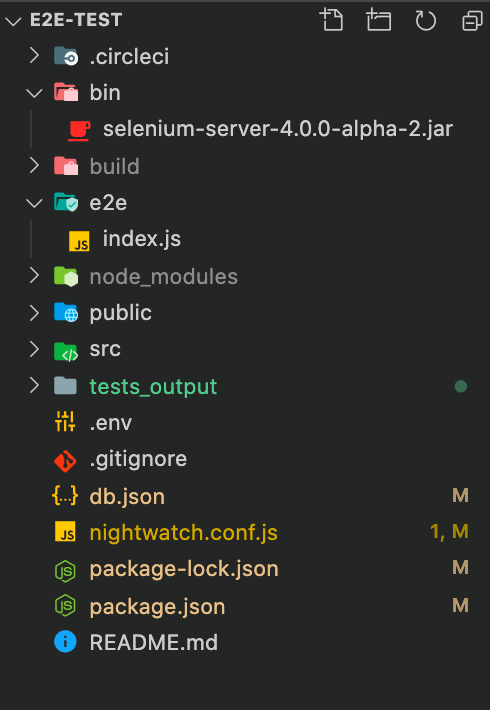
After following these instructions, we should have a folder structure similar to the above.
I built a demo app in React so you can see end-to-end tests in action. This demo app server was built with a fake REST API using JSON SERVER, as found in the source code for this blog post.

If I click on any of the subscribe buttons, it creates a request to our fake API to make an order for a new subscription. If successful, an alert pops up to notify us.
On success, the alert displays, “Subscription successful. Fire on!”
If it fails, the alert displays, “Unable to make a subscription at the moment, try again!”
The E2E tests can be found in the E2E folder in the project. Below is a test for the subscribe functionality:
module.exports = {
    "SUBSCRIBE_USER": function(browser) {
     // the aside element css selector
        const alertElement = "div[role=alert]";
        browser
        .url("http://localhost:3005/")
        .waitForElementVisible("body")
        .click('#subscribe2')
        .waitForElementVisible(alertElement)
        .assert.containsText(alertElement, "Subscription successful. Fire on!")
        .saveScreenshot('subscription.png');
    }
}
The goal of this post is not to teach the specifics of writing an end-to-end test in Nightwatch, but I’ll explain the above test, which is an incredibly applicable use case.
 browser
        .url("http://localhost:3005/")
The above code navigates to http://localhost:3005/ in the browser.
.waitForElementVisible("body")
The waitForElementVisible command waits for 5000ms for an element to be visible on a page before performing any other commands or assertions. The element, in this case, is the body of the page.
.click('#subscribe2')
The click command enables us to click on any CSS selector passed as an argument to it, so we click on the “standard” subscribe button, which has an ID of #subscribe2.
.assert.containsText(alertElement, "Subscription successful. Fire on!")
The assert.containsText checks if the CSS selector it accepts contains the expected text.
.saveScreenshot('subscription.png');
Lastly, we save the screenshot of the test with a name in the test_output folder as defined in our Nightwatch configuration.

We run the following command in the project directory to do the following:
First, start the fake server:
npm run server:start
Then, start the React app:
npm run start
Finally, run the E2E test:
npm run e2e
We can also run the following command to accomplish all of the steps from the above test:
npm run e2e-test
The command above is equivalent to the following.
concurrently -k --success first \”npm run start\” \”npm run server:start\” \”npm run e2e\””
Notice that we added a package concurrently because we need to run these commands at the same time.
We also need to ensure to terminate all other command processes when any of the commands fail or end.

Now that we are sure our test runs locally, we need to ensure it runs on our CI pipeline to accelerate development time.
Below is the CircleCI configuration file for this test.
Let’s begin by setting up CircleCI for your project.
After completing this, edit .circleci/config.yml file in your root directory and paste the following:
version: 2.1
orbs:
  browser-tools: circleci/[email protected]
jobs:
  build:
    docker:
      - image: 'cimg/node:15.0.1-browsers'
        auth:
          username: $DOCKERHUB_USER
          password: $DOCKERHUB_PASSWORD
    working_directory: ~/repo

    steps:
      - checkout
      - browser-tools/install-browser-tools

      - run: npm install

      # run tests!
      - run: npm test
      - run: npm run e2e-test
We made use of CircleCI convenience images, which provide us with the necessary stable docker images required by our browsers for testing in the docker container running on CircleCI.
- image: 'cimg/node:15.0.1-browsers'
We also leveraged the CircleCI orbs, which install a variety of browsers and tools for browser testing. It includes Chrome, FireFox, ChromeDriver, and GeckoDriver.
orbs:
  browser-tools: circleci/[email protected]
In this article, we discussed how end-to-end tests work, the various approaches to tackle end-to-end testing — such as testing in parallel in various browsers to ensure browser compatibility — and leveraging on the Selenium Server grid.
We also learned how to set it up locally and hook it up to our CI/CD pipeline. Happy coding!
 Monitor failed and slow network requests in production
Deploying a Node-based web app or website is the easy part. Making sure your Node instance continues to serve resources to your app is where things get tougher. If you’re interested in ensuring requests to the backend or third-party services are successful, try LogRocket.

LogRocket lets you replay user sessions, eliminating guesswork around why bugs happen by showing exactly what users experienced. It captures console logs, errors, network requests, and pixel-perfect DOM recordings — compatible with all frameworks.
LogRocket's Galileo AI watches sessions for you, instantly identifying and explaining user struggles with automated monitoring of your entire product experience.
LogRocket instruments your app to record baseline performance timings such as page load time, time to first byte, slow network requests, and also logs Redux, NgRx, and Vuex actions/state. Start monitoring for free.
Would you be interested in joining LogRocket's developer community?
Join LogRocket’s Content Advisory Board. You’ll help inform the type of content we create and get access to exclusive meetups, social accreditation, and swag.
Sign up now
Learn how OpenAPI can automate API client generation to save time, reduce bugs, and streamline how your frontend app talks to backend APIs.

Discover how the Interface Segregation Principle (ISP) keeps your code lean, modular, and maintainable using real-world analogies and practical examples.

<selectedcontent> element improves dropdowns

Learn how to implement an advanced caching layer in a Node.js app using Valkey, a high-performance, Redis-compatible in-memory datastore.


One Reply to "Using Nightwatch.js to write end-to-end tests"
Thanks it worked for me but I cannot get circleci to show the test results in the ‘Test’ tab with the ‘store_test_results’ step, any recommendations on that matter?