Developing a Flutter mobile app involves rendering some UI elements that get changed according to the user-initiated touch events , so we often need to use the user device’s hardware components via platform-specific SDKs.

Every mobile platform offers inbuilt APIs to access hardware components and core operating system features. For example, if you build a native Android app with Kotlin, you can use the Vibratorclass from the Android SDK to make the user’s device vibrate.
You can use your existing Kotlin/Java-based shared libraries within native Kotlin-based Android apps. But what if you need to call this platform-specific Kotlin code from your Flutter app?
Flutter lets you use Dart’s inbuilt cross-platform standard library for general-purpose programming requirements (i.e., I/O, Math, etc.). It also offers the platform channels API to communicate with platform-specific code to use operating-system-level APIs or invoke code segments written in the native app development language.
In this tutorial, I will explain how to call Kotlin code from the Dart side via the Flutter platform channels’ MethodChannel class. Also, I will explain how to do event-driven Flutter-Native communications via EventChannel.
Jump ahead:
MethodChannelMethodChannel’s architectureMethodChannelEventChannel classMethodChannel vs. EventChannel vs. BasicMessageChannelMethodChannelFlutter offers the MethodChannel Dart class for developers to invoke platform-specific native code from the Flutter environment. Also, Flutter gives you the required APIs to send data back to Flutter from the native host app code. Check the following highlighted features that MethodChannel offers:
We’ll discuss how to invoke Kotlin code from Flutter, but the Flutter framework implementation lets you call native code on iOS, Linux, macOS, and Windows. So, calling Swift/Objective-C and C/C++ code is also possible.
Flutter doesn’t use embedded JavaScript execution environments, unlike other popular cross-platform app development frameworks. Also, it uses AOT (ahead-of-time) compilation for release binaries to achieve near-native performance.
Similarly, the Flutter team designed the Flutter-Native communication strategy with a performance-first, binary messaging protocol for better app performance. So, using Kotlin and Dart on Android for accessing the Android SDK has no visible performance difference!
The Dart-based MethodChannel class helps you call platform-specific code from Flutter. On the other hand, Flutter exposes platform-specific MethodChannel API to call Dart code from the native side. So, you can make a bi-directional communication line between your Dart code and platform-specific native code.
Flutter’s low-level platform channels API uses a binary messaging protocol, so all method calls are transformed into a byte stream during the Dart-to-Native communication (see how Android type-conversion implementation uses ByteBuffer here). Flutter automatically removes data records from the byte stream and generates language-specific data types in the Dart and native end. So, you can transfer your Dart-based data to Kotlin/Java data, and vice-versa as you work with one language, even though there are two different environments. Moreover, the type conversion feature is available for all supported platforms.
Platform-specific APIs typically throw exceptions or return error codes for unexpected or failure events. On the native side, we can easily use native SDK error-handling strategies, but what can we do from the Dart side? MethodChannel comes with inbuilt-error handling support and throws Dart exceptions. Also, you can use error codes from exception instances to improve the error-handling strategy if you want.
MethodChannel‘s architectureYou’ve presumably just read an overview of MethodChannel and the Flutter platform channels API’s goals. The Flutter framework is comprised of two key components: the Dart framework and the Flutter engine.
The Dart framework consists of an inbuilt widgets toolkit implementation, and the Flutter engine implements native host apps that embed the Dart framework. The platform channels API connects these two components together with a bi-directional communication line.
The MethodChannel implementation, a part of the platform channels API lets you execute and extract the result of named methods on Dart and native code.
Now, you know the architectural aspects of MethodChannel. You can read more about the entire Flutter architecture from this article and the official documentation.
Let’s get started with practical applications!
In this section, we’ll build a sample Flutter app and extend it according to various practical requirements to understand how to use MethodChannel for connecting Kotlin and Dart together.
First, create a new Flutter project with the following command:
flutter create flutter_platform_channels_demo
cd flutter_platform_channels_demo
Run the newly generated app with the flutter run command to check that everything works.
You can inspect the native Android host app source by opening the android/app directory. By default, the flutter create command generates a Kotlin-based host app , and you can find the Android app’s Kotlin code in MainActivity.kt. You won’t see so much code there, but you will notice it implements the FlutterActivityclass, a part of the Flutter engine.
Now, we can start modifying the MainActivity Kotlin class to build up a method channel to connect with the Dart side.
We know that we can generate a random number within Dart, but let’s call the Kotlin standard library’s random number generator from the Dart side to get started with MethodChannel.
First, we need to register a method call handler from the Kotlin side. Add the following code to your MainActivity.kt:
package com.example.flutter_platform_channels_demo

import kotlin.random.Random
import androidx.annotation.NonNull
import io.flutter.embedding.android.FlutterActivity
import io.flutter.embedding.engine.FlutterEngine
import io.flutter.plugin.common.MethodChannel

class MainActivity: FlutterActivity() {
  override fun configureFlutterEngine(@NonNull flutterEngine: FlutterEngine) {
    super.configureFlutterEngine(flutterEngine)
    MethodChannel(flutterEngine.dartExecutor.binaryMessenger, "example.com/channel").setMethodCallHandler {
      call, result ->
        if(call.method == "getRandomNumber") {
          val rand = Random.nextInt(100)
          result.success(rand)
        }
        else {
          result.notImplemented()
        }
    }
  }
}
Here, we override the configureFlutterEngine method from the FlutterActivity class to register a method channel for building a communication line with Dart. The configureFlutterEngine method gets invoked when the Flutter engine is initialized with a specific Android Activity instance, so Flutter recommends using it to register method channel handlers.
A method channel is like a namespace that consists of multiple method signatures, so you can use one method channel to implement several native methods. In this scenario, we implemented the getRandomNumber method for demonstration purposes. When the particular method channel receives a method call, we can identify the method name using a conditional statement:
if(call.method == "getRandomNumber") {
    val rand = Random.nextInt(100)
    result.success(rand)
}
// ---
// ---
Here, we use the result.success method to return the generated random number to the Dart environment. Even though we don’t provide invalid method names deliberately from Dart, it’s always good to handle unknown method calls as follows:
// ---
else {
   result.notImplemented()
}
Now, the native implementation is ready to receive method calls from Dart. We’ll modify Flutter’s default demo app to display a random number generated from Kotlin. After we press the floating action button, we see a new random number.
Add the following code to your main.dart:
import 'package:flutter/services.dart';
import 'package:flutter/material.dart';

void main() {
  runApp(const MyApp());
}

class MyApp extends StatelessWidget {
  const MyApp({super.key});
  @override
  Widget build(BuildContext context) {
    return MaterialApp(
      title: 'Flutter Demo',
      theme: ThemeData(
        primarySwatch: Colors.blue,
      ),
      home: const MyHomePage(title: 'Flutter Demo Home Page'),
    );
  }
}

class MyHomePage extends StatefulWidget {
  const MyHomePage({super.key, required this.title});
  final String title;
  @override
  State<MyHomePage> createState() => _MyHomePageState();
}

class _MyHomePageState extends State<MyHomePage> {
  int _counter = 0;
  static const platform = MethodChannel('example.com/channel');
Future<void> _generateRandomNumber() async {
    int random;
    try {
      random = await platform.invokeMethod('getRandomNumber');
    } on PlatformException catch (e) {
      random = 0;
    }
setState(() {
      _counter = random;
    });
  }
  @override
  Widget build(BuildContext context) {
    return Scaffold(
      appBar: AppBar(
        title: Text(widget.title),
      ),
      body: Center(
        child: Column(
          mainAxisAlignment: MainAxisAlignment.center,
          children: <Widget>[
            const Text(
              'Kotlin generates the following number:',
            ),
            Text(
              '$_counter',
              style: Theme.of(context).textTheme.headline4,
            ),
          ],
        ),
      ),
      floatingActionButton: FloatingActionButton(
        onPressed: _generateRandomNumber,
        tooltip: 'Generate',
        child: const Icon(Icons.refresh),
      ),
    );
  }
}
We created a MethodChannel instance in the Dart environment as follows:
static const platform = MethodChannel('example.com/channel');
Note that we should pass the exact method channel name we used in the Kotlin code — otherwise, the specific method call will throw a MissingPluginException.
We invoke the _generateRandomNumber method when the user presses the floating action button. When the particular method gets invoked, the app sends a message to the method channel via platform.invokeMethod(‘getRandomNumber’). Internally, the Flutter engine triggers the method channel handler and executes the Kotlin-based random number generation code we wrote before.
Run the app and see the sample app in action:
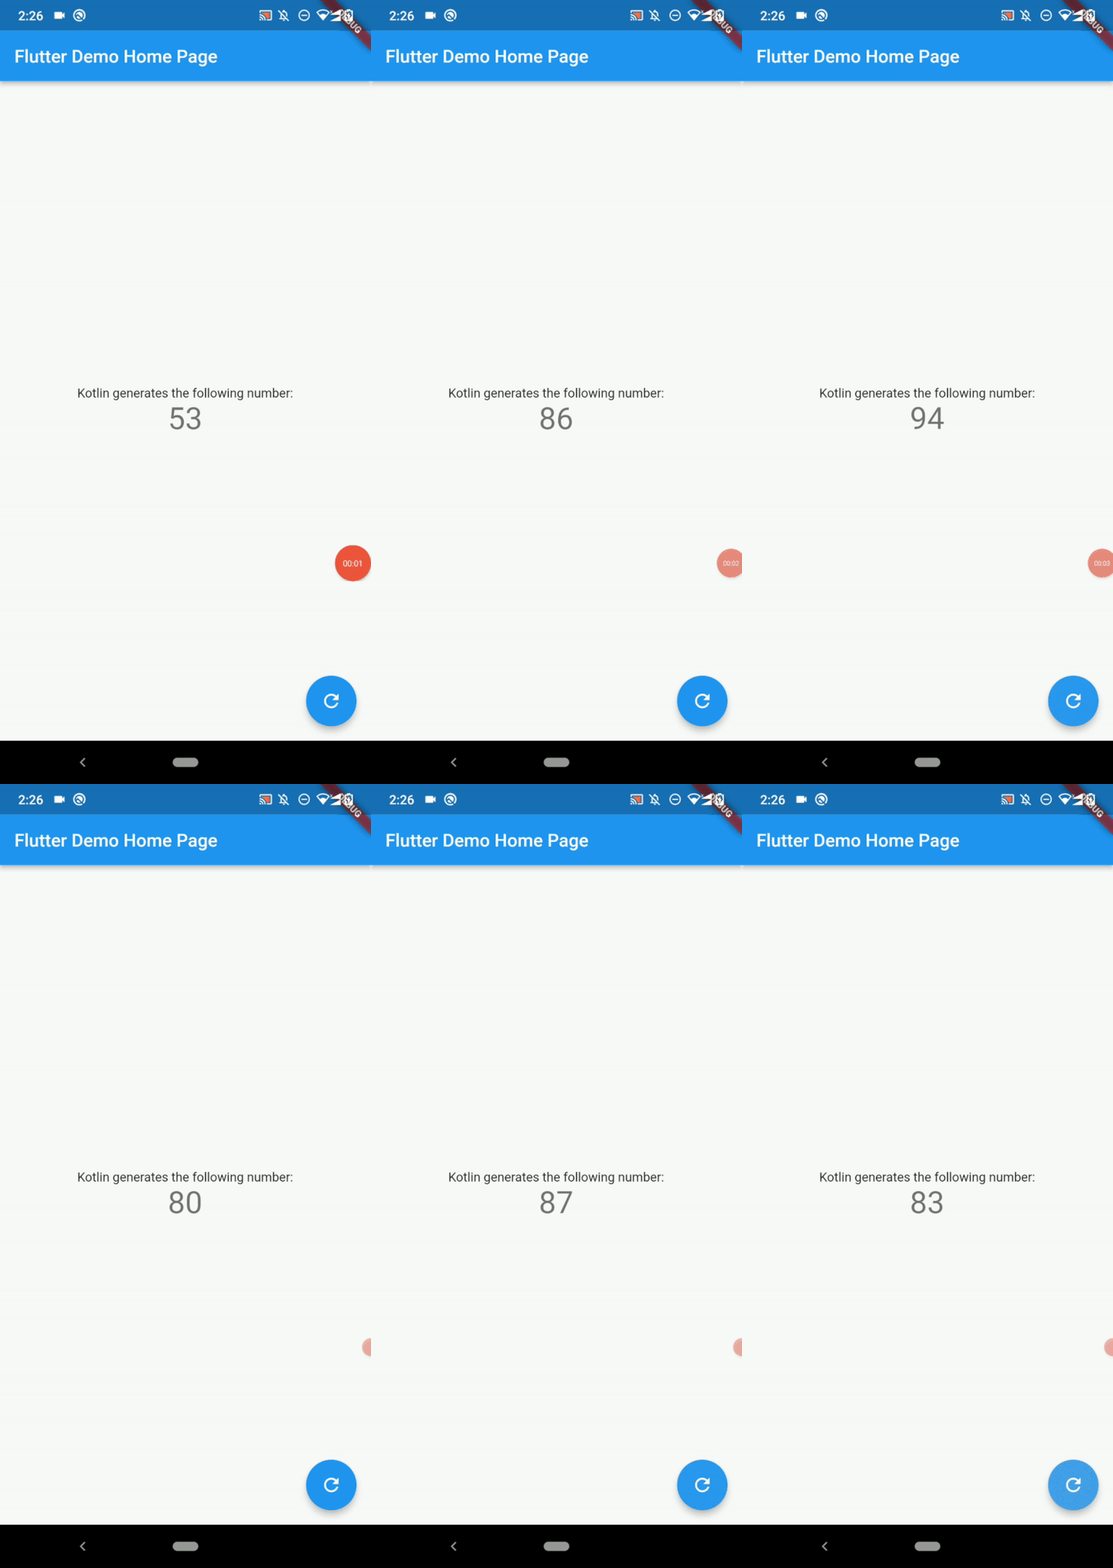
In the previous example, we returned an integer from Kotlin to Dart. When we provide a Kotlin Int type to a particular method call, Flutter automatically converts it to a Dart int type.
Similarly, Flutter’s Method Channel implementation automatically converts all atomic types and some complex inbuilt objects as well, such as Kotlin List and HashMap. The following table from the Flutter documentation lists all supported automatic type conversions:
| Dart | Kotlin |
|---|---|
| null | null |
| bool | Boolean |
| int | Int |
| int | Long |
| double | Double |
| String | String |
| Uint8List | ByteArray |
| Int32List | IntArray |
| Int64List | LongArray |
| Float32List | FloatArray |
| Float64List | DoubleArray |
| List | List |
| Map | HashMap |
Let’s try to use Kotlin’s String type and see what happens from the Dart side. Use the following code to generate a random string from Kotlin in MainActivity.kt:
override fun configureFlutterEngine(@NonNull flutterEngine: FlutterEngine) {
    super.configureFlutterEngine(flutterEngine)
    MethodChannel(flutterEngine.dartExecutor.binaryMessenger, "example.com/channel").setMethodCallHandler {
      call, result ->
        if(call.method == "getRandomString") {
          val rand = ('a'..'z').shuffled().take(4).joinToString("")
          result.success(rand)
        }
        else {
          result.notImplemented()
        }
    }
  }
We return a four-character-long random string for the getRandomString method for the Dart side. Now, modify your main.dart file to accept a string value from Kotlin as follows:
import 'package:flutter/services.dart';
import 'package:flutter/material.dart';

void main() {
  runApp(const MyApp());
}

class MyApp extends StatelessWidget {
  const MyApp({super.key});
  @override
  Widget build(BuildContext context) {
    return MaterialApp(
      title: 'Flutter Demo',
      theme: ThemeData(
        primarySwatch: Colors.blue,
      ),
      home: const MyHomePage(title: 'Flutter Demo Home Page'),
    );
  }
}

class MyHomePage extends StatefulWidget {
  const MyHomePage({super.key, required this.title});
  final String title;
  @override
  State<MyHomePage> createState() => _MyHomePageState();
}

class _MyHomePageState extends State<MyHomePage> {
  String _counter = '';
  static const platform = MethodChannel('example.com/channel');
Future<void> _generateRandomString() async {
    String random = '';
    try {
      random = await platform.invokeMethod('getRandomString');
      print(random.runtimeType);
    } on PlatformException catch (e) {
      random = '';
    }
setState(() {
      _counter = random;
    });
  }
  @override
  Widget build(BuildContext context) {
    return Scaffold(
      appBar: AppBar(
        title: Text(widget.title),
      ),
      body: Center(
        child: Column(
          mainAxisAlignment: MainAxisAlignment.center,
          children: <Widget>[
            const Text(
              'Kotlin generates the following string:',
            ),
            Text(
              '$_counter',
              style: Theme.of(context).textTheme.headline4,
            ),
          ],
        ),
      ),
      floatingActionButton: FloatingActionButton(
        onPressed: _generateRandomString,
        tooltip: 'Generate',
        child: const Icon(Icons.refresh),
      ),
    );
  }
}
The above code uses print(random.runtimeType) to check the output data type of the invokeMethod method. In this case, we receive a string from the Kotlin side and display on the Flutter app screen. Run the above code and press the floating action button to generate random strings via Kotlin:
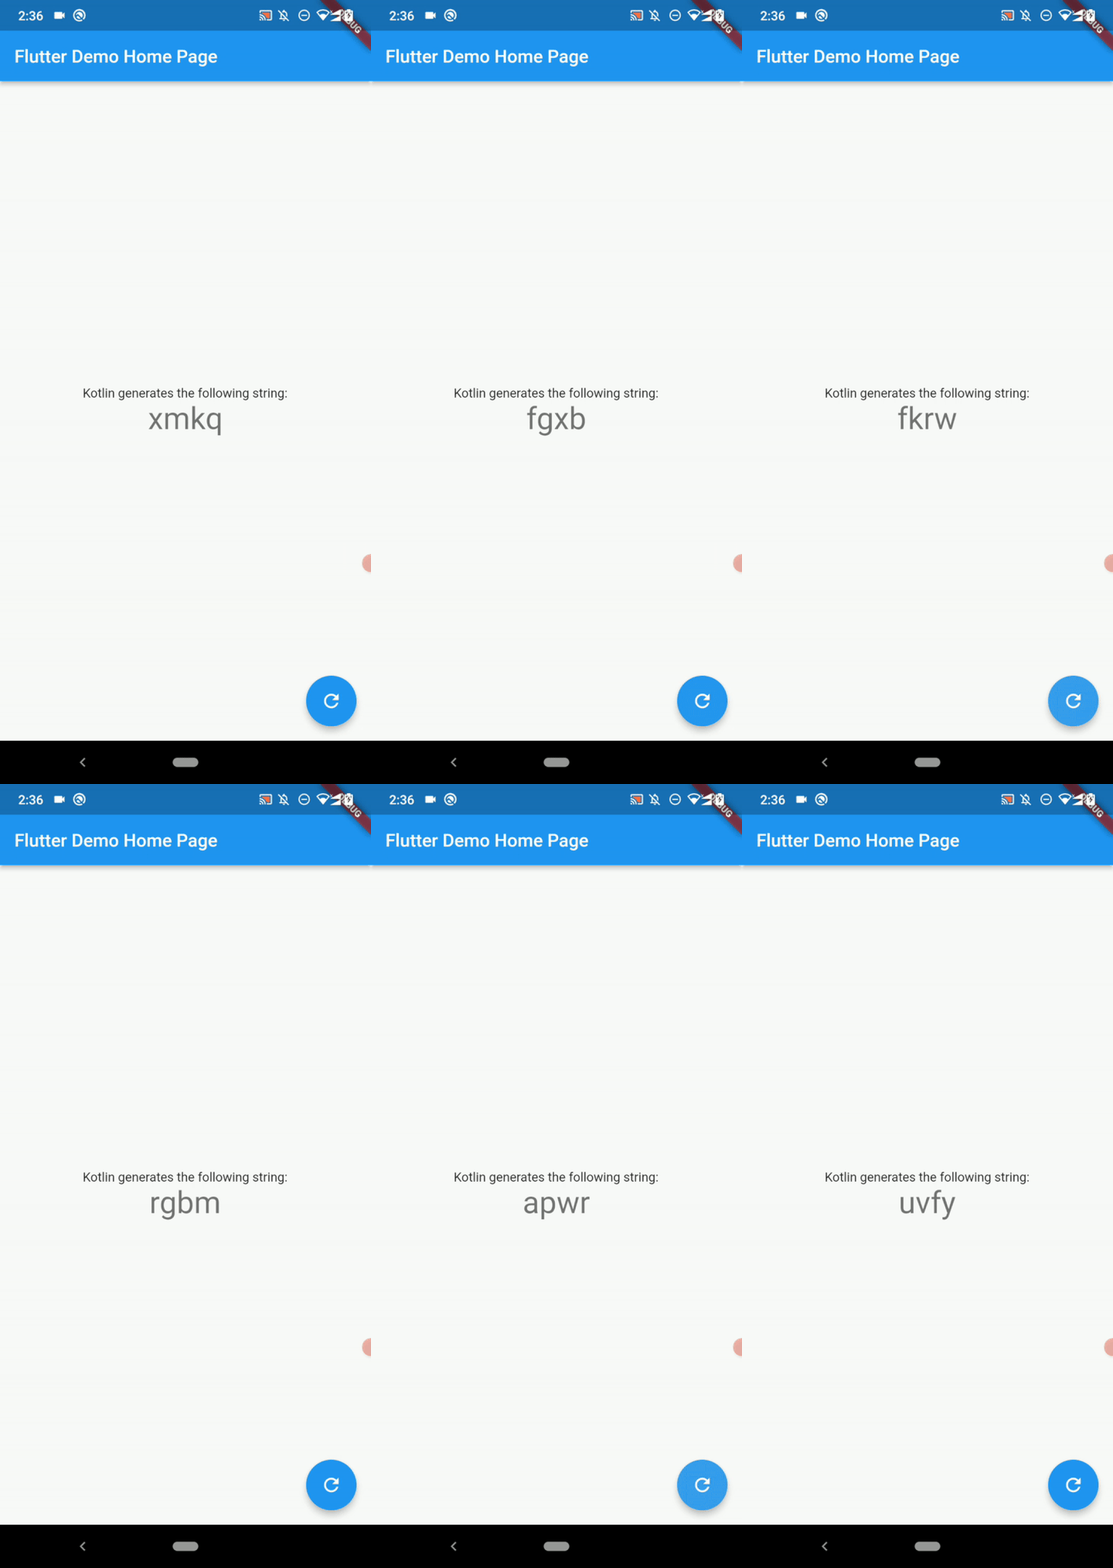
If you check your terminal screen, you should see that the print function outputs String as the data type of the random variable; if this is so, then we know the type conversion worked.
Experiment with the other primitive data types. I will explain how to transfer complex data types and objects between Kotlin and Dart in an upcoming section of this tutorial.
We already discussed how to return data from Kotlin with success method calls. What if you need to send some data to Kotlin from Dart?
We typically use method parameters when we call a method in a specific programming language — and the same approach works with Flutter method channels! You can pass named parameters via the invokeMethod method using a Dart dynamic map.
Assume that you have to configure the random string generation process from the Dart side. For example, we can send the string length and a prefix from the Flutter app code.
First, identify the required parameters:
len: Random string lengthprefix: A prefix for the random stringSend these parameters with values via _generateRandomString:
Future<void> _generateRandomString() async {
    String random = '';
    try {
      var arguments = {
        'len': 3,
        'prefix': 'fl_',
      };
      random = await platform.invokeMethod('getRandomString', arguments);
    } on PlatformException catch (e) {
      random = '';
    }
setState(() {
      _counter = random;
    });
  }
Next, update the Kotlin code to consume the named parameters:
if(call.method == "getRandomString") {
  val limit = call.argument("len") ?: 4
  val prefix = call.argument("prefix") ?: ""
  val rand = ('a'..'z')
                .shuffled()
                .take(limit)
                .joinToString(prefix = prefix, separator = "")
  result.success(rand)
}
The above code uses Kotlin’s Elvis operator [?:]to set default values for limit and prefix constants. Run the app. You will see random strings based on parameters we’ve provided from the Dart side of the method channel:
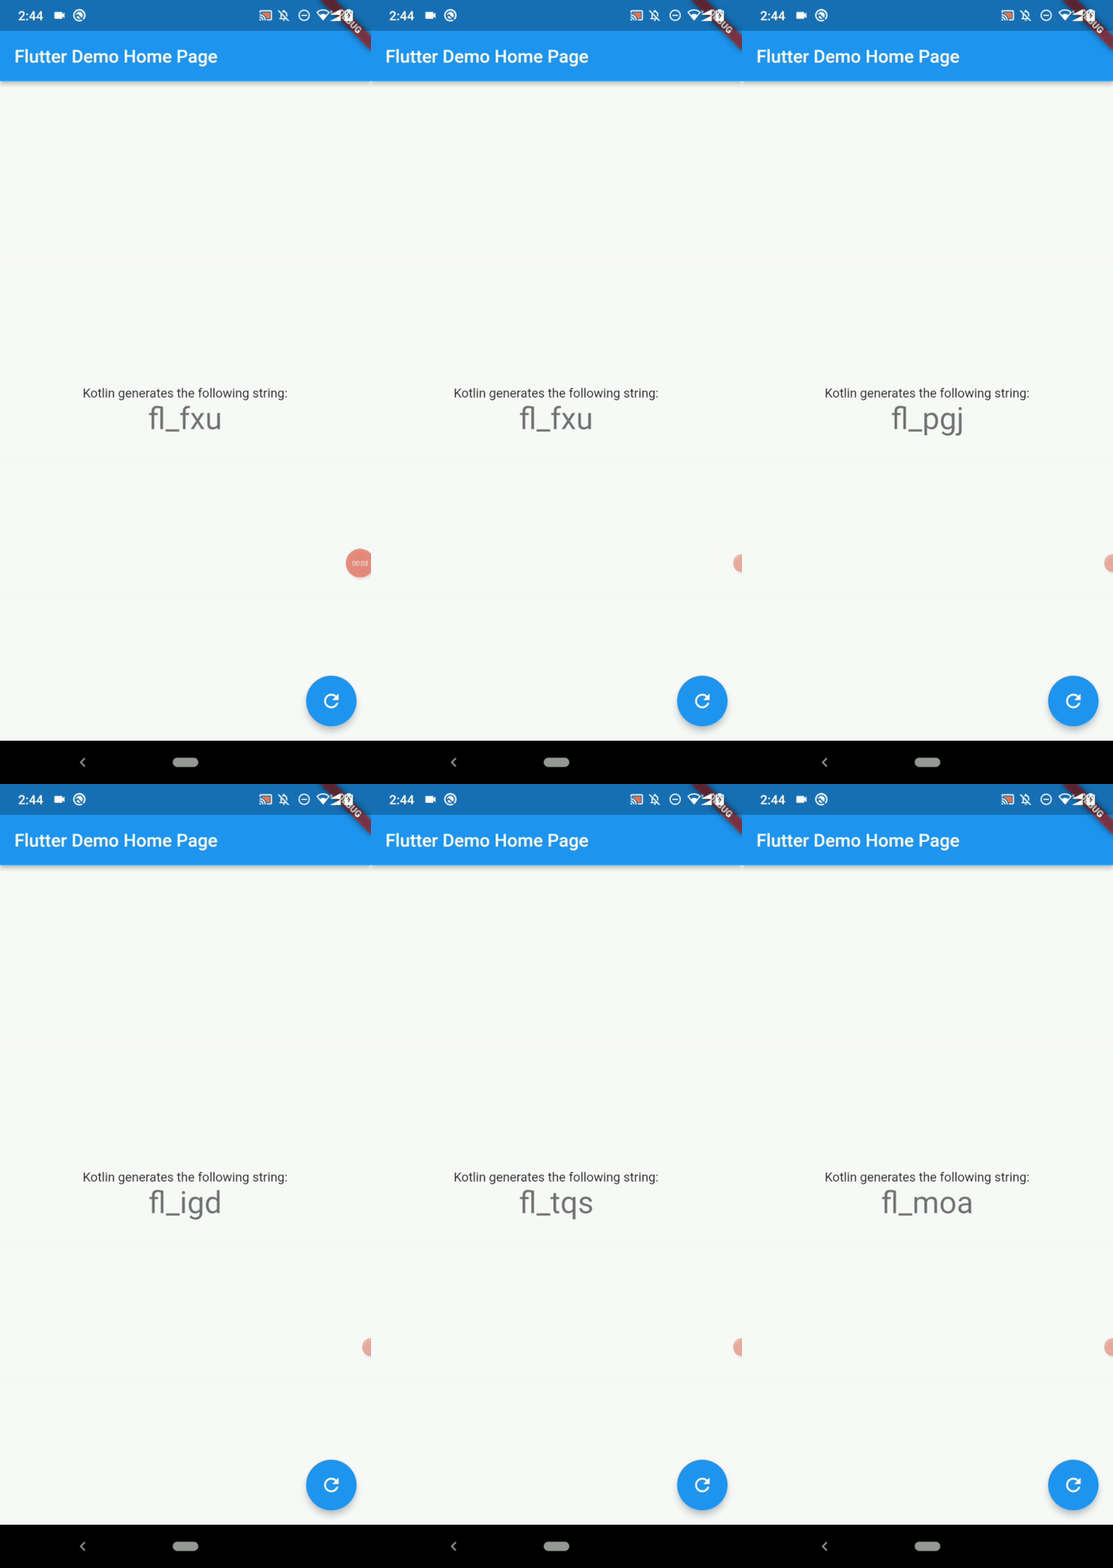
Experiment further using various values for method parameters and try to add more parameters.
If you need to pass one method parameter, you can directly pass the particular parameter without creating a dynamic map for better readability. See how the following code snippet sends the random string length:
// Dart:
random = await platform.invokeMethod('getRandomString', 3);

// Kotlin
val limit = call.arguments() ?: 4
val rand = ('a'..'z')
              .shuffled()
              .take(limit)
              .joinToString("")
result.success(rand)
There are two primary error-handling strategies in programming: error code-based and exceptions-based. Some programmers use a hybrid error-handling strategy by mixing both.
MethodChannel has inbuilt support to handle exceptions from Dart for the Kotlin side’s error flows. Also, it offers a way to distinguish native error types with error codes in exception instances. In other words, MethodChannel offers a hybrid error-handling strategy for Flutter developers.
In previous examples, we used the result.success method to return a value and result.notImplemented to handle unknown method calls, which will throw MissingPluginException in Dart.
What if we need to make a Dart exception from the Kotlin side? The result.error method helps you throw a Dart PlatformException instance from Kotlin. Assume that we need to throw an exception if we provide a negative value for the random string length in the previous example.
First, update the Kotlin code as follows to notify Dart about the exception:
if(call.method == "getRandomString") {
  val limit = call.arguments() ?: 4
  if(limit < 0) {
    result.error("INVALIDARGS", "String length should not be a negative integer", null)
  }
  else {
    val rand = ('a'..'z')
                  .shuffled()
                  .take(limit)
                  .joinToString("")
    result.success(rand)
  }
}
Here, we provide a unique exception code and message via result.error. Next, catch the exception and use it within the Dart side as follows:
Future<void> _generateRandomString() async {
    String random = '';
    try {
      random = await platform.invokeMethod('getRandomString', -5);
    } on PlatformException catch (e) {
      random = '';
      print('PlatformException: ${e.code} ${e.message}');
    }
    setState(() {
      _counter = random;
    });
  }
When you run the app and press the floating action button, you will see the exception code and message on your terminal because we passed -5 as the string length from the Dart side:

As we saw in the above example, you can catch PlatformException in Dart, and you can check the error code in the exception instance for handling method channel errors. Another more abstract approach is to make your own exception instance based on Kotlin error codes. Check the Flutter camera plugin’s CameraException as a reference implementation.
MethodChannelNow, we know how to use MethodChannel to invoke Kotlin code from Dart. We’ve used Kotlin’s standard library features in previous demonstrations. Similarly, you can reuse your pre-implemented Kotlin/Java libraries with the Flutter platform channels. Using native SDKs is also possible with method channels, and that’s the main goal behind Flutter’s platform channels implementation.
Flutter already supports system dark theme handling and has plugins for other native SDKs, but let’s invoke some native SDK APIs to understand MethodChannel use cases further.
We’ll write a native method to check whether the dark theme is on or not. First, implement a new method in Flutter method channels with Kotlin in your MainActivity.kt:
package com.example.flutter_platform_channels_demo

import kotlin.random.Random
import androidx.annotation.NonNull
import android.content.res.Configuration
import io.flutter.embedding.android.FlutterActivity
import io.flutter.embedding.engine.FlutterEngine
import io.flutter.plugin.common.MethodChannel

class MainActivity: FlutterActivity() {
  override fun configureFlutterEngine(@NonNull flutterEngine: FlutterEngine) {
    super.configureFlutterEngine(flutterEngine)
    MethodChannel(flutterEngine.dartExecutor.binaryMessenger, "example.com/channel").setMethodCallHandler {
      call, result ->sucess
        if(call.method == "isDarkMode") {
          val mode = getContext()
                        .getResources()
                        .getConfiguration().uiMode and Configuration.UI_MODE_NIGHT_MASK
          result.success(mode == Configuration.UI_MODE_NIGHT_YES)
        }
        else {
          result.notImplemented()
        }
    }
  }
}
Here we used the uiMode bit mask from the Android SDK’s Configuration API to detect the system theme. Next, use the isDarkMode method from Dart by updating the _MyHomePageState implementation:
class _MyHomePageState extends State<MyHomePage> {
  String _theme = '';
  static const platform = MethodChannel('example.com/channel');
  Future<void> _findColorTheme() async {
    bool isDarkMode;
    try {
      isDarkMode = await platform.invokeMethod('isDarkMode');
    } on PlatformException catch (e) {
      isDarkMode = false;
      print('PlatformException: ${e.code} ${e.message}');
    }
  setState(() {
      _theme = isDarkMode ? 'dark' : 'light';
    });
  }

  @override
  Widget build(BuildContext context) {
    return Scaffold(
      appBar: AppBar(
        title: Text(widget.title),
      ),
      body: Center(
        child: Column(
          mainAxisAlignment: MainAxisAlignment.center,
          children: <Widget>[
            const Text(
              'System color theme:',
            ),
            Text(
              _theme,
              style: Theme.of(context).textTheme.headline4,
            ),
          ],
        ),
      ),
      floatingActionButton: FloatingActionButton(
        onPressed: _findColorTheme,
        tooltip: 'Find color theme',
        child: const Icon(Icons.refresh),
      ),
    );
  }
}
Test the app by changing your system color theme as follows:
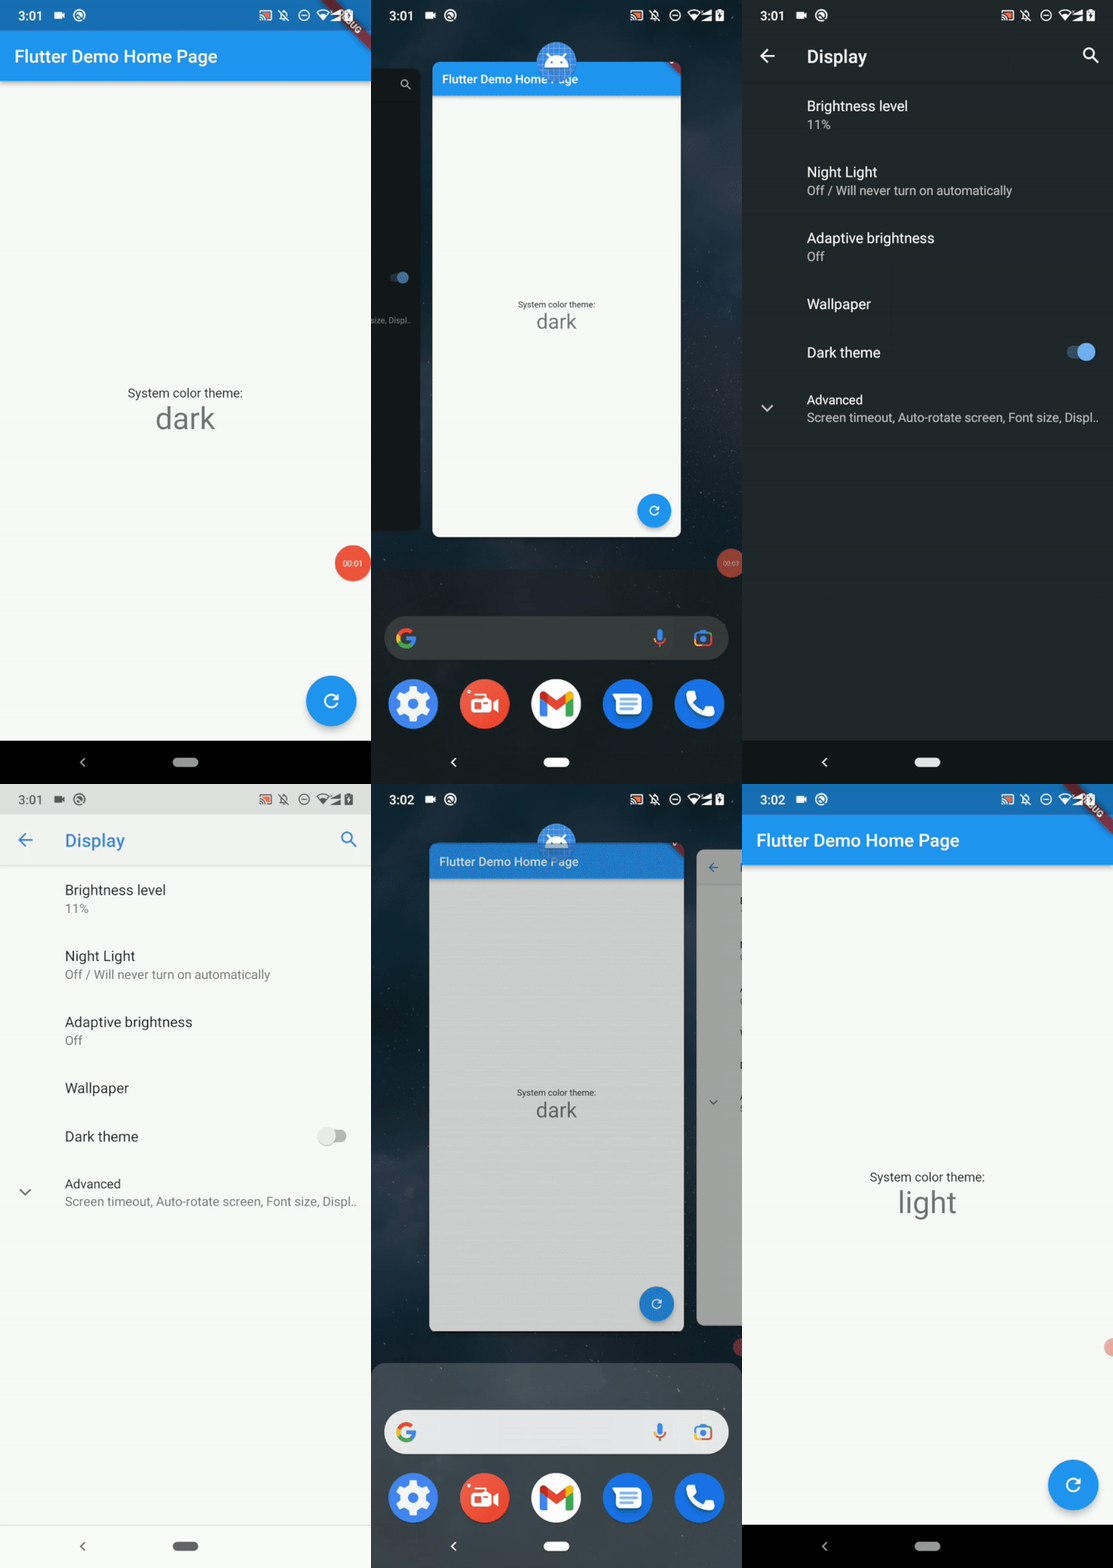
Similarly, you can call any Android SDK APIs from Dart via Flutter platform channels.
EventChannel classThe MethodChannel class provides a request-response-based communication solution as traditional RESTful APIs do. What if we need to call clients from the server when we work with web applications? Then, we tend to choose an event-driven communication mechanism like WebSockets. The EventChannel class offers an asynchronous event stream for building an event-driven communication line between the native host app and Flutter. The EventChannel class is mostly used to send native events to the Dart side.
For example, we can dispatch the system theme change event from Kotlin to Dart. Also, we can use EventChannel to broadcast frequent events from the device’s sensors.
Earlier, we had to press the floating action button to detect the current system color theme. Now, we’ll improve our app by adding an EventChannel instance to handle it automatically.
First, add the following code to your MainActivity.kt:
package com.example.flutter_platform_channels_demo

import kotlin.random.Random
import androidx.annotation.NonNull
import android.os.Bundle
import android.content.res.Configuration
import android.content.pm.ActivityInfo
import io.flutter.embedding.android.FlutterActivity
import io.flutter.embedding.engine.FlutterEngine
import io.flutter.plugin.common.EventChannel
import io.flutter.plugin.common.EventChannel.EventSink
import io.flutter.plugin.common.EventChannel.StreamHandler

class MainActivity: FlutterActivity() {
  var events: EventSink? = null
  var oldConfig: Configuration? = null

  override fun onCreate(savedInstanceState: Bundle?) {
    super.onCreate(savedInstanceState)
    oldConfig = Configuration(getContext().getResources().getConfiguration())
  }

  override fun configureFlutterEngine(@NonNull flutterEngine: FlutterEngine) {
    super.configureFlutterEngine(flutterEngine)
EventChannel(flutterEngine.dartExecutor.binaryMessenger, "example.com/channel").setStreamHandler(
      object: StreamHandler {
        override fun onListen(arguments: Any?, es: EventSink) {
          events = es
          events?.success(isDarkMode(oldConfig))
        }
        override fun onCancel(arguments: Any?) {
        }
      }
    );
  }

  override fun onConfigurationChanged(newConfig: Configuration) {
    super.onConfigurationChanged(newConfig)
    if(isDarkModeConfigUpdated(newConfig)) {
      events?.success(isDarkMode(newConfig))
    }
    oldConfig = Configuration(newConfig)
  }

  fun isDarkModeConfigUpdated(config: Configuration): Boolean {
    return (config.diff(oldConfig) and ActivityInfo.CONFIG_UI_MODE) != 0
      && isDarkMode(config) != isDarkMode(oldConfig);
  }

  fun isDarkMode(config: Configuration?): Boolean {
    return config!!.uiMode and Configuration.UI_MODE_NIGHT_MASK == Configuration.UI_MODE_NIGHT_YES
  }
}
We use the EventChannel class to create an event-driven communication stream. Once the EventChannel handler is attached, we can use the EventSink instance to send events to the Dart side. Events occur in the following situations:
Note that here we use a boolean value as the event payload to identify whether the dark mode is activated or not. Now, add the following code to your main.dart file and complete the implementation:
import 'package:flutter/services.dart';
import 'package:flutter/material.dart';

void main() {
  runApp(const MyApp());
}

class MyApp extends StatelessWidget {
  const MyApp({super.key});
  @override
  Widget build(BuildContext context) {
    return MaterialApp(
      title: 'Flutter Demo',
      theme: ThemeData(),
      darkTheme: ThemeData.dark(),
      themeMode: ThemeMode.system,
      home: const MyHomePage(title: 'Flutter Demo Home Page'),
    );
  }
}

class MyHomePage extends StatefulWidget {
  const MyHomePage({super.key, required this.title});
  final String title;
  @override
  State<MyHomePage> createState() => _MyHomePageState();
}

class _MyHomePageState extends State<MyHomePage> {
  String _theme = '';
  static const events = EventChannel('example.com/channel');

  @override
  void initState() {
    super.initState();
    events.receiveBroadcastStream().listen(_onEvent);
  }
  void _onEvent(Object? event) {
    setState(() {
      _theme = event == true ? 'dark' : 'light';
    });
  }

  @override
  Widget build(BuildContext context) {
    return Scaffold(
      appBar: AppBar(
        title: Text(widget.title),
      ),
      body: Center(
        child: Column(
          mainAxisAlignment: MainAxisAlignment.center,
          children: <Widget>[
            const Text(
              'System color theme:',
            ),
            Text(
              _theme,
              style: Theme.of(context).textTheme.headline4,
            ),
          ],
        ),
      ),
    );
  }
}
The above code connects with the event channel we created before and displays the current theme. The EventChannel implementation triggers the _onEvent callback whenever it receives a new event from the Kotlin side.
Run the app and activate/deactivate dark mode. You should see the theme name on the app screen, as shown in the following preview:
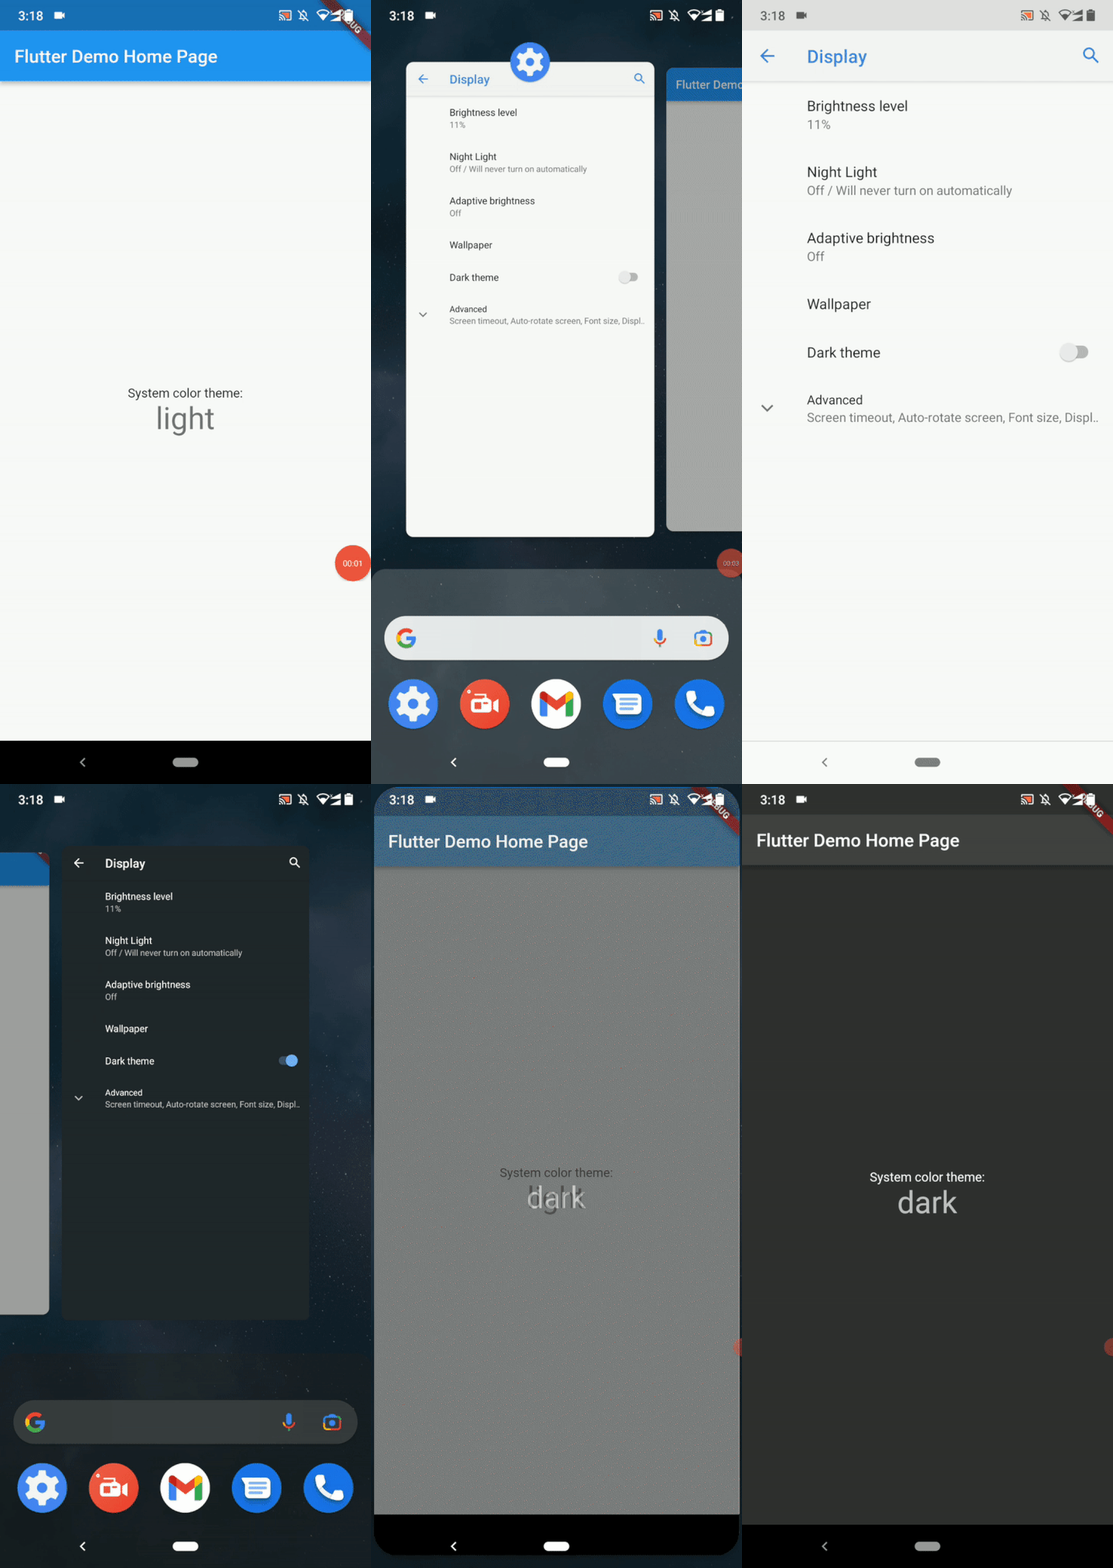
You will notice the app color scheme is changed based on the current theme. This behavior happens because we used ThemeMode.system for themeMode to make the Flutter app responsive to the current system theme, and this behavior is not a result of the EventChannel API usage.
The Flutter platform channels API automatically converts inbuilt complex types, like maps and lists. But, in some scenarios, we need to pass even more complex objects with many data records. You can consider the following strategies for sending/receiving such complex objects:
FirestoreMessageCodec as a reference implementationFlutter lets you modify the native host app and build a communication line with Dart via platform channels APIs. In this tutorial, we learned MethodChannel by updating the Kotlin-based host app directly. You also can use the same approach to reuse your Kotlin/Java libraries, call Android SDK APIs, or invoke any Kotlin code segment. You can reuse native code modifications in other Flutter apps, in most cases.
For example, if you use MethodChannel to vibrate the user’s device, you may need the same native implementation in your other apps. The Flutter SDK offers a fully-featured plugin system to create, publish, and integrate shareable plugins.
Assume that you need to use the Kotlin-based random number generator method in multiple Flutter apps. Then, you can create a Flutter plugin and import it rather than modifying every native host app. Check the official documentation to get started with Flutter plugin development and inspect the shared_preferences plugin to learn the recommended Flutter plugin structure.
MethodChannel vs. EventChannel vs. BasicMessageChannelThe BasicMessageChannel class is also a part of the Flutter platform channels API. It helps you implement low-level communication lines with custom codecs. Choosing the most suitable platform channels class for connecting Kotlin with Dart will help motivate you to keep your codebase readable, efficient, and minimal.
Look at the following comparison table:
| Comparison factor | MethodChannel |
EventChannel |
BasicMessageChannel |
|---|---|---|---|
| Communication type | Request-response (RPC-like) type method invocation | Event-driven stream | Low-level messages |
| Direction | Bi-directional | Bi-directional | Bi-directional |
| An example generic use case | Calling native codes | Subscribing to native events | Implementing custom codecs |
We studied the Flutter platform channels API and tested the MethodChannel class with practical examples in this tutorial. Also, we became familiar with the EventChannel class that helps us create event-driven communication streams with the native host app. This tutorial focused on calling Kotlin code from Flutter, but the Flutter framework lets you call other platform languages too.
We typically have to call Kotlin code either to reuse it or to call Android SDK functions. If you’ve migrated to Flutter from a native Android app, but you still have a lot of business logic written in a Kotlin/Java package or you need to reuse your Java-based web API’s business logic, you can use MethodChannel for calling your existing Kotlin code efficiently. For most Android SDK functions, you can find pre-implemented plugins. So, check existing open source community plugins before creating a MethodChannel for calling native SDKs.
The MethodChannel API doesn’t offer code generation, so we have to use conditional statements to distinguish method calls and pass arguments via dynamic Dart maps. Besides, it doesn’t guarantee type safety. If you seek such features, check out the pigeonpackage.
Overall, the MethodChannel API is an efficient, minimal, dynamic, and inbuilt mechanism that we can use to call Kotlin code from your Flutter app.
LogRocket is an Android monitoring solution that helps you reproduce issues instantly, prioritize bugs, and understand performance in your Android apps.
LogRocket's Galileo AI watches sessions for you, instantly identifying and explaining user struggles with automated monitoring of your entire product experience.
LogRocket also helps you increase conversion rates and product usage by showing you exactly how users are interacting with your app. LogRocket's product analytics features surface the reasons why users don't complete a particular flow or don't adopt a new feature.
Start proactively monitoring your Android apps — try LogRocket for free.
Would you be interested in joining LogRocket's developer community?
Join LogRocket’s Content Advisory Board. You’ll help inform the type of content we create and get access to exclusive meetups, social accreditation, and swag.
Sign up now
Discover how to use Gemini CLI, Google’s new open-source AI agent that brings Gemini directly to your terminal.

This article explores several proven patterns for writing safer, cleaner, and more readable code in React and TypeScript.

A breakdown of the wrapper and container CSS classes, how they’re used in real-world code, and when it makes sense to use one over the other.

This guide walks you through creating a web UI for an AI agent that browses, clicks, and extracts info from websites powered by Stagehand and Gemini.