Editor’s note: This article was updated on 10 April 2022 to ensure code blocks are consistent with React 18 and dependencies kept up to date in relation to Socket IO v4.x.
REST was the undisputed champion of web APIs. It dethroned the old SOAP and its verbose XML in favor of JSON over HTTP. REST also had quite the elaborate conceptual model rooted in resources and verbs.
But, REST wasn’t a perfect fit for every web-based communication problem. Developers bent over backwards and tried to fit every communication and data exchange requirement into the RESTful pattern.
Nowadays, modern software development teams tend to develop their web service communications with WebSockets, GraphQL, gRPC, and HTTP/2 over the traditional RESTful pattern. Web developers often choose WebSockets for building modern real-time web applications.
This article is all about WebSockets. You’ll learn:
click eventOur demo will have you build a cool, client-server game of Connect4 with Node on the backend, React+SVG on the frontend, and all of the communication between the server and the clients run over WebSockets.
WebSockets are a connection-based communication protocols that support full-duplex real-time communication.
What’s the big deal, you ask? We’ve had TCP since the dawn of time for such requirements.
That’s true, but TCP is a low-level communication protocol and is not available for web developers in the browser as a web API.
Every modern web browser supports WebSockets, and every popular backend language has WebSocket server libraries as either third-party modules or standard library modules. Until WebSockets came along, you could only perform HTTP request-response operations within the web browser.
WebSockets, however, are message-based — this means you send a message and the other side receives a message. WebSockets are implemented on top of TCP, but raw TCP is stream-based. You send a bunch of bytes (octets) and the other side has to figure out how to accumulate them and break them down into coherent messages. WebSockets does it for you, which is a great help to developers.
Let’s look at the following diagram and understand how the WebSocket client and server full-duplex communication channel is formed:
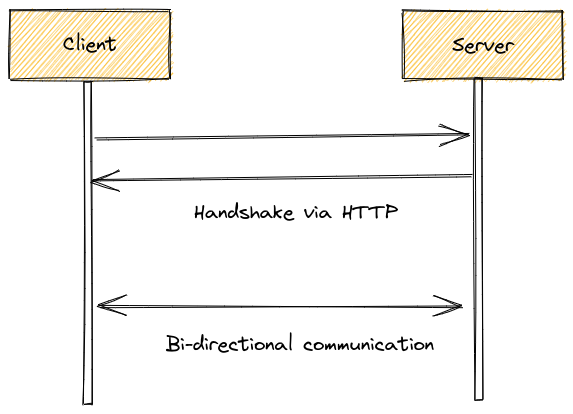
As shown in the above diagram, the client first tends to initialize a WebSocket connection with the server by sending an HTTP request.
Next, the server completes the WebSocket handshake by replying with an HTTP response to initialize the WebSocket connection.
Once the connection is established, both the client and server can send messages to each other asynchronously with the WebSocket protocol messages.
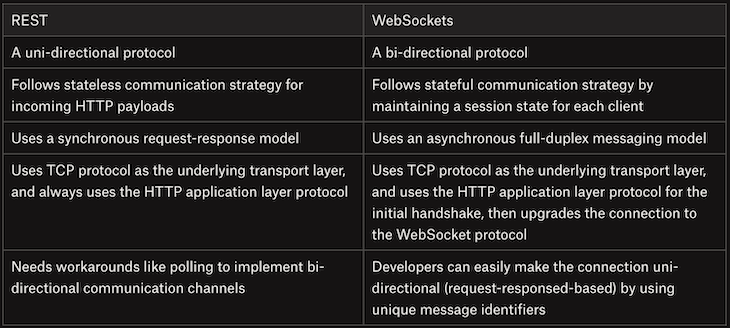
WebSockets are really useful when the server wants to push a lot of data and/or frequently update the browser (think multiplayer games or chat services). The traditional RESTful pattern is a synchronous request-response-based mechanism and isn’t suitable for full-duplex real-time scenarios. Look at the following comparison between the RESTful approach and WebSockets:
Consider a game where every operation a player performs must be communicated to the other players ASAP.
If you tried to implement it with REST, you’d probably resort to some polling mechanisms where all the players constantly bombard the server with requests for updates.
There are several issues with this scenario:
With WebSockets, all of these problems are removed — the server is in control and it knows exactly how many clients are connected at each time.
It can update all the connected clients immediately when something worthwhile happens and there is no lag for HTTP polling mechanisms. The server doesn’t need to keep state around once it’s notified all clients, and additionally, if a client drops, the connection drops, and the server is notified immediately.
Chat services are a killer application for WebSockets. Character-by-character updates or even just the message: “X is typing…” is not possible without WebSockets in the browser.
Let’s build a Connect4 game that demonstrates how WebSockets work.
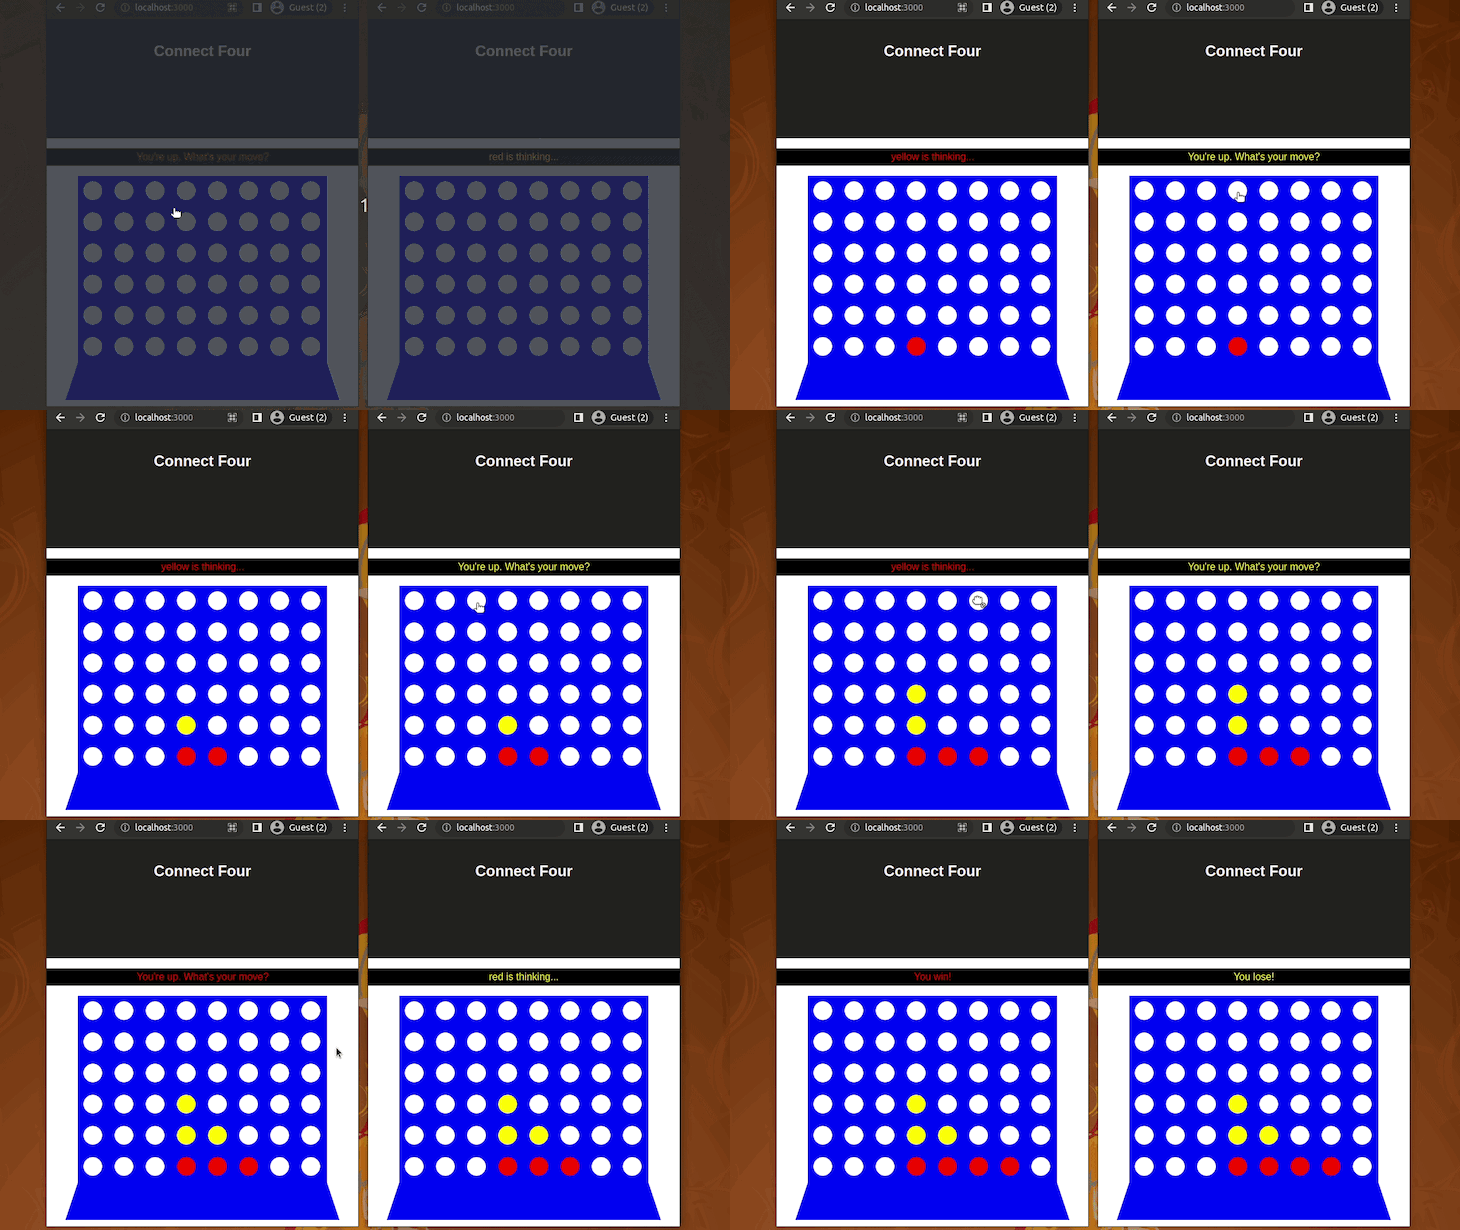
There will be a server that manages the state of the game and two players that play against each other. The server is in charge of managing the board, ensuring players make only valid moves, tell each player when it’s their turn, check for victory conditions, and notify players.
The client is a React-based app. It displays the board and messages from the server. When the server sends an updated board or message, the client updates its state and React takes care of updating the display.
The client also takes care of responding to clicks on the board when it’s the player’s turn and notifies the server.
(Note: The Connect4 game is not optimized at all. The whole board is sent every time, instead of just changes, and I send multiple messages even when they can be combined. This is by design — I’m doing this to show how easy and user-friendly WebSockets are. The code is very straightforward and readable and the only somewhat complex aspect is checking for victory, which is isolated in its own function on the server-side)
Here is what it looks like:
Before we dive into the code, let’s quickly find it and examine how it’s structured.
The code for both the server and the client is available on this GitHub repository. Clone the GitHub repository in your working directory and open it with your favorite code editor to start inspecting the source code.
You’ll notice that the entire server is in a single file, server.js, and the client was created using Create React App (CRA), which creates its own directory structure. I moved everything into the client sub-directory to isolate frontend code from the backend code.
There are two README files.
README.md is a concise file that gives a short description of the app and how to use it.
The README2.md is the file generated by CRA and contains a lot of information about the goodies you get from using CRA to start your project.
Now, install the dependencies and run the following command to start the game:
npm run dev
# or
yarn dev
The above command starts both server and client in the development mode. Open the game in two browser windows simultaneously and try playing it.
Let’s dive into to the source code and study each module.
The server is a Node.js application that uses socket.io to function as a WebSockets server. All it takes to start is a WebSockets server listening on port 1337:
const { createServer } = require('http')
const { Server } = require('socket.io')

const httpServer = createServer()
const io = new Server(httpServer, {
  cors: {
    origin: '*'
  }
})
.
.
.
reset()
const port = 1337
httpServer.listen(port)
console.log('Listening on port ' + port + '...')
The server is super simple; it can run only one game at a time. The game state includes the game board, the two players, and who the current player is.
The board is a 6×8, 2D array where all the cells are initially white. I chose to represent the players as an object with two attributes, red and yellow. There’s no need for a map here because the keys are strings and I don’t need to iterate over them. The value for each player is their WebSocket connection reference, which is initially null.
let board = null
const players = {'red': null, 'yellow': null}
let player = 'red'

function reset() {
  board = Array(6).fill(0).map(x => Array(8).fill('white'))
  players['red'] = null
  players['yellow'] = null
  player = 'red'
}
Why keep a players object instead of just two variables? The strings red and yellow are used throughout to communicate important information back and forth between the server and the client.
On the server-side, everything happens inside io.on('connection', function(socket) {...}. This callback function is called whenever a new client connects to the server.
The server then registers callbacks for various events and messages, which I’ll cover soon. But first, the server stores the socket object reference in the players object.
The first client to connect gets to be the red player; yellow is second. The server will disconnect any further connection attempts to isolate the current two-player game session. The server will also send each player their color and whose turn it is.
if (players['red'] == null) {
    players['red'] = socket
    socket.emit('color', 'red')
  } else if (players['yellow'] == null) {
    players['yellow'] = socket
    socket.emit('color', 'yellow')
    io.emit('turn', 'red')
  } else {
    socket.disconnect()
  }
The emit() function used to send messages to the client/clients has two flavors:
io.emit() call: This lets the server broadcast the same message to all connected clientssocket.emit() call: This sends the message to a particular clientOne example to consider here is that each player needs to get a different message to know their color, but all players need to get the same message to tell whose turn it is.
The server then goes on to register callbacks for two events: disconnect and click. The disconnect event is not very interesting and just removes the disconnecting player’s socket from the player’s object.
click eventThe click event is where all the action is. When the active player clicks a column on the board, the server receives the click event and goes to work. First, the server verifies that the click is valid.
Clicks are ignored in the following cases:
click)socket.on('click', function (column) {
// Ignore players clicking when it's not their turn
if (players[player] !== socket) {
return
}
// Ignore clicks on full columns
if (board\[0\][column] !== 'white') {
  return
}

// Ignore clicks before both players are connected
if ((players['red'] == null) || (players['yellow'] == null)) {
  return
}
Once this part is done, the server knows it’s a proper click and proceed to process it. Then, the server places a new piece at the top of the target column and sends the updated board to all players via the board message:
// find first open spot in the column
    let row = -1
    for (row = 5; row >= 0; --row) {
      if (board\[row\][column] === 'white') {
        board\[row\][column] = player
        break
      }
    }

io.emit('board', board)
Now, the server needs to check if the current player actually won by placing that piece. It calls the checkVictory() function with the location of the currently placed piece, and if it returns true, it means the current player won.
The server will then broadcast the victory message to both players with the winning player’s color, disconnect both players, and bail out.
But, if the player didn’t win, the player toggles the active player and notifies both players with the turn message.
// Check victory (only current player can win)
    if (checkVictory(row, column)) {
      io.emit('victory', player)
      // Disconnect players
      players['red'].disconnect()
      players['yellow'].disconnect()
      reset()
      return
    }

// Toggle the player
    player = player === 'red' ? 'yellow' : 'red'
    io.emit('turn', player)
The most complicated part of the server is the victory check. It’s not rocket science, but you can easily miss some corner cases if you’re not careful. Let’s discuss it a little bit and then look at some of the code.
To win a game of Connect4, a player must have four adjacent pieces aligned horizontally, vertically, or diagonally. If a player wins on a turn, then the piece that was just placed must be part of the four adjacent pieces.
The trivial approach is to start from the last placed piece and then check in each of the eight directions for the additional three adjacent pieces in the player’s color.
But, then you can miss a case where the placed piece was in the middle of the sequence, as in the following image:
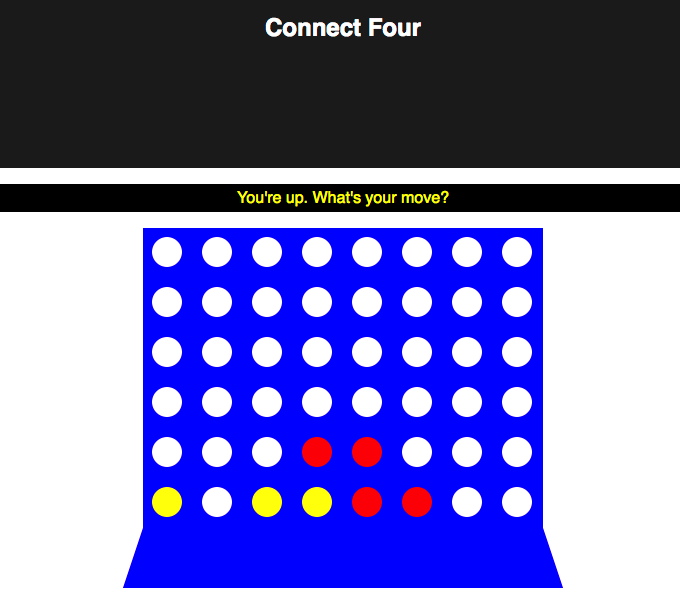
So, the correct way to check is to go both ways and count the total of pieces with the player’s color. For example, when checking the horizontal direction, we check both to the left and to the right.
That means that we only ever need to check four directions: horizontal, vertical, top-left to bottom-right diagonally, and bottom-left to top-right diagonally. We also need to pay attention and not go out of bounds with our checks. Here is part of the code for horizontal checks:
function checkVictory(i, j) {
  const c = board\[i\][j]

// Check horizontally
  let count = 0
  // count to the left
  for (let k = 1; k < 4; ++k) {
    if (j - k < 0) {
      break
    }
    if (board\[i\][j - k] !== c) {
      break
    }
    count++
  }
  // count to the right
  for (let k = 1; k < 4; ++k) {
    if (j + k > 7) {
      break
    }
    if (board\[i\][j + k] !== c) {
      break
    }
    count++
  }

if (count > 2) {
    return true
  }
We count up to three places to the left and right, breaking when encountering anything that is not the current player’s color. In the end, if the count is more than two, it means we have a sequence of four, including the currently placed piece, and it’s a victory.
The checks for verticals and diagonals are very similar, except the indices are a little different and, in the case of the diagonals, both i and j are incremented.
Check the complete implementation of the checkVictory function from here.
WebSockets are awesome, but let’s talk about WebSockets-based solution design.
The client connects and sends click messages to the server. The server sends multiple messages, like board, color, and turn.
Is it really necessary to send all of these in separate messages? Not really. The server could send a single state message that includes everything.
However, if you send just one message, then the client-side code will be more complicated because it has to parse and figure out what has changed.
The board message presents another decision point. In our demo app, I sent the whole board, but I could just as easily send just the location of the most recently placed piece.
If that were the case, then the application frontend implementation would have to store the board state in the memory and update it properly when receiving a message on a newly placed piece, instead of just receiving the whole board.
Our application frontend’s board rendering logic is now simple since we send the entire board matrix with the board message. We can render the new board state with the following one-liner:
this.setState({...self.state, board: board})
Also, we send the board object directly from the server-side. However, we can reduce the WebSocket message payload size by sending only the updated location coordinate of the board. But, we will send the entire board matrix for the sake of simplicity in this tutorial.
The client is a React app, and all of the action takes place in the App main component. It also has two sub-components: Board and Infobar.
InfoBar componentThe InfoBar is a stateless functional component that displays information in the player’s color. It’s got some embedded styling and receives both the message and the color as properties from its parent:
import React from 'react'

const InfoBar = ({message, color}) => {
  let style = {color: color,
               backgroundColor: 'black',
               padding: '5px'};
  return <p style={style}>{message}</p>
}

export default InfoBar
Board componentThe board is much more interesting. It has to handle clicks, and yet it is also a stateless functional component that knows nothing about the server or WebSockets.
How does it work?
The parent App component passes a callback function called onColumnClick as a prop — the board simply invokes this callback with the clicked column.
Another cool thing about the board is that it uses SVG to render the board and the pieces — not traditional DOM elements. In addition, it also changes the mouse pointer according to the player’s turn.
Let’s break it down piece by piece to get detailed information about the board component’s props.
The board accepts three props from the parent. The board prop is the 6×8 2D array that you’re already familiar with from building the server. The onColumnClick prop is the callback that will be invoked when a column is clicked and yourTurn is a boolean for handling the current mouse cursor.
Next, the board defines an empty array for cells that will be populated later and sets the mouse cursor to either pointer or no-drop, depending on the yourTurn prop.
import React from 'react'

const Board = ({board, onColumnClick, yourTurn}) => {
  const cells = []
  const style = {cursor: yourTurn? 'pointer' : 'no-drop'}
Here, we populate the cells arrays with the board cells. Each cell is an SVG group that has a 50×50 px blue rectangle with a circle in the middle. The circle’s color comes from the board prop, and will be red, yellow, or white.
for (let i = 0; i < 6; ++i) {
  for (let j = 0; j < 8; ++j) {
    let cell =  onColumnClick(j)}
                style={style}>


    cells.push(cell)
  }
}
Finally, we return a 440×360 px SVG element with the board represented by the cells on top, followed by a blue trapezoid that serves as the base.
return <svg width={440} height={360}>
          {cells}
          <polygon points="20,300 0,360 440,360 420,300"
          fill={'blue'}/>
       </svg>
}
export default Board
App componentThe App is the main component. It is in charge of rendering the InfoBar and board components, as well as handling all communication.
It also uses a little CSS from App.css. For communicating with the server, it uses the Socket.io library that provides the io() function.
import React, {Component} from 'react'
import './App.css'
import InfoBar from './components/InfoBar'
import Board from './components/Board'
import { io } from 'socket.io-client'
The constructor sets the state, which consists of:
InfoBaryourTurn booleanclass App extends Component {
constructor(props) {
super(props)
this.state = {
board: Array(6).fill(0).map(x => Array(8).fill('white')),
message: 'Waiting for another player...',
yourTurn: false
}
The next part of the constructor is where all the communication takes place. First, the this pointer is stored as the self variable in a closure. This is necessary for the WebSockets to have access to the component’s state.
Then, the app constructor registers handlers for the following messages:
boardcolorturnvictoryIn each case, the constructor updates the relevant parts of the state.
(Note: The handlers are registered in the constructor, but will be called again as the game progresses)
let self = this

socket.on('board', board => {
  this.setState({...self.state, board: board})
});

socket.on('color', color => {
  this.setState({...self.state, color: color})
});

socket.on('turn', player => {
  if (player === this.state.color) {
    this.setState({...self.state, message: "You're up. What's your move?", yourTurn: true})
  } else {
    this.setState({...self.state, message: player + ' is thinking...', yourTurn: false})
  }
});

socket.on('victory', player => {
  let newState = {yourTurn: false}
  if (player === this.state.color) {
    newState['message'] = 'You win!'
  } else {
    newState['message'] = 'You lose!'
  }
  this.setState({...self.state, ...newState})
});
Remember the onColumnClick function the board receives to invoke when a column is clicked? It’s a one-liner that just sends a click message to the server.
onColumnClick = column => socket.emit('click', column);
The render() function is pretty straightforward. It renders the header, then the InfoBar, then the board, passing the necessary props from the state.
render() {
    return (
      <div className="App">
        <header className="App-header">
          <h1 className="App-title">Connect Four</h1>
        </header>
        <InfoBar color={this.state.color}
                 message={this.state.message} />
        <Board board={this.state.board}
               onColumnClick={this.onColumnClick}
               yourTurn={this.state.yourTurn}/>
      </div>
    )
  }
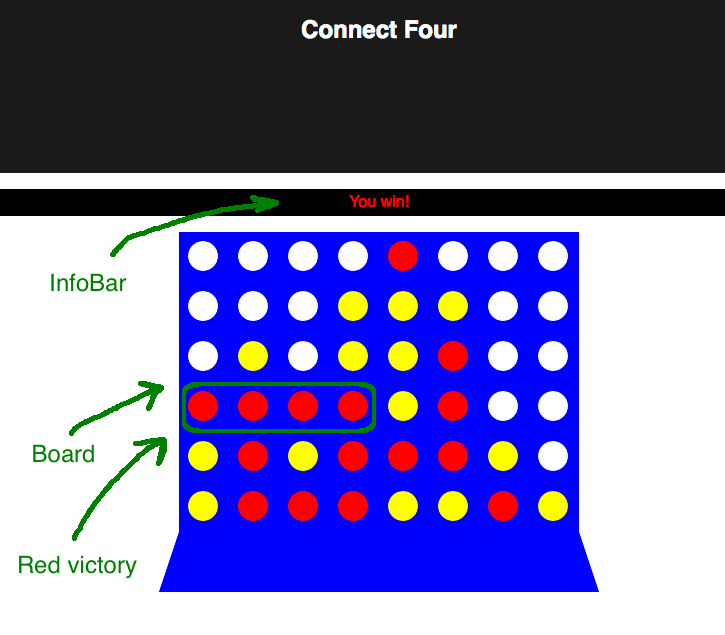
Here is an illustration with some arrows of a victory:
WebSockets are a great technology for client-server applications where the server needs to send messages, events, or notifications to the client without being constantly prompted or polled.
For example, we can use WebSockets to build real-time chat apps, online browser-based multiplayer games, and monitoring tools. WebSocket payloads are more lightweight than HTTP messages, so we can use WebSockets for building live web dashboards as well.
In this post, we learned the advantages of using WebSockets over REST, and we went though a full-fledged example of a Node server and React clients that communicate over WebSockets and together implement the classic Connect4 game. As a bonus, we used SVG for rendering the board and pieces.
Now, it’s your time to go out there and build awesome stuff with WebSockets.
Install LogRocket via npm or script tag. LogRocket.init() must be called client-side, not
server-side
$ npm i --save logrocket

// Code:

import LogRocket from 'logrocket';
LogRocket.init('app/id');
// Add to your HTML:

<script src="https://cdn.lr-ingest.com/LogRocket.min.js"></script>
<script>window.LogRocket && window.LogRocket.init('app/id');</script>
Would you be interested in joining LogRocket's developer community?
Join LogRocket’s Content Advisory Board. You’ll help inform the type of content we create and get access to exclusive meetups, social accreditation, and swag.
Sign up now
A breakdown of the wrapper and container CSS classes, how they’re used in real-world code, and when it makes sense to use one over the other.

This guide walks you through creating a web UI for an AI agent that browses, clicks, and extracts info from websites powered by Stagehand and Gemini.

This guide explores how to use Anthropic’s Claude 4 models, including Opus 4 and Sonnet 4, to build AI-powered applications.

Which AI frontend dev tool reigns supreme in July 2025? Check out our power rankings and use our interactive comparison tool to find out.