Those who have built native Android apps might cringe when they try to work with assets in Flutter. As a Flutter developer, you have no choice but to refer to them using strings directly in your code. Working with images, for instance, is not easy because you have to refer to them by their path string.

The Android app development environment has a tool to help convert all your assets into type-safe variables that can be referenced anywhere in your code. This tool has a lot of benefits which include:
Flutter does not offer such a tool out of the box. Fortunately, there’s FlutterGen, a Flutter code generator for your assets that help remove all string-based APIs in your app.
In this article, you will learn how to use FlutterGen in your Flutter apps.
An asset is any file bundled and deployed with your application for accessing at runtime. Assets can be in the following forms:
To load assets in your Flutter app, you have to reference the asset using path strings, which is not safe. The FlutterGen package helps remove all string-based APIs in your app by generating code for all your assets.
Working with FlutterGen is super easy:
pubspec.yaml file as you would normally do; no other configuration is neededlib/gen directory by defaultThe following are available parsers you can configure:
assets.gen.dart file under lib/genfonts.gen.dart file under lib/gencolors.gen.dart file under lib/genWhen working with assets such as animations, FlutterGen offers the following integrations:
Let’s try it out!
To follow along, you can get the starter app here. The app has the following assets added under the assets folder in the root directory:
.riv file.ttf file.png and .svg files.json file.mp4It is good practice to group your assets based on type as shown in the folder structure.
Below is the folder structure and app look:
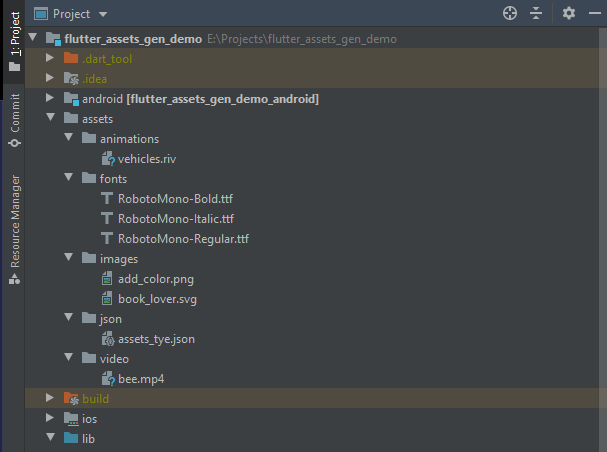

The assets have been loaded in the app but with path strings. You will generate the code for the assets and access them using static variables instead. You can find the final app with the generated code in the FlutterGen branch.
Learn how to get started with FlutterGen next.
To set up FlutterGen in your app:
You can install FlutterGen in several ways:
build_runnerWe will install it as part of build_runner.
Add build_runner and flutter_gen as part of your dev_dependencies in the pubspec.yaml file:
dev_dependencies:
  build_runner:
  flutter_gen_runner:
Run the command below in your root app directory to install FlutterGen:
$ flutter pub get
Specify assets in your pubspec.yaml file as shown:
flutter:
  uses-material-design: true
  assets:
    - assets/images/
    - assets/video/
    - assets/animations/
    - assets/json/

  fonts:
    - family: RobotoMono
      fonts:
        - asset: assets/fonts/RobotoMono-Regular.ttf
        - asset: assets/fonts/RobotoMono-Bold.ttf
          weight: 700
        - asset: assets/fonts/RobotoMono-Italic.ttf
          style: italic
Note the types of parsers used, assets, and fonts. The starter app contains the assets and fonts.
Run flutter packages pub run build_runner build in your root app directory. This command will generate the files for related assets in the lib/gen folder. In this case, since two parsers are specified, assets and fonts, two files are generated for each:
assets.gen.dart — contains generated code for your image, video, animation, and JSON assetsfonts.gen.dart — contains generated code for your font assetsYou will have to add the file imports to the relevant layout files:
import '../gen/assets.gen.dart';
import '../gen/fonts.gen.dart';
Depending on how you named your asset files, a class will be created to read its path string.
For example, if we added a video in the format below, a string class is created and can be accessed:
// getter
String get bee => 'assets/video/bee.mp4';

// static variable
static const String robotoMono = 'RobotoMono';
Now that you have the generated code for your assets, say goodbye to typos and use the static variables generated in your code.
You’ll learn how to work with the generated code in your layout files next.
If the format of the image added is supported by Flutter, an Image class is generated.
For your case, the image path is assets/images/add_color.png. You can load your image in the following formats:
Assets.images.addcolor — implements the AssetImage classAssets.images.addcolor.image(...) — return Image classAssets.images.addcolor.path — return path stringIn the starter code, replace the image path with the generated path:
// with string APIs
Image.asset(
  "assets/images/add_color.png",
  height: 400,
  width: 400,
),

// with generated path - option 1
Image.asset(
 Assets.images.addColor.path,
  height: 400,
  width: 400,
),

// with generated image class- option 2
Assets.images.addColor.image(width: 400, height: 400),
You can also use .svg image files. The svg class is also created in this case. You will implement the flutter_svg integration to load your .svg files:
pubspec.yaml fileThe FlutterGen integrations are set to false by default. To use them, you have to set their values to true.
flutter_gen:
  integrations:
    flutter_svg: true
flutter:
Run the code below whenever you make changes to pubspec.yaml:
flutter pub get

flutter packages pub run build_runner build
To finish, add an SVG image to the app:
// with string APIs
SvgPicture.asset(
  "assets/images/book_lover.svg",
  height: 300,
  width:300,
),

// with generated SVG class
Assets.images.bookLover.svg(width: 300, height: 300),
For videos, the path string can be read from the string class created:
// with string APIs
_videoController = VideoPlayerController.asset("assets/video/bee.mp4");

// with generated path string
_videoController = VideoPlayerController.asset(Assets.video.bee);
For animations as well as images, a class is created: rive, in this case, as we are using a .rive file. You will have to enable the rive integration as well:
flutter_gen:
  integrations:
    flutter_svg: true
    rive: true
You can access the animations the same way you accessed images:
// with string APIs
RiveAnimation.asset(
  "assets/animations/vehicles.riv",
  controllers: [_animationController],
  animations: const ['idle', 'curves'],
),

// with generated path - option 1
RiveAnimation.asset(
  Assets.animations.vehicles.path,
  controllers: [_animationController],
  animations: const ['idle', 'curves'],
),

// with generated rive class - option 2
Assets.animations.vehicles.rive(
    controllers: [_animationController],
    animations: const ['idle', 'curves'],
  ),
),
The generated font name is assigned to a static variable in a FontFamily class that can be accessed throught your app:
// with string APIs
const Text(
  "This is RobotoMono font - medium",
  style: TextStyle(fontFamily: 'RobotoMono'),
),

// with generated variable
const Text(
  "This is RobotoMono font - medium",
  style: TextStyle(fontFamily: FontFamily.robotoMono),
The path to static data such as texts and JSON are assigned to getters, which can be read from your app:
// with string APIs
final String response = await rootBundle.loadString("assets/json/assets_tye.json");
final data = await json.decode(response);

// with generated path
final String response = await rootBundle.loadString(Assets.json.assetsTye);
final data = await json.decode(response);
By default, the FlutterGen package generates code for your assets using the dot-delimiter style:
Assets.video.bee. Other styles of code generation are supported. These include:
snake-case — asset accessed as Assets.video_beecamel-case — asset accessed as Assets.videoBeeTo change the code generation style, you have to specify the style in your pubspec.yaml file:
flutter_gen:
  integrations:
    flutter_svg: true
    rive: true

  assets:
    enabled: true
    # Avaliable values:
    # - camel-case
    # - snake-case
    # - dot-delimiter
    style: dot-delimiter
You have gone through the type of assets and how they are accessed in Flutter using string paths. You are now able to install and use FlutterGen to:
You can check out FlutterGen on GitHub. We hope you enjoyed this tutorial!
Install LogRocket via npm or script tag. LogRocket.init() must be called client-side, not
server-side
$ npm i --save logrocket

// Code:

import LogRocket from 'logrocket';
LogRocket.init('app/id');
// Add to your HTML:

<script src="https://cdn.lr-ingest.com/LogRocket.min.js"></script>
<script>window.LogRocket && window.LogRocket.init('app/id');</script>

Learn how to set up Meilisearch, index documents, and build keyword, semantic, and hybrid search with AI-powered retrieval.

Compare pnpm and npm across security defaults, disk usage, dependency strictness, and workspace policy to decide which package manager fits your project.

I migrated 20 production-style components from Tailwind to StyleX. Here’s what the data showed about LOC, CSS bundle size, build time, and type safety.

A guide for using JWT authentication to prevent basic security issues while understanding the shortcomings of JWTs.
Hey there, want to help make our blog better?
Join LogRocket’s Content Advisory Board. You’ll help inform the type of content we create and get access to exclusive meetups, social accreditation, and swag.
Sign up now

