FastAPI is a web framework for building APIs with Python ≥v3.6 that is based on standard Python-type hints. What makes FastAPI stand out is its focus on modern Python, high performance, and ease of use. But, you might be wondering how Docker containers come into the FastAPI conversation.
Imagine that you’re building a REST API and you need to use PostgreSQL, Redis, Celery, RabbitMQ, and a bunch of other dependencies. The first problem you’d run into is configuring all those dependencies on your machine. This setup process could be a hassle, however, there is another, more pressing problem.
What if you’re developing on Linux, but your colleague develops on Windows? You have to keep in mind that some dependencies that work well on Linux don’t work well on Windows. And even if you somehow manage to get past the development phase, what if your development environment isn’t consistent with your deployment environment? All these problems sum up to one thing, portability.
To make your project more portable, you could develop in an isolated environment that has the project code and all the dependencies installed, which is exactly what Docker containers does.
Docker isn’t exclusive to FastAPI; we can use Docker to containerize most projects regardless of what languages or frameworks are used. In this article, we’ll learn how to containerize a FastAPI application with Docker.
The Replay is a weekly newsletter for dev and engineering leaders.
Delivered once a week, it's your curated guide to the most important conversations around frontend dev, emerging AI tools, and the state of modern software.
Let’s create a rudimentary FastAPI application with one endpoint that returns a list of users.
To create a virtual environment, run python3 -m venv env-name on Unix and macOS or python -m venv env-name on Windows. Replace env-name with the name you chose for your virtual environment.
To activate the virtual environment, run source env-name/bin/activate on Unix and macOS or .\\env-name\\Scripts\\activate on Windows.
In the directory where you want to start your project, run mkdir demo_app, which will create a new folder called demo_app in that directory:
cd demo_apppip install fastapi[all]pip freeze > requirements.txt to create a requirements file in the demo_app folder with all the installed dependenciesLaunch the demo_app folder in the IDE of your choice. Create a file called demo_app/\[main.py\](<http://main.py>) and add the snippet below into the main.py file:
from fastapi import FastAPI

app = FastAPI()

@app.get("/")
async def root():
    return {"message": "Hello World"}

@app.get("/users")
async def users():
    users = [
        {
            "name": "Mars Kule",
            "age": 25,
            "city": "Lagos, Nigeria"
        },

        {
            "name": "Mercury Lume",
            "age": 23,
            "city": "Abuja, Nigeria"
        },

         {
            "name": "Jupiter Dume",
            "age": 30,
            "city": "Kaduna, Nigeria"
        }
    ]

    return users
We created two endpoints, one returns “Hello, World!” and the second, /users, returns a dummy list of users. Next, run uvicorn main:app --reload to start your FastAPI application.
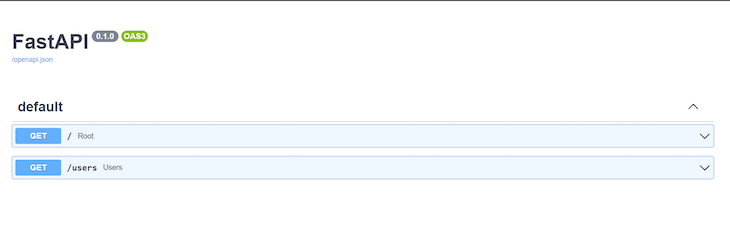
Point your browser to [http://127.0.0.1:8000](<http://127.0.0.1:8000/>)/docs. You should see the two endpoints we just added documented:
To test the endpoint, point your browser to \[http://127.0.0.1:8000\](<http://127.0.0.1:8000/>)/users. It should return the dummy list of users, as shown in the image below:

Now, we have a basic FastAPI application, but to improve the development experience, we can eliminate the need to create a virtual environment and install the project dependencies manually. This optimization would handle what dependencies to install, where to install them, and how to install them when porting our project to other platforms. Let’s learn how to do this with Docker.
By running the project inside a Docker container, we can eliminate the need to create a virtual environment and having to install project dependencies manually.
You can think of a Docker container as a small computer that runs on another computer. Essentially, a Docker container is just an isolated environment on some machine that contains a project’s code and its dependencies.
When we containerize or dockerize our FastAPI application, we are essentially creating a lightweight virtual box with our project’s dependencies installed and our FastAPI code configured to run. As a result, anyone with our virtual box could run our application without having to deal with the low-level project configuration logistics.
Most importantly, we could simply upload this virtual-box to our staging or production server to make our application go live without having to add a lot of configuration.
In our example, what we share with other people or deploy to our servers is not the container or virtual-box itself, but the manual for creating the container. You probably already know this manual as the Docker image.
A Docker image contains step-by-step instructions for building a container. Containers are spun from images during the build step. But, to create a Docker image, we first need to write a Docker file.
To containerize our FastAPI application, we need to follow three steps:
Let’s explore each step further.
Create a demo_app/Dockerfile file and add the code snippet below:
FROM python:3-slim-buster

RUN mkdir /code

WORKDIR /code

COPY requirements.txt .

RUN pip install -r requirements.txt

COPY . .

CMD ["uvicorn", "main:app", "--host=0.0.0.0", "--port=80"]
We populated our Dockerfile with a set of instructions that the Docker daemon would follow chronologically to build our image when issued the command.
When you install Docker, it automatically installs the Docker client, which accepts Docker commands in your terminal and the Docker daemon. Think of the Docker daemon as Docker’s backend, the main entity that processes commands received by the Docker client.
Let’s make sense of what each command in our Dockerfile above means. The FROM instruction sets the official Python image as the base. It instructs the Docker daemon to build our image on top of an existing image. Docker adopts this layered approach to enhance reusability.
RUN mkdir /code creates a code directory in the image when it is built and eventually the container when it is created.
The WORKDIR instruction sets the default working directory to the newly created /code directory. This working directory will be applicable to any subsequent COPY, ADD, RUN, and CMD instructions.
The first COPY instruction adds the requirements.txt file to the current working directory. The RUN instruction executes the pip install -r requirements.txt command. This command would install the dependencies listed in the requirements file in our container.
The second COPY instruction copies the rest of the content from the current directory . of the host filesystem to the working directory . inside the image and eventually the container. Lastly, the CMD instruction sets the command for running our application’s server published on port 8080.
Go to your demo_app directory in your terminal and then run the following command:
docker image build --tag demo-app-image .
To build our image, the Docker daemon needs a few pieces of information. For one, it needs the name of the Dockerfile to use. If this isn’t passed, Docker looks for a file named Dockerfile in the working directory. If you name your file anything other than Dockerfile, then you must pass the name of the file using the --file option:
docker image build --file custom-docker-file-name --tag demo-app-image
Docker also needs the build context. The build context is the directory that’s accessible to Docker during the build process. In our case, we specified the current working directory as the build context with ..
If the image build was successful, you should get an output similar to the image below:

At this point, you should have an image called demo-app-image on your machine. You can run the docker image ls command to see a list of all the images you’ve created or pulled to your local machine from the registry.
Run the command below to spin up a container from our demo-app-image:
docker container run --publish 80:80 --name demo-app-container demo-app-image
The --name option creates a container with the name demo-app-container that is based on the demo-app-image. The --publish option forwards requests coming through port 8080 on our local machine to port 8080 in our container.
If the command works, you should get the following output in your terminal:

You can point your browser to [http://localhost:80/docs](http://localhost/docs) to visit the documentation page. You can also test the /users endpoint. That’s it!
Docker containers make our projects more portable. Remember that what we share with other people or push to our deployment environment isn’t the container itself, but the image. Usually, we share an image by publishing it to a public registry like the Docker Hub.
However, it’s not always the case that we’d want our image to be publicly available. In that case, we could push our Dockerfile along with the project code and have other members of the team build the image and run the container on their end.
In this article, we’ve learned how to simplify locally setting up a FastAPI project or deploying to a staging or production environment with Docker containers.
Fundamentally, a Docker container creates a virtual-box-like isolated environment that bundles our application code with its dependencies. As a result, it’s easier to deploy our application anywhere without having to worry about platform-specific inconsistencies.
To containerize a FastAPI application or just any application with Docker, first, we need to add a Dockerfile to the project, build an image from the Dockerfile, and run a container from the image. While Docker is the most popular containerization technology out there, it’s not the only one.
Install LogRocket via npm or script tag. LogRocket.init() must be called client-side, not
server-side
$ npm i --save logrocket

// Code:

import LogRocket from 'logrocket';
LogRocket.init('app/id');
// Add to your HTML:

<script src="https://cdn.lr-ingest.com/LogRocket.min.js"></script>
<script>window.LogRocket && window.LogRocket.init('app/id');</script>

AI-generated tests can speed up React testing, but they also create hidden risks. Here’s what broke in a real app.re

Why the future of DX might come from the web platform itself, not more tools or frameworks.

A hands-on test of Claude Code Review across real PRs, breaking down what it flagged, what slipped through, and how the pipeline actually performs in practice.

CSS art once made frontend feel playful and accessible. Here’s why it faded as the web became more practical and prestige-driven.
Would you be interested in joining LogRocket's developer community?
Join LogRocket’s Content Advisory Board. You’ll help inform the type of content we create and get access to exclusive meetups, social accreditation, and swag.
Sign up now

