Editor’s note: This article was last updated on 14 June 2023 to compare the event bus in Vue 2 and Vue 3, such as the new need to install an external event emitter and listener package. Check out this article for more information about setting up event emitters in Vue.js, or this article for a deep dive into Vue event handling.
Vue has a way of communicating between two child components through a parent component using event emitters. When you set up an event in a child component and a listener in the parent component, the reaction is passed down through the parent to the nested components.
While this is a valuable solution, it can become clumsy as your project grows. Event bus is a Vue.js instance that can emit events in one component, and then listen and react to the emitted event in another component directly — without the help of a parent component. An event bus is more efficient than an emitter because it requires less code to run.
In this tutorial, we’re going to create an event bus in our Vue.js project to facilitate communication between two components via a private channel. This is commonly known as the publish-subscribe approach.
We’ll cover the following:
This post is suited for developers of all stages, including beginners. Here are a few things you should already have before going through this article:
node -vnpm -v# npm 6.x npm create vite@latest event-bus-tutorial --template vue # npm 7+, extra double-dash is needed: npm create vite@latest event-bus-tutorial -- --template vue
event-bus-tutorial directory and use npm to install the required dependencies:
cd event-bus-tutorial
npm install
In Vue 2.x, a Vue instance could be used to trigger handlers attached imperatively via the event emitter API ($on, $off, and $once).
In order to use the event bus pattern, all you had to do was create a new instance of the Vue constructor, assign the instance to a constant variable named eventBus, and then export it. This instance serves as the event bus, allowing different components in your Vue application to communicate with each other:
// eventBus.js
const eventBus = new Vue()
export default eventBus
Import the eventBus instance and add an event listener in the component that you want to receive events:
// ChildComponent.vue
import eventBus from './eventBus'

export default {
  mounted() {
    // adding eventBus listener
    eventBus.$on('custom-event', () => {
      console.log('Custom event triggered!')
    })
  },
  beforeDestroy() {
    // removing eventBus listener
    eventBus.$off('custom-event')
  }
}
Import the eventBus instance and add an event emitter in the component that you want to send events:
// ParentComponent.vue
import eventBus from './eventBus'

export default {
  methods: {
    sendCustomEvent() {
      // sending the event
      eventBus.$emit('custom-event')
    }
  }
}
In Vue 3, the $on, $off, and $once methods were removed from the Vue instance completely. So, in order to use the event bus pattern, you have to install an external event emitter and listener package, such as mitt.
Use the following commands to install the mitt package and start serving the application:
npm install --save mitt
npm run dev
Open the main.js file located in the src directory, and modify the code inside it to look like the following:
import { createApp } from 'vue'
import mitt from 'mitt'
import App from './App.vue'

const emitter = mitt()
const app = createApp(App)

app.config.globalProperties.emitter = emitter
app.mount('#app')
This code integrates the mitt event emitter library with your Vue 3 application by creating an emitter instance, making it globally accessible through the Vue application instance, and mounting the application to the DOM. This allows components to emit and listen for events using the emitter without the need for direct imports.
In our demo, we’re going to create two child components that need to communicate with each other without using the parent component as an intermediary. First, create a new file named Child1.vue inside the components directory and paste the following code block inside it:
<template>
  <div>
    <button>Increment</button>
  </div>
</template>

<script >
export default {
  name: "Child1",
  data: () => ({
    counter: 0,
  }),
  methods: {},
};
</script>

<style scoped>
button {
  margin: 4rem 0 0;
  padding: 1rem;
  background-color: #0d6efd;
  color: white;
  border-radius: 1rem;
  font-size: 2rem;
}
</style>
Overall, this code renders a <div> containing a styled <button>. The component also has an internal data property counter set to 0 and an empty methods property.
Create a new file named Child2.vue inside the components directory and paste the following code block inside it:
<template>
  <div>
    <h1>{{ counter }}</h1>
  </div>
</template>

<script>
export default {
  name: "Child2",
  data: () => ({
    counter: 0,
  }),
};
</script>

<style scoped>
h1 {
  margin: 5rem 0 0;
  font-size: 10.5rem;
}
</style>
This Vue component renders a <div> component that contains a styled <h1> heading. The counter value is displayed dynamically in the heading.
Now, go to your App.vue file and replace its entire code with the following:
<template>
  <div id="app">
    <Child2 />
    <Child1 />
  </div>
</template>
<script>
import Child1 from "./components/Child1.vue";
import Child2 from "./components/Child2.vue";
export default {
  name: "app",
  components: {
    Child1,
    Child2,
  },
};
</script>
<style>
#app {
  font-family: "Avenir", Helvetica, Arial, sans-serif;
  -webkit-font-smoothing: antialiased;
  -moz-osx-font-smoothing: grayscale;
  text-align: center;
  color: #2c3e50;
  margin-top: 5rem;
}
</style>
Inside the App.vue component, the code imports and renders the Child1 and Child2 components within a styled parent div.
Now that your two components are ready, you can set up the event through emission in the Child1 component while you listen to the event in the Child2 component. Open your Child1.vue file and copy the following code block into it:
<template>
  <div>
    <button v-on:click="sendEvent">Increment</button>
  </div>
</template>

<script >
export default {
  name: "Child1",
  data: () => ({
    counter: 0,
  }),
  methods: {
    sendEvent() {
      this.counter += 1;
      this.emitter.emit("increment", { msg: this.counter });
    },
  },
};
</script>

<style scoped>
button {
  margin: 4rem 0 0;
  padding: 1rem;
  background-color: #0d6efd;
  color: white;
  border-radius: 1rem;
  font-size: 2rem;
}
</style>
Here, an onclick event listener was added to the button element. When this event is triggered, a method named sendEvent() will be called.
The sendEvent() method increments the counter value by one and uses the global event emitter to emit an increment event with the updated counter value to any parent or sibling component.
After setting up the event, we need to make the second component listen and react to the event. Open your Child2.vue file and copy in the following code block:
<template>
  <div>
    <h1>{{ counter }}</h1>
  </div>
</template>

<script>
export default {
  name: "Child2",
  data: () => ({
    counter: 0,
  }),
  mounted() {
    this.emitter.on("increment", (data) => {
      this.counter = data.msg;
    });
  },
};
</script>

<style scoped>
h1 {
  margin: 5rem 0 0;
  font-size: 10.5rem;
}
</style>
The code uses a mounted lifecycle hook to initialize the listening process as the app is mounted on the DOM.
The emitter.on statement is now listening to the increment event, passing the data argument down, and setting it as the new counter:
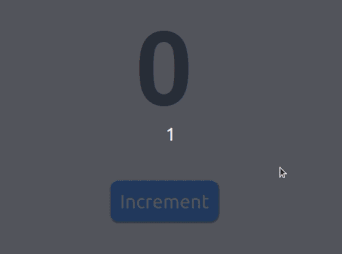
When you click the Increment button located on the Child1 component, the increment event is sent alongside the updated counter value to the Child2 component.
Using a global event bus to facilitate communication between components is not recommended in most cases. While it may initially appear to be the easiest solution, it frequently leads to significant maintenance challenges over time.
Depending on the specific situation, the Vue developer team recommends several alternative approaches to consider instead of relying on an event bus:
This has been an introduction to the event bus in Vue.js. The event bus serves as an easy-to-achieve, independent communication between components without passing through a central or parent component.
While the event bus may initially seem like a convenient method for inter-component communication, it is advised to explore alternative options such as provide/inject or global state management. These alternatives offer more robust and maintainable solutions for facilitating communication between components.
Debugging Vue.js applications can be difficult, especially when users experience issues that are difficult to reproduce. If you’re interested in monitoring and tracking Vue mutations and actions for all of your users in production, try LogRocket.

LogRocket lets you replay user sessions, eliminating guesswork by showing exactly what users experienced. It captures console logs, errors, network requests, and pixel-perfect DOM recordings — compatible with all frameworks.
With Galileo AI, you can instantly identify and explain user struggles with automated monitoring of your entire product experience.
Modernize how you debug your Vue apps — start monitoring for free.
Would you be interested in joining LogRocket's developer community?
Join LogRocket’s Content Advisory Board. You’ll help inform the type of content we create and get access to exclusive meetups, social accreditation, and swag.
Sign up now
Not sure if low-code is right for your next project? This guide breaks down when to use it, when to avoid it, and how to make the right call.

Compare Firebase Studio, Lovable, and Replit for AI-powered app building. Find the best tool for your project needs.

Discover how to use Gemini CLI, Google’s new open-source AI agent that brings Gemini directly to your terminal.

This article explores several proven patterns for writing safer, cleaner, and more readable code in React and TypeScript.


7 Replies to "Using event bus in Vue.js to pass data between components"
Sounds good! But could be better solution pass the bus object as prop to the different components, isn’t it? To be able to decouple as much as possible to the “parent” or to be independent from the project.
What do u think?
I have that feeling that having an EventBus in Vue is an anti-pattern, especially if you’re using VueX but I can’t quite put my finger on it. At the point you want to be sharing data like that, wouldn’t it be better to use a store to handle all of those “events” / “mutations”?
It’s not a well formed or versed opinion yet, but I’d be happy for some external thoughts on the matter.
Very Helpful…
At this point do you even need the props? Why not just have header as a data property?
I agree, there’s something that feels wrong about an EventBus.
Perhaps because it feels like a global variable and difficult to manage the state of the events? How hard would it be to maintain a bus that 7 different components are listening/firing events to?
Your instincts are correct, this is basically a version of the Publish/Subscribe pattern (pub-sub), and at a small scale it works fine, great even. But once things get bigger, not so much. You will want to use some sort of state management architecture to manage things. Vuex uses the Flux pattern, though you could roll your own for smaller projects that don’t need it.
https://en.wikipedia.org/wiki/Publish%E2%80%93subscribe_pattern#Disadvantages
From my experience, this eventBus approach will lead you down the flames of hell. 😀
I agree this seems like a very convienent approach to avoid bubbling up through multiple components, but it doesn’t mean you should do it.
Developers get confused whether this is better than passing down props/emitting events, and basically just go for the eventBus every time, even when the shouldn’t, just because it’s easy. After a few weeks, you will realize your code has just become a huge pile of noodles/spaghettis (take your pick :D) where developers (team of 7, hard to track everything) used the event bus to also pass properties down to the children, and the whole purpose of having self-contained components, with one-way data flow, that you can test in isolation, is just gone forever. You opened the world of X-way data flow, where the event handlers add their own concerns to the data before passing it to the next.
In the long run, you will forget which component is responsible for owning the data, and where is your source of truth.
As a solution, not a silver bullet but a good compromise, I’d recommend having a look at Vuex (or something redux-like)