Events are one of the integral features of the web as we know it. Without events, the web would most be terribly bland.

Events are actions that happen on a web page to HTML elements. Any time something happens on a web page, you can be sure it’s most likely an event, from when the page loads initially, to the user clicking a button, to closing or resizing a window. They’re all examples of different events that happen in the browser.
As a scripting language for the web, JavaScript lets us execute code in reaction to the occurrence of an event fired by HTML elements.
For JavaScript frameworks, events can also be used to pass data easily across an application. For example, React only supports unidirectional data flow, which means data can only pass from top level components to lower level components. But with events, you can listen for and react to certain events on any component level.
This article will cover how we can create and use custom events in React.
The Replay is a weekly newsletter for dev and engineering leaders.
Delivered once a week, it's your curated guide to the most important conversations around frontend dev, emerging AI tools, and the state of modern software.
The browser has a set number of default events available to various HTML elements. But then, in some cases, the need to create a custom event arises. For example, if you’d like to communicate to another component when a dialog component has been closed, the best way to achieve that would be through a custom event, as there is no such thing as an “onDialogClose” event in the browser.
We can create custom events using the Event constructor. We can now finally create our non-existent “onDialogClose” event as such:
//First, we initialize our event
const event = new Event('onDialogClose');

// Next, we dispatch the event.
elem.dispatchEvent(event);
If we wanted to add a bit more data to our custom event, we could do so through the CustomEvent interface using the detail property:
//First, we initialize our event
const event = new CustomEvent('onDialogClose', {detail: "Main Dialog"});

// Next, we dispatch the event.
elem.dispatchEvent(event);
Check out this well-written article to learn more about custom events in JavaScript and how to implement them in your vanilla JavaScript projects.
For this article, we’ll build a demo to illustrate how to make use of custom events in our React applications.
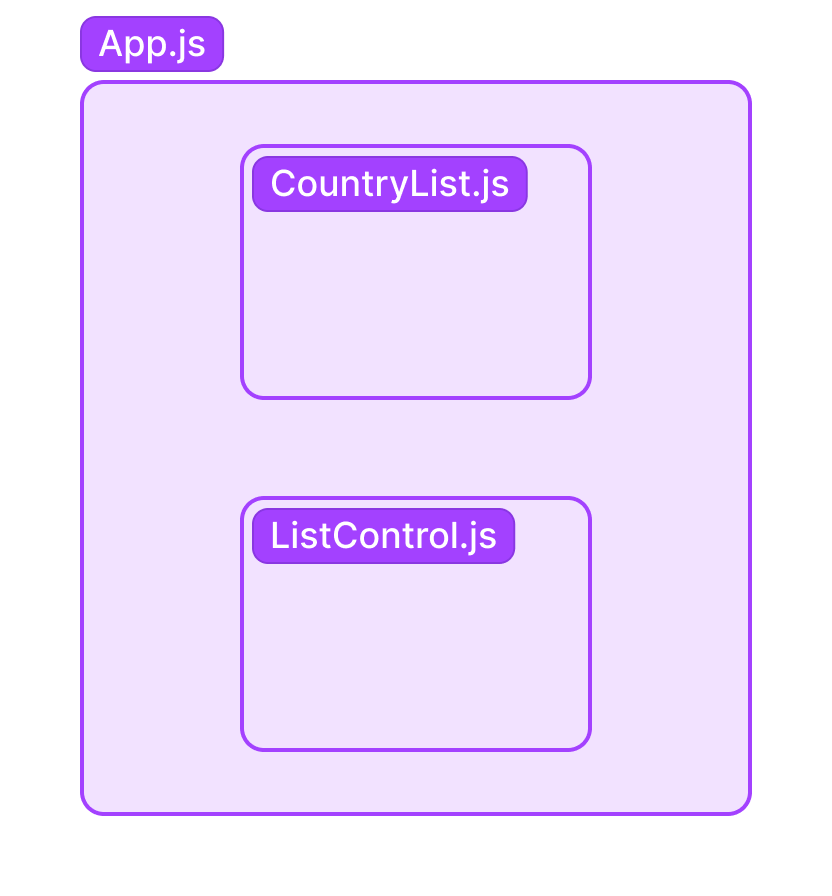
For the demo, our use case would be trying to display and hide a list of African countries, which will be contained is a CountryList.js component and declared in our application’s parent component App.js from another child component, ListControl.js.
For fetching the list of African countries, we’ll use the REST countries API.

Let’s dive in!
First of all, we’ll create a new React project using Create React App.
Next, we’ll create a components folder in the src folder and create our components CountryList.js and ListControl.js inside of it.
The CountryList.js component will render the list of all countries in Africa from our API endpoint, and the ListControl.js component will contain buttons that will either display or hide the list, depending on its current state.
Also, in the root of our src folder, we’ll create an events.js file to abstract the code for emitting and listening for events, so our code is a bit cleaner and reusable.
Once you’ve completed the instructions above, go ahead and copy and paste into your code editor the contents of the code blocks below. Don’t worry, we’ll go over everything in detail.
First, the event.js file:
//events.js

function subscribe(eventName, listener) {
  document.addEventListener(eventName, listener);
}

function unsubscribe(eventName, listener) {
  document.removeEventListener(eventName, listener);
}

function publish(eventName, data) {
  const event = new CustomEvent(eventName, { detail: data });
  document.dispatchEvent(event);
}

export { publish, subscribe, unsubscribe};
In the event.js file, as stated earlier, we’re only abstracting the logic for creating a custom event, dispatching the event, adding event listeners and removing event listeners for use in other components of our application.
N.B., You can rename the function names here to whatever you like, I just thought this naming pattern worked well with the publisher-subscriber pattern
Next up is the CountryList.js component:
//CountryList.js

const CountryList = (props) => {
    return (
        <ul>
            <h2>List of countries in Africa</h2>
            {props.listData.map((el) => {
                return (
                    <li key={el.tld}>
                        <span>
                          <img src={el.flags.svg} alt={el.name.common}
                            style={{ width: "20px", marginRight: "5px" }} />
                        </span>
                        <span style={{fontSize: "20px"}}>{el.name.common} </span>
                    </li>
                );
            })}
        </ul>
    );
}
export default CountryList;
This component accepts a prop from its parent component which, according to our diagram above, is App.js. We’ll get to that in a bit.
It displays the data such as country name and flag from the API. I’ve added a bit of inline styling to the list item so it looks better.
Next, in our ListControl.js component, we’ll dispatch an event using the publish function we created:
import { publish } from "../events"
const ListControl = (props) => {
  const showList = () => {
    publish('showList');
  }
  const hideList = () => {
    publish('hideList');
  }
  return (
    <div>
      {
        props.listState ? <button onClick={hideList}>Hide List</button> :
        <button onClick={showList}>Show List</button>
       }
    </div>
  );
}
export default ListControl;
/pre>
This component contains the button control logic for showing or hiding the list of countries. It’s also where events for both actions will be dispatched.
We import the publish function from our events file and use it to create the custom events and dispatch them.
In addition, this component receives a prop from the App.js component that tells it when the list is rendered or not, and depending on the state of the list, renders one of two buttons: “Show list” or “Hide list”.
Next, in our App.js file, we’ll add an event listener to subscribe to the showList custom event we created. Let’s go over the process in steps:
import './App.css';
import { useState, useEffect } from "react";
import ListControl from './components/ListControl';
import CountryList from './components/CountryList';
import { subscribe, unsubscribe } from "./events";

const App = () => {
  const [isOpen, setIsOpen] = useState(false);
  const [countryList, setList] = useState([]);

  useEffect(() => {
    subscribe("showList", () => setIsOpen(true));
    subscribe("hideList", () => setIsOpen(false));

    async function fetchData() {
      const apiUrl = 'https://restcountries.com/v3.1/region/africa';
      const response = await fetch(apiUrl)
      let data = await response.json()
      setList(data)
    }
    fetchData()

    return () => {
      unsubscribe("showList", () => setIsOpen(false));
      unsubscribe("hideList", () => setIsOpen(true));
    }
  }, []);

  return (
    <div className="App">
      <h1>Using Custom Events In React</h1>
      <ListControl listState={isOpen}></ListControl>
      {
        isOpen ? <CountryList listData={countryList}></CountryList> :
          <h3>
            Click on the Button above to render the list of African Countries
          </h3>
      }
    </div>
  );
}
export default App;
The parent component first imports all the necessary components and React Hooks for our app to function.
Next, we declare our app’s default state with the useState Hook.
Remember the ListControl component which creates and dispatches (or “publishes”) the various custom events? Well, the App.js file is the component where we listen for and “subscribe” to those events.
Also, when our app is first loaded, the various event listeners get activated. Then, the fetchData function is triggered inside the useEffect Hook, which makes a HTTP request to the API and stores the returned data in our app’s state.
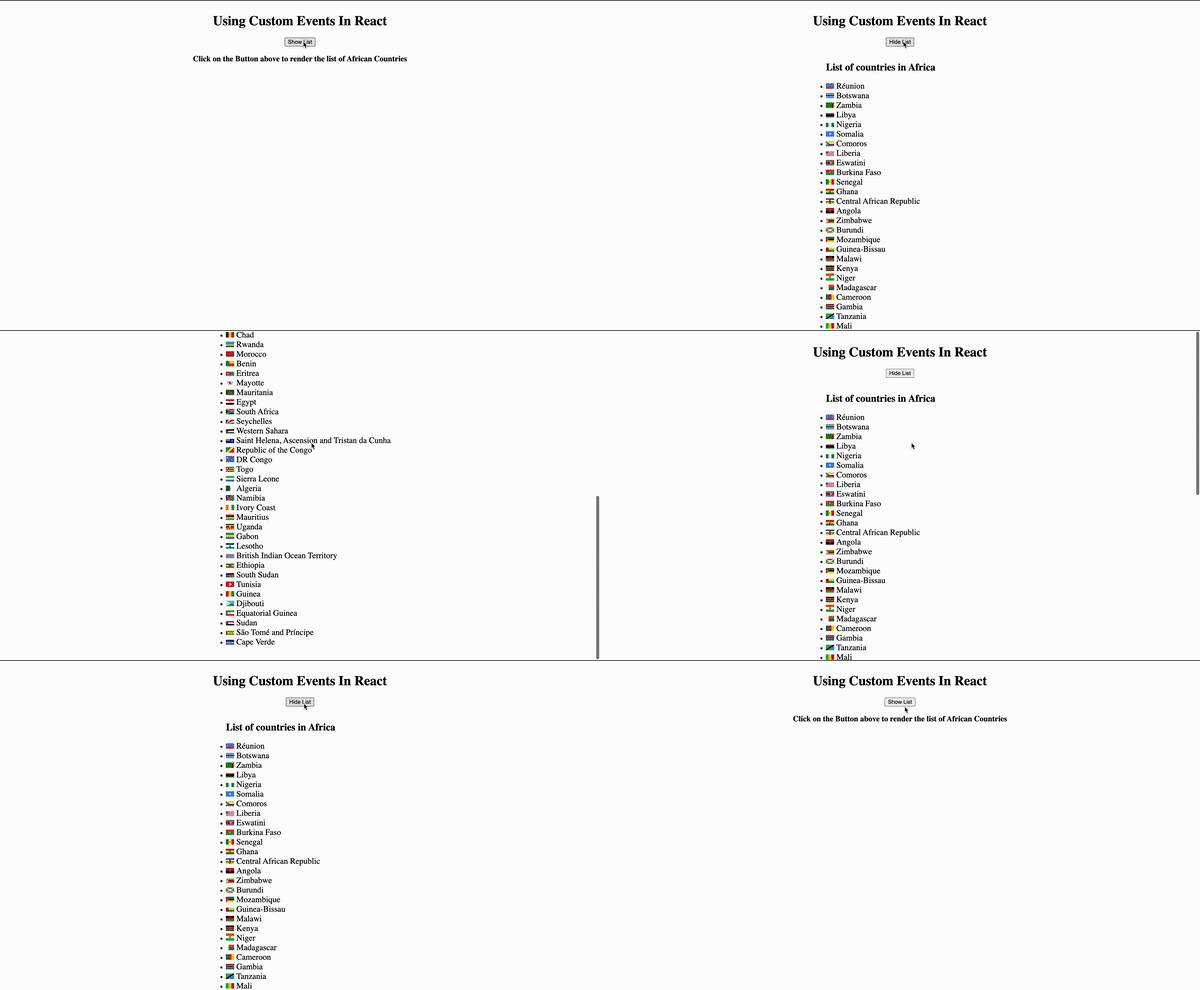
When the showList event is published, the value of isOpen is changed to true, which in turn displays the list. However, when the hideList event is published, the value of isOpen is changed to false and it hides the list component and returns a message instead.
N.B., Inside the *useEffect* Hook, we have a cleanup return function, which removes all event listeners when the component unmounts. This prevents multiple unused event listeners from being created and causing a memory leak in the application
Voila! Here’s the output of our work so far:

Running tests is part of the software development lifecycle, so let’s write some unit tests to ensure our custom events are working as expected.
We’ll need a test framework like Jest to perform unit tests in React. Fortunately, when using the create-react-app command, Jest comes bundled with the resulting application, so we don’t need to make any extra configuration.
A deep dive into how Jest works is beyond the scope of this article, but if you‘d like to learn more about Jest, check out this guide.
Now let’s create the test file in the src directory and name it events.test.js. Add the below code to the file:
//import the event.js file
import { publish, subscribe, unsubscribe } from "./events";
//test the subscribe function
test("subscribe", () => {
    const listener = jest.fn();
    subscribe("test", listener);
    publish("test", "test data");
    expect(listener).toHaveBeenCalledWith(
        expect.objectContaining({
            type: "test",
            detail: "test data",
        })
    );
});
//test the unsubscribe function
test("unsubscribe", () => {
    const listener = jest.fn();
    subscribe("test", listener);
    unsubscribe("test", listener);
    publish("test", "test data");
    expect(listener).not.toHaveBeenCalled();
});
//test the publish function
test("publish", () => {
    const listener = jest.fn();
    subscribe("test", listener);
    publish("test", "test data");
    expect(listener).toHaveBeenCalledWith(
        expect.objectContaining({
            type: "test",
            detail: "test data",
        })
    );
});
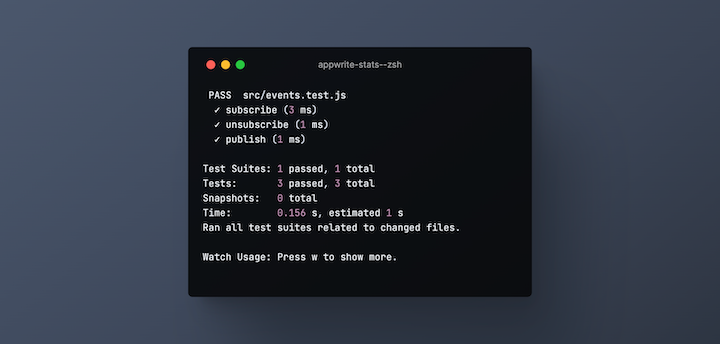
To confirm that our tests check out, let’s run the command npm run test in the terminal:

The terminal output shows that all three tests passed. This means our functions act as intended.
In this article, we learned about events and custom events in vanilla JavaScript. We also discussed how to implement the same pattern inside a React application and how to dispatch, subscribe to, and write unit tests for our custom events.
All the code for this tutorial is hosted on GitHub here. Feel free to fork it and play around with the code, and if you loved this tutorial, please give it a star.
Also, feel free to leave your thoughts in the comment section below.
Install LogRocket via npm or script tag. LogRocket.init() must be called client-side, not
server-side
$ npm i --save logrocket

// Code:

import LogRocket from 'logrocket';
LogRocket.init('app/id');
// Add to your HTML:

<script src="https://cdn.lr-ingest.com/LogRocket.min.js"></script>
<script>window.LogRocket && window.LogRocket.init('app/id');</script>

@container scroll-state: Replace JS scroll listeners nowCSS @container scroll-state lets you build sticky headers, snapping carousels, and scroll indicators without JavaScript. Here’s how to replace scroll listeners with clean, declarative state queries.

Explore 10 Web APIs that replace common JavaScript libraries and reduce npm dependencies, bundle size, and performance overhead.

Russ Miles, a software development expert and educator, joins the show to unpack why “developer productivity” platforms so often disappoint.

Discover what’s new in The Replay, LogRocket’s newsletter for dev and engineering leaders, in the February 18th issue.
Would you be interested in joining LogRocket's developer community?
Join LogRocket’s Content Advisory Board. You’ll help inform the type of content we create and get access to exclusive meetups, social accreditation, and swag.
Sign up now
2 Replies to "Using custom events in React"
Custom events are also known as “synthetic” events.
You need to check this statement. Synthetic events are react wrappers over native HTML events. Custom events are what you described in your article.
For unsubscribe to work you need to pass the initial function. So unsubscribe(“hideList”); need the pointer to the function.
So:
let f = setIsOpen(false);
subscribe(“hideList”, f);
and later:
return () => {
unsubscribe(“hideList”,f);
}