Editor’s note: This post was updated in August 2021 with relevant information that addresses common errors developers experience when using GitLab OAuth, as well as when naming files to create a dynamic API route with NextAuth.js.

Authentication is the act of proving that someone is who they say they are, such as confirming the identity of a user in an application, for example. In this tutorial, we’ll learn how to implement authentication in Next.js apps using NextAuth.js.
NextAuth.js is a library specifically designed to handle authentication solutions in Next.js apps. According to the documentation, “NextAuth.js is a complete open-source authentication solution for Next.js applications. It is designed from the ground up to support Next.js and Serverless.”
To follow along with this tutorial, you’ll need the following:
Nice-to-haves:
In this tutorial, we are going to build a basic authentication API using the built-in Next.js API routes. The authentication will consist of a passwordless email sign-in and open authentication with Google. Then we’ll look into securing API endpoints and protected pages.
All the code written in this tutorial is available on this GitHub repository.
Next.js has a handy CLI we can use to generate a starter project. To begin, install the CLI globally:
npm install -g create-next-app
Now, create a new Next.js app:
create-next-app next-authentication
When prompted to choose a template, choose the default starter app option and hit enter to continue.
Now change the directory to the newly created project folder:
cd next-authentication
Then, start the development server:
yarn dev
This should start the development server at http://localhost:3000.
Because we are going to work with several credentials, we need to hide them. Create a new file at the root of the project folder called .env.local and paste in this snippet:
NEXTAUTH_URL=http://localhost:3000
Notice that this is the same as the URL of our development server. If you have yours running on another port, then replace it. We’ll populate this file as we progress.
In this step, we are going to install the next-auth dependency and use API routes. API routes in Next.js allow us to create API endpoints without creating a custom server.
API routes run on one server during development, and when deployed, are deployed as sever-less functions that run independently of each other. Learn more about API routes in the documentation.
next-auth dependencyInstall next-auth by running the snippet below:
yarn add next-auth
npm install next-auth
Create a new file called […nextauth].js in pages/api/auth and paste this snippet into the newly created file:
// pages/api/auth/[...nextauth].js
import NextAuth from 'next-auth'

const options = {
  site: process.env.NEXTAUTH_URL
}

export default (req, res) => NextAuth(req, res, options)
Make sure that you have named your file as [...nextauth.js] and not [...nextAuth.js]. If you do so, you will receive an undefined error. Note how we used the spread operator in the name of the dynamic API route wrapped in square brackets. That’s because behind the scenes, all requests made to /api/auth/* (sign-in, callback, sign-out, etc.), will automatically be handled by NextAuth.js.
The site option is used by NextAuth.js as a base URL to work with, so all redirects and callback URLs will use http://localhost:3000 as their base URL. In production, for example, this should be replaced with the base URL of your website.
<Provider>According to the documentation: “Using the supplied React <Provider> allows instances of useSession() to share the session object across components, by using React Context under the hood. This improves performance, reduces network calls and avoids page flicker when rendering. It is highly recommended and can be easily added to all pages in Next.js apps by using pages/_app.js.”
So now, open pages/_app.js and replace it with this snippet:
// pages/_app.js
import { Provider } from 'next-auth/client'

export default function App({ Component, pageProps }) {
  return (
    <Provider session={pageProps.session}>
      <Component {...pageProps} />
    </Provider>
  )
}
In this code, we wrapped our application with the Provider component from NextAuth.js and passed in the session page prop. This is to avoid checking the session twice on pages that support both server and client-side rendering.
For email sign-in to work, we’ll need a database to store information about the user. As mentioned earlier, we’ll be using MongoDB as the database of choice, but feel free to use any other one.
Note: NextAuth.js requires a database if working with email sign-in. However, for OAuth, a database is not required.
Because we’ll be using MongoDB, we can create a database by running the following snippet:
Enter MongoDB shell:
mongosh
Create a new database called nextauth:
use nextauth
Our database connection string should look something like this:
mongodb://localhost:27017/nextauth.
Now open the .env.local file and add this snippet:
DATABASE_URL=mongodb://localhost:27017/nextauth
The last piece necessary for the database to work is the database driver. Luckily, all we need to do now is install mongodb as a dependency:
yarn add mongodb
npm install mongodb
If you’re using any other database, install the appropriate database driver by following this link.
Providers to NextAuth.jsNextAuth.js has a concept of providers, which define the services that can be used to sign in, such as email or OAuth.
To begin, import the Providers module and replace the options object with the following snippet in the pages/api/auth/[…nextauth].js:
// pages/api/auth/[…nextauth].js
// ...other imports
import Providers from 'next-auth/providers'

const options = {
  site: process.env.NEXTAUTH_URL,
  providers: [
    Providers.Email({
      server: {
        port: 465,
        host: 'smtp.gmail.com',
        secure: true,
        auth: {
          user: process.env.EMAIL_USERNAME,
          pass: process.env.EMAIL_PASSWORD,
        },
        tls: {
          rejectUnauthorized: false,
        },
      },
      from: process.env.EMAIL_FROM,
    })
  ],
  database: process.env.DATABASE_URL
}
Let’s break down what these new changes are:
First, we imported the Providers module, which gives us access to the different providers that NextAuth.js supports. Next, we introduced a new providers option, which is an array that takes a list of all the providers. For now, we passed the Email provider along with some options about our email server.
The email provider accepts either a connection string or a configuration object similarly to using Nodemailer to take care of sending confirmation emails based on the credentials passed above.
Learn more about configuring email providers here.
Note: In the above configuration, I used my Gmail account. If you choose to use yours, then you might need to enable less secure apps. Later on, request an app password so that you can link your Gmail account with NextAuth. If not, then provide credentials from your email server.
Moving forward, the database option takes in the connection string to our database created earlier.
From the snippet above, we referenced a few new variables, so add them by pasting this snippet in .env.local file:
EMAIL_FROM=YOUR NAME <[email protected]>
[email protected]
EMAIL_PASSWORD=your_app_password
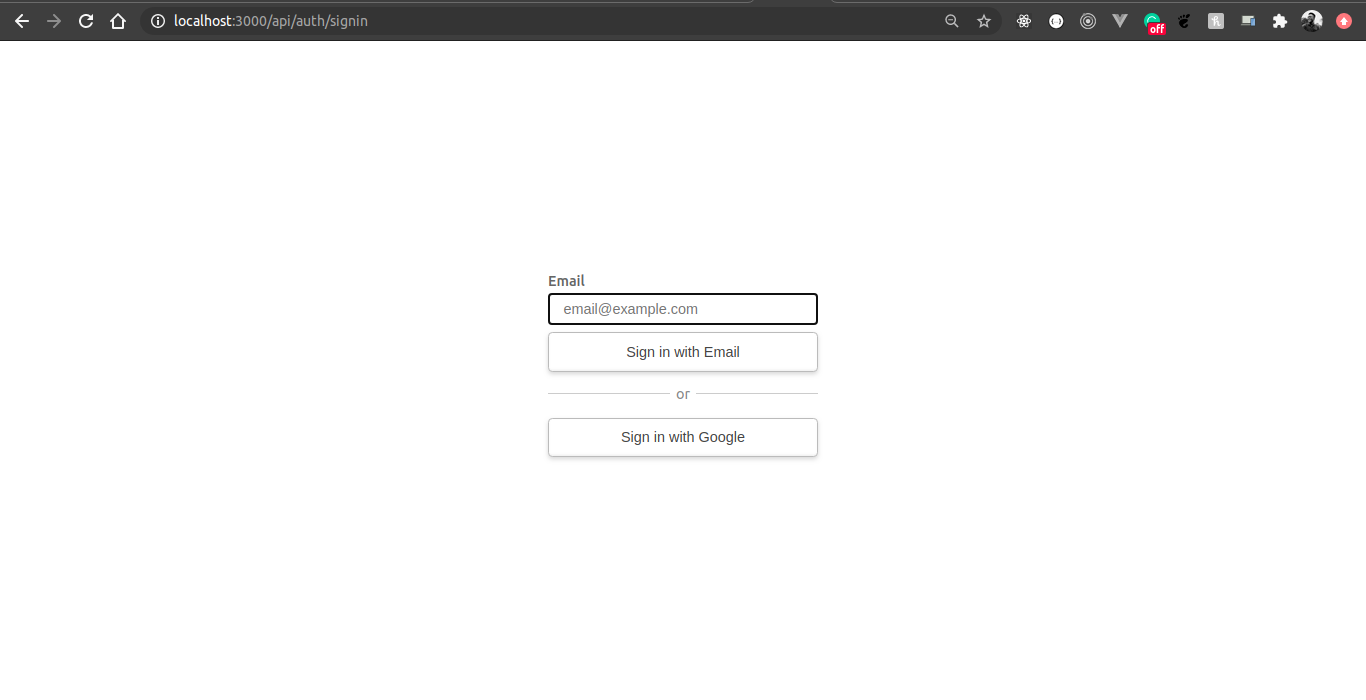
At this point, we need to restart our server to allow those new environment variables to take effect. Once that’s done, we need to navigate to http://localhost:3000/api/auth/signin to see the sign-in screen.
It should look like this:
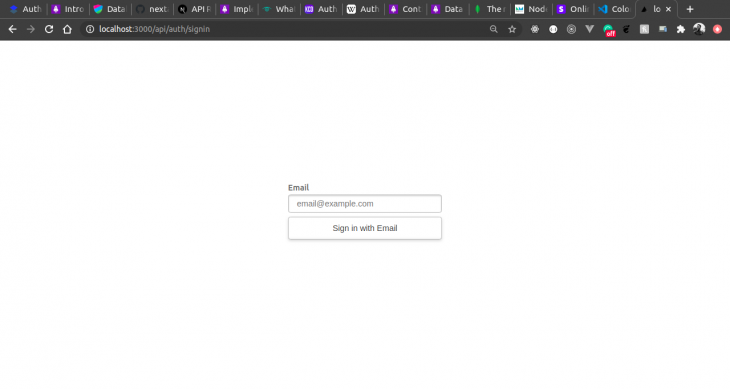
By default, NextAuth.js comes baked with a minimal UI that shows sign-in options based on the authentication providers provided during configuration.
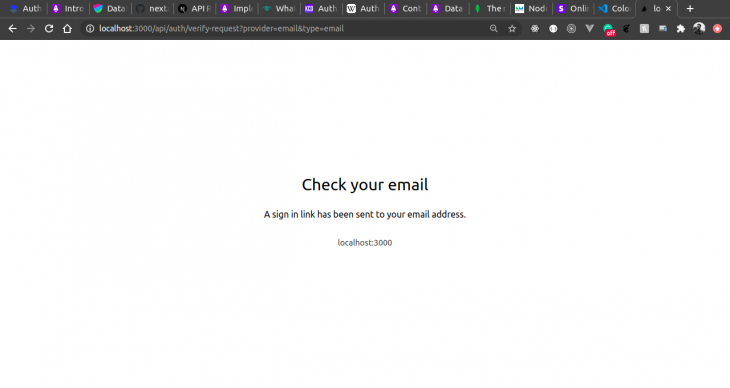
After submitting the form, we should be redirected to a success page and receive an email with a verification token if that’s the first sign-in with that email. If not, we’ll receive a sign-in email link.
This is what the success page should look like:
And here’s what the verification email should look like.
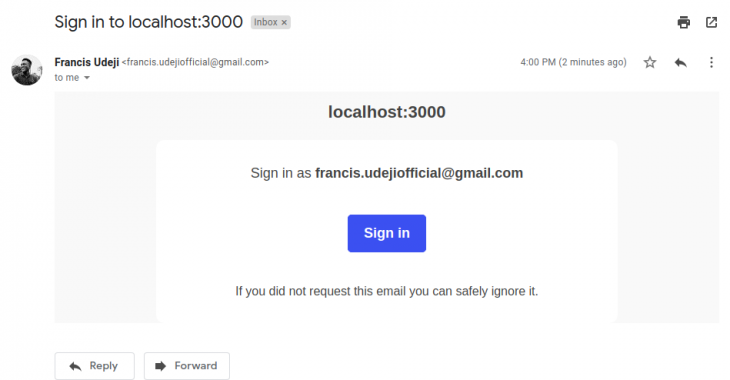
Clicking on the sign-in link should take us to the homepage by default.
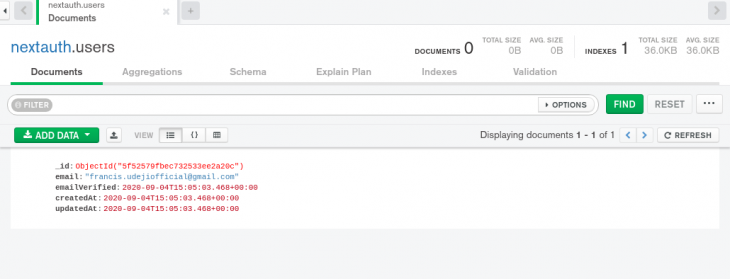
In the next section, we’ll look at how to display the current user information. If we take a look at our database now, we’ll see a new entry with information about the signed-in user:
In this section, we’re going to use the session data to display information about the current user. It’s worth noting that, by default, NextAuth.js uses database sessions for email sign-in and JWT for OAuth.
To enable JWT when using email sign-in, we need to add that option to our API route. To do so, add this snippet to the options object in pages/api/[...nextauth].js:
 session: {
  jwt: true,
  maxAge: 30 * 24 * 60 * 60 // the session will last 30 days
},
This option tells NextAuth.js to use JWT for storing user sessions, and that the session should last for 30 days. For more information about the possible options, refer to the documentation.
Now, to get the session data in our app, we either choose to use the useSession hook on the client side or the getSession function on the server side.
Next, open pages/index.js and replace the current content with this snippet:
// pages/index.js
import { signIn, signOut, useSession } from 'next-auth/client'
export default function Page() {
const [session, loading] = useSession()
if (loading) {
return <p>Loading...</p>
}
return (
<>
{!session && (
<>
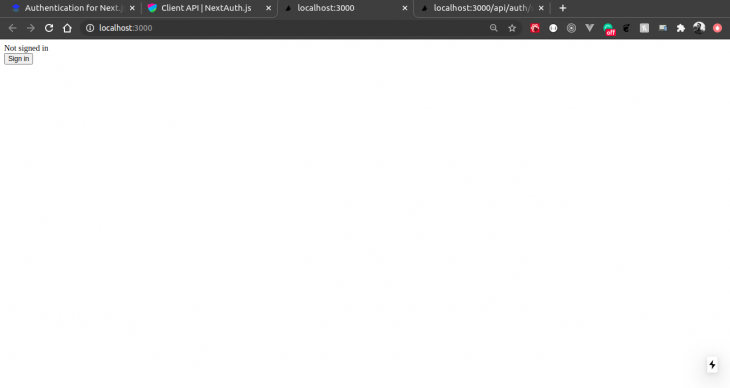
Not signed in <br />
<button onClick={signIn}>Sign in</button>
</>
)}
{session && (
<>
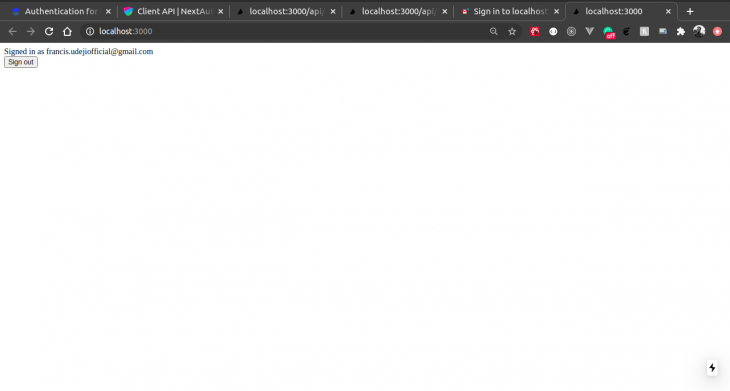
Signed in as {session.user.email} <br />
<button onClick={signOut}>Sign out</button>
</>
)}
</>
)
}
In this snippet, we imported a few functions: signIn, signOut, and useSession. The first two, as you might have guessed, are used for signing in a user and signing out a signed-in user.
The useSession hook returns a tuple containing the session and a loading state. We used the loading state to display a loading text and conditionally render a sign-in or sign-out button, as well as user data, depending on whether the user is currently signed in or not.
Here are previews of the homepage with and without a signed-in user:
Now that we have implemented email sign-in, we can use the user session to grant or deny access to any page we want. We also have the option of doing this on the server or on the client side.
To take advantage of route protection using SSR, we can use the getSession function instead. To begin, create a new file called dashboard.js in the pages folder and paste the following snippet:
// pages/dashboard.js
import { getSession } from 'next-auth/client'

export default function Dashboard({ user }) {
  return (
    <div>
      <h1>Dashboard</h1>
      <p>Welcome {user.email}</p>
    </div>
  )
}

export async function getServerSideProps(ctx) {
  const session = await getSession(ctx)
  //if no session found(user hasn’t logged in)  if (!session) {
    return {
     redirect: {
     destination: ‘/’, //redirect user to homepage
     permanent: false,
     }
    }
   }
  return {
    props: {
      user: session.user,
    },
  }
}
To server render a page in Next.js, we need to export an async function called getServerSideProps. This function receives a context argument, and by passing the context to the getSession function, we get back the session. To learn more about SSR in Next, read the documentation.
If there’s no session, we simply redirect the user back to the home page, else we return an object with a user prop. This contains user info like their email and full name.
Finally, on the Dashboard component, we accessed the user prop that contains the user data.
To begin, create a new file called profile.js in the pages folder and paste this snippet:
// pages/profile.js
import { useSession } from 'next-auth/client'
import dynamic from 'next/dynamic'

const UnauthenticatedComponent = dynamic(() =>
  import('../components/unauthenticated')
)
const AuthenticatedComponent = dynamic(() =>
  import('../components/authenticated')
)

export default function Profile() {
  const [session, loading] = useSession()

  if (typeof window !== 'undefined' && loading) return <p>Loading...</p>

  if (!session) return <UnauthenticatedComponent />

  return <AuthenticatedComponent user={session.user} />
}
This is somewhat similar to what we had in the pages/index.js file, but this time, we are taking advantage of code-splitting by lazy loading both the AuthenticatedComponent and the UnauthenticatedComponent.
Here’s a rundown of what this snippet does:
First, we imported the useSession hook, then we imported a special function in Next.js called dynamic. This function is what enables us to dynamically import any component. Because our app will always be in one of two states — authenticated or unauthenticated — we don’t need to import both components if only one is going to be used at a time.
Next, we destructured the session and loading state and used the session to dynamically render to the DOM.
Finally, we rendered a loading text while NextAuth.js is still loading, and either the AuthenticatedComponent or UnauthenticatedComponent, depending on if we have a session.
Now, create a new folder called components and two files: authenticated.js and unauthenticated.js.
In authenticated.js, paste this snippet:
// components/authenticated.js
import { signOut } from 'next-auth/client'

export default function Authenticated({ user }) {
  return (
    <div>
      <p>You are authenticated {user.email}</p>
      <button onClick={signOut}>Sign Out</button>
    </div>
  )
}
In the unauthenticated.js file, paste this snippet:
// components/unauthenticated.js
import { signIn } from 'next-auth/client'

export default function Unauthenticated() {
  return (
    <div>
      <p>You are not authenticated</p>
      <button onClick={signIn}>Sign In</button>
    </div>
  )
}
In components/authenticated.js, we imported the signOut function and destructured the user prop passed from pages/profile.js. We also displayed the user data and sign out button for signing out the user.
In components/unauthenticated.js, we displayed a message to the user. When the user clicks on the sign in button, we call the signIn function imported above.
We can also extend our authentication service to Next.js’s API routes. It’ll be similar to what we did with server-side rendering and can be useful for allowing API access to only authenticated users.
To start, create a new file called data.js in pages/api and paste this snippet:
// pages/api/data.js
import { getSession } from 'next-auth/client'

export default async (req, res) => {
  const session = await getSession({ req })

  if (session) {
    res.status(200).json({
      message: 'You can access this content because you are signed in.',
    })
  } else {
    res.status(403).json({
      message:
        'You must be sign in to view the protected content on this page.',
    })
  }
}
Any file that exports a default async function and is created in the page/api folder will automatically be an API route. In this case, this file will be mapped to http://localhost:3000/api/data.
In this snippet, we imported the getSession function and passed in the request object acquired from our API route. From there, NextAuth.js takes care of reading the cookies. Finally, we returned a message to the user based on the availability of the session.
To test this, we can create a GET request to http://localhost:3000/api/data to get back a response.
NextAuth.js has many built-in providers out of the box. Unlike the email provider, we don’t need a database to use them. In this section, we’re going to create an app on Google’s developer console and obtain our client ID and secret.
If you’re already familiar with creating apps on these platforms, then you can skip ahead to the “Handling page redirects” section.
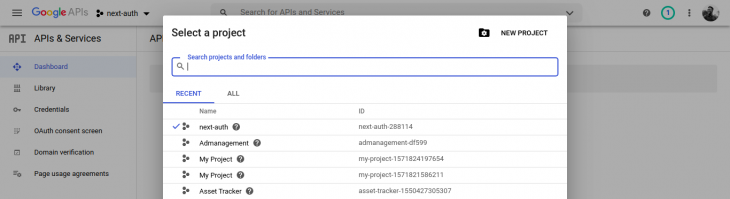
To enable sign in with Google, we need to create a new project on the developer console, sign in with our Google account, and create a new app by clicking the NEW PROJECT button on the modal.
It should look something like this:
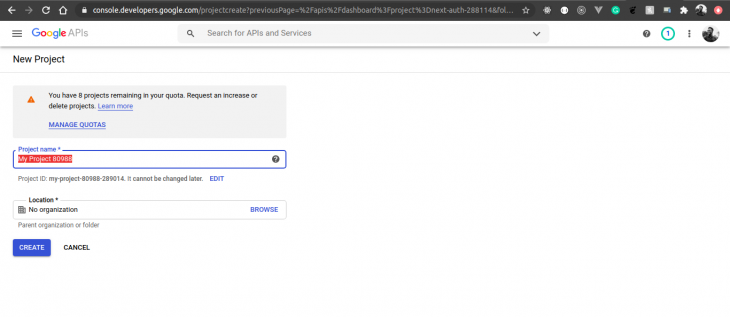
Next, we need to give our project a name and click the CREATE button:
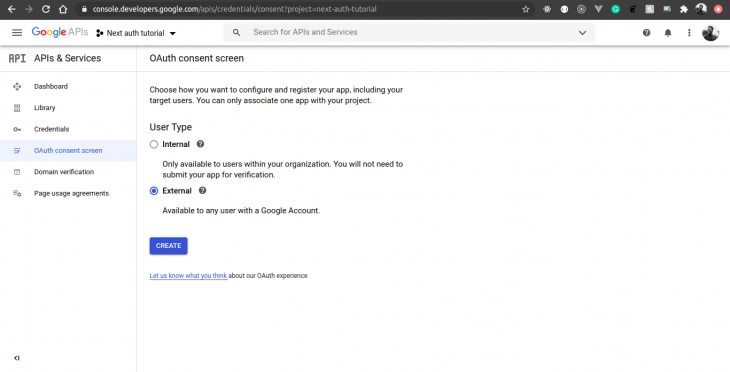
Next, click on the CONFIGURE CONSENT SCREEN button:
Then, check the External checkbox, and then click the CREATE button. Here’s the screen:
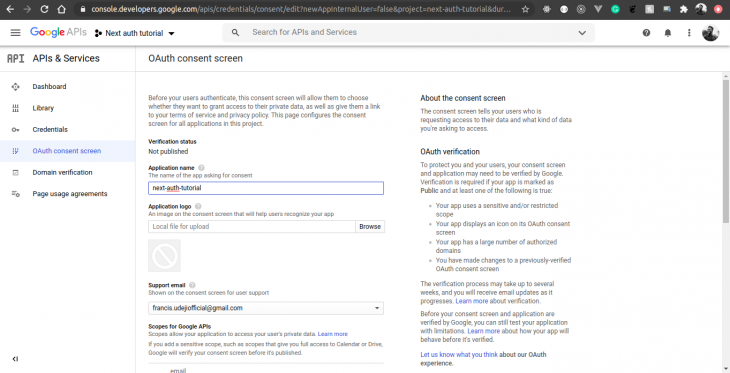
For the next step, we need to give our app a name. Once that’s done, click the Save button.
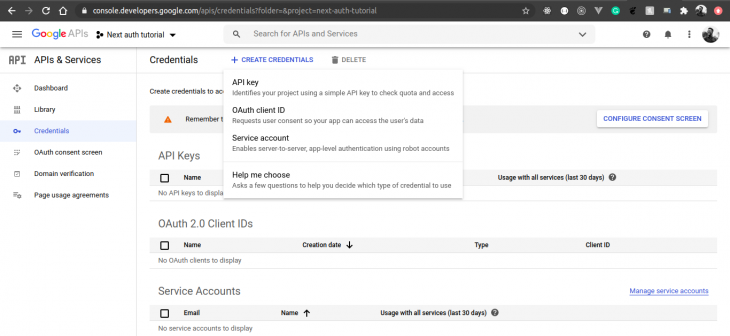
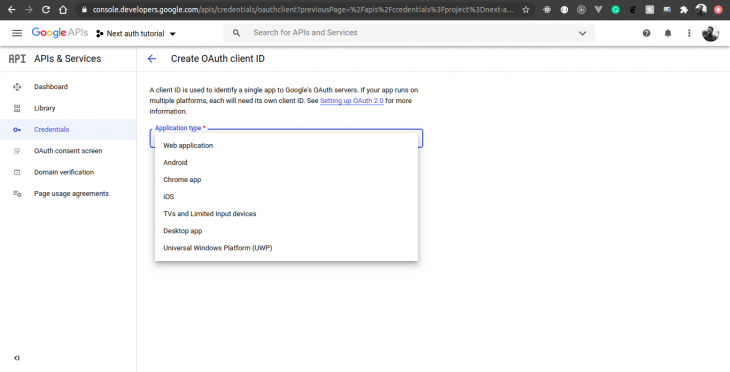
Now we need to go back to the credentials page, click on the CREATE CREDENTIALS drop-down button, and choose OAuth client ID:

Select Web Application as the application type:
Fill in the form like in the screenshot below:
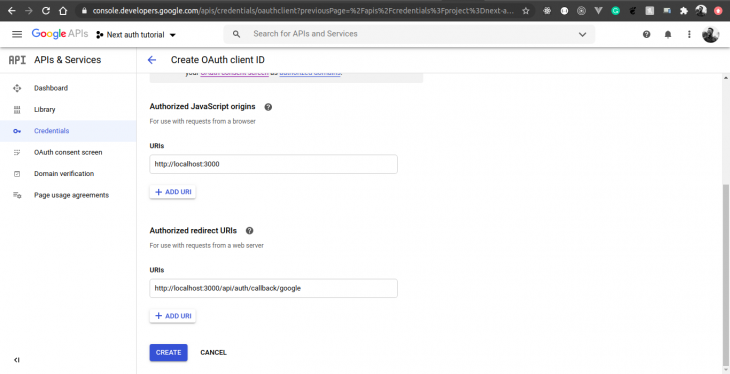
Here, we added our app’s base URL and the callback URL NextAuth.js expects for Google OAuth. Using another service like GitHub would mean we’d need to replace “/callback/google” with “/callback/github.”
After clicking on the CREATE button, a modal should pop up with our credentials, like so:

All we need to do now is add these as environment variables and register a new provider.
Open the .env.local lo file and paste this snippet:
GOOGLE_ID=YOUR_GOOGLE_ID
GOOGLE_SECRET=YOUR_GOOGLE_SECRET
Open pages/api/auth/[nextauth].js file and add this snippet in the providers array:
 Providers.Google({
  clientId: process.env.GOOGLE_ID,
  clientSecret: process.env.GOOGLE_SECRET,
}),
We’ll need to restart our app to see the new changes. After a restart, our sign-in page should now look like this.
With this, we should be able to log in with our Google accounts. From here on out, adding a new provider should be as easy as creating an app on the platform, obtaining credentials, and adding it to the list of providers.
Next.js provides a way to customize callbacks in our app. One of these callbacks is the redirect callback. This is called any time a user is redirected to a callback, such as sign in and sign out, for example.
But why do we care about this? Well, do you notice how any time we sign in, we get redirected back to the home page? Let’s change that to go to the /profile page we created earlier.
To handle this, we’ll need to hook into NextAuth.js’ callbacks option and modify only the redirect function. Add this snippet to the options object in pages/api/auth/[…nextauth].js:
// ...other options
callbacks: {
    redirect: async (url, baseUrl) => {
      if (url === '/api/auth/signin') {
        return Promise.resolve('/profile')
      }
      return Promise.resolve('/api/auth/signin')
    },
},
The redirect function takes two parameters: url and baseUrl. But for this example, we don’t care about the second parameter. This function also expects that we return a promise.
Now, check to see that we are currently on the sign-in page. If so, then we need to go to the /profile page, otherwise we are sent back to the sign-in page.
Sometimes GitLab OAuth gives a callback error. Make sure that you have enabled the read_user and email scopes on the Applications page. Furthermore, make sure that your GitLab config matches NextAuth’s config. This will allow you to successfully enable OAuth for your app. If it still doesn’t work, look at this solution in this GitHub issue.
In this tutorial, we learned how to implement email and OAuth authentication using Next.js and NextAuth.js in our application. In the process, we used the session data to protect pages on both the client and server sides. After reading this, hopefully adding authentication in a brand-new or existing Next.js app is now seamless.
NextAuth.js comes baked in with many features not covered in this tutorial. A great next step to take is to add more OAuth providers and customize the design of the sign-in page by following this guide.
Debugging Next applications can be difficult, especially when users experience issues that are difficult to reproduce. If you’re interested in monitoring and tracking state, automatically surfacing JavaScript errors, and tracking slow network requests and component load time, try LogRocket.
LogRocket captures console logs, errors, network requests, and pixel-perfect DOM recordings from user sessions and lets you replay them as users saw it, eliminating guesswork around why bugs happen — compatible with all frameworks.
LogRocket's Galileo AI watches sessions for you, instantly identifying and explaining user struggles with automated monitoring of your entire product experience.
The LogRocket Redux middleware package adds an extra layer of visibility into your user sessions. LogRocket logs all actions and state from your Redux stores.


Modernize how you debug your Next.js apps — start monitoring for free.

Learn how to protect full-stack projects from NPM supply chain attacks with a practical security checklist.

Explore 15 essential MCP servers for web developers to enhance AI workflows with tools, data, and automation.

Learn how contrast-color() automatically picks accessible text colors using native CSS, without JavaScript.

Learn how to build a harness-style AI workflow using Claude Code with specialized Dev, QE, and Ops subagents, gated handoffs, MCP telemetry, and LEARNING.md.
Hey there, want to help make our blog better?
Join LogRocket’s Content Advisory Board. You’ll help inform the type of content we create and get access to exclusive meetups, social accreditation, and swag.
Sign up now

