Flutter helps us create beautiful mobile applications for multiple platforms with a single codebase. Isn’t that awesome? Yes, it is.

Designers and developers favor using a custom font to give their app a distinct appearance that helps in building brand awareness and a better product altogether.
Roboto and San Fransisco are the default font family for Android and iOS, respectively. You might have a custom-created font from a designer, or you might have downloaded a font from any other resource like Google Fonts. Either way, you will have to download the font file (.ttf ) and import it to your Flutter project.
In this article, you’ll learn how to add custom a font to your project by creating a basic Flutter app that displays texts with different font styles.
Follow these steps to begin with fonts in Flutter:
pubspec.yamlLet’s get started by downloading a custom font from Google Fonts. In this example, we’ll use the Montserrat font. You might have gotten a custom font file from a designer or somewhere else. But in this tutorial, we will be downloading the .ttf font file from Google Fonts. Google Fonts is a catalog containing fonts published under licenses that allow you to use them on any website or an app for commercial or personal use.
Follow these steps to download the font file:
After downloading, we need to add the font files to our Flutter project. Create a folder named fonts in the root of the Flutter project.
You need to structure the folder like this:
my_app/
  lib
  fonts/
    Montserrat-Regular.ttf
Next, move the Montserrat font files or .ttf files into the fonts folder that you just created.
N.B., you will see many fonts files after unzipping but only copy Monserrat-Regular.ttf, Monserrat-Italic.ttf, Monserrat-Bold.ttf for this tutorial. Later you can experiment with as many variants as you want.
So now after importing the font files into our Flutter project, we need to add them to our pubspec.yaml. By declaring the font in the pubspec.yaml, you tell Flutter to register this font and remember it so that you can use it all over the project.
You need to follow a specific structure while declaring the font in the pubspec.yaml:
Follow the below structure to declare the font:
flutter:
  fonts:
    - family: Montserrat
      fonts:
        - asset: fonts/Montserrat-Regular.ttf
        - asset: fonts/Montserrat-Italic.ttf
          style: italic
        - asset: fonts/Montserrat-Bold.ttf
          weight: 700
Keep these things in mind while declaring fonts in the pubspec 🤓:
family determines the name of the font and it should be unique for different font familiesasset is the path of the font from the root of the projectweight property represents the weight of the font, an integer value from 100 to 900style property specifies whether the font is normal or italicHint: After adding a font in the pubspec.yaml, always restart the app from the cold. 🔥
Up until now you have successfully imported and added the font. In the next step, you will see how to use the font in the project.
Now it’s time for the real action. After all those steps, you’re set up to start using the custom font and make a custom-tailored app.
Let’s see how to use the custom font in a Text widget:
import 'package:flutter/material.dart';
import 'package:flutter/cupertino.dart';
void main() => runApp(MyApp());
class MyApp extends StatelessWidget {
@override
Widget build(BuildContext context) {
return const MaterialApp(
home: Scaffold(
body: SafeArea(
child: Center(
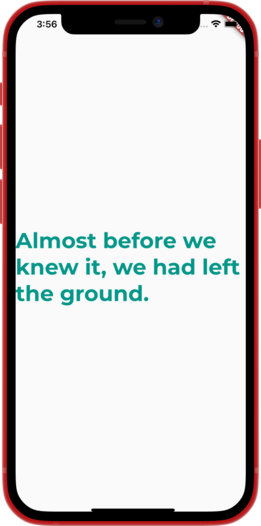
child: Text(
'Almost before we knew it, we had left the ground.',
style: TextStyle(
fontFamily: 'Montserrat',
fontSize: 36.0,
color: Colors.teal,
fontWeight: FontWeight.bold,
),
),
),
),
),
);
}
}
Result:
You need to use TextStyle to add style to a Text widget. TextStyle takes a fontFamily parameter that is the name of the font that you earlier added in the pubspes.yaml (here Montserrat). Other parameters like fontSize, color, and fontWeight declare the size of the font, color of the font, and weight of the font, respectively.
Instead of declaring the font separately in each Text widget, you can also make a font app-level that will be implemented throughout the app.
By declaring the font in the MaterialApp‘s theme property, you can apply the custom font to the entire app.
Here’s how you add do it 😎:
class MyApp extends StatelessWidget {
  const MyApp({Key? key}) : super(key: key);
  @override
  Widget build(BuildContext context) {
    return MaterialApp(
      title: 'Flutter Demo',
      theme: ThemeData(
        primarySwatch: Colors.blue,
        fontFamily: 'Montserrat',
      ),
      home: const HomePage(),
    );
  }
}
In the above example, we added Montserrat as the default font family for our app. Every Text widget that you’ll add will now be using Montserrat as their font. Configuring fontWeight and fontStyle to bold and italic will use the Montserrat font that you added for italic and bold in pubspec.yaml.
Here’s a complete example of using different variations of the Montserrat font:
import 'package:flutter/material.dart';
import 'package:flutter/widgets.dart';
void main() {
runApp(const MyApp());
}
class MyApp extends StatelessWidget {
const MyApp({Key? key}) : super(key: key);
@override
Widget build(BuildContext context) {
return MaterialApp(
title: 'Flutter Demo',
theme: ThemeData(
primarySwatch: Colors.blue,
fontFamily: 'Montserrat',
),
home: const HomePage(),
);
}
}
class HomePage extends StatelessWidget {
const HomePage({Key? key}) : super(key: key);
@override
Widget build(BuildContext context) {
return Scaffold(
body: Center(
child: Column(
mainAxisAlignment: MainAxisAlignment.center,
children: const [
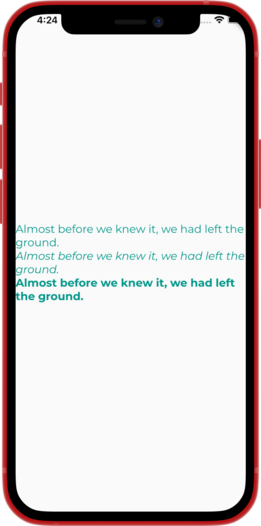
Text(
"Almost before we knew it, we had left the ground.",
style: TextStyle(
fontSize: 18.0,
color: Colors.teal,
),
),
Text(
"Almost before we knew it, we had left the ground.",
style: TextStyle(
fontStyle: FontStyle.italic,
fontSize: 18.0,
color: Colors.teal,
),
),
Text(
"Almost before we knew it, we had left the ground.",
style: TextStyle(
fontWeight: FontWeight.bold,
fontSize: 18.0,
color: Colors.teal,
),
),
],
),
),
);
}
}
Result:
At times either your designer or you may want to add multiple fonts in your app to make it more vibrant, expressive, and better looking.
To add another font in the pubspec.yaml, just do the following :
pubspec.yaml:
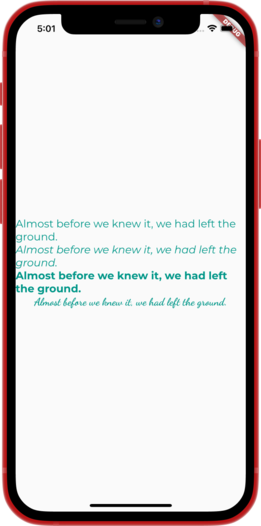
Text widget in the ColumnAfter adding a Text widget that uses DancingScript, here’s how the HomePage widget will look:
class HomePage extends StatelessWidget {
  const HomePage({Key? key}) : super(key: key);
  @override
  Widget build(BuildContext context) {
    return Scaffold(
      body: Center(
        child: Column(
          mainAxisAlignment: MainAxisAlignment.center,
          children: const [
            Text(
              "Almost before we knew it, we had left the ground.",
              style: TextStyle(
                fontSize: 18.0,
                color: Colors.teal,
              ),
            ),
            Text(
              "Almost before we knew it, we had left the ground.",
              style: TextStyle(
                fontStyle: FontStyle.italic,
                fontSize: 18.0,
                color: Colors.teal,
              ),
            ),
            Text(
              "Almost before we knew it, we had left the ground.",
              style: TextStyle(
                fontWeight: FontWeight.bold,
                fontSize: 18.0,
                color: Colors.teal,
              ),
            ),
            Text(
              "Almost before we knew it, we had left the ground.",
              style: TextStyle(
                fontFamily: 'DancingScript',
                fontWeight: FontWeight.bold,
                fontSize: 18.0,
                color: Colors.teal,
              ),
            ),
          ],
        ),
      ),
    );
  }
}
Result:
In this tutorial, you learned how you can use custom fonts in a Flutter project.
Another way to use fonts from Google Fonts is by using the google_fonts package. The google_font package can fetch the .ttf or font files once via http at runtime, and cache it in the app’s file system instead of storing it in the fonts folder and declaring the font in the pubspec.yaml. I’m excited to see what you all come up with all this learning.
Good luck! Happy Fluttering! 👨💻
If you have any questions, feel free to post them 👇.
Any feedback is welcome 😃.
If you enjoyed this article, you can support us by sharing it with your friends.
Install LogRocket via npm or script tag. LogRocket.init() must be called client-side, not
server-side
$ npm i --save logrocket

// Code:

import LogRocket from 'logrocket';
LogRocket.init('app/id');
// Add to your HTML:

<script src="https://cdn.lr-ingest.com/LogRocket.min.js"></script>
<script>window.LogRocket && window.LogRocket.init('app/id');</script>
Would you be interested in joining LogRocket's developer community?
Join LogRocket’s Content Advisory Board. You’ll help inform the type of content we create and get access to exclusive meetups, social accreditation, and swag.
Sign up now
This guide walks you through creating a web UI for an AI agent that browses, clicks, and extracts info from websites powered by Stagehand and Gemini.

This guide explores how to use Anthropic’s Claude 4 models, including Opus 4 and Sonnet 4, to build AI-powered applications.

Which AI frontend dev tool reigns supreme in July 2025? Check out our power rankings and use our interactive comparison tool to find out.

Learn how OpenAPI can automate API client generation to save time, reduce bugs, and streamline how your frontend app talks to backend APIs.


