
Vue.js is a popular frontend JavaScript framework that helps us build straightforward and fast UIs and SPAs. It also allows us to extend our HTML by using HTML attributes, also known as directives. These directives can be built-in, or they can be custom directives predefined by the user.

For this article, we will discuss touch events, which are triggered by users on touchscreen devices like mobile phones or tablets. This article will explain what touch events are, the types of touch events available, and how to implement touch events in Vue.js for Android and iOS.
Let’s get started.
Jump ahead:
The Replay is a weekly newsletter for dev and engineering leaders.
Delivered once a week, it's your curated guide to the most important conversations around frontend dev, emerging AI tools, and the state of modern software.
Touch events can interpret pointer activities from a finger or stylus on touch surfaces, like touch screens or trackpads. They listen for touch points or interactions between the user and the touch surface, including when the user’s finger touches, moves, or leaves the screen. They do not work on non-touchscreen devices.
Unlike mouse events, which listen for interactions happening in the same instance, touch events can listen for simultaneous or multi-touch interactions. For example, they can listen for two-finger gestures, like pinching, or an advanced movement, like flickering.
The event starts when the pointer touches the surface and ends when the pointer leaves. During this event, an application receives all the properties relating to the touch events during the start, move, and end phases. The properties we can access during any event are:
identifier: A unique identifier for a specific event. It is used to track multi-touch eventsscreenX / screenY: The x and y coordinates of the touch pointer in the screen coordinatespageX / pageY: The x and y coordinates of the touch pointer in the page coordinates (including scrolling)clientX / clientY: The x and y coordinates of the touch pointer relative to the browser viewport (not including scrolling)radiusX / radiusY / rotationAngle: These describe the area covered by the touch pointertarget: The element touched by the pointer, such as a p elementforce: The amount of pressure applied to the surface by the user. It ranges from 0.0 (no pressure) and 1.0 (maximum pressure)If multi-touch points are active simultaneously, all the properties relating to each touch point are collected and stored in a TouchList array and tracked with the identifier property. Before we listen to touch events, let’s understand what some of these events are.
Touchstart: This event is triggered when one or more touch points are on the touch surfaceTouchmove: This occurs when one or more touch points move along the touch surfaceTouchend: This triggers when one or more touch points leave the touch surfaceTouchcancel: Occurs when one or more touch points get disrupted in an implementation-specific mannerTap: Is triggered when a user briefly touches the touch surfaceDoubleTap: This event is triggered when a user rapidly touches the touch surface twiceDrag: This triggers when a user drags a touch point from one point to another over the surface without losing contactFlick/Swipe: This event is triggered when a user quickly brushes the surfaceThere are several interactions that can occur on a touch surface. This article will focus on the most common ones, which are the events users perform regularly; tap, drag, swipe, and press. You can refer to these touch gesture cards created by Luke Wroblewski to learn about other interactions and their functionalities.
Listening for touch events is the same as listening for any event in an element. You add an event listener to the touch event you want to listen for, then call the desired function when that event is triggered. Here’s an example:
<body>
<p>This is a paragraph</p>

<script>
      document.querySelector('p').addEventListener('touchstart', myFunction);

                  function myFunction(e) {
                          console.log(e.touches, e.type);
                  }
</script>
</body>
You can also listen for touch events on any mobile browser and iOS or Android. Listening for touch events in Vue.js is the same process as listening for any event in Vue.js. You add an event listener relating to the touch event you want to listen for and call the function you want to run when that event is triggered:
<MyComponent
    @touchstart="startDrag(item)"
    @touchmove="moveDrag(item)"
    @touchend="endDrag(item)"
/>

…

methods: {
    startDrag(item) {
        // do something on touchstart
     },
     moveDrag(item) {
        // do something on touchmove
     },
     endDrag(item) {
        // do something on touchend
     },
},
As I mentioned earlier, the web browser only gives us access to the touchstart, touchend, touchmove, and touchcancel events. You need to write a custom function to listen to custom touch events. Luckily, we have a few npm packages that already handle these event functions for us — the vue3-touch-events and Hammer.js plugins. We will use the vue3-touch-events package in this article.
The vue3-touch-events package lets us listen for events like tap, swipe, hold, and drag on any HTML DOM element in Vue 3. If you are using Vue 2, you will use the vue2-touch-events package.
First, create your Vue.js app by opening your terminal and running the command vue create touch-events, then install the vue3-touch-events package using the command yarn add vue3-touch-events or npm install vue3-touch-events, depending on the package manager you use.
Open the app in your preferred code editor and run the command yarn serve or npm run dev to view the app in your browser.
In your App.vue file, replace its current code with the following:
<template>
  <button
    class="btn"
    @touchstart="nameCurrentEvent('touchstart')"
    @touchmove="nameCurrentEvent('touchmove')"
    @touchend="nameCurrentEvent('touchend')"
    >Touch me</button
  >
  <p class="output"
    >Current Touch Event:
    <span class="event">{{ name }}</span>
  </p>
</template>

<script>
export default {
  name: "App",
  data() {
    return {
      name: "none",
    };
  },
  methods: {
    nameCurrentEvent(name) {
      this.name = name;
      console.log(name);
    },
  },
};
</script>

<style>
#app {
  font-family: Avenir, Helvetica, Arial, sans-serif;
  -webkit-font-smoothing: antialiased;
  -moz-osx-font-smoothing: grayscale;
  text-align: center;
  color: #2c3e50;
  margin-top: 60px;
}
.btn {
  border: 2px solid rgb(71, 197, 255);
  background-color: rgb(246, 244, 244);
  border-radius: 5px;
  width: 150px;
  height: 100px;
  font-size: 1rem;
  margin: auto;
  display: flex;
  align-items: center;
  justify-content: center;
}
.event {
  border-bottom: 1px solid rgb(71, 197, 255);
  color: rgb(113, 113, 113);
}
</style>
Looking at the code above, we created a button element with three event listeners on it: touchstart, touchmove, and touchend. These will call the same function, nameCurrentEvent, whenever its event is triggered. The event’s name, when triggered, is stored in a variable called name, and the function outputs name on the screen.
This is the outcome when we view it in the browser:

To view the same web app on your phone simultaneously, copy the Network Url created for you in the terminal where you ran yarn serve and paste the link into your phone browser. The link should look something like http://000.000.00.00/8080:
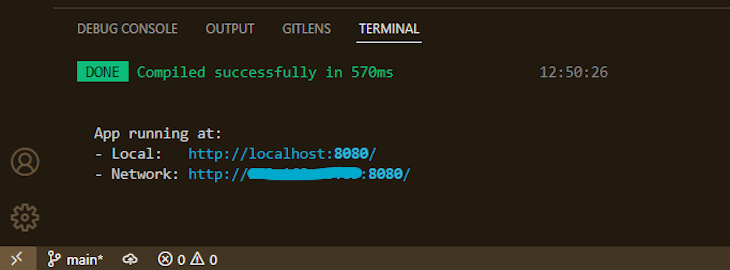
So, in your mobile browser, we will have the following:
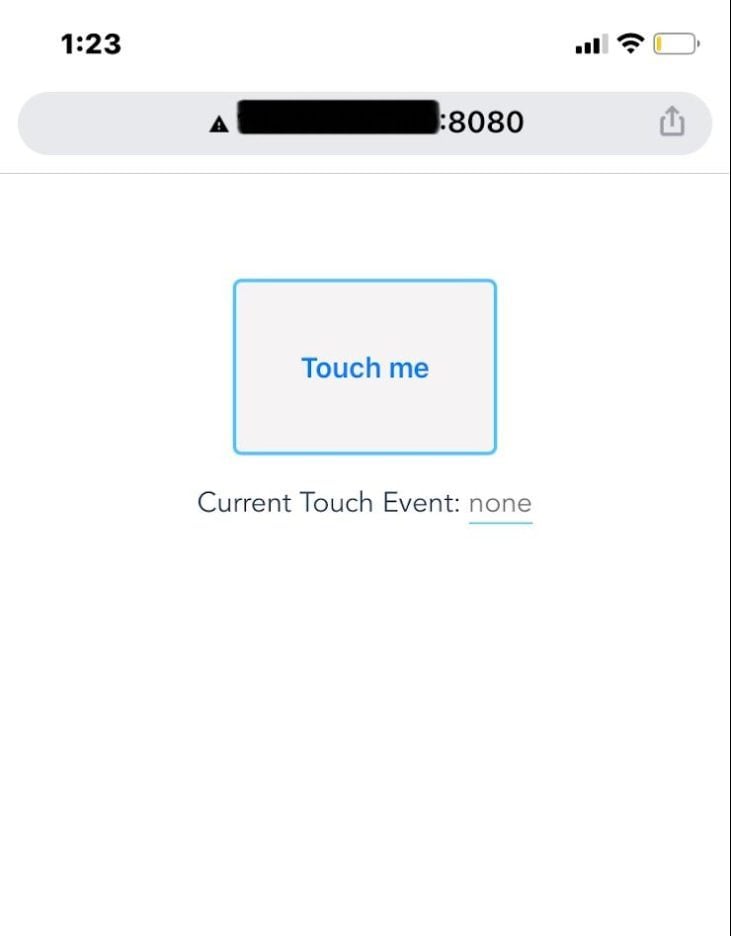
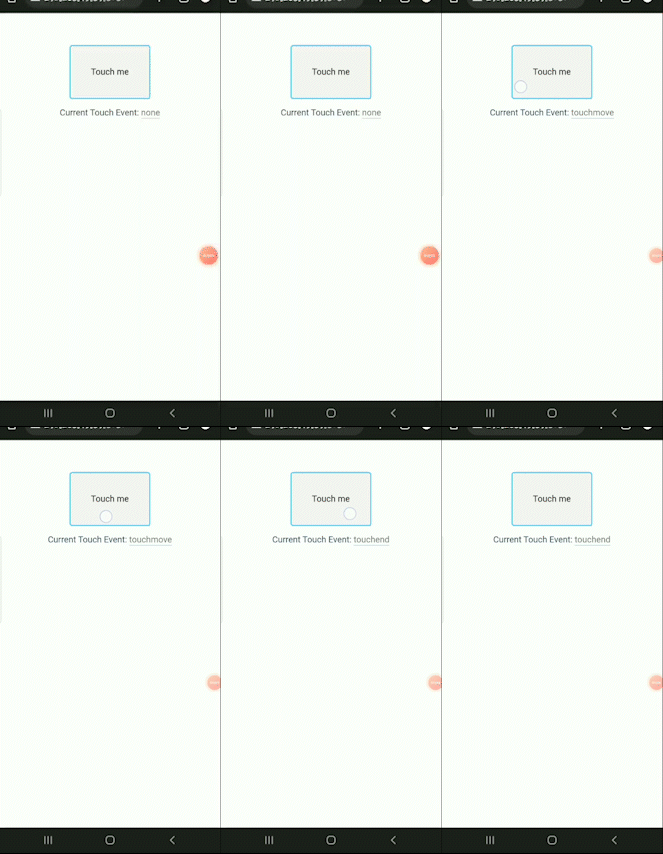
Now, interacting with the button on our mobile phone, we should see our name value go from none to touchstart when our finger touches the button. Then, when we move our finger from one point in the button to another, we will see touchmove, then touchend when our finger leaves the screen.
Note that you can only test this code on a touchscreen device:
Using vue3-touch-events to listen to custom events is relatively easy. Because we already installed the plugin, we register the plugin inside our main.js file:
import { createApp } from "vue";
import App from "./App.vue";
import Vue3TouchEvents from "vue3-touch-events";

createApp(App).use(Vue3TouchEvents).mount("#app");
Then, in Vue, we add the touch events to our elements using the v-touch directive. So let’s add the attached functions we want to run when the touch event is triggered. Going into App.js, we modify our current code:
<template>
  <div class="grid-cntr">
    <button
      class="btn"
      @touchstart="nameCurrentEvent('touchstart')"
      @touchmove="nameCurrentEvent('touchmove')"
      @touchend="nameCurrentEvent('touchend')"
      >Touch me</button
    >
    <button class="btn" v-touch:tap="onTapItem">Tap me</button>
    <button class="btn" v-touch:swipe="onSwipeItem">Swipe any direction</button>
    <button class="btn" v-touch:swipe.left="onSwipeLeftItem">Swipe left</button>
    <button class="btn" v-touch:drag="onDragItem">Drag me</button>
    <button class="btn" v-touch:press="onPressItem">Press me</button></div
  >

  <p class="output"
    >Current Touch Event:
    <span class="event">{{ name }}</span>
  </p>
</template>

<script>
export default {
  name: "App",
  data() {
    return {
      name: "none",
    };
  },
  methods: {
    nameCurrentEvent(name) {
      this.name = name;
    },
    onTapItem() {
      return (this.name = "tapped");
    },
    onSwipeItem() {
      return (this.name = "swiped");
    },
    onSwipeLeftItem() {
      return (this.name = "swiped left");
    },
    onDragItem() {
      return (this.name = "dragged");
    },
    onPressItem() {
      return (this.name = "pressed");
    },
  },
};
</script>

<style>
#app {
  font-family: Avenir, Helvetica, Arial, sans-serif;
  -webkit-font-smoothing: antialiased;
  -moz-osx-font-smoothing: grayscale;
  text-align: center;
  color: #2c3e50;
  margin-top: 60px;
}
.grid-cntr {
  display: grid;
  grid-template-columns: 1fr 1fr 1fr;
  max-width: 500px;
  margin: auto;
}
.btn {
  border: 2px solid rgb(71, 197, 255);
  background-color: rgb(246, 244, 244);
  border-radius: 5px;
  height: 100px;
  font-size: 1rem;
  margin: 10px;
  display: flex;
  align-items: center;
  justify-content: center;
}
.event {
  border-bottom: 1px solid rgb(71, 197, 255);
  color: rgb(113, 113, 113);
}
</style>
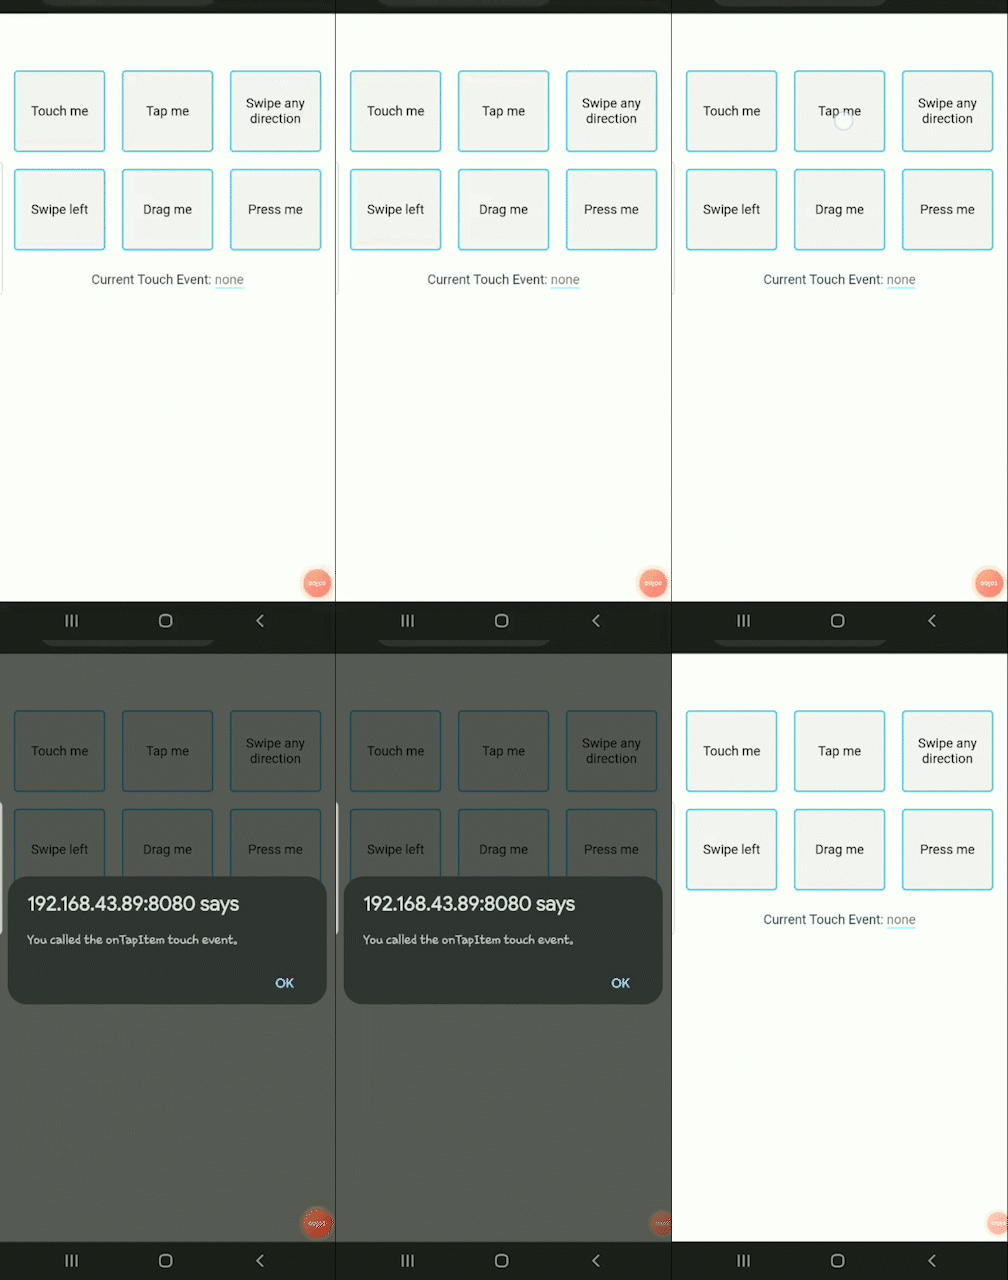
In the code above, we added five buttons and used v-touch to add tap, swipe, swipe.left, drag, and press. Let’s test it on our mobile browser:
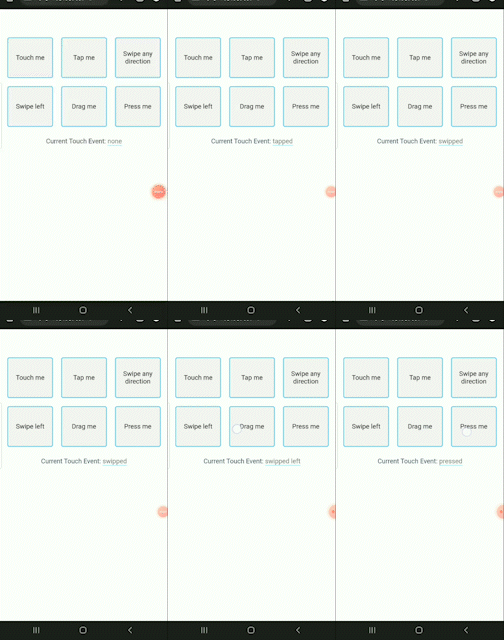
To learn about other vue3-touch-events, check out the GitHub repo.
parameters in vue3-touch-eventsvue3-touch-events also allows us to pass parameters to the event handler. We need to return delegate to event handler, and we can pass as many attributes as we need.
So, let’s pass a parameter into v-touch:tap and edit onTapItem:
<button class="btn" v-touch:tap="onTapItem('onTapItem')">Tap me</button>

…

onTapItem(param) {
      return function () {
        alert("You called the " + param + " touch event.");
      };
 },
We passed a string as an argument into another string in our function and then alerted the new string to the user:
And that’s it on understanding touch events in Vue.js! We discussed what touch events are and the different touch events possible in Vue, including the default browser events and custom events. We also discussed how to listen for them and use third-party plugins to create and listen for custom touch events. The codes for this article are available here on GitHub. If you want to learn more about Vue.js, check out this archive.
Debugging Vue.js applications can be difficult, especially when users experience issues that are difficult to reproduce. If you’re interested in monitoring and tracking Vue mutations and actions for all of your users in production, try LogRocket.

LogRocket lets you replay user sessions, eliminating guesswork by showing exactly what users experienced. It captures console logs, errors, network requests, and pixel-perfect DOM recordings — compatible with all frameworks.
With Galileo AI, you can instantly identify and explain user struggles with automated monitoring of your entire product experience.
Modernize how you debug your Vue apps — start monitoring for free.

React Server Components and the Next.js App Router enable streaming and smaller client bundles, but only when used correctly. This article explores six common mistakes that block streaming, bloat hydration, and create stale UI in production.

Gil Fink (SparXis CEO) joins PodRocket to break down today’s most common web rendering patterns: SSR, CSR, static rednering, and islands/resumability.

@container scroll-state: Replace JS scroll listeners nowCSS @container scroll-state lets you build sticky headers, snapping carousels, and scroll indicators without JavaScript. Here’s how to replace scroll listeners with clean, declarative state queries.

Explore 10 Web APIs that replace common JavaScript libraries and reduce npm dependencies, bundle size, and performance overhead.
Would you be interested in joining LogRocket's developer community?
Join LogRocket’s Content Advisory Board. You’ll help inform the type of content we create and get access to exclusive meetups, social accreditation, and swag.
Sign up now