One of the most common challenges when building AI-powered applications is providing them context. Without context, even the most sophisticated models are just glorified chatbots, talking but unable to take meaningful action.

Take, for example, a bookstore application that uses an AI agent to help users make purchase decisions. The agent might receive a query like:
“I need a list of the highest-rated books on Goodreads that I can purchase from this website.”
On its own, the AI model can’t fulfill this request because it lacks the necessary context. It would need access to the store’s product database to check availability and also be able to query Goodreads, likely through a third-party API, to retrieve book ratings. Only when it has access to both sources can it generate a useful and accurate response.
Before now, developers had to manually integrate AI models with various external datasets, a process that was often tedious and lacked standardization. To solve this, Anthropic, the team behind Claude, introduced the Model Context Protocol (MCP) in 2024. This open source protocol provides a universal, standardized way for AI models to access contextual information from diverse data sources and tools.
In this article, we’ll explore what MCP is, break down its core components, explain how they work together, and walk through a hands-on implementation.
MCP is an open standard that allows AI models to securely interact with local and remote tools through standardized server implementations, whether it’s querying a database or running a command. This lets models go beyond their training data, making them flexible and aware of the world around them.
To clarify, let’s revisit the example from the previous section. If you build an AI tool that fetches a list of available books from the store’s database and provides that information to the AI agent, you effectively solve the context problem for the agent.
However, integrating Goodreads review scores would require extra effort. It would require calling an external API to retrieve review data. This process can quickly become tedious, especially if you need to work with multiple APIs.
Now, imagine if Goodreads offered a tool similar to the bookstore, one that returns book review scores via an MCP server. Goodreads could expose its tool through this server and allow any compatible LLM to discover and access it remotely.
With this standardization, MCP fosters an interoperable ecosystem by providing a unified protocol for all models, where developers can build AI tools once and make them accessible to a wide range of hosts and services through MCP servers.
As of this writing, there are already several host applications that support MCP, including Claude Desktop, Claude Code, and IDEs like Cursor and Windsurf. You can find a curated list of host applications on the Awesome GitHub repo and a collection of MCP client and server tools on the PulseMCP website.
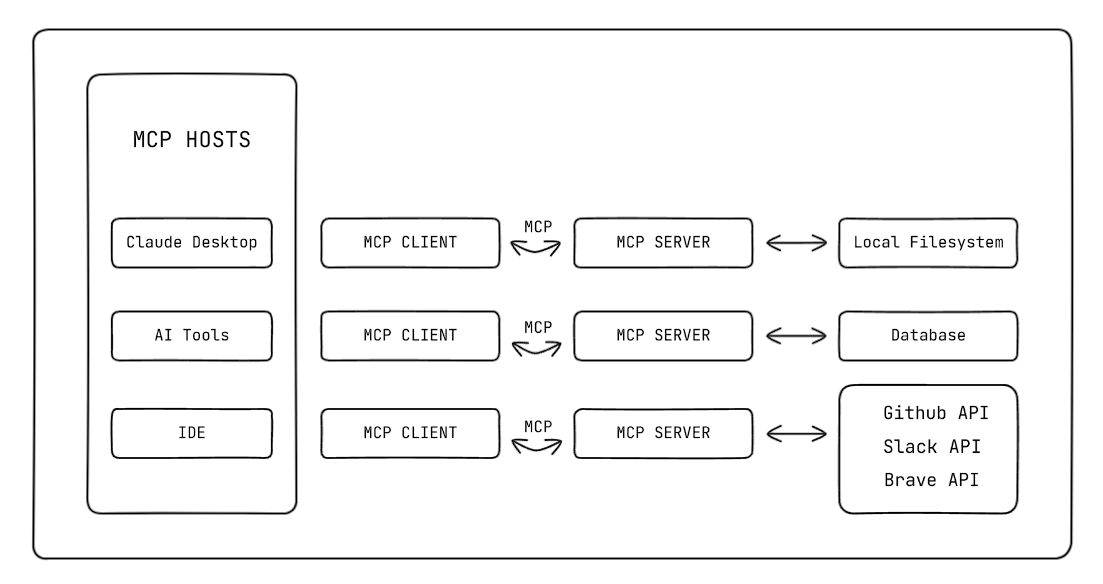
MCP follows a client-server architecture similar to the Language Server Protocol (LSP), which helps different programming languages connect with a wide range of dev tools. However, in this case, it helps host applications to connect with a wide range of AI tools.
The MCP architecture is made up of four core components:
MCP follows a standardized communication process that can be broken down into four well-defined flows when a host application that supports MCP is queried by a user:
As you may have gathered from the previous section, MCP is essentially an API that uses a two-way connection protocol between the client and the server.
However, unlike traditional APIs that rely on various HTTP request methods sent via URLs, the MCP protocol is based on three essential primitives that an MCP server can expose to an LLM:
The tools and resources are the most used primitives because their primary use is to enrich the context available to the LLM.
The quickest way to get started with MCP, as recommended by Anthropic, is to use the Claude Desktop integration along with one of the pre-built servers for popular systems, such as Google Drive, Slack, Git, and various databases, open sourced by Anthropic. You can also use servers from curated community directories or repositories, like the ones highlighted in previous sections.
The integration process typically involves configuring the AI application (in this case, Claude Desktop) using a configuration schema like the following:
{
    "mcpServers": {
      "brave": {
        "command": "npx",
        "args": [
          "-y",
          "@modelcontextprotocol/server-brave",
          "--env",
          "BRAVE_API_KEY=API_KEY"
        ]
      }
    }
  }
This is a configuration schema for the Brave MCP server. The schema essentially tells the host how to run the MCP server using the following instructions:
mcpServer: The mcpServer object holds definitions for one or more MCP server configurations, in this case, for Bravecommand: Specifies the executable command to run. Here, it uses npx, Node’s package execute toolarg: Contains the command-line arguments that will be passed to the npx commandIn summary, when this configuration schema is activated by a host, it will execute the following command:
npx -y @modelcontextprotocol/server-brave --env BRAVE_API_KEY=API_KEY
This tells the host to install and run the Brave MCP server locally using the STDIO transport layer. To access the Claude Desktop config file, navigate to Settings → Developer:
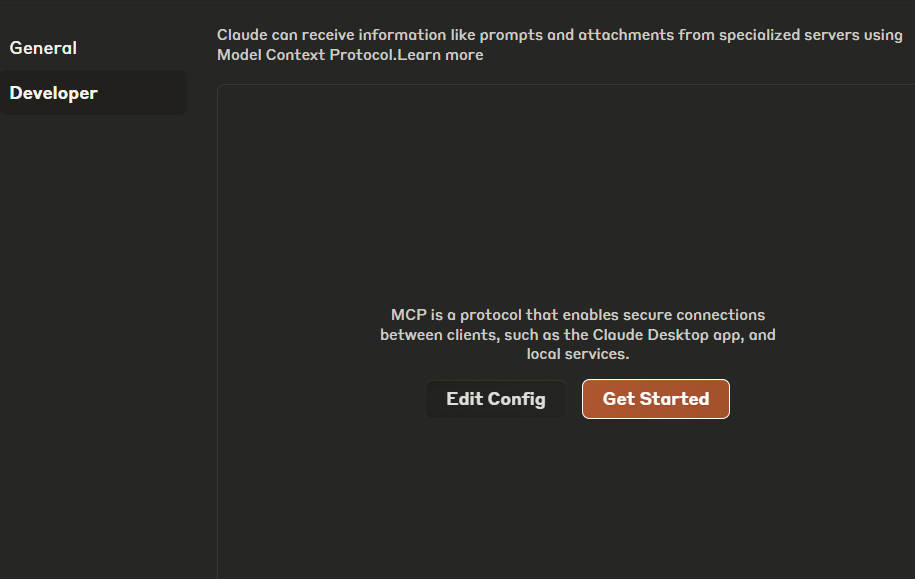
Clicking on the Edit Config button will open Claude’s claude_desktop_config.json file in your file explorer. You can then edit the file using any text or code editor:

As mentioned earlier, there are community directories that curate lists of MCP servers from various publishers. Platforms like Smithery and mcp.so not only list these servers, but also make integrating them much easier:
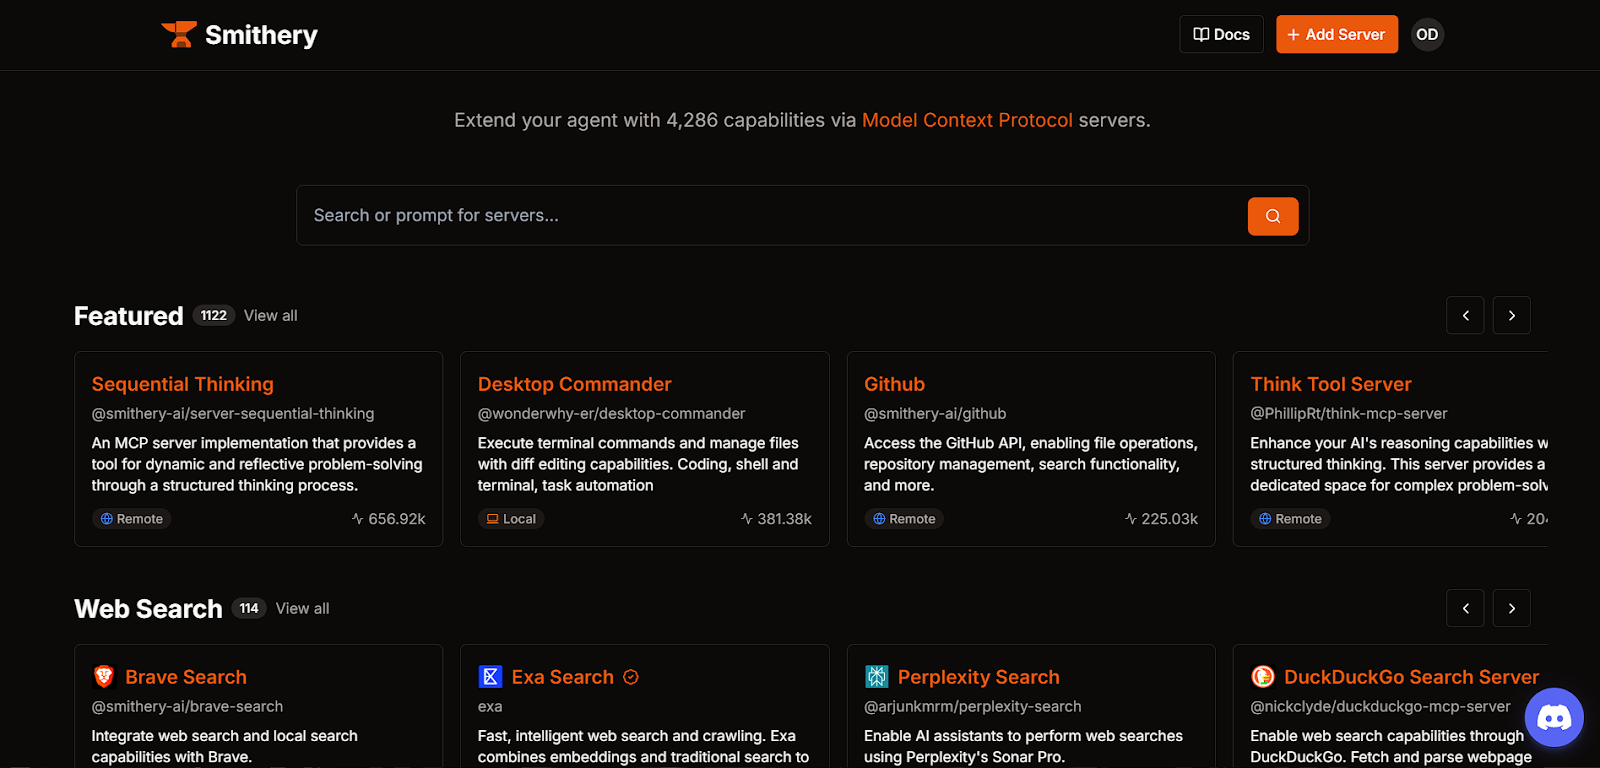
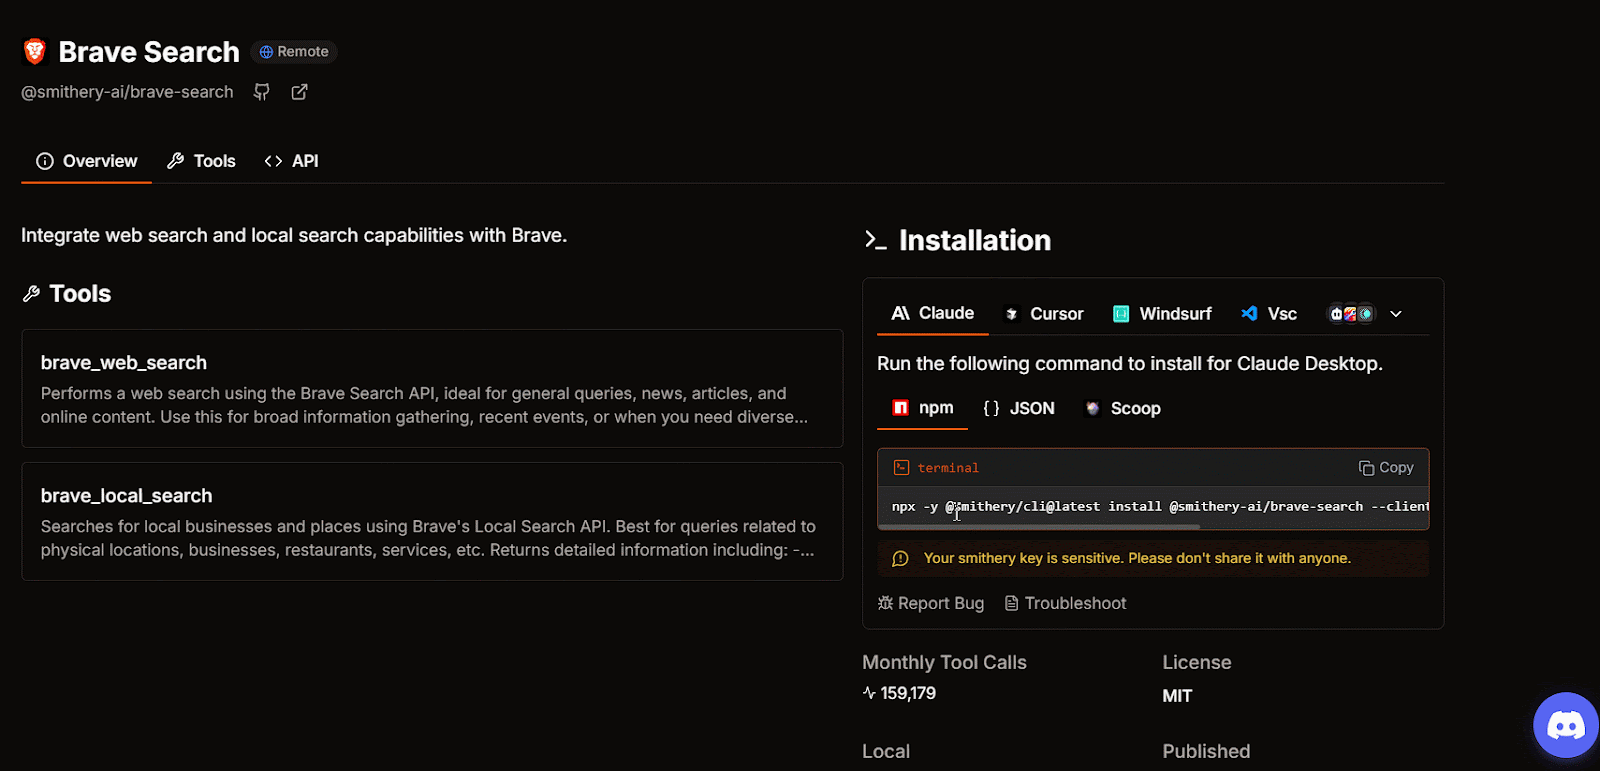
For example, if you try to get the JSON config for the Brave Search MCP server from Smithery, you’ll first need to select your preferred AI agent, such as Claude, Cursor, or Windsurf, and provide an API key for the MCP server if required. Once done, the platform will give you the option to either install the package via an npm command or via the JSON config:
However, to provide a more in-depth overview of how MCP works and to highlight its use case, we’ll take a deeper dive by building our own MCP server from scratch.
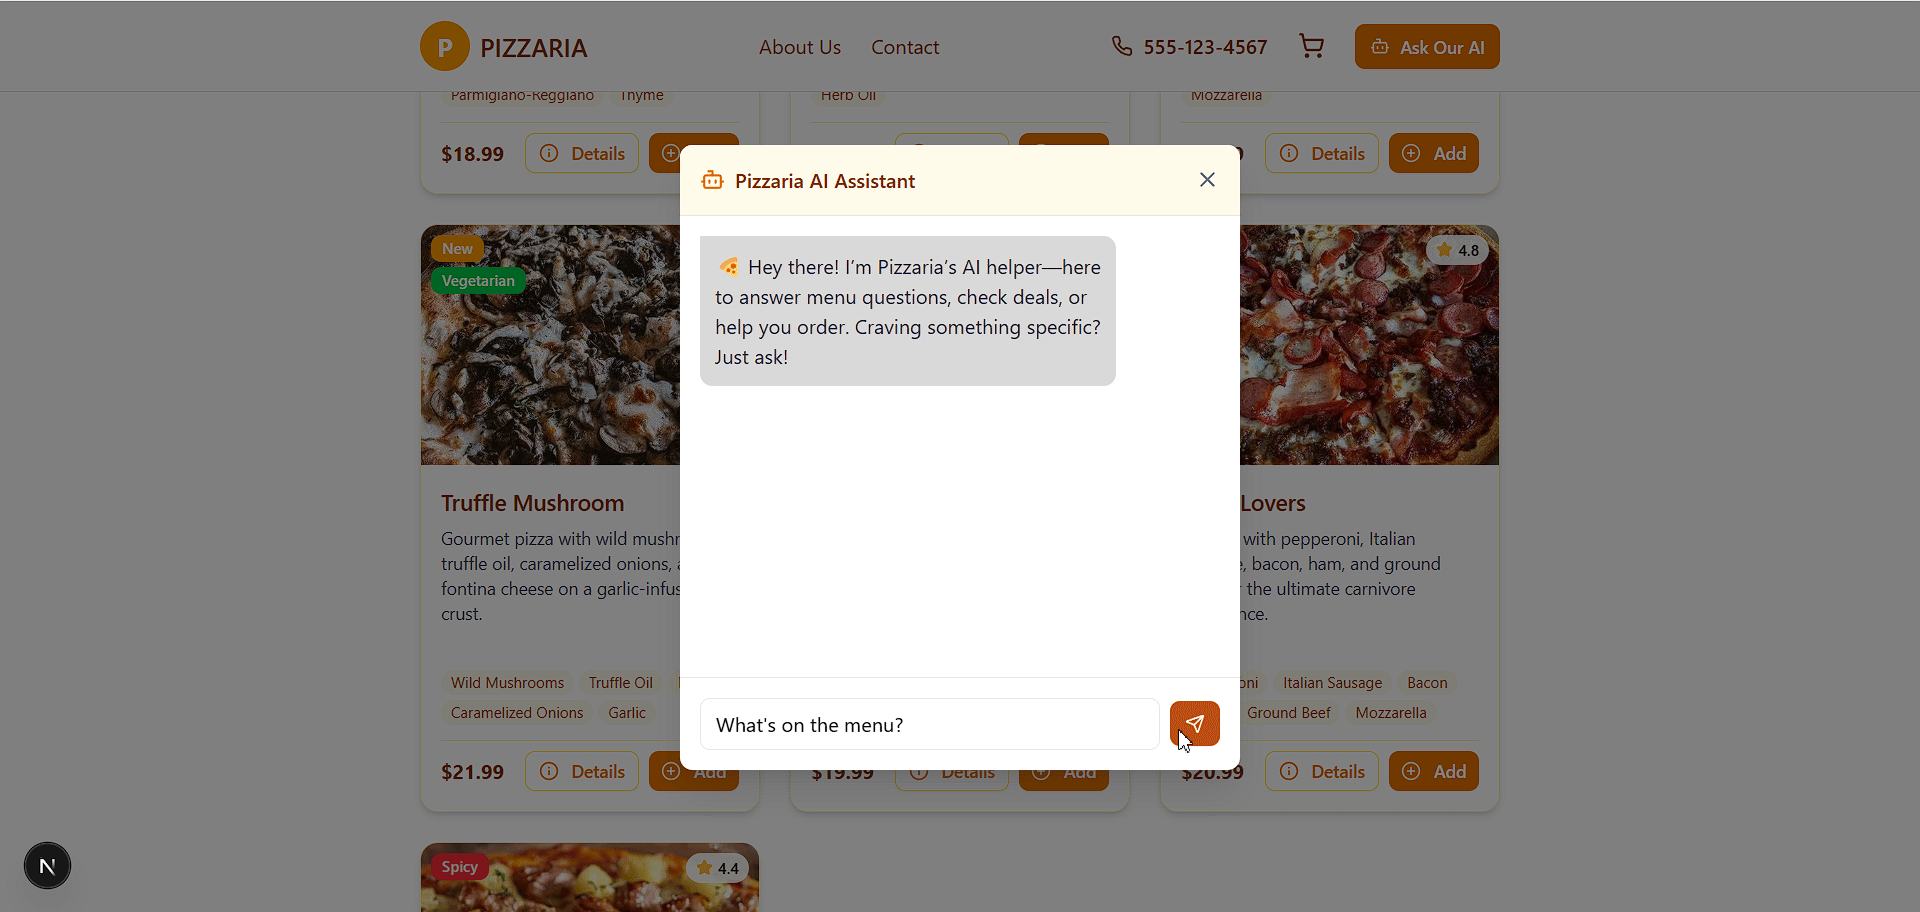
We’ll build a conceptual storefront application, similar to the example used in previous sections, but this time, it will be for a pizza business. This storefront web app will feature a custom AI agent capable of executing tools to help users make purchase decisions based on available items in the database.
Next, we’ll make this tool publicly accessible by creating an MCP server for it. This way, other AI agents can interact with our application’s context and perform actions like fetching available items from the database.
This hands-on approach will give you a real-time understanding of how MCP works.
To keep things simple and straight to the point, I’ve already built the application using Next.js. You can find the codebase in my GitHub repository. Our focus will be on creating a tool for the AI and exposing it via an MCP server. To follow along, make sure you meet the following prerequisites:
After cloning the repo, the first step is to navigate to the project’s directory, open the .env file, and add your DeepSeek API key to the DEEPSEEK_API_KEY environment variable, along with a system command for the AI agent in the AI_SYSTEM_COMMAND variable.
Next, open your terminal and run the following commands to install the dependencies and start the development server:
npm install
npm run dev
Once the development server is running, open your browser and navigate to localhost:3000. You should see a website similar to the one shown below:

Right now, our store’s AI agent is fully functional and will provide responses when you interact with it. However, if we ask it to give us a list of available items in the store, it will respond with a made-up list:

As you can see, the agent is just hallucinating. This proves that the AI agent lacks awareness of its environment and requires additional context to function effectively. What we actually want is for the AI agent to have access to our pizza API.
There’s a lot going on in the project, but for our purposes, we’re only interested in the /chat API route and the ai-chat.tsx component.
The /chat route is responsible for querying the DeepSeek API using the streamText function from Vercel’s AI SDK to fetch the LLM’s response:
// App/api/chat/route.ts

import { streamText } from "ai";
import { deepseek } from "@ai-sdk/deepseek";
import getTools from "@/utils/ai-tools";

const model = deepseek("deepseek-chat");

export async function POST(req: Request) {
  try {
    const { messages } = await req.json();
    const tools = await getTools();

    const systemPrompt = process.env.AI_SYSTEM_COMMAND;
    if (!systemPrompt) {
      throw new Error("AI_SYSTEM_COMMAND environment variable not set.");
    }

    const result = streamText({
      model,
      system: systemPrompt,
      messages,
      tools
    });
    return result.toDataStreamResponse({
      sendReasoning: true,
    });
  } catch (error) {
    console.error(`Chat Error: ${error}`);
    return new Response(JSON.stringify({ error: "Internal Server Error" }), {
      status: 500,
      headers: { "Content-Type": "application/json" },
    });
  }
}
The ai-chat.tsx component, on the other hand, handles streaming both the user’s input and the AI’s response to the UI using the SDK’s useChat() hook. Here’s the relevant part of the component:
// components/ai-chat.tsx

const { messages, input, handleSubmit, handleInputChange, status } = useChat({
    initialMessages: [
      {
        id: "xxx",
        role: "assistant",
        content:
          "🍕 Hey there! \n I’m Pizzaria’s AI helper—here to answer menu questions, check deals, or help you order. Craving something specific? Just ask!",
      },
    ],
  });
To provide our application’s context to the AI agent, we need to create a tool that grants it access to our app’s database. This will allow the agent to generate responses based on the context we’ve provided.
We’ll do this using the tool function from Vercel’s AI SDK. If you cloned the repo I shared earlier, you don’t need to install anything, as it’s already set up. However, if you’re working with your own app, you can install the SDK and the DeepSeek provider using the following commands:
npm i ai @ai-sdk/deepseek
Note: To follow along with this tutorial, you’ll need to use the Vercel AI SDK for querying DeepSeek on the backend. Although OpenAI’s SDK also offers tool calling, the process differs significantly from Vercel AI’s, so keep this in mind.
After installing the packages, navigate to the project directory and create a new folder src → utils → ai-tools. Then, add the following code:
// utils/ai-tools.ts

import { pizzas } from "@/data/pizzas";
import { tool } from "ai";
import { z } from "zod";

const pizzaTool = tool({
  description: "Get all pizzas from the database",
  parameters: z.object({
    message: z
      .string()
      .describe("The message to get the get all pizza based on"),
  }),
  execute: async () => {
    return pizzas;
  },
});

export default async function getTools() {
  return {
    pizzaTool,
  };
}
This code is pretty straightforward. We instantiate a tool instance using the tool method from the AI library. Then, we provide a description string that explains the tool’s purpose, parameters to define the expected input for the tool, and an execute function that returns the pizza data.
Another important thing to note here is that we’re using Zod to validate the structure of the data being passed to the parameters. This helps prevent the LLM from hallucinating random information.
Next, navigate back to the /chat route at api → chat and import the tool we just created. Destructure pizzatool from the getTools function and add it to the streamText object as follows:
// App/api/chat/route.ts

const { pizzariaTool } = await getTools();

export async function POST(req: NextRequest) {
  const { messages } = await req.json();

  const result = streamText({
    model,
    system: process.env.AI_SYSTEM_COMMAND,
    messages,
    tools: {
      pizzaria: pizzariaTool,
    },
  });

  return result.toDataStreamResponse({
    sendReasoning: true,
  });
}
Now, if you go back to the AI agent on the website and ask it a question like 'What's on the menu?', it should provide a proper response with the correct items from the database:
Right now, only our AI agent has access to this tool. We can create an identical tool using an MCP server and expose the site’s context to third-party LLMs and IDEs.
To create an MCP server, we need to set up a new Node server project entirely separate from our main app. Since we’re using STDIO as the transport mechanism, we don’t need to create the server using the conventional process of setting up an HTTP instance.
The protocol provides an official SDK for building MCP servers in various languages, including TypeScript, Java, C#, and Python. For this tutorial, we’ll use the TypeScript SDK. You can find the package in the official GitHub repository or simply install it using the following command after setting up your Node project:
npm install @modelcontextprotocol/sdk
Next, add the following code to your main server file (server.ts, index.ts, or any other name you’ve chosen):
import { McpServer } from "@modelcontextprotocol/sdk/server/mcp.js";
import { StdioServerTransport } from "@modelcontextprotocol/sdk/server/stdio.js";

const server = new McpServer({
  name: "pizzaria",
  version: "1.0.0",
});

// Helper for getting pizzas
async function fetchPizzas() {
  try {
    const res = await fetch("http://localhost:3000/api/pizzas");

    if (!res.ok) {
      const errorText = await res.text();
      console.error(
        `API request failed with status ${res.status}: ${errorText}`
      );
    }

    const inventory = await res.json();

    return inventory;
  } catch (error) {
    console.error(`An unexpected error occurred: ${error}`);
  }
}

server.tool("getPizzas", "Get the list of pizza in the database", async () => {
  const result = await fetchPizzasLogic();

  return { content: [{ type: "text", text: JSON.stringify(result) }] };
});

// Setup and connect MCP server using Standard I/O
async function startMcpServer() {
  const transport = new StdioServerTransport();
  try {
    await server.connect(transport);
    console.error("MCP server connected via stdio and ready for requests.");
  } catch (error) {
    console.error("Failed to connect MCP server:", error);
    process.exit(1);
  }
}

// Start the server
startMcpServer();
In the first part of this code, we use the McpServer method to initialize an MCP server and then use its instance to register a tool. We’re also using the fetchPizzas() helper function to retrieve pizza data from our other server and return it from the tool:
const server = new McpServer({
  name: "pizzaria",
  version: "1.0.0",
});

// fetchPizzas Helper function is here…

server.tool("getPizzas", "Get the list of pizza in the database", async () => {
  const result = await fetchPizzasLogic();

  return { content: [{ type: "text", text: JSON.stringify(result) }] };
});
As you can see, the tool method, similar to the resource method, typically accepts three parameters: the name of the resource, a parameter (which, in the case of resource, is usually a URI), and a callback function used to fetch the data.
In this example, we’ve set the name to getPizzas, passed an instruction as the parameter to retrieve the list of pizzas from the database, and used the execution function to handle the data fetching.
In the second half, we instantiate the STDIO transport layer and bind it to our MCP server instance. Finally, we start the server to begin listening for incoming requests:
async function startMcpServer() {
  const transport = new StdioServerTransport();

  try {
    await server.connect(transport);
    console.error("MCP server connected via stdio and ready for requests.");
  } catch (error) {
    console.error("Failed to connect MCP server:", error);
    process.exit(1);
  }
}

startMcpServer();
You can start the MCP server using the good ol’ node server.ts command, and the server should spin up without issues. Currently, there’s no visible indicator confirming that the server is working correctly. While the MCP team does provide a tool for testing MCP servers, we’ll skip that for now and connect it directly to Claude Desktop instead.
Now that our server resource is exposed, we can connect it to any supported host, such as Claude, ChatGPT, or AI-powered IDEs. For this tutorial, we’ll stick with Claude since we’re already familiar with its setup.
To do this, all we have to do is go to Claude’s claude_desktop_config.json config file and add a connection schema for our MCP server:
{
  "mcpServers": {
    "pizzaria": {
      "command": "node",
      "args": ["C:/Users/dave/OneDrive/Desktop/MCP_server/server.ts"]
    }
  }
}
Since we’re serving locally, all we have to provide is the path to our MCP server and the node command to run it.
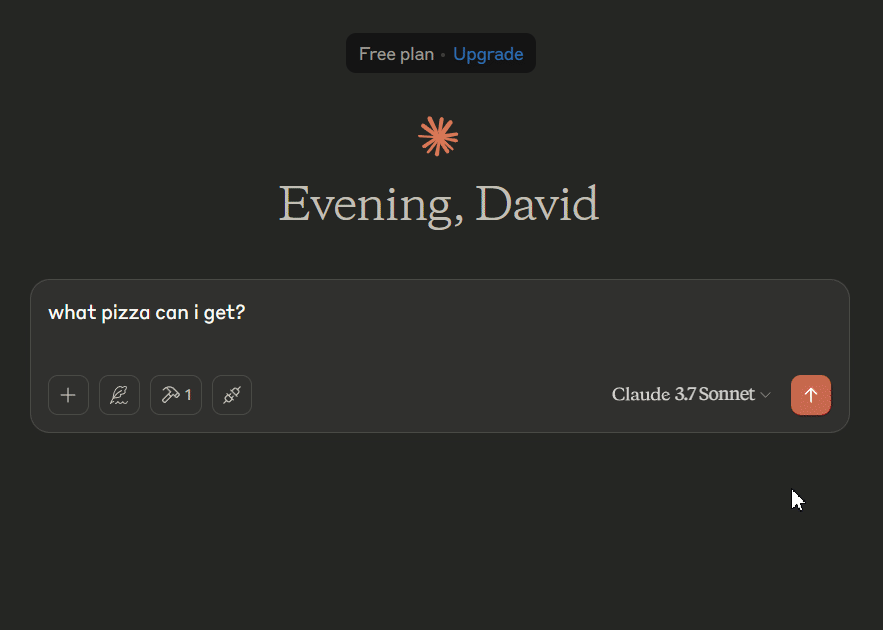
Now, if you restart Claude, you should see a tool and MCP attachment icon, indicating that our MCP server has been successfully installed and connected to Claude Desktop’s MCP client:
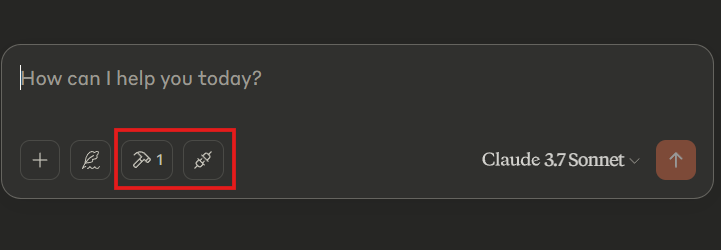
If we ask Claude Desktop pizza-related questions, it will call the getPizzas tool and use the returned results to form a response:
This use case might seem like overkill, considering our MCP server only needs to access the database. However, the goal here is to demonstrate how to build an MCP server for a small service entirely from scratch.
Like any emerging technology, MCP brings its own set of complexities and challenges that developers and organizations should consider before adopting it at scale:
AI agents often struggle with tool selection and execution. MCP addresses this by allowing structured tool descriptions and specifications, enabling agents to better interpret and use them. However, the effectiveness of this approach still heavily depends on the clarity and quality of these descriptions, as well as the agent’s ability to interpret them correctly.
Best practice: Write clear, concise, and comprehensive tool descriptions. Explain not just what the tool does but when to use it, including parameter-by-parameter documentation to guide the AI effectively.
Tools with broad functionalities can create usability and maintenance issues. AI agents may struggle to choose or execute these tools correctly due to overlapping functionalities, and such tools often require frequent updates.
Best practice: Design tools with specific, well-defined purposes. Break complex logic into smaller, single-responsibility tools, minimize the number of parameters, and define data types wherever applicable.
MCP is still a relatively new protocol and is evolving rapidly. This means the ecosystem is subject to frequent (and potentially breaking) changes. While the core concepts behind MCP are stable, version updates for servers and clients may introduce overhead for maintenance.
Best practice: Anticipate breaking changes. Stay updated with the latest specifications and release notes. Consider version locking and semantic versioning in production environments to minimize disruption.
Currently, MCP only has first-class support within the Anthropic ecosystem (i.e., Claude). While OpenAI has extended its agent SDK to support MCP, widespread adoption is still uncertain. Many other AI platforms do not yet natively support MCP, which may require additional workarounds, such as custom adapters or integrations.
Best practice: Evaluate the MCP compatibility of your chosen AI providers. If you rely on multiple AI systems, consider designing abstraction layers or fallback mechanisms to maintain flexibility.
MCP is expected to revolutionize the AI landscape, much like how mobile applications spurred the boom of smartphone devices. With MCPs, developers can build truly connected ecosystems of AI models and intelligent user experiences.
As a challenge, create an addToCart tool that can query the /cart route and add pizzas to the cart upon request. Happy coding!

Discover how React Fiber works under the hood. Learn how React builds the DOM, handles concurrent rendering, and works alongside React 19 features and the new React Compiler.

Learn how to use Skybridge, an open-source React framework, to build and deploy cross-platform AI apps and interactive UI widgets for ChatGPT, Claude, and MCP clients from a single codebase.

Learn how to set up Meilisearch, index documents, and build keyword, semantic, and hybrid search with AI-powered retrieval.

Compare pnpm and npm across security defaults, disk usage, dependency strictness, and workspace policy to decide which package manager fits your project.
Hey there, want to help make our blog better?
Join LogRocket’s Content Advisory Board. You’ll help inform the type of content we create and get access to exclusive meetups, social accreditation, and swag.
Sign up now

