For a long time, tRPC was the top choice in the TypeScript world. It solves a problem that every full-stack developer faces: how to keep backend logic and frontend types in sync without writing endless schemas or fighting with code generators. It was fast, elegant, and simple. Teams that lived inside Typescript picked it up and rarely looked back.

Then oRPC came into play. It borrowed the parts developers loved about tRPC, but pushed for a more advanced idea. It maintained the same clean, type-safe workflow but added something tRPC never aimed for, which is first OpenAPI support. All of a sudden, the same functions that powered your TypeScript client could also power Python services, mobile apps, or third-party integrations without extra work.
This dilemma raises an important question for many developers: If both tools share the same foundation, which one should power your next project? And more importantly, what edges does each framework bring when you look past the surfaces?
In this article, we’ll examine how each framework performs in practice, highlighting where each one excels, and the circumstances in which one choice is far more sensible than the other.
The Replay is a weekly newsletter for dev and engineering leaders.
Delivered once a week, it's your curated guide to the most important conversations around frontend dev, emerging AI tools, and the state of modern software.
Before comparing the two, let’s quickly recap what RPC frameworks actually do and how they fit into modern backend communication.
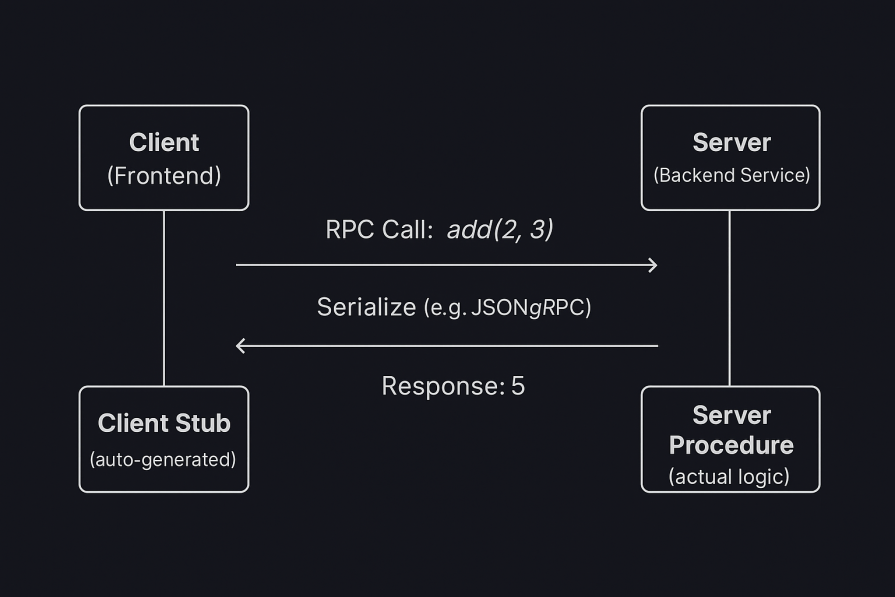
An RPC (Remote Procedure Call) allows one application (the client) to execute a function on another machine (the server) as though it were running locally. Instead of sending HTTP requests, parsing JSON, or handling routes manually, the client calls a remote function directly. Think of it like calling a function in your local codebase, only this time the computation happens on a remote server while the framework quietly handles the networking and data exchange for you.
To illustrate this, consider the following simple client-server interaction:
// Pseudo-code (client)
const result = server.addNumbers(2, 3);
console.log(result); // 5
// Behind the scenes (server)
function addNumbers(a, b) {
  return a + b;
}
The magic is that the client doesn’t know the function actually lives on another server. The RPC layer serializes the function call, sends it over a transport (HTTP, TCP, or WebSocket), executes it remotely, and returns the response in a way that feels completely transparent.
Below is a diagram showing how it works in a system representation:
RPC frameworks are built around a few shared design principles:
Together, these principles form the foundation of every RPC framework. However, different frameworks interpret them in unique ways depending on their goals and ecosystems.
Let’s look at how tRPC applies these ideas in a TypeScript-first environment in the next section and what makes it stand out from other RPC implementations.
tRPC stands for Typescript Remote Procedure Call. It is a lightweight library that enables you to build end-to-end, typesafe APIs without requiring schemas or code generation. Instead of maintaining backend routes and frontend types separately, tRPC makes use of TypeScript’s inference system to keep both aligned. You can liken it to a bridge that keeps your client and server aware of each other’s types, ensuring that any mismatch is caught instantly before your code even runs.
At its core, tRPC is based on a simple concept: you write your server functions once and your client directly as if they were local. You start by defining your server’s procedures, which are the functions that handle queries or mutations. Instead of manually generating clients or schemas, tRPC automatically infers their types. The client then imports those types and calls the procedures just like normal functions, with full autocompletion and compile-time safety.
tRPC organizes APIs with routers and procedures. Think of a router as a folder that groups related procedures, and a procedure as the specific function in that folder that runs a query or a mutation. This structure keeps larger apps readable and encourages clear separation between features such as users, posts, or tasks.
Below is a typical demonstration:
const appRouter = router({
  users: router({
    getById: procedure,   // query
    create: procedure,    // mutation
    update: procedure,    // mutation
  }),
  posts: router({
    list: procedure,      // query
    create: procedure,    // mutation
  }),
});
Under the hood, tRPC is grounded in a few familiar pieces. TypeScript provides the types that flow across the boundary. HTTP or WebSockets carry requests. Zod is commonly used to declare and validate inputs at runtime while also producing compile-time types. Framework adapters connect tRPC to servers such as Express, Next.js, or Fastify.
tRPC is built for developer speed and type safety. Here are some of the key features that make it stand out:
While tRPC offers development and type safety, there are some drawbacks to consider before implementing it in large-scale systems:
To see how tRPC works in practice, let’s build a small demo that includes both the backend and frontend in one project.
The project and its folders are already set up in the Github directory. Clone or download it. After downloading or cloning the project, open your terminal and set up the dependencies.
For the server, run:
cd server
npm install
In another terminal window, navigate to the client folder and run:
cd client
npm install
Once everything is installed, we’ll start wiring up both sides step by step to see how tRPC synchronizes types, validates input, and keeps the entire stack in sync automatically.
The first step is to set up the tRPC core and context that every request will use. Create a file called trpc.ts inside the server/src folder. Add the following code:
// server/src/trpc.ts
import { initTRPC } from '@trpc/server';
export const createContext = () => ({ userId: 'demo-user' });
export type Context = Awaited<ReturnType<typeof createContext>>;
const t = initTRPC.context<Context>().create();
export const router = t.router;
export const publicProcedure = t.procedure;
export const protectedProcedure = t.procedure.use(({ ctx, next }) => {
  if (!ctx.userId) throw new Error('Not authenticated');
  return next({ ctx });
});
We built the foundation that every tRPC application relies on. The initTRPC() function initializes the core engine that will register all our API routes later. The createContext() function returns a small object that travels with every request. In this demo, it simply contains a userId, but in a real application, it could include authentication data, a database instance, or environment configuration. You can think of this context as a small backpack that every request carries to your procedures. It ensures that shared data, such as user information, is always available wherever it is needed.
We also created two helpers: publicProcedure for routes that are open to everyone, and protectedProcedure for routes that require authentication. The protectedProcedure checks for a userId in the context and stops the request if it is missing.
With this setup, you have a simple, consistent way to handle authentication and access control across your entire API.
Next, create a user router with input validation. Create a sub-folder called routes inside the server/routes folder. Inside it, create a file called users.ts. Add the following code:
// server/src/routers/users.ts
import { z } from 'zod';
import { router, publicProcedure, protectedProcedure } from '../trpc';
const users = [{ id: 1, name: 'Ada', email: '[email protected]' }];
export const userRouter = router({
  list: publicProcedure.query(() => users),
  createUser: protectedProcedure
    .input(z.object({
      name: z.string().min(1, 'Name cannot be empty'),
      email: z.string().email('Invalid email address'),
    }))
    .mutation(async ({ input }) => {
      const exists = users.some(u => u.email === input.email);
      if (exists) throw new Error('Email already exists');
      const user = { id: users.length + 1, ...input };
      users.push(user);
      return user;
    }),
});
Here, we defined two procedures that the client can call. The first is the list procedure, which returns all the users in our temporary in-memory array. In a real application, this would likely be a database query that fetches user records.
The second procedure is the createUser procedure, which handles adding a new user, but before it accepts any input, it passes the data through a Zod schema. Zod acts as both a validator and a type generator. It checks at runtime that the data matches the expected format, and at the same time it gives the TypeScript compiler enough information to enforce those rules during development.
For example, the schema ensures that name is a non-empty string and email is a valid address. If any of these checks fail, the request never reaches the logic that saves the user.
Now you need to connect the router to an Express server. Create a file called index.ts inside the server/src folder and add the following code:
// server/src/index.ts
import express from 'express';
import cors from 'cors';
import { createExpressMiddleware } from '@trpc/server/adapters/express';
import { router, createContext } from './trpc';
import { userRouter } from './routers/users';
export const appRouter = router({ users: userRouter });
export type AppRouter = typeof appRouter;
const app = express();
app.use(cors());
app.use('/trpc', createExpressMiddleware({ router: appRouter, createContext }));
app.listen(3000, () => {
  console.log('tRPC server running on http://localhost:3000/trpc');
});
We have now connected our router to an Express server so that it can start receiving and handling real API requests. The appRouter combines all the individual routers, like the one we created for users, into a single entry point that represents the entire backend API.
The createExpressMiddleware function does most of the heavy lifting. It automatically connects each procedure defined in your routers to an HTTP endpoint under /trpc. Whenever the client calls a procedure, this middleware determines which one to run and returns the response in the correct format.
We also exported the AppRouter type as it contains the complete definition of every query and mutation in your API. The frontend will import it next, which allows TypeScript to give the client full awareness of all the available procedures, their inputs, and their outputs.
With this setup, the server is now fully operational and ready to communicate with the frontend using strongly typed procedures rather than manually defined routes.
Now that the server exposes a typed API, you need to connect the frontend by setting up the React client that speaks to tRPC server. Create a file called trpc.ts inside the client/src. Add the following code:
// client/src/trpc.ts
import { createTRPCReact } from '@trpc/react-query';
import type { AppRouter } from '../../server/src/index';
export const trpc = createTRPCReact<AppRouter>();
Note: In this monorepo setup, the client can import types directly from the server using a relative path. This works because both projects are in the same repository, and TypeScript can resolve types across folders. The AppRouter type contains the complete definition of your API, enabling full type safety across the client and server.
This file would act as a bridge between the client and the server.
To connect it with React Query, create a file called main.tsxin the client/src folder. Add the following code
// client/src/main.tsx
import React from 'react';
import ReactDOM from 'react-dom/client';
import { QueryClient, QueryClientProvider } from '@tanstack/react-query';
import { httpBatchLink } from '@trpc/client';
import App from './App';
import { trpc } from './trpc';
const queryClient = new QueryClient();
const trpcClient = trpc.createClient({
  links: [httpBatchLink({ url: 'http://localhost:3000/trpc' })],
});
ReactDOM.createRoot(document.getElementById('root')!).render(
  <trpc.Provider client={trpcClient} queryClient={queryClient}>
    <QueryClientProvider client={queryClient}>
      <App />
    </QueryClientProvider>
  </trpc.Provider>
);
In the code above, we connected this bridge to React Query, which handles caching and request management behind the scenes. The httpBatchLink function optimizes network usage by combining multiple procedure calls into a single HTTP request whenever possible.
This setup means we no longer need to manually define API endpoints or data-fetching hooks. Every function exposed by the server can now be called safely from the client, and TypeScript ensures that both sides stay perfectly in sync.
You need a simple form to list and add users. Create a file called App.tsx inside the client/src folder. Add the following code:
// client/src/App.tsx
import { useState } from 'react';
import { trpc } from './trpc';
export default function App() {
  const [name, setName] = useState('Temi');
  const [email, setEmail] = useState('[email protected]');
  const users = trpc.users.list.useQuery();
  const create = trpc.users.createUser.useMutation({
    onSuccess: () => users.refetch(),
  });
  return (
    <div style={{ padding: 20, fontFamily: 'Inter, sans-serif' }}>
      <h2>tRPC Demo: Create User</h2>
      <h3>Existing users</h3>
      <ul>
        {users.data?.map(u => (
          <li key={u.id}>{u.name} — {u.email}</li>
        ))}
      </ul>
      <h3>Create user</h3>
      <div style={{ display: 'flex', gap: 8, marginBottom: 8 }}>
        <input value={name} onChange={e => setName(e.target.value)} placeholder="Name" />
        <input value={email} onChange={e => setEmail(e.target.value)} placeholder="Email" />
        <button onClick={() => create.mutate({ name, email })}>Create</button>
      </div>
      {create.isPending && <p>Creating...</p>}
      {create.error && <p style={{ color: 'crimson' }}>{create.error.message}</p>}
    </div>
  );
}
We’ve just created a simple but fully functional interface that communicates directly with the backend. The users.list query fetches data from the server and automatically updates when the data changes. The useQuery() hook from React Query manages caching and synchronization, ensuring the user list always stays current without extra setup.
The createUser mutation calls the users.createUser procedure on the server and sends the input data. Because the procedure uses a Zod schema, any invalid input, such as an empty name or an incorrectly formatted email, is immediately rejected before it affects the data store.
There are no manual API calls or endpoint configurations here. RPC handles all the communication behind the scenes, while TypeScript provides autocompletion and compile-time checking for every parameter and return value. When the mutation succeeds, the list refetches automatically, keeping the UI responsive and consistent.
With this UI in place, you can already fetch data, add new records, and see how tRPC keeps both the client and server perfectly aligned through shared types and real-time validation.
Now let’s test tRPC’s type safety by breaking things on purpose. In the client/app.tsx, change:
<button onClick={() => create.mutate({ name, email })}>Create</button>
To:
<button onClick={() => create.mutate({ name: 'Ada', email: 42 })}>Create</button>
You’ll see that typescripts automatically flags it, and you’ll see a red underline. When you hover over it, you’ll see:
The expected type comes from property 'email' which is declared here on type '{ name: string; email: string; }'
This shows tRPC’s end-to-end type safety. The client knows exactly what the server expects, and invalid data is caught instantly at compile time, long before it can make a request.
Undo that and let’s try to change the server schema and watch the client respond. Modify the input schema in server/src/routers/users.ts:
.input(z.object({
  name: z.string().min(1),
  email: z.string().email(),
  role: z.enum(['user', 'admin']),
}))
When you go back to the client folder in your app.tsx, you should see a red underline on this line:
create.mutate({ name, email });
When you hover on it, you’ll see:
Argument of type '{ name: string; email: string; }' is not assignable to parameter of type '{ name: string; email: string; role: "user" | "admin"; }'.
  Property 'role' is missing in type '{ name: string; email: string; }' but required in type '{ name: string; email: string; role: "user" | "admin"; }'.
This is tRPC’s schema synchronization in action. The frontend and backend share a single type contract, so when you change the schema on the server, the client automatically updates its expectations. There is no need for code generation or manual syncing because everything stays aligned by design.
You can fix it by changing the code to:
create.mutate({ name: 'Temi', email: '[email protected]', role: 'user' });
Now let’s test everything together. Make sure both your development servers are running.
In the server terminal, run:
npm run dev
You should see a message like:
tRPC server running on[ http://localhost:3000/trpc](http://localhost:3000/trpc)
Also in the client terminal, run:
npm run dev
When you open that URL, you’ll see the tRPC Demo page showing the existing user. Try adding a new user. The entry should appear instantly under the list. If you enter an invalid email, the client displays a clear validation message.
Everything you just saw, from instant validation to automatic type updates and communication between the client and server, happens because both ends of the application share the same source of truth for types and data contracts.
Let’s now explore oRPC and how it approaches the same idea of remote procedure calls through a more language-agnostic and interoperable design.
oRPC stands for Open Remote Procedure Call. You can think of it as tRPC’s younger sibling. It provides the same type safety and developer experience but adds full OpenAPI support and a stronger focus on interoperability.
Like tRPC, oRPC lets you build type-safe APIs where the client can call server functions directly as if they were local. But it goes a step further by automatically generating OpenAPI specifications from your procedures. This means your API is not only type-safe within TypeScript but also fully documented and compatible with other clients or services through standard API specifications.
You can liken oRPC to a bridge that connects the simplicity of RPC-based development with the openness of the API ecosystem. It gives you the flexibility to keep your TypeScript workflow while making your API discoverable and usable by tools like Swagger, Scalar, or Postman without extra setup.
Like tRPC, oRPC uses this router–procedure structure to keep APIs modular and maintainable. The key difference is that oRPC automatically produces a schema contract (based on the OpenAPI specification) that other languages, tools, and frameworks can understand, allowing your type-safe API to integrate seamlessly with non-TypeScript environments.
Here’s a simple demonstration:
// Router structure example
const appRouter = orpc.router({
  users: orpc.router({
    getById: orpc.procedure,   // query
    create: orpc.procedure,    // mutation
    update: orpc.procedure,    // mutation
  }),
  posts: orpc.router({
    list: orpc.procedure,      // query
    create: orpc.procedure,    // mutation
  }),
});
Under the hood, oRPC builds on familiar components, one of which is Zod, which is used to declare and validate input schemas while providing runtime and compile-time safety.
However, oRPC does not limit you to only Zod. It also supports other schema libraries such as Valibot, ArkType, or any validator that can produce a compatible JSON Schema. This flexibility means you can use your preferred validation library and still get type safety and OpenAPI support automatically.
oRPC extends on tRPC’s simplicity but with built-in Open API support, typed error handling, and schema flexibility. Below are some of the features of oRPC:
1. OpenAPI support
The “o” in oRPC refers to its built-in OpenAPI generation. Every procedure produces a full, compliant spec, so your API can be used from any language or tool that understands OpenAPI. You can plug that spec into tools like Scalar or Swagger to get interactive docs and an easy testing surface.
2. First-contract approach
oRPC is a contract-first workflow. You define the API structure before proceeding to code implementation. This type of workflow minimizes schema mismatches and maintains alignment between frontend and backend teams.
3. Typed error handling
oRPC biasts of a dedicated ORPCError class used for creating strongly typed errors. With it, you can define custom errors with the error.find method. This ensures that you have consistent responses and cleaner debugging.
4. Schema flexibility
oRPC is not tied to a single validation library. It works with Zod, Valibot, ArkType, or any tool that can produce a JSON schema. This gives you the freedom to choose your preferred validation system while maintaining type inference and Open API compatibility.
5. Batching, limiting, and retrying
oRPC comes with built-in features that can help in batching multiple requests, limiting API calls, and retrying failed requests. These capabilities make it suitable for high-traffic or distributed environments.
6. Type safety and autocompletion
Like tRPC, oRPC provides end-to-end type safety. When you change a schema on the server, the client instantly updates to reflect it, preventing invalid calls before runtime.
7. Cross-framework compatibility
Because it generates OpenAPI specs, oRPC works with frameworks and languages outside TypeScript, such as Python, Go, or Java, making it ideal for polyglot teams.
Despite its flexibility and OpenAPI support, oRPC has a few trade-offs to keep in mind:
To see how oRPC works in practice, let’s build a small demo that includes both the backend and frontend in one project.
The project and its folders are already set up in the Github directory. Clone or download it. After downloading or cloning the project, open your terminal and set up the dependencies.
For the server, run:
cd server
npm install
In another terminal window, navigate to the client folder and run:
cd client
npm install
Once everything is installed, we’ll start wiring up both sides step by step to see how tRPC synchronizes types, validates input, and keeps the entire stack in sync automatically.
We’ll start by setting up the oRPC core and router that every request will use. Create a file called orpc.ts inside the server/src folder. Add the following code:
// server/src/orpc.ts
import type { IncomingHttpHeaders } from "node:http";
import { os, ORPCError } from "@orpc/server";

export type BaseContext = { headers: IncomingHttpHeaders };

export { os, ORPCError };
This file sets up a simple base context that carries request headers through every call.
In oRPC, procedures and routers are built around this context, allowing access to things like authentication, tokens, or custom headers.
Next, you need a user router with Zod validation. Create a file called users.ts inside the server/src folder. Add the following code:
// server/src/routers/users.ts
import * as z from "zod";
import { os, ORPCError } from "@orpc/server";

const users = [{ id: 1, name: "Ada", email: "[email protected]" }];

const UserSchema = z.object({
 id: z.number().int().min(1),
 name: z.string(),
 email: z.string().email(),
});

const CreateUserInput = z.object({
 name: z.string().min(1, "Name cannot be empty"),
 email: z.string().email("Invalid email address"),
});

export const userRouter = {
 list: os
   .route({ method: "GET", path: "/users" })
   .output(z.array(UserSchema))
   .handler(async () => users),

 create: os
   .route({ method: "POST", path: "/users" })
   .input(CreateUserInput)
   .output(UserSchema)
   .handler(async ({ input }) => {
     if (users.some((u) => u.email === input.email)) {
       throw new ORPCError("CONFLICT", { message: "Email already exists" });
     }
     const user = { id: users.length + 1, ...input };
     users.push(user);
     return user;
   }),
};
In the code above, we define two endpoints. The first is a list that returns the full user array, and the second is create, which validates and adds a new user. Both are fully typed, so if you send bad input, the server rejects it automatically through Zod validation.
Now, bring everything together by combining the user router, oRPC runtime, and OpenAPI layer inside a single Express server. Create a file called index.ts inside the server/src folder. Add the folloiwng code:
// server/src/index.ts
import express from "express";
import cors from "cors";

// oRPC runtimes
import { RPCHandler } from "@orpc/server/node";
import { OpenAPIHandler } from "@orpc/openapi/node";
import { OpenAPIGenerator } from "@orpc/openapi";
import { ZodSmartCoercionPlugin, ZodToJsonSchemaConverter } from "@orpc/zod";

import { userRouter } from "./routers/users";

export const appRouter = { users: userRouter };
export type AppRouter = typeof appRouter;

const app = express();
app.use(cors());
app.use(express.json());

/** RPC endpoints at /rpc (used by your React client) */
const rpc = new RPCHandler(appRouter);
app.use("/rpc", async (req, res, next) => {
 const { matched } = await rpc.handle(req, res, {
   prefix: "/rpc",
   context: { headers: req.headers },
 });
 if (matched) return;
 next();
});

/** OpenAPI REST endpoints at /api (used by Swagger UI "Try it out") */
const openapi = new OpenAPIHandler(appRouter, {
 plugins: [new ZodSmartCoercionPlugin()],
});
app.use("/api", async (req, res, next) => {
 const { matched } = await openapi.handle(req, res, {
   prefix: "/api",
   context: { headers: req.headers },
 });
 if (matched) return;
 next();
});

/** OpenAPI JSON and docs */
const generator = new OpenAPIGenerator({
 schemaConverters: [new ZodToJsonSchemaConverter()],
});

app.get("/openapi.json", async (_req, res) => {
 const spec = await generator.generate(appRouter, {
   info: { title: "Users API", version: "1.0.0" },
   servers: [{ url: "http://localhost:4000/api" }],
   });
 res.type("application/json").send(spec);
});

app.get("/docs", (_req, res) => {
 res.type("html").send(`<!doctype html>
<html>
 <head>
   <meta charset="utf-8"/>
   <title>Users API Docs</title>
   <meta name="viewport" content="width=device-width, initial-scale=1"/>
   <link rel="stylesheet" href="https://unpkg.com/swagger-ui-dist/swagger-ui.css"/>
 </head>
 <body>
   <div id="swagger-ui"></div>
   <script src="https://unpkg.com/swagger-ui-dist/swagger-ui-bundle.js"></script>
   <script>
     window.onload = function () {
       window.ui = SwaggerUIBundle({
         url: "/openapi.json",
         dom_id: "#swagger-ui",
         presets: [SwaggerUIBundle.presets.apis],
         layout: "BaseLayout",
       });
     };
   </script>
 </body>
</html>`);
});

const port = 4000;
app.listen(port, () => {
 console.log(`oRPC server listening on http://localhost:${port}`);
 });
Unlike tRPC, which only provides typed procedures through TypeScript clients, oRPC exposes your API as both an RPC interface and a REST-compliant OpenAPI service, all within the same code.
Now we’ll set up the frontend. Create a file called orpc.ts inside the client/src. Add the following:
import type { RouterClient } from "@orpc/server";
import { createORPCClient } from "@orpc/client";
import { RPCLink } from "@orpc/client/fetch";
import type { AppRouter } from "@server/index"; // this is your router type

const link = new RPCLink({
 url: "http://localhost:4000/rpc", // Add /rpc here
});

export const orpc: RouterClient<AppRouter> = createORPCClient(link);
This gives the client full type awareness of the backend’s procedures, just like tRPC, but with OpenAPI compliance.
Also, create a file called main.tsc in the client/src folder. Add the following code:
 import React from "react";
import ReactDOM from "react-dom/client";
import App from "./App";

ReactDOM.createRoot(document.getElementById("root")!).render(<App />);
This will wire everything up.
To use the oRPC client to list and create users, create a file called App.tsx in the client/src folder, add the following code:
import { useEffect, useState } from "react";
import { orpc } from "./orpc";

type User = { id: number; name: string; email: string };

export default function App() {
 const [users, setUsers] = useState<User[]>([]);
 const [name, setName] = useState("Temi");
 const [email, setEmail] = useState("[email protected]");
 const [error, setError] = useState<string | null>(null);
 const [busy, setBusy] = useState(false);

 // Load users once
 useEffect(() => {
   orpc.users
     .list()
     .then(setUsers)
     .catch((e) => setError(String(e)));
 }, []);

 async function onCreate() {
   setBusy(true);
   setError(null);
   try {
     const user = await orpc.users.create({ name, email });
     setUsers((prev) => [...prev, user]);
     setName("");
     setEmail("");
   } catch (e: any) {
     setError(e?.message ?? "Request failed");
   } finally {
     setBusy(false);
   }
 }

 return (
   <div style={{ padding: 20, fontFamily: "Inter, system-ui, sans-serif" }}>
     <h2>oRPC Demo: Create User</h2>

     <h3>Existing users</h3>
     <ul>
       {users.map((u) => (
         <li key={u.id}>
           {u.name} — {u.email}
         </li>
       ))}
     </ul>

     <h3>Create user</h3>
     <div style={{ display: "flex", gap: 8, marginBottom: 8 }}>
       <input
         value={name}
         onChange={(e) => setName(e.target.value)}
         placeholder="Name"
       />
       <input
         value={email}
         onChange={(e) => setEmail(e.target.value)}
         placeholder="Email"
       />
       <button onClick={onCreate} disabled={busy}>
         {busy ? "Creating..." : "Create"}
       </button>
     </div>

     {error && <p style={{ color: "crimson" }}>{error}</p>}
   </div>
 );
}
Now, before we run it, let’s test oRPC’s end-to-end type safety just like we did for tRPC by breaking things on purpose.
In client/src/App.tsx, find this line:
await orpc.users.create({ name, email });
Change it to:
await orpc.users.create({ name: 'Ada', email: 42 });
You’ll immediately see a red underline under 42. When you hover over it, TypeScript tells you:
The expected type comes from property 'email' which is declared here on type '{ name: string; email: string; }'
This shows oRPC’s compile-time type safety in action. The client knows exactly what the server expects because both sides share the same schema through AppRouter. Invalid data is caught instantly before any network request is made.
Undo that change before moving on.
Now let’s test what happens when we change the schema on the server. Open server/src/routers/users.ts and modify the CreateUserInput schema by adding a role field:
const CreateUserInput = z.object({
  name: z.string().min(1, "Name cannot be empty"),
  email: z.string().email("Invalid email address"),
  role: z.enum(['user', 'admin']),
});
When you switch back to the client’s App.tsx, TypeScript will immediately highlight an error on this line:
await orpc.users.create({ name, email });
Hover over it and you’ll see:
Argument of type '{ name: string; email: string; }' is not assignable to parameter of type '{ name: string; email: string; role: "user" | "admin"; }'.
  Property 'role' is missing in type '{ name: string; email: string; }' but required in type '{ name: string; email: string; role: "user" | "admin"; }'.
That’s oRPC’s schema synchronization at work. The frontend and backend share a single type contract. As soon as the server’s schema changes, the client updates its expectations automatically, eliminating the need for code generation, manual syncing, and guessing what the API looks like.
If you change that line to:
await orpc.users.create({
  name: 'Temi',
  email: '[email protected]',
  role: 'user',
});
Your TypeScript becomes happy again.
Undo the changes back to the original, and then save and start up the server in the server terminal.
npm run dev
Also in the client terminal, run:
npm run dev
Your client will launch at http://localhost:5173
You can test it out by adding a new user, like you did for tRPC. The entry should appear instantly under the list.
Unlike tRPC, oRPC also generates OpenAPI documentation automatically.
This means your same endpoints are instantly available as REST APIs, complete with interactive docs.
Open your browser and visit:
Here, you can use the “Try it out” section to make requests directly to /api/users endpoints without writing any client code.
While tRPC and oRPC share the same foundation of end-to-end type safety, their internal architectures, tooling, and developer ergonomics set them apart. Below are the core differences based on hands-on testing and developer experience.
RPCHandler and OpenAPIHandler) lets it serve both RPC and REST requests through the same Express instance. That means you can power internal TypeScript clients and external REST consumers from a single router, without duplicating routes or validation logictRPC is usually the best fit when your entire application is TypeScript-based and managed by a single team. It provides the fastest developer feedback loop, minimal tooling, and a seamless experience for building internal APIs. If your backend and frontend live in the same repo, tRPC keeps everything tightly aligned and extremely productive.
oRPC becomes a stronger choice when your API needs to serve more than just TypeScript clients. If you work with external partners, mobile teams, Python or Go services, or you need auto-generated documentation, oRPC’s built-in OpenAPI layer gives you a cleaner, more interoperable contract. You also get both RPC and REST interfaces from the same procedures, which is ideal when your system needs to grow beyond a single stack.
| Scenario | tRPC | oRPC | Recommended |
|---|---|---|---|
| Your entire stack is TypeScript and managed by one team | ✅ | ❌ | tRPC |
| You need automatic OpenAPI docs, schema exports, or SDK generation | ❌ | ✅ | oRPC |
| You expect mobile apps, Python/Go services, or external partners to consume API | ❌ | ✅ | oRPC |
| You want the simplest setup with minimal tooling | ✅ | ❌ | tRPC |
| You may someday expose your internal API as REST | ❌ | ✅ | oRPC |
| You prefer contract-first design for cross-team coordination | ❌ | ✅ | oRPC |
| You are building a prototype that may scale into a public API | ❌ | ✅ | oRPC |
| You want maximum IDE autocompletion and instant type inference | ✅ | ✅ | Both |
tRPC and oRPC solve the same problem, but they approach it from different angles. tRPC keeps things simple and fast for teams that live fully in the TypeScript ecosystem. It offers a smooth workflow, instant type feedback, and a structure that works well for internal apps or monorepos where both sides of the stack move together.
oRPC steps in when your API needs to reach beyond TypeScript. The OpenAPI support, typed errors, and stronger contract model make it a good fit for teams that expect to work with external services, mobile apps, or multiple languages. It also lets you expose both RPC and REST from the same routes, which is useful once a project grows and serves a wider audience.
The choice depends on your environment. If you want the fastest path to building a fully typed internal API, tRPC is hard to beat. If your project calls for a shared contract that works across tools, platforms, and languages, oRPC offers the structure that keeps everything aligned. Both are solid options, and the best one is simply the one that fits the shape of your system and your team.

LogRocket lets you replay user sessions, eliminating guesswork by showing exactly what users experienced. It captures console logs, errors, network requests, and pixel-perfect DOM recordings — compatible with all frameworks, and with plugins to log additional context from Redux, Vuex, and @ngrx/store.
With Galileo AI, you can instantly identify and explain user struggles with automated monitoring of your entire product experience.
Modernize how you understand your web and mobile apps — start monitoring for free.

AI-generated tests can speed up React testing, but they also create hidden risks. Here’s what broke in a real app.re

Why the future of DX might come from the web platform itself, not more tools or frameworks.

A hands-on test of Claude Code Review across real PRs, breaking down what it flagged, what slipped through, and how the pipeline actually performs in practice.

CSS art once made frontend feel playful and accessible. Here’s why it faded as the web became more practical and prestige-driven.
Would you be interested in joining LogRocket's developer community?
Join LogRocket’s Content Advisory Board. You’ll help inform the type of content we create and get access to exclusive meetups, social accreditation, and swag.
Sign up now

