
Editor’s note: This post was updated on 16 March 2022 to remove any outdated content and to add information on React Testing Library vs. Jest

Testing is an essential practice in software engineering that helps build robust and high-quality software and boosts a team’s confidence in the code, making the application more flexible and prone to fewer errors when introducing or modifying features.
Highly efficient teams make testing a core practice in their everyday routines, and no feature is released before automated tests are in place. Some developers even write the tests before writing the features, following a process called test-driven development (TDD).
In this article, we’ll test React applications with Jest and React Testing Library, a popular combination of a JavaScript testing framework and a React utility for testing components. It’s also the official recommendation given in React’s documentation.
We’ll cover the following topics:
React Testing Library
React Testing Library vs. JestThe Replay is a weekly newsletter for dev and engineering leaders.
Delivered once a week, it's your curated guide to the most important conversations around frontend dev, emerging AI tools, and the state of modern software.
Testing is the process of automating assertions between the results the code produces and what we expect the results to be.
When testing React applications, our assertions are defined by how the application renders and responds to user interactions.
There are many different types of testing paradigms and philosophies. This article will focus on creating unit and component tests (or integration tests).
React Testing LibraryJest is a JavaScript testing framework that allows developers to run tests on JavaScript and TypeScript code and integrates well with React.
It’s a framework designed with simplicity in mind and offers a powerful and elegant API to build isolated tests, snapshot comparison, mocking, test coverage, and much more.
React Testing LibraryReact Testing Library is a JavaScript testing utility built specifically to test React components. It simulates user interactions on isolated components and asserts their outputs to ensure the UI is behaving correctly.
React Testing Library vs. JestReact Testing Library is not an alternative to Jest. Each performs a clear task, and you need them both to test your components.
Jest is a test runner that finds tests, runs the tests, and determines whether the tests passed or failed. Additionally, Jest offers functions for test suites, test cases, and assertions.
React Testing Library provides virtual DOMs for testing React components.
Any time we run tests without a web browser, we must have a virtual DOM to render the app, interact with the elements, and observe if the virtual DOM behaves like it should (like changing the width of a div on a button click).
React Testing Library is not specific to any testing framework; we can use it with any other testing library, although Jest is recommended and preferred by many developers.
create-react-app uses both Jest and React Testing Library by default. Additionally, [react-scripts] automatically sets up our server to watch for changes, so if the test file is modified, the server automatically compiles and runs the test without needing to restart your server.
To see how these libraries work together, let’s take a look at create-react-app’s autogenerated test file:
import { render, screen } from '@testing-library/react';
import App from './App';

test('renders learn react link', () => {
  render(<App />);
  const linkElement = screen.getByText(/learn react/i)
  expect(linkElement).toBeInTheDocument();
});
Here, the test case is provided by Jest. For rendering and accessing the virtual DOM, we import and use both render and screen from React Testing Library.
If you set up your React app from scratch, then you must install and set up Jest and React Testing Library yourself.
Let’s begin by installing the required libraries and setting up the project. The easiest way to get a React application up and running is by using create-react-app.
I recommend that you follow the steps along with the tutorial by running the commands and writing the code yourself. However, if you prefer to follow the code on the final project result, you can clone the tutorial project from GitHub.
First, create a React app:
npx create-react-app react-jest-tutorial
Now, install React Testing Library:
npm install --save-dev @testing-library/react
Finally, install additional libraries:
npm install axios
Next, let’s build a minimal application that will display users from an API. Because we’ll only focus on the frontend, let’s use the JSONPlaceholder user API. This app is built exclusively for building tests.
Replace the contents of the App.js file with the following:
import { useEffect, useState } from 'react';
import axios from 'axios';
import { formatUserName } from './utils';
import './App.css';

function App() {
 const [users, setUsers] = useState([]);

 // Load the data from the server
 useEffect(() => {
   let mounted = true;

   const getUsers = async () => {
     const response = await axios.get('https://jsonplaceholder.typicode.com/users');
     if (mounted) {
       setUsers(response.data);
     }
Next, create a file called utils.js in the src folder and write the following function:
export function formatUserName(username) {
 return '@' + username;
}
You can now run the app with this command:
npm start
After, you should see this screen.
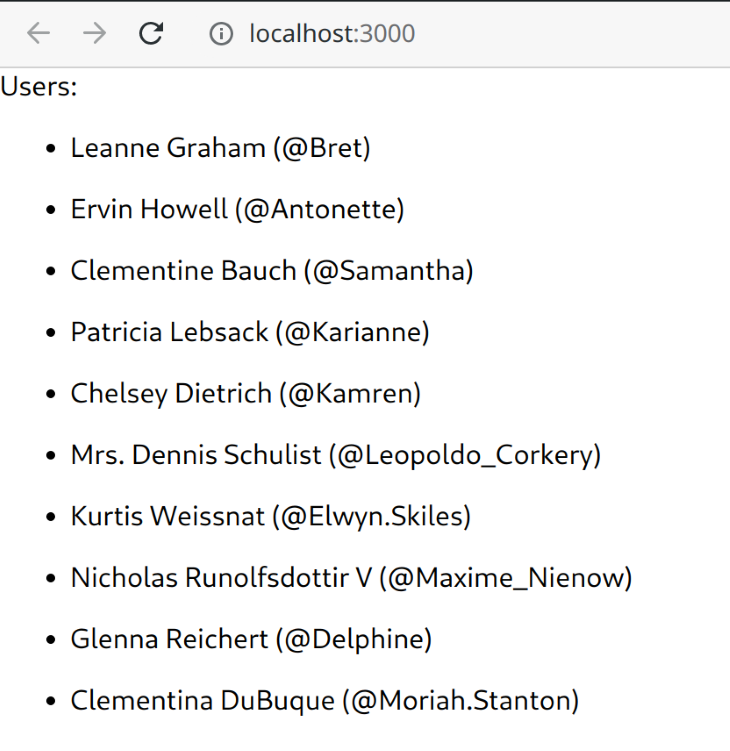
Unit tests test individual software units or components in isolation. A unit could be a function, routine, method, module, or object, and the test objective determines if the unit outputs the expected results for a given input.
A test module comprises a series of methods provided by Jest to describe the tests’ structure. We can use methods like describe or test as follows:
describe('my function or component', () => {
 test('does the following', () => {
   // Magic happens here
 });
});
The describe block is the test suite, and the test block (or simply test) is the test case. A test suite can have multiple test cases, and a test case doesn’t have to be in a test suite, although it’s common practice to do so.
Inside a test case, we can write assertions (for example, expect in Jest) that validate successful (green) or erroneous (red). Each test case can have multiple assertions.
Here is a somewhat trivial example of assertions that turns out successfully:
describe('true is truthy and false is falsy', () => {
 test('true is truthy', () => {
   expect(true).toBe(true);
 });

 test('false is falsy', () => {
   expect(false).toBe(false);
 });
});
Next, let’s write our first test case targeting the function formatUserName from the utils module.
To do this, we must first create a new file: utils.test.js. Note that all test files use the pattern {file}.test.js where {file} is the name of the module file to test.
Our function in question takes a string as an input and outputs the same string adding an @ at its beginning. Our test function can assert that, given a string, for example, "jc", the function will output "@jc".
Here is the code for the test file:
import { formatUserName } from "./utils";

describe('utils', () => {
 test('formatUserName adds @ at the beginning of the username', () => {
   expect(formatUserName('jc')).toBe('@jc');
 });
});
We usefully describe what the module is and what the test case is for so that if they fail, we get a clear idea of what could have gone wrong.
Now that our first test is ready, we can run it and see what outputs. create-react-app makes it easy for us to run all tests by using a simple npm command:
npm run test
For now, let’s focus on running a single test by using the following:
npm run test -- -t 'utils'
We do this because we have other tests already created by create-react-app that we need to ignore for now.
If everything went well, you should see a similar output to the following:
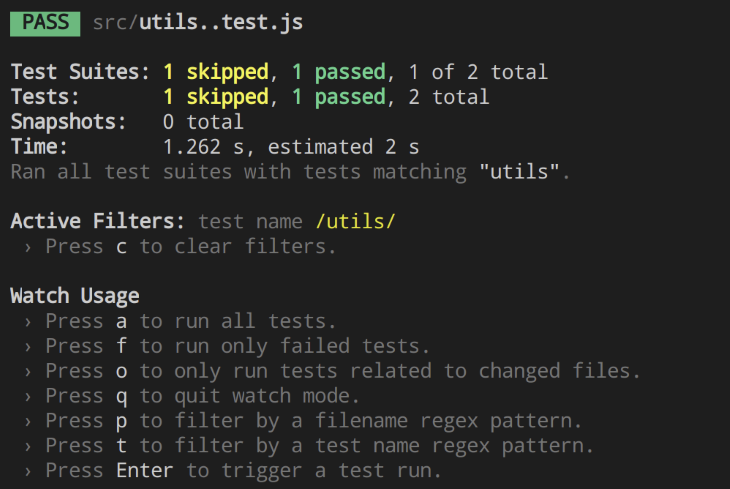
Notice that one test skipped (we wanted it that way) and one test passed successfully. But, what would happen if something went wrong? Let’s add a new test to the utils test suite to find out:
test('formatUserName does not add @ when it is already provided', () => {
   expect(formatUserName('@jc')).toBe('@jc');
 });
Now the situation is different; if the username already contains an @ symbol at the beginning of the string, we expect that the function returns the username as provided, without adding a second symbol.
Let’s run it:
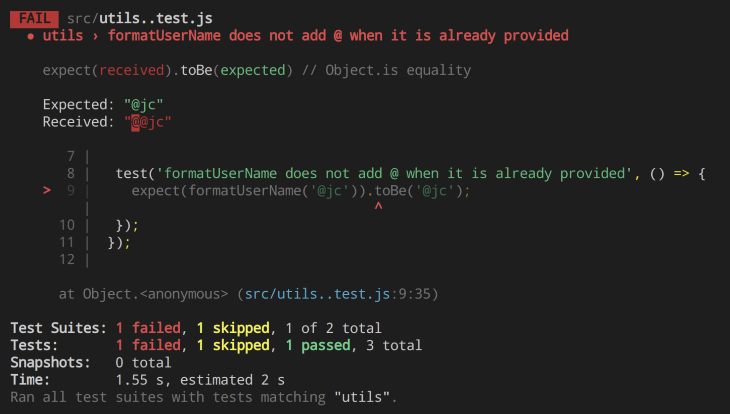
As predicted, the test failed, and we received information specifically about which expect call failed, the expected value, and the actual outcome. Because we’ve detected an issue with our original function, we can fix it:
export function formatUserName(username) {
 return username.startsWith('@') ? username : '@' + username;
}
And now, let’s run our tests once more:
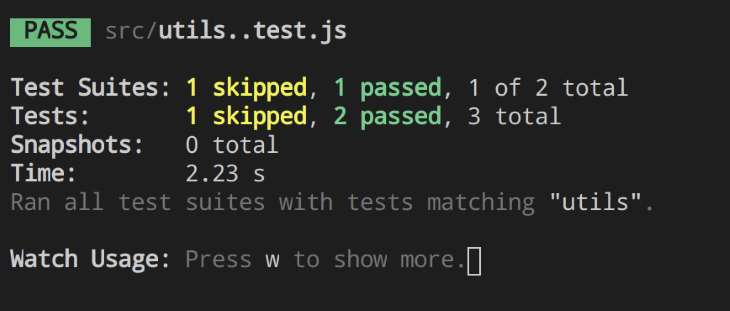
We have made great progress so far. We wrote two test cases for our app, detected a bug thanks to writing those test cases, and fixed it before releasing it.
Testing components is not much different than testing functions. The idea and concepts are the same, but the difference is in how we write the assertions.
We will test our App component by building a few test cases, and on each test case, we will introduce different things we can do to validate React components.
Our first test will be elemental and it will only validate the component renders.
Jump over to the file App.test.js (autogenerated by create-react-app) and replace its contents with the following:
import { render } from '@testing-library/react';
import App from './App';

describe('App component', () => {
 test('it renders', () => {
   render(<App />);
 });
})
Similar to before, we have a describe block and a test block, but this time, we use the render function mount to render an individual component in isolation. This test only fails if there’s a compilation error or an error in the function component that impedes its rendering.
Though valid, it is not a complete test because it does not perform any assertions.
To fix this, we can match for contents in the component and see if they are present, for example:
import { render, screen } from '@testing-library/react';
import App from './App';

describe('App component', () => {
 test('it renders', () => {
   render(<App />);


   expect(screen.getByText('Users:')).toBeInTheDocument();
 });
})
Our new test is better; it validates that the component can render, but it also searches for an element present in the DOM with the text "Users:", which it is in our case, and thus the test passed successfully.
The object [screen] is essential in React Testing Library because it provides helper methods to interact with the components and its elements.
Next, we want to validate that the user list renders with items after the API completes. For that, we can write a test case as follows:
import { render, screen, waitFor } from '@testing-library/react';
import App from './App';

describe('App component', () => {
 test('it displays a list of users', async () => {
   render(<App />);


   expect(screen.getByTestId('user-list')).toBeInTheDocument();
 });
});
However, when we run the tests, it fails with the following message:
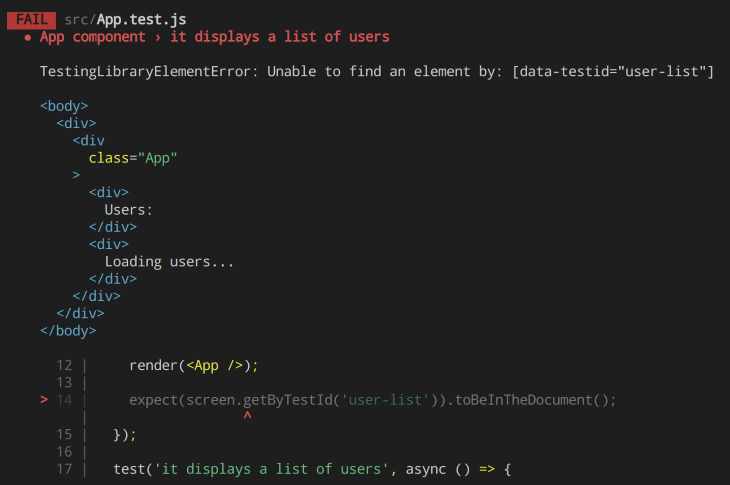
The reason it fails is simple: the async operation (fetch) is still pending when we evaluate the screen, so the "Loading users…" message is shown instead of the user list.
The solution is to wait:
import { render, screen, waitFor } from '@testing-library/react';
import App from './App';

describe('App component', () => {
 test('it displays a list of users', async () => {
   render(<App />);


   const userList = await waitFor(() => screen.getByTestId('user-list'));
   expect(userList).toBeInTheDocument();
 });
});
And now, the tests are passing successfully.
Our next step is to validate how the component will react to the data gathered from the API. But, how can we test the data if we are not sure what the API’s response would be? The solution to this problem is mocking.
The purpose of mocking is to isolate the code tested from external dependencies such as API calls. This is achieved by replacing dependencies with controlled objects that simulate those dependencies.
Mocking is a three-step process. First, we must import the dependencies:
import axios from 'axios';
Then, mock the dependency:
jest.mock('axios');
And finally, fake the function outputs:
axios.get.mockResolvedValue({ data: fakeUsers });
Let’s see them now in action:
import axios from 'axios';
import { render, screen, waitFor } from '@testing-library/react';
import App from './App';

jest.mock('axios');

const fakeUsers = [{
  "id": 1,
  "name": "Test User 1",
  "username": "testuser1",
 }, {
  "id": 2,
  "name": "Test User 2",
  "username": "testuser2",
 }];

describe('App component', () => {

 test('it displays a row for each user', async () => {
   axios.get.mockResolvedValue({ data: fakeUsers });
   render(<App />);


   const userList = await waitFor(() => screen.findAllByTestId('user-item'));
   expect(userList).toHaveLength(2);
 });
});
One last note: because we mock axios, each test case that uses the library will return undefined unless a mocked value passes. So, to recap our full component test, we have the following:
import axios from 'axios';
import { render, screen, waitFor } from '@testing-library/react';
import App from './App';

jest.mock('axios');

const fakeUsers = [{
  "id": 1,
  "name": "Test User 1",
  "username": "testuser1",
 }, {
  "id": 2,
  "name": "Test User 2",
  "username": "testuser2",
 }];

describe('App component', () => {
 test('it renders', async () => {
   axios.get.mockResolvedValue({ data: fakeUsers });
   render(<App />);


   expect(screen.getByText('Users:')).toBeInTheDocument();
 });

 test('it displays a list of users', async () => {
   axios.get.mockResolvedValue({ data: fakeUsers });


   render(<App />);


   const userList = await waitFor(() => screen.getByTestId('user-list'));
   expect(userList).toBeInTheDocument();
 });

 test('it displays a row for each user', async () => {
   axios.get.mockResolvedValue({ data: fakeUsers });
   render(<App />);


   const userList = await waitFor(() => screen.findAllByTestId('user-item'));
   expect(userList).toHaveLength(2);
 });
});
Let’s run all tests and see the results:

Snapshot tests are useful when you want to make sure your UI does not change unexpectedly.
A typical snapshot test case renders a UI component, takes a snapshot, then compares it to a stored reference snapshot file. If the two snapshots match, the test will pass. If the two snapshots do not match this could be due to an unexpected change or due to the reference snapshot needing to be updated to the new version of the UI component.
To write a snapshot test, the react-test-renderer library is needed as it is a library that enables you to render React components to pure JavaScript objects. You can install the library with the following command:
npm i [email protected]
Now, let’s edit the App.js file to include a snapshot test.
import renderer from "react-test-renderer";

// ...

test("it renders a correct snapshot", async () => {
  axios.get.mockResolvedValue({ data: fakeUsers });
  const tree = renderer.create(<App />).toJSON();
  expect(tree).toMatchSnapshot();
});

// ...
Now if we run the test, we should see updated passed test results with the notation: “it renders a correct snapshot”.

The first time this test is run, Jest will create a snapshot file in the __snapshots__ folder. Here’s what the file will look like:
// Jest Snapshot v1, https://goo.gl/fbAQLP

exports[`App component it renders correctly 1`] = `
<div
  className="App"
>
  <div>
    Users:
  </div>
  <div>
    Loading users...
  </div>
</div>
`;
Now, if we go ahead to modify the App component by changing a simple text value, we can expect the it renders a correct snapshot test to fail because the output of the component has changed.
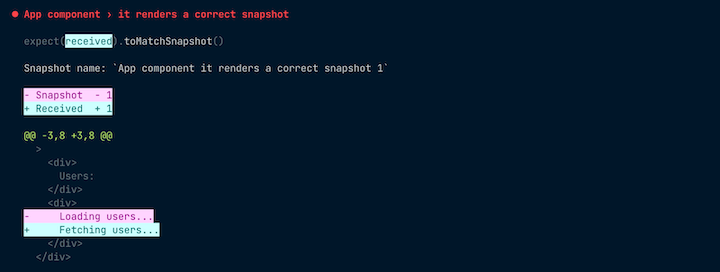
We need to make this test pass and also inform Jest about intentional changes to the tested components. We can easily do this when Jest is in watch mode by first pressing w in the command line to show more, and then pressing u to update the snapshot.

When it comes to testing libraries or frameworks, there are various options and combinations to consider. Here’s a look at some of the most popular testing frameworks and their specific pros and cons.
The React community recommends Jest as the React testing framework of choice. Jest is used by many high-profile companies, such as Facebook, Uber, and Airbnb. Jest also happens to be the default for many JavaScript frameworks out of the box including create-react-app.
Here are some benefits of using Jest to test your React applications:
Enzyme lets you manipulate, traverse, and in some ways simulate runtime given the output. It helps you render components, find elements, and interact with elements.
This library was designed specifically for React, and it offers two testing methods: shallow rendering, which is helpful to test components as a unit without child components, and mount testing. If your components have very high granulation with nested child and grandchild components, it will mean that each of the children will need to have their own specific test to cover all logic.
Enzyme is usually used in conjunction with Jest.
Here are some benefits of using Enzyme to test your React applications:
React Testing LibraryReact Testing library is a lightweight library offering a complete set of utilities for the testing of React DOM. When used with the Jest testing library, React Testing Library allows developers to easily test components to simulate a user’s behavior. React Testing Library comes with inbuilt React DOM testing utilities that emulate actual user actions on a React application. it does not, however, provide support for shallow rendering and accessing a component’s state.
React Testing Library offers the following benefits:
Jasmine is a simple JavaScript testing framework for browsers and Node.js. Jasmine follows a behavior-driven development pattern, so configuration is generally in place before use.
To use Jasmine in testing React applications, developers can add other third-party frameworks such as Enzyme.
Some of Jasmine’s benefits include:
Despite its many benefits, Jasmine isn’t the perfect testing framework for React apps. It doesn’t support snapshot tests, and it requires third-party libraries for parallelization and Native DOM manipulation.
Mocha is a JavaScript framework that runs on Node.js and is used to test React applications. It boasts browser support, async testing, and the use of assertion libraries.
Mocha is very flexible but always requires importing other libraries in order to be able to write tests. Similar to Jest, Mocha may be combined with other libraries like Enzyme for assertion, mocking, etc.
Here are some of the best benefits of using Mocha to test your React applications:
Testing your React application is the key to producing high-quality apps, and, thanks to React, Jest, and React Testing Library, it’s easier than ever to test our components and applications.
All the code for the application and tests are available at GitHub. Thanks for reading!
Install LogRocket via npm or script tag. LogRocket.init() must be called client-side, not
server-side
$ npm i --save logrocket

// Code:

import LogRocket from 'logrocket';
LogRocket.init('app/id');
// Add to your HTML:

<script src="https://cdn.lr-ingest.com/LogRocket.min.js"></script>
<script>window.LogRocket && window.LogRocket.init('app/id');</script>

@container scroll-state: Replace JS scroll listeners nowCSS @container scroll-state lets you build sticky headers, snapping carousels, and scroll indicators without JavaScript. Here’s how to replace scroll listeners with clean, declarative state queries.

Explore 10 Web APIs that replace common JavaScript libraries and reduce npm dependencies, bundle size, and performance overhead.

Russ Miles, a software development expert and educator, joins the show to unpack why “developer productivity” platforms so often disappoint.

Discover what’s new in The Replay, LogRocket’s newsletter for dev and engineering leaders, in the February 18th issue.
Hey there, want to help make our blog better?
Join LogRocket’s Content Advisory Board. You’ll help inform the type of content we create and get access to exclusive meetups, social accreditation, and swag.
Sign up now
2 Replies to "React app testing: Jest and React Testing Library"
If someone has an error about act(): wrap the userList initialization line and the exect one by the waitFor (deleting it from the userList line.
Also, the |findAllBy…| does returns a promise (https://testing-library.com/docs/queries/about/) , replace it by |getAllBy…| for our case
There is a missing chunk of code on the bottom of the first code block for App.js. The code does not work as it is. If you are stuck there, use the following code.
“`
import ‘./App.css’;
import { useState, useEffect } from ‘react’;
import { formatUserName } from ‘./utils’;
function App() {
const [users, setUsers] = useState([]);
// load data from server
useEffect(()=> {
let mounted = true;
const getUsers = async () => {
await fetch(‘https://jsonplaceholder.typicode.com/users’)
.then(response => response.json())
.then((data) => {
if (mounted) {
setUsers(data);
}
})
}
getUsers();
},[]);
return (
Users:
{
users.map( user => (
{ user.name } { formatUserName(user.username) }
))
}
);
}
export default App;
“`