In this post, we’ll use Node.js to build a sentiment analysis application that analyzes text data from user reviews and uses natural language processing (NLP) to determine the user’s sentiment.
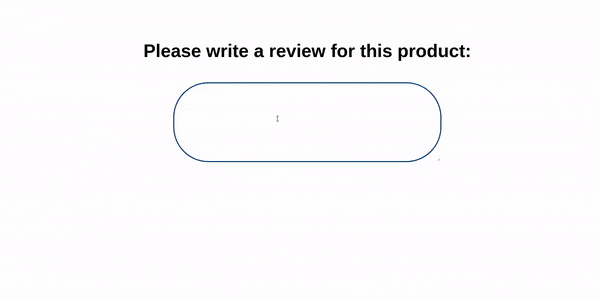
Our final application will look like this:
Before we get started, let’s understand what sentiment analysis and natural language processing mean.
The Replay is a weekly newsletter for dev and engineering leaders.
Delivered once a week, it's your curated guide to the most important conversations around frontend dev, emerging AI tools, and the state of modern software.
Sentiment analysis is the process of analyzing text data and deriving its emotional tone. An example would be classifying a customer’s review of a product into either happy, unhappy, or neutral. To automate this process, we’ll be using natural language processing, a branch of artificial intelligence.
Unlike programming languages, natural languages are often ambiguous and were not designed to be understood by computers — hence the need for a technology that handles its processing in order to derive meaningful and actionable data from it. SAS puts it succinctly:
Natural language processing is a branch of AI that gives computers the ability to interpret, derive meaning from, and manipulate human languages.
Let’s start by building a new Node.js application using the Express framework. We’ll generate a scaffold app with the express-generator CLI tool.
First, we’ll ensure that we have Node installed by running the following command on our terminal:
node --version
If it returns an error message, click here to see Node installation instructions. With Node installed, let’s run the following command on our terminal:
npm install -g express-generator
The express-generator is what we’ll use to scaffold a new Node app. To do this, we’ll run:
express node_nlp --no-view
To start our application, let’s navigate to our new app directory and run npm start:
cd node_nlp
npm start
In our new generated app directory, let’s navigate to ./package.json. We’ll need to set up nodemon to help us automatically restart our application whenever we save new changes. On your terminal, run:
npm install --save nodemon
Next, we’ll add a new script to start our application via nodemon. Under scripts in package.json, add the following code:
"dev": "nodemon ./bin/www"
Moving on, we can start our application by running the following command on our terminal:
npm run dev
Now that we’ve successfully set up our application, let’s implement our sentiment analysis functionality using NLP.
We’ll start by installing Natural, a Node.js package that supports most of the NLP algorithms we’ll be using for our project. Let’s run the following command on our terminal:
npm install --save natural
Next, in our routes directory, we’ll create a new file and call it nlp.js. This is where we’ll house our NLP-related routes for our API. In our new file, ./routes/nlp.js, let’s import the following packages:
const express = require('express');
const natural = require('natural');
After this, we’ll create a new route and give it the path s-analyzer. When users send POST requests to our route with the product review in their request body, they should receive a response containing its sentiment analysis.
To create our new route, let’s modify our ./routes/nlp.js file:
const express = require('express');
const natural = require('natural');

const router = express.Router();

router.post('/s-analyzer', function(req, res, next) {
  const { review } = req.body;
});
Notice that we’ve destructured the user’s review since we’ll be expecting it from our request.body object.
The raw data we get from our user is often filled with a lot of noise and is likely to contain many errors, hence the need to transform it into an understandable/usable format for our NLP algorithm. This step is known as data preprocessing.
To maintain uniform structure in our text data, we need to convert contractions (e.g., I’m, you’re, etc.) to their standard lexicon (i.e., I am, you are, etc.). To do this, let’s install the package apos-to-lex-form by running the following command on our terminal:
npm install --save apos-to-lex-form
Next, we’ll import it in our /routes/nlp.js file and use it for our data conversion:
const express = require('express');
const aposToLexForm = require('apos-to-lex-form');
const natural = require('natural');

const router = express.Router();

router.post('/s-analyzer', function(req, res, next) {
  const { review } = req.body;
  const lexedReview = aposToLexForm(review);
});
During our sentiment analysis, we want all the data in a uniform format. This step ensures that our algorithm treats good and GOOD as the same words. We’ll do this by using JavaScript’s default toLowerCase() function:
...

const router = express.Router();

router.post('/s-analyzer', function(req, res, next) {
  const { review } = req.body;
  const lexedReview = aposToLexForm(review);
  const casedReview = lexedReview.toLowerCase();
});
To improve our accuracy in classifying the user’s sentiment, we’ll remove special characters and numerical tokens since they don’t contribute to sentiment. This process will ensure that our text data is left with only alphabetical characters.
Let’s use JavaScript’s default replace() function to achieve this:
...

const router = express.Router();

router.post('/s-analyzer', function(req, res, next) {
  const { review } = req.body;
  const lexedReview = aposToLexForm(review);
  const casedReview = lexedReview.toLowerCase();
  const alphaOnlyReview = casedReview.replace(/[^a-zA-Z\s]+/g, '');
});
This is the process of splitting a text into its individual meaningful units. We can think of a word as a token of a sentence, and a sentence as a token of a paragraph.
For our next step, we’ll be using the WordTokenizer from our imported Natural package:
...

const router = express.Router();

router.post('/s-analyzer', function(req, res, next) {
  const { review } = req.body;
  const lexedReview = aposToLexForm(review);
  const casedReview = lexedReview.toLowerCase();
  const alphaOnlyReview = casedReview.replace(/[^a-zA-Z\s]+/g, '');

  const { WordTokenizer } = natural;
  const tokenizer = new WordTokenizer();
  const tokenizedReview = tokenizer.tokenize(alphaOnlyReview);
});
Since the product reviews will be manually written by our users, there is a high chance of typographic errors. Before passing our data to our sentiment analysis algorithm, let’s use the spelling-corrector package to correct misspelled words, so that if our user inputs lov by mistake, the correct spelling, love, will be passed to our algorithm.
Let’s start by installing it with the following command:
npm install --save spelling-corrector
Next, we’ll add the following highlighted lines to our ./routes/nlp.js file:
...
const SpellCorrector = require('spelling-corrector');

const router = express.Router();

const spellCorrector = new SpellCorrector();
spellCorrector.loadDictionary();

router.post('/s-analyzer', function(req, res, next) {
  const { review } = req.body;
  const lexedReview = aposToLexForm(review);
  const casedReview = lexedReview.toLowerCase();
  const alphaOnlyReview = casedReview.replace(/[^a-zA-Z\s]+/g, '');

  const { WordTokenizer } = natural;
  const tokenizer = new WordTokenizer();
  const tokenizedReview = tokenizer.tokenize(alphaOnlyReview);

  tokenizedReview.forEach((word, index) => {
    tokenizedReview[index] = spellCorrector.correct(word);
  })
});
Stop words are generally the most common words in a language, which are filtered out before processing. Some examples of stop words include but, a, or, and what. Since these words have no effect on a user’s sentiment, removing them will help us focus on the important keywords.
To do this, we’ll use the stopword package. Let’s install it by running the following command on our terminal:
npm install --save stopword
Next, we’ll add the following highlighted line to our ./routes/nlp.js file:
...
const SW = require('stopword');

const router = express.Router();

const spellCorrector = new SpellCorrector();
spellCorrector.loadDictionary();

router.post('/s-analyzer', function(req, res, next) {
  const { review } = req.body;
  const lexedReview = aposToLexForm(review);
  const casedReview = lexedReview.toLowerCase();
  const alphaOnlyReview = casedReview.replace(/[^a-zA-Z\s]+/g, '');

  const { WordTokenizer } = natural;
  const tokenizer = new WordTokenizer();
  const tokenizedReview = tokenizer.tokenize(alphaOnlyReview);

  tokenizedReview.forEach((word, index) => {
    tokenizedReview[index] = spellCorrector.correct(word);
  })
  const filteredReview = SW.removeStopwords(tokenizedReview);
});
This is a process of word normalization in NLP that is used to convert derived or inflected words to their base or root form. For example, a stemmer algorithm is expected to reduce the words “giving,” “gave,” and “giver” to their root word, “give.”
For our application, we’ll not be performing this process separately because the SentimentAnalyzer from the Natural library provides us with the option of supplying a stemmer as a parameter while calling it. During its analysis, the individual words will be converted to their root form.
Now that we have the text data in our desired state, we can use the SentimentAnalyzer from Natural to make an analysis of our user’s review.
The sentiment analysis algorithm from the Natural library is based on a vocabulary that assigns polarity to words. For example, the word “good” has a polarity of 3, while “bad” has a polarity of -3. The algorithm does its sentiment calculation by summing the polarity of each word in a piece of text and normalizing with the length of a sentence.
This is why preprocessing and removing all the noise from our data was a necessary step to achieve a more accurate result. The text’s sentiment is considered negative if our algorithm returns a negative value, positive if it returns a positive value, and neutral if it returns 0.
The SentimentAnalyzer constructor has three parameters:
Here’s a link to the official sentiment analysis documentation from the Natural library.
To use the algorithm in our application, let’s add the following highlighted code to our ./routes/nlp.js file:
...

router.post('/s-analyzer', function(req, res, next) {
  const { review } = req.body;
  const lexedReview = aposToLexForm(review);
  const casedReview = lexedReview.toLowerCase();
  const alphaOnlyReview = casedReview.replace(/[^a-zA-Z\s]+/g, '');

  const { WordTokenizer } = natural;
  const tokenizer = new WordTokenizer();
  const tokenizedReview = tokenizer.tokenize(alphaOnlyReview);

  tokenizedReview.forEach((word, index) => {
    tokenizedReview[index] = spellCorrector.correct(word);
  })
  const filteredReview = SW.removeStopwords(tokenizedReview);

  const { SentimentAnalyzer, PorterStemmer } = natural;
  const analyzer = new SentimentAnalyzer('English', PorterStemmer, 'afinn');
  const analysis = analyzer.getSentiment(filteredReview);

  res.status(200).json({ analysis });
});

module.exports = router;
In our newly added lines, we destructured the SentimentAnalyzer and PorterStemmer methods from the Natural library, then created a new variable, analyzer and assigned the result of our sentiment analysis to it.
Notice that in the SentimentAnalyzer constructor, we supplied the parameters English (since this is the language we’ll be expecting from our users), PorterStemmer (the type of stemmer we chose for our analysis), and afinn (the type of vocabulary for our analysis).
With our sentiment analysis route set up, the next step will be connecting it to our Express server. To do this, we’ll import the nlp router to our ./app.js file and add it as a route with the /api/nlp path.
Let’s add the following highlighted lines to our ./app.js file:
var express = require('express');
var path = require('path');
var cookieParser = require('cookie-parser');
var logger = require('morgan');

var indexRouter = require('./routes/index');
var nlpRouter = require('./routes/nlp');

var app = express();

app.use(logger('dev'));
app.use(express.json());
app.use(express.urlencoded({ extended: false }));
app.use(cookieParser());
app.use(express.static(path.join(__dirname, 'public')));

app.use('/', indexRouter);
app.use('/api/nlp', nlpRouter);

module.exports = app;
Now that we have our route set up, let’s connect it with the frontend of our application. We’ll be adding a simple form that collects our user’s review and a JavaScript function for making our API call.
Let’s modify our ./public/index.html file to look like this:
<html>

<head>
  <title>Sentiment Analyzer</title>
  <link rel="stylesheet" href="/stylesheets/style.css">
</head>

<body>
  <h1 id="title">Please write a review for this product:</h1>
  <form id="reviewForm">
    <textarea id="review" rows="4" cols="50"></textarea>
  </form>

  <div id="emojiSection"></div>

  <script type="text/javascript" src="./javascripts/index.js"></script>
</body>

</html>
Next, in the /public/javascripts folder, let’s create a new file index.js and paste the following lines code in it:
const submitReview = (e) => {
  e.preventDefault();
  const review = document.getElementById('review').value;
  const options = {
    method: 'POST',
    body: JSON.stringify({ review }),
    headers: new Headers({ 'Content-Type': 'application/json' })
  }

  const emojiSection = document.getElementById('emojiSection');
  const title = document.getElementById('title');
  const outline = document.querySelector(':focus');

  fetch('/api/nlp/s-analyzer', options)
    .then(res => res.json())
    .then (({ analysis }) => {
      if (analysis < 0) {
        emojiSection.innerHTML = '<img src="https://img.icons8.com/emoji/96/000000/angry-face.png">';
        title.style.color = 'red';
        outline.style.borderColor = 'red';
      };
      if (analysis === 0) {
        emojiSection.innerHTML = '<img src="https://img.icons8.com/officel/80/000000/neutral-emoticon.png">';
        title.style.color = '#00367c';
        outline.style.borderColor = '#00367c';
      }
      if (analysis > 0) {
        emojiSection.innerHTML = '<img src="https://img.icons8.com/color/96/000000/happy.png">';
        title.style.color = 'green';
        outline.style.borderColor = 'green'
      }
    })
    .catch(err => {
      emojiSection.innerHTML = 'There was an error processing your request!'
    })
}

document.getElementById('review').addEventListener('keyup', submitReview);
document.getElementById('reviewForm').addEventListener('submit', submitReview);
Notice that we’re rendering an emoji to the emojiSection div we created in our index.html file. We are also changing the color of our application based on the sentiment value received from our API: results less than 0 are considered negative, greater than 0 positive, and equal to 0 neutral.
Now when we start our application and navigate to http://localhost:3000/, it should be able to calculate the sentiment analysis of our product review based on our form input, just like the demo below:
In this article, we’ve covered the basics of natural language processing using Node.js and have built a sentiment analysis application that calculates a user’s sentiment based on the text data received from their review.
Here’s the link to the GitHub repo for our demo app: node_nlp_sentiment_analysis. Feel free to reach out to me via Twitter if you need any further assistance on NLP with Node.js.
 Monitor failed and slow network requests in production
Deploying a Node-based web app or website is the easy part. Making sure your Node instance continues to serve resources to your app is where things get tougher. If you’re interested in ensuring requests to the backend or third-party services are successful, try LogRocket.

LogRocket lets you replay user sessions, eliminating guesswork around why bugs happen by showing exactly what users experienced. It captures console logs, errors, network requests, and pixel-perfect DOM recordings — compatible with all frameworks.
LogRocket's Galileo AI watches sessions for you, instantly identifying and explaining user struggles with automated monitoring of your entire product experience.
LogRocket instruments your app to record baseline performance timings such as page load time, time to first byte, slow network requests, and also logs Redux, NgRx, and Vuex actions/state. Start monitoring for free.

Learn about TypeScript v6’s breaking changes, new ES2025 features, and deprecated options. A complete migration guide from v5 to prepare for v7.

Learn how Vite+ unifies Vite, Vitest, Oxlint, Oxfmt, Rolldown, and Node.js management in one CLI.

AI companies are buying developer tools as coding agents turn runtimes, package managers, and linters into strategic infrastructure.

Learn how AI-assisted development governance uses rules, agents, hooks, and protocols to help AI coding tools produce safer, more consistent code.
Hey there, want to help make our blog better?
Join LogRocket’s Content Advisory Board. You’ll help inform the type of content we create and get access to exclusive meetups, social accreditation, and swag.
Sign up now

