Local storage is a crucial part of mobile app development for maintaining and preserving users’ data until the app is removed. Today, an app’s trustworthiness hinges upon how its data is being saved.

In this tutorial, you’ll learn how to securely save data locally from your Flutter app.
You might be wondering why we need local storage when we can save the data on a server. What if you need the data in your app in offline mode? You don’t want to show the “No Connectivity” warning to your end users, which is why local storage is important.
So, how do you save the data locally? There are several ways to do that in Flutter, but you’ll use the flutter_secure_storage package for this tutorial.
N.B., if you are new to Flutter, please go through the official documentation to learn about it.
flutter_secure_storage is a Flutter plugin used to store data in secure storage. So what is this secure storage, and how secure is it? Well, the description of secure storage changes with consideration for the platform.
If the platform is Android, then flutter_secure_storage stores data in encryptedSharedPreference, which are shared preferences that encrypt keys and values. It handles AES encryption to generate a secret key encrypted with RSA and stored in KeyStore.
For the iOS platform, flutter_secure_storage uses the KeyChain which is an iOS-specific secure storage used to store and access cryptographic keys only in your app.
In the case of the web, flutter_secure_storage uses the Web Cryptography (Web Crypto) API.
Download the starter project containing the prebuilt UI and minimal configuration from here.
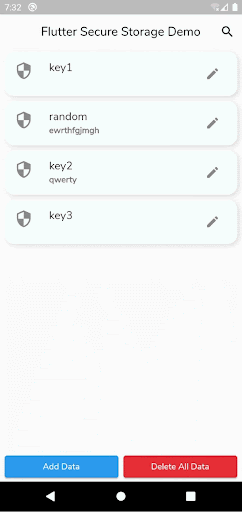
Open it in your editor, then build and run the app:
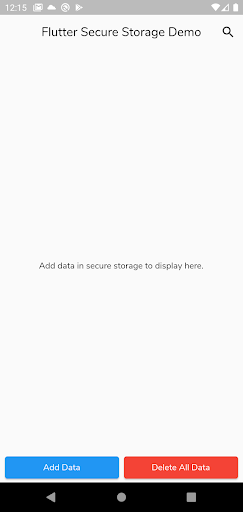
The file structure of the starter project looks like this:
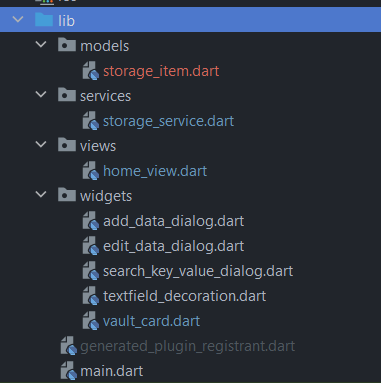
main.dart — the entry point for the whole apphome_view.dart — contains the Home view where the secured data list will be displayedstorage_service.dart — contains the methods responsible for reading, writing, and deleting data from secured storagestorage_item.dart — the model or state to store data in a key-value pair:class StorageItem {
StorageItem(this.key, this.value);
final String key;
final String value;
}
add_data_dialog.dart — a dialog widget used to add new data to the secure storageadd_data_dialog.dart — a dialog widget that edits a StorageItem objectsearch_key_value_dialog.dart — a dialog widget to search for a key valuetextfield_decoration.dart — a widget to add shadow over the input text field in the Dialog widgetsvault_card.dart — a custom widget to display a list tile in the home screen and provide features like editing the value, and long-press value visibilityAdd the flutter_secure_storage in the pubspec dependencies:
#yaml
flutter_secure_storage: ^5.0.2
In your project-level build.gradle file, update the minSdkVersion:
//gradle
android {
    ...
    defaultConfig {
        ...
        minSdkVersion 18
        ...
    }
}
Apps targeting API level 23+ automatically back up almost all the data to Google Drive. You can disable it in your app manifest file:
<!--xml-->
<manifest ... >
    ...
    <application android:allowBackup="true" ... >
        ...
    </application>
</manifest>
If you want to control what gets backed up, you need to define a custom XML rule, as mentioned here.
Be sure to enable HTTP Strict-Transport-Security (HSTS) and other important HTTP security headers because Web Crypto only works when the website is running with HTTPS or localhost.
Use Flutter’s manual installation instead of Flutter Snap. Also, you need libsecret-1-dev and libjsoncpp-dev on your machine to build the project, and libsecret-1-0 and libjsoncpp1 to run the application:
sudo apt reinstall libjsoncpp1 libsecret-1-0 libjsoncpp-dev libsecret-1-dev -y

#OR

sudo apt-get install clang cmake ninja-build pkg-config libgtk-3-dev libblkid-dev liblzma-dev
You are now ready to create a class of all methods required to read, write, and delete data from secure storage.
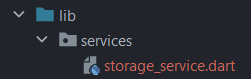
In your lib directory, create a new directory named services and create a secure_storeage.dart file inside it:
Now, create a StorageService class inside the file as below:
import 'package:flutter_secure_storage/flutter_secure_storage.dart';

class StorageService {
 final _secureStorage = const FlutterSecureStorage();
}
Here you initialized _secureStorage, an instance of FlutterSecureStorage().
Now create the method responsible for writing data into secure storage:
Future<void> writeSecureData(StorageItem newItem) async {
 await _secureStorage.write(
     key: newItem.key, value: newItem.value, aOptions: _getAndroidOptions());
}
In the above code, _getAndroidOptions() is also a method of the StorageService class used to set the encryptedSharedPreference property true:
AndroidOptions _getAndroidOptions() => const AndroidOptions(
     encryptedSharedPreferences: true,
   );
You can also create more options methods concerning your device.
N.B., When upgrading the flutter_secure_storage to 5.0.0 in Android, you can migrate to EncryptedSharedPreferences using the above method. This will auto-migrate all the preferences. Once migrated, this cannot be undone. If you try to disable the encryptedSharedPreference, you’ll be unable to read the value.
Next, create the readSecureData method to read the secured data concerning the key:
Future<String?> readSecureData(String key) async {
 var readData =
     await _secureStorage.read(key: key, aOptions: _getAndroidOptions());
 return readData;
}
Now, to delete a key-value pair, create the deleteSecureData method as below:
Future<void> deleteSecureData(StorageItem item) async {
 await _secureStorage.delete(key: item.key, aOptions: _getAndroidOptions());
}
Create a containsKeyInSecureData method responsible for checking whether the storage contains the provided key or not:
Future<bool> containsKeyInSecureData(String key) async {
 var containsKey = await _secureStorage.containsKey(key: key, aOptions: _getAndroidOptions());
 return containsKey;
}
To read all the secured data, create the readAllSecureData method as below:
Future<List<StorageItem>> readAllSecureData() async {
 var allData = await _secureStorage.readAll(aOptions: _getAndroidOptions());
 List<StorageItem> list =
     allData.entries.map((e) => StorageItem(e.key, e.value)).toList();
 return list;
}
In the above code, you return a list of StorageItems after reading all the data.
Next, to delete all the secured data, create the deleteAllSecureData method:
Future<void> deleteAllSecureData() async {
 await _secureStorage.deleteAll(aOptions: _getAndroidOptions());
}
Now, you’ll update the starter project so that you can utilize the above methods.
Let’s start with reading all the data present in the storage and displaying it in the UI. So, in the home_view.dart, first initialize the StorageService instance:
final StorageService _storageService = StorageService();
Next, update the initList() method:
void initList() async {
    _items = await _storageService.readAllSecureData();
    _loading = false;
    setState(() {});
  }
In the above code, you are using the readAllSecureData method to update and set the list in the initState.
This will auto-update the home screen if the data exits as we already have a ListView.builder widget rendering each list item using the VaultCard widget.
To write new data, first update the AddDataDialog widget:
ElevatedButton(
                    onPressed: () {
                      final StorageItem storageItem = StorageItem(
                          _keyController.text, _valueController.text);
                      Navigator.of(context).pop(storageItem);
                    },
                    child: const Text('Secure'))
In the above code, you used the _keyController and _valueController controllers to create a new StorageItem object and return it to the home screen.
Next, use the onPressed property of the Add Data button from your home_view.dart:
ElevatedButton(
 onPressed: () async {
   // 1
   final StorageItem? newItem = await showDialog<StorageItem>(
       context: context, builder: (_) => AddDataDialog());
   if (newItem != null) {
     // 2
     _storageService.writeSecureData(newItem).then((value) {
       setState(() {
         _loading = true;
       });
       // 3
       initList();
     });
   }
 },
 child: const Text("Add Data"),
)
In the above code, you did the following:
newItem: added a nullable StorageItem object coming from the AddDataDialog widgetnewItem object into the writeSecureData method to write new datainitList method to fetch all the existing data from secure storageBuild and restart your app, and you’ll be able to write new data in secure storage.
Now, to delete any particular data from the list, update the ListView.builder widget in the home_view.dart:
ListView.builder(
                    itemCount: _items.length,
                    padding: const EdgeInsets.symmetric(horizontal: 8),
                    itemBuilder: (_, index) {
              // 1
                      return Dismissible(
                        // 2
                        key: Key(_items[index].toString()),
                        child: VaultCard(item: _items[index]),
                        // 3
                        onDismissed: (direction) async {
                          // 4
                          await _storageService
                              .deleteSecureData(_items[index])
                              .then((value) => _items.removeAt(index));
                          // 5
                          initList();
                        },
                      );
                    })
In the above code, you did the following:
VaultCard widget with the Dismissible widget to dismiss the respective card horizontallyKey widget with the help of the current list item to create a unique key for the mandatory key property of the Dismissible widget. You can have random numeric or alphanumeric values as wellonDismissed property of the Dismissible widget to remove the particular card/data from the listdeleteSecureData, you passed the respective element and deleted it. However, make sure to remove the item from the list as well, else the Dismissible widget will throw an errorinitList() method to update the list after deleting the itemBuild and restart your app, and you’ll be able to delete data from the secure storage.
To search existing data, you need the key to use it in the SearchKeyValueDialog widget. So update the AppBar in your home_view.dart to show the SearchKeyValueDialog as below:
 IconButton(
            icon: const Icon(Icons.search, color: Colors.black),
            onPressed: () => showDialog(
                context: context, builder: (_) => const SearchKeyValueDialog()),
          )
Next, initialize the StorageService instance in the SearchKeyValueDialog widget and update the onPressed property of the Search button:
ElevatedButton(
                    onPressed: () async {
                      _value = await _storageService
                          .readSecureData(_keyController.text);
                      setState(() {});
                    },
                    child: const Text('Search'))
Here you have updated the _value by using the readSecureData method and passing the key in it. This will auto-update the dialog and display the value below the button.
Build and restart your app.
To delete all the data, go back to the home_view.dart and update the Delete All Data button:
ElevatedButton(
                  style: ElevatedButton.styleFrom(primary: Colors.red),
                  onPressed: () async {
                    _storageService
                        .deleteAllSecureData()
                        .then((value) => initList());
                  },
                  child: const Text("Delete All Data"),
                )
Here, you utilized the deleteAllSecureData method and updated the list using the initList method.
Editing existing data is performed in the VaultCard widget, so update it by initializing an instance of the StorageService:
final StorageService _storageService = StorageService();
Next, use the EditDataDialog widget to get the updated value back in the VaultCard widget using the StorageItem. Update the EditDataDialog:
final StorageItem item;

const EditDataDialog({Key? key, required this.item}) : super(key: key);
You update the constructor in the above code to receive the StorageItem object.
Next, update the Update button:
ElevatedButton(
                    onPressed: () {
                      Navigator.of(context).pop(_valueController.text);
                    },
                    child: const Text('Update'))
Here you return the updated value to the VaultCard widget.
Now, update the onPressed property of the edit IconButton in the VaultCard:
IconButton(
              icon: const Icon(Icons.edit),
              onPressed: () async {
                // 1
                final String updatedValue = await showDialog(
                    context: context,
                    builder: (_) => EditDataDialog(item: widget.item));
                if (updatedValue.isNotEmpty) {
                  // 2
                  _storageService
                      .writeSecureData(
                          StorageItem(widget.item.key, updatedValue))
                      .then((value) {
                     // 3
                    widget.item = StorageItem(widget.item.key, updatedValue);
                    setState(() {});
                  });
                }
              },
            )
In the above code, you did the following:
StorageItem object as an argument to the EditDataDialog widgetwriteSecureData method if the received value is not emptyStorageItem object itselfBuild and restart your app.
So this is how you can use the flutter_secure_storage. You can also use it at the time of authentication to store user data.
You can find the final project here.
In this tutorial, you learned about flutter_secure_storage and how you can use it in your Flutter app. For the next step, you can use any state management solution with secure storage (such as GetX) for more efficiency, or learn about using the sqlcipher library on both iOS and Android devices, which also provides the ability to store data securely.
There are more databases providing encryption and decryption of data to your Flutter app; it all depends upon how they are supporting it. Is the encrypt/decrypt done on the application layer? Does it depend upon third-party packages?
After understanding how to secure your data locally using the flutter_secure_storage, check out these alternatives, which may make your life easier:
SQFlite with SQLCipher support, or sqflite_sqlcipher, is a plugin which uses the sqflite_common Dart package/wrapper with the SQLCipher library to handle the platform channel calls from SQLite on both iOS and Android.
What is the SQLCipher library? It is a fork of the SQLite database with some features listed below:
You can learn more about the library here.
It has a similar API to the SQLite plugin with the only difference being an optional parameter password in the openDatabase method:
import 'package:sqflite_sqlcipher/sqflite.dart';

Database db = await openDatabase(
  path,
  password: "my password",
  ...
);
On desktop, the encryption is supported by using the SQLCipher with sqflite_common_ffi, which is a SQLite-based FFI implementation(based on SQLite 3) on Linux, macOS, and Windows on both Flutter and Dart VM.
However, there are a few limitations, like the database calls are done in a separate isolate and it is better to use path_provider to get the database path instead of the getDatabasesPath method.
Sembast is a NoSQL persistent database where the whole DB is based on a single text file (JSON format) loaded in memory when opened. The changes to it are appended right away to the file and are autocompacted when required.
It works on Dart VM and Flutter, so it supports all the platforms. Sembast provides a way to support encryption/decryption of data using a user-defined codec (like SHA256) or application layer cryptography using external packages like encrypt, and crypto:
// Initialize the encryption codec with a user password
var codec = getEncryptSembastCodec(password: '[your_user_password]');

// Open the database with the codec
Database db = await factory.openDatabase(dbPath, codec: codec);
The database header will contain a codec encoded signature so that a database cannot be opened if the password is wrong.
Any custom encryption/codec can be used as long as there is a way to encode/decode a JSON encodable object (Map, List, num, String, and Bool) to/from a single line String.
You can learn more about the codec and encryption from here.
Hive supports AES-256 encryption with the only need for a 256-bit encryption key. You can generate the key by yourselves or use the helper function provided by Hive using the Fortuna random number generator.
After generating the key, you can use it to open the box using the encryptionCipher property:
import 'dart:convert';
import 'package:hive/hive.dart';

void main() async {
  final key = Hive.generateSecureKey();
  final encryptedBox= await Hive.openBox('vaultBox', encryptionCipher: HiveAesCipher(key));
  encryptedBox.put('secret', 'Hive is cool');
  print(encryptedBox.get('secret'));
}
Additionally, you should encrypt your key at the application layer as well (using RSA encryption or other) and store it using the flutter_secure_storage plugin mentioned above. This secures your key as well, however, this is done using an external package.
Drift is a persistence library for Flutter and Dart, built on top of SQLite, which supports queries in both SQL and Dart available on mobile. It provides experimental support for the web at the time of writing this update.
Drift on both mobile and desktop is using the sqlite3 to send queries.
To use Drift for encrypted databases, you can use the encrypted_moor package similar to moor_flutter, using the sqflite_sqlcipher library mentioned above as one of the alternatives.
Alternatively, you can use the sqlcipher_flutter_libs package to include native SQLCipher libraries in your app.
You can learn more about the native encryption with Drift from here.
You might have observed by now that majority of the alternatives mentioned above are dependent upon an external package or another alternative mentioned. So make sure to use a database which suits your requirements the most. For me, Sqflite with SqlCipher support looks like a good alternative as I don’t have to create a codec, or depend upon a package to save my keys. Let us know what alternative are you going ahead with and why if possible.
Install LogRocket via npm or script tag. LogRocket.init() must be called client-side, not
server-side
$ npm i --save logrocket

// Code:

import LogRocket from 'logrocket';
LogRocket.init('app/id');
// Add to your HTML:

<script src="https://cdn.lr-ingest.com/LogRocket.min.js"></script>
<script>window.LogRocket && window.LogRocket.init('app/id');</script>

A guide for using JWT authentication to prevent basic security issues while understanding the shortcomings of JWTs.

Discover how to build, render, and automate product demo videos with Remotion, replacing traditional screen recordings with reusable React code.

Chrome’s Modern Web Guidance embeds modern web platform skills into AI coding agents, helping them choose native HTML, CSS, and browser APIs over legacy patterns.

Learn how to use Fallow to analyze AI-generated code, detect dead code, duplicate logic, and complexity issues, and integrate automated code quality checks into your AI-assisted development workflow.
Hey there, want to help make our blog better?
Join LogRocket’s Content Advisory Board. You’ll help inform the type of content we create and get access to exclusive meetups, social accreditation, and swag.
Sign up now

