In this tutorial, we’ll explore the ViewTransition, addTransitionType, and Activity APIs with hands-on guidance. Developers will learn what they can do with these new features in real-world projects.

The React team has released the long-awaited View Transitions and Activity APIs, which at the time of writing this tutorial are still experimental.
Before now, the View Transitions API, which makes it easier to add animations to elements in the DOM with less JavaScript and CSS code when transitioning between pages in web apps, was only available as a native browser API. To optimize the performance of these Animations, the React team further improved on the native View Transitions API to support its virtual DOM.
The new React Activity API offers a more performant approach to pre-render or visually hide parts of your UI while preserving their state.
To follow along with this tutorial, you should have:
The React View Transition API takes care of view transitions behind the scenes. With it, you won’t need to directly interact with the native view transition API, like manually calling the document.startViewTransition() method. It applies a view-transition-name to the closest DOM node inside the <ViewTransition> component, and if the DOM node has sibling nodes, it ensures each gets a unique name.
If a transition is already running, React waits for it to finish before executing another. And if multiple transition updates happen while a transition is in progress, React batches them into a single transition from the current to the latest state.
When a transition starts, React runs lifecycle methods like getSnapshotBeforeUpdate, applies DOM mutations, waits for things like fonts and navigation to finish, measures layout changes, and then figures out what it needs to animate.
After the transition is ready, React lets you hook into callbacks like onEnter, onExit, onUpdate, and onShare for manual control of the transitions.
One thing to watch for: if a flushSync happens in the middle, React skips the transition because it needs to finish synchronously. Finally, React runs useEffect after the animation is done, unless another update forces it to run earlier to keep everything in order.
The React team occasionally introduces experimental features for early testing and feedback from developers before adding them to the stable release. To explore these experimental features, you need to opt into an experimental React build and configure your project based on React documentation or RFCs.
After setting up your React project with Vite or Create React App, install the experimental versions to override the regular react and react-dom packages:
npm install react@experimental react-dom@experimental
Next, check package compatibility because not all third-party packages support experimental builds. The View Transitions and Activity experimental APIs do not require enabling any flag. Check out the React documentation or the RFCs for configuration guides to see which APIs require this.
With this configuration, you can explore the View Transitions and Activity APIs functionality and provide feedback ahead of their official releases.
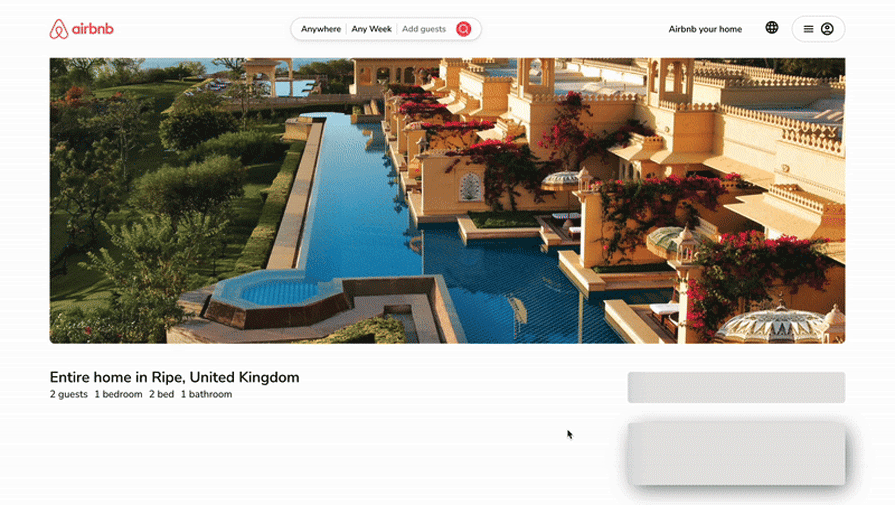
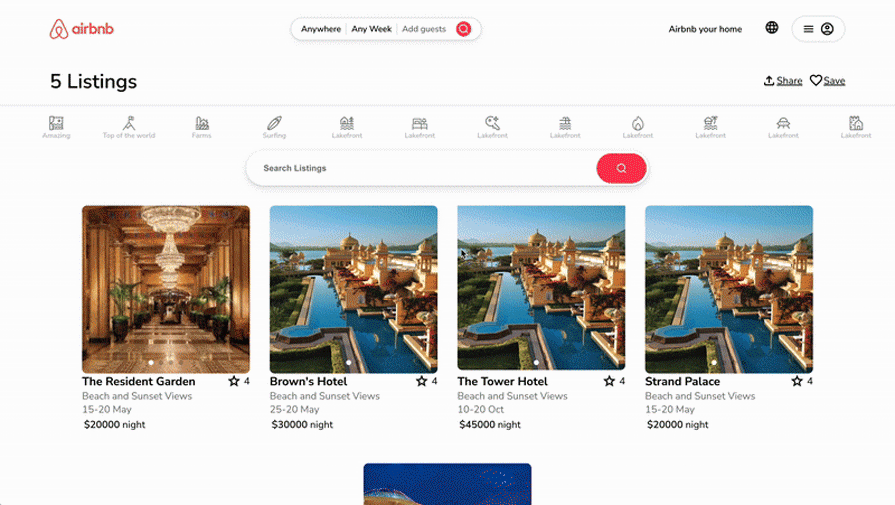
To make this tutorial as practical as possible, we’ll work with an AirBnB clone project, exploring various use cases for the View Transitions and Activity APIs.
The project covers:
Clone the starter project to follow along with this tutorial:
Since transitions between pages or views depend on the routing logic, to work with the React View Transitions API, you have to configure your routers to enable view transitions.
The React View Transitions API supports three triggers (startTransition, useDeferredValue and Suspense) for a View Transition.
In this section, we’ll introduce the startTransition trigger:
startTransition(() => setState(...));
To trigger a view transition, add startTransition to your router config as follows:
import {createContext, useTransition} from "react";
const RouterContext = createContext({ url: "/", params: {} });
export function Router({ children }) {
  const [isPending, startTransition] = useTransition();
  function navigate(url) {
    // Update router state in transition.
    startTransition(() => {
      go(url);
    });
  }
  return (
      <RouterContext
        value={{
          ...,
          navigate
        }}
      >
        {children}
      </RouterContext>
  )
}
The useTransition Hook handles navigation as a low-priority update (non-blocking). When you call navigate("/new-url"), it triggers a transitioned navigation, then calls the go(URL) function that updates the URL and router state during the transition.
For the full router configuration for this demo, check out the router.jsx file.
Now you can add <ViewTransition> to the App component to animate between page transitions:
import {useRouter} from './router';
import "./App.css";
import Listing from "./views/Listing";
import Home from './views/Home';
function App() {
  const { url } = useRouter();
  return (
    <ViewTransition>
      {url === "/" ? <Home /> : <Listing/>}
    </ViewTransition>
  )
}
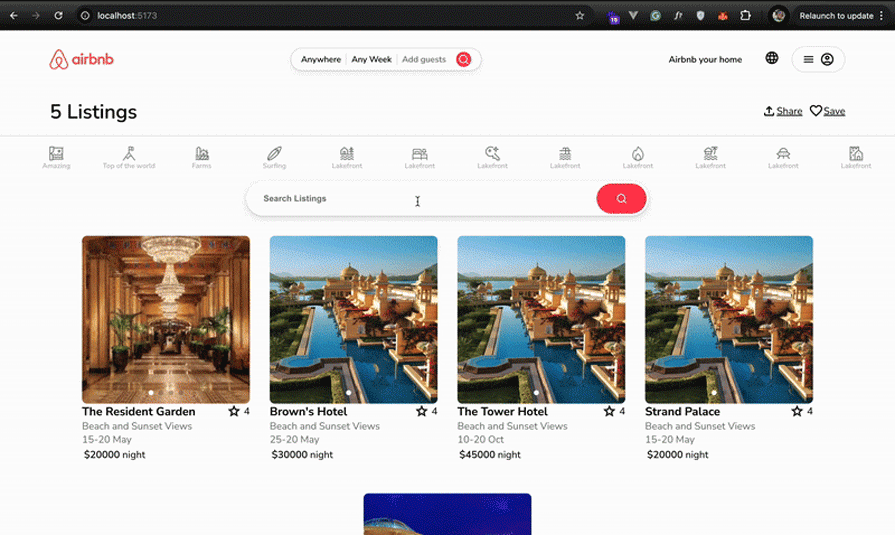
Run the app, and you’ll notice the subtle cross-fade animation on page transition between the home page and the listing page.
Customizing the default animations in view transition is as easy as adding the default prop to the <ViewTransition> component and setting its value to the transition class (CSS class name(s)) applied by React during the transition:
<ViewTransition default="transition-classname">
  {url === "/" ? <Home /> : <Listing/>}
</ViewTransition>
Then define the transition-classname in CSS to control the page transitions using traditional CSS:
::view-transition-old(.transition-classname) {
    animation-duration: 1000ms;
}
::view-transition-new(.transition-classname) {
    animation-duration: 1000ms;
}
The transition class includes: slide-in, slide-out, fade-in, fade-out etc.
With this, you can customize the view transition’s default cross-fade animation.
Update App.js with the following:
...
import {unstable_ViewTransition as ViewTransition} from 'react';

function App() {
  const { url } = useRouter();
  return (
    <ViewTransition default="slow-fade">
      {url === "/" ? <Home /> : <Listing />}
    </ViewTransition>
  );
}
Then add the following to App.css:
::view-transition-old(.slow-fade) {
    animation-duration: 1000ms;
}
::view-transition-new(.slow-fade) {
    animation-duration: 1000ms;
}
Run the app, and you’ll see that the cross fade is slower:
The typical use case for a shared element transition is a thumbnail image on our home page transitioning into a full-width listing image on the listing details page.
To implement this, add a unique name to the <ViewTransition>. Update the Thumbnail component as follows:
import {  unstable_ViewTransition as ViewTransition } from "react";

export function Thumbnail({ listing, children }) {
  return (
    <ViewTransition name={`listing-${listing.id}`}>
      {children}
    </ViewTransition>
  );
}
This adds a unique name to animate with a shared element transition. When React detects that a <ViewTransition> with a specific name is removed and a new <ViewTransition> with the same name is added, it automatically triggers a shared element transition between them:
addTransitionType APIReact’s View Transition API supports animating based on the cause of the transition. With this, you can use the addTransitionType API to specify the cause of a transition.
Add addTransitionType to the startTransition trigger:
startTransition(() => {
  addTransitionType('nav-forward');
  go(url);
});
This sets the cause of transition to nav-forward. Now you can update the <ViewTransition>
component with the following:
<ViewTransition
  name="nav"
  share={{
    'nav-forward': 'slide-forward',
  }}>
  ...
</ViewTransition>
React will apply the slide-forward transition class to animate the <ViewTransition> based on the nav-forward transition type.
To see this in practice, update the navigate and navigateBack methods in router.js with the following:
function navigate(url) {
  startTransition(() => {
    addTransitionType('nav-forward');
    go(url);
  });
}
function navigateBack(url) {
  startTransition(() => {
    addTransitionType('nav-back');
    go(url);
  });
}
Wrap {heading} prop in Layout.jsx with the following:
<ViewTransition
  name="nav"
  share={{
    'nav-forward': 'slide-forward',
    'nav-back': 'slide-back',
  }}>
  {heading}
</ViewTransition>
Then define the 'slide-forward' and 'slide-back' transition classes in App.css as follows:
/* Animations for view transition classed added by transition type */
::view-transition-old(.slide-forward) {
  /* when sliding forward, the "old" page should slide out to left. */
  animation: 150ms cubic-bezier(0.4, 0, 1, 1) both fade-out,
  400ms cubic-bezier(0.4, 0, 0.2, 1) both slide-to-left;
}
::view-transition-new(.slide-forward) {
  /* when sliding forward, the "new" page should slide in from right. */
  animation: 210ms cubic-bezier(0, 0, 0.2, 1) 150ms both fade-in,
  400ms cubic-bezier(0.4, 0, 0.2, 1) both slide-from-right;
}
::view-transition-old(.slide-back) {
  /* when sliding back, the "old" page should slide out to right. */
  animation: 150ms cubic-bezier(0.4, 0, 1, 1) both fade-out,
  400ms cubic-bezier(0.4, 0, 0.2, 1) both slide-to-right;
}
::view-transition-new(.slide-back) {
  /* when sliding back, the "new" page should slide in from left. */
  animation: 210ms cubic-bezier(0, 0, 0.2, 1) 150ms both fade-in,
  400ms cubic-bezier(0.4, 0, 0.2, 1) both slide-from-left;
}
/* New keyframes to support our animations above. */
@keyframes fade-in {
  from {
      opacity: 0;
  }
}
@keyframes fade-out {
  to {
      opacity: 0;
  }
}
@keyframes slide-to-right {
  to {
      transform: translateX(50px);
  }
}
@keyframes slide-from-right {
  from {
      transform: translateX(50px);
  }
  to {
      transform: translateX(0);
  }
}
@keyframes slide-to-left {
  to {
      transform: translateX(-50px);
  }
}
@keyframes slide-from-left {
  from {
      transform: translateX(-50px);
  }
  to {
      transform: translateX(0);
  }
}
This allows the name of the property in the listing detail page to slide in from the right upon entering the page. The number of listed properties in the Home page slides in from the left upon returning to the page:
Make sure to use unique name props on the <ViewTransition> component to avoid the following error: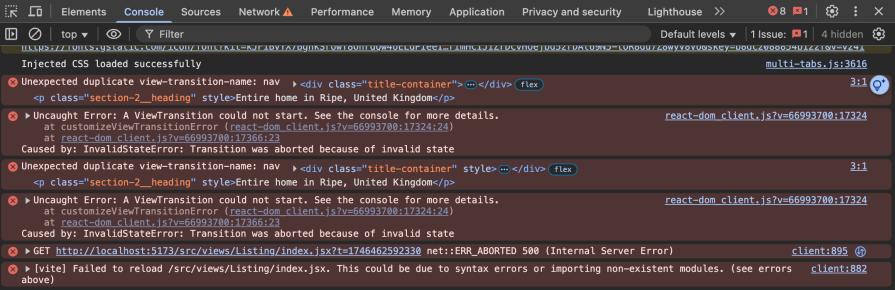
In the router section, we mentioned Suspense as one of the React View Transitions API supported triggers. In this section, we’ll explore animating the suspense boundaries with the Suspense trigger.
To implement this, wrap the Suspense component with <ViewTranstion>:
<ViewTransition>
  <Suspense fallback={<ReservationFallback />}>
    <Reservation id={listing.id} />
  </Suspense>
</ViewTransition>
You can also animate the Suspense fallback and content individually for a more granular animation experience.
Update the Suspense in Listing/index.jsx with the following:
import React, { Suspense, unstable_ViewTransition as ViewTransition  } from "react";
const Listing = ({listing}) => {
  return (
    <div>
      <ViewTransition default="slow-fade">
        <Suspense fallback={<ViewTransition exit="slide-down"><ReservationFallback /></ViewTransition>}>
          <ViewTransition enter="slide-up">
            <Reservation id={listing.id} />
          </ViewTransition>
        </Suspense>
      </ViewTransition>
    </div>
  )
}
Add the slide-down and slide-up transition classes to App.css:
/* Slide the fallback down */
::view-transition-old(.slide-down) {
  animation: 150ms ease-out both fade-out, 150ms ease-out both slide-down;
}

/* Slide the content up */
::view-transition-new(.slide-up) {
  animation: 210ms ease-in 150ms both fade-in, 400ms ease-in both slide-up;
}

/* Define the new keyframes */
@keyframes slide-up {
  from {
      transform: translateY(10px);
  }
  to {
      transform: translateY(0);
  }
}

@keyframes slide-down {
  from {
      transform: translateY(0);
  }
  to {
      transform: translateY(10px);
  }
}
This will slide the Suspense fallback down and slide the content up:
useDeferredValueWe also mentioned useDeferredValue as one of the React View Transitions API supported triggers. In this section, we’ll explore Triggering Animation with the useDeferredValue trigger.
Let’s consider the use case of animating filtered or re-ordered elements from a list:
const [searchText, setSearchText] = useState("");
const deferredSearchText = useDeferredValue(searchText);
const foundListings = filterListings(listings, deferredSearchText);
Then wrap the component that depends on foundListings with <ViewTransition>:
<ViewTransition>
    <Cards list={foundListings} />
</ViewTransition>
To see this in practice, update the Home component in Home/index.jsx with the following:
 export default function Home() {
  const listings = use(fetchListings());
  const count = listings.length;
  const [searchText, setSearchText] = useState("");
  const deferredSearchText = useDeferredValue(searchText);
  const foundListings = filterListings(listings, deferredSearchText);
  return (
    <Layout heading={<p className="section-1__title">{count} Listings</p>}>
      <Filter />
      <SearchInput value={searchText} onChange={setSearchText} />
      <div className="listing-list">
        {foundListings.length === 0 && (
          <div className="no-results">No results</div>
        )}
        <div className="listings">
          <ViewTransition>
              <Cards list={foundListings} />
          </ViewTransition>
        </div>
      </div>
    </Layout>
  );
}
Now, you should notice the animation while searching for a property listing on the Home page.
The new React Activity API offers a more performant approach to pre-render or visually hide parts of the UI while preserving their state, compared to the performance costs of unmounting or hiding with CSS.
The applicable use case for the Activity API includes saving state for parts of the UI the user isn’t using and pre-rendering parts of the UI that the user is likely to use next.
With the current implementation of the demo app, when the user enters a value in the search field and navigates to the listing detail page, the value in the search field disappears once the user returns to the Home page.
To ensure that this value is persisted upon leaving the Home page, wrap the Home component in App.jsx with <Activity> as follows:
<Activity mode={url === '/' ? 'visible' : 'hidden'}>
  <Home />
</Activity>
To pre-render parts of the UI that the user is likely to visit next, update App.jsx with the following:
function App() {
  const { url } = useRouter();
  const listingId = url.split("/").pop();
  const listings = use(fetchListings());

  return (
    <ViewTransition default="slow-fade">
      ...
      {listings.map((listing) => (
        <Activity key={listing.id} mode={Number(listingId) === listing.id ? 'visible' : 'hidden'}>
          <Listing listing={listing}/>
        </Activity>
      ))}
    </ViewTransition>
  );
}
export default App;
This pre-renders the Listing component for all the listing items. Once the listing detail page is visited and the listing id matches the listingId popped from the URL, the Listing component renders completely.
Update the Listing component in Listing/index.jsx to receive the listing prop:
const Listing = ({listing}) => {
  const { url, navigateBack } = useRouter();
  return (...)
}
With the pre-render implementation, the Suspense component will animate and render immediately without the fallback.
Here is what the final build looks like:
You can also find the code for the final build on GitHub.
In this tutorial, we explored the new React View Transitions, addTransitionType, and Activity API with hands-on examples in a real-world application. We also covered animating elements on page transitions, animating a shared element, animating the reorder of items in a list, animating from Suspense content, customizing animations, pre-rendering, and visually hiding parts of your UI while preserving their state.
Keep in mind that experimental features can change or be removed at any time. It’s best to avoid them in production as they can break your app in future updates. Use them only in development environments, and always check the release notes for breaking changes.
If you encounter any issues while following this tutorial or need expert help with web/mobile development, don’t hesitate to reach out on LinkedIn. I’d love to connect and am always happy to assist!
Install LogRocket via npm or script tag. LogRocket.init() must be called client-side, not
server-side
$ npm i --save logrocket

// Code:

import LogRocket from 'logrocket';
LogRocket.init('app/id');
// Add to your HTML:

<script src="https://cdn.lr-ingest.com/LogRocket.min.js"></script>
<script>window.LogRocket && window.LogRocket.init('app/id');</script>

Learn how to set up Meilisearch, index documents, and build keyword, semantic, and hybrid search with AI-powered retrieval.

Compare pnpm and npm across security defaults, disk usage, dependency strictness, and workspace policy to decide which package manager fits your project.

I migrated 20 production-style components from Tailwind to StyleX. Here’s what the data showed about LOC, CSS bundle size, build time, and type safety.

A guide for using JWT authentication to prevent basic security issues while understanding the shortcomings of JWTs.
Would you be interested in joining LogRocket's developer community?
Join LogRocket’s Content Advisory Board. You’ll help inform the type of content we create and get access to exclusive meetups, social accreditation, and swag.
Sign up now

