The web platform has remained attractive to both software developers, product owners, and stakeholders alike because of its reach and universal access. Powerful web apps work everywhere regardless of device type or operating system. Now, when combined with the PWA sauce, web apps get the added benefits of offline access, alongside other capabilities that were previously only possible on native platforms.

Despite the fact that PWAs have come a long way since they were popularized by Google in 2015, there’s still a long way to go. In order to continually bridge the gap between what’s possible on the web versus on native, Google, Microsoft, Intel, and some other corporations came together to initiate, “The Web Capabilities Project” or what is commonly known as Project Fugu, with one goal:
Web apps should be able to do anything native apps can
In this article, we’ll learn about five new APIs that have recently been shipped from Project Fugu to help developers build full-featured apps on the web.
The Replay is a weekly newsletter for dev and engineering leaders.
Delivered once a week, it's your curated guide to the most important conversations around frontend dev, emerging AI tools, and the state of modern software.
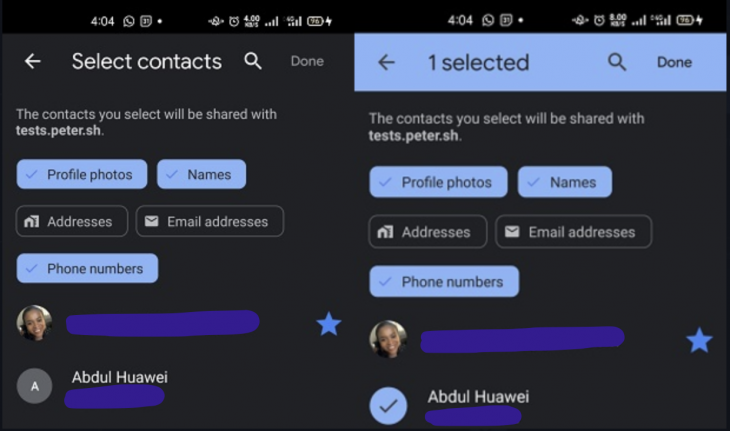
The Contact API gives you access to a user’s contact list, (with their permission, of course) the way native apps do. For example, let’s assume you’re building a web app that helps people come up with random thoughtful messages for their friends.
Previously if you want to send a message generated in a web application to a member of your contact list, you would have to copy the message, switch screens to go to your phone contact, select the target contact, tap to send a message, paste the text, then send. With the new Contact API, you can now add the option to let users automatically select a contact from their contact list to send the generated message to, as opposed to having to manually copy it, look for the receiving contact, paste, and then send.
With the Contact API, there is no need to switch screens. App developers can add the option to select the contact right from their application. You won’t have to copy and paste and you won’t have to switch apps.

A few things you should know about this API:
To get started with the Contact API:
const sendMessage = async() => {
  const isSupported = ('contacts' in navigator && 'ContactsManager' in window);
  const availableProperties = await navigator.contacts.getProperties();
  if(isSupported && availableProperties.includes('tel')){
    try{
      const props = ['name','tel',];
      const opts = {multiple: true};
      const contacts = await navigator.contacts.select(props, opts);
      functionToSendMessageToSelectedContacts(contacts);
    }catch{
      //handle any errors
    }
  }else{
    alert('Contacts API not supported in this browser, please copy and paste message instead')
  }
}
The navigator.contacts.getProperties method returns a promise that resolves to an array of strings containing contact properties supported by a particular browser, like (name, email,tel, address,icon). navigator.contacts.select does two things — when called, it returns a promise and displays the contact picker to allow the user to select the contact(s) they want to share with the site. After selecting the contacts to share and clicking Done, the promise resolves with an array of contacts selected by the user. It accepts two arguments — an array of properties that should be returned for each contact and a multiple indicator to specify whether multiple contacts can be selected or not.
To see the Contact API in action, check out this demo app.
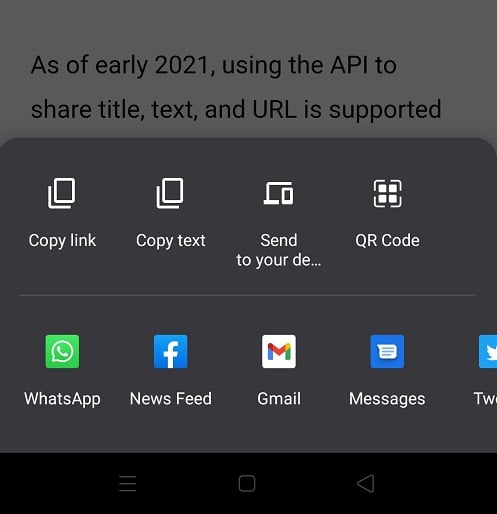
The first release of the Web Share API, which was launched in Chrome 61 for Android, allows websites to share textual data to any supported destination selected by the user, using their device’s native sharing capabilities. This is made possible via the navigator.share() method, which takes in an object that contains either a url and/or text property with an optional title property:
shareButton.addEventListener("click", async () => {
  if(navigator.share){
    try {
        await navigator.share({
          title: "5 Developer NewsLetters to help you grow as a frontend developer ",
          url: "https://www.codewithlinda.com/blog/developer-newsletters-to-help-you-grow/",
          text:"Discover 5 new newsletters that will help you grow in your career"
});
       console.log("Data was shared successfully");
    }catch (err) {
       console.error("Share failed:", err.message);
    }
    }else{
      console.log("Share not supported")
   }
});
Like every other sensitive API, the share method can only be triggered via a gesture to prevent abuse. When a user clicks the share button, the navigator.share() method is called, it triggers the user’s device share target picker to pop up and then returns a promise that resolves when the user selects an application to share to.

After a while, an addition was made to the Web Share API to allow the sharing of files alongside the text, via an added files property that accepts an array of files to be shared. This addition was tagged as the Web Share API Level 2 and was shipped to Chrome 75 and upwards on Android:
if (navigator.canShare && navigator.canShare({ files: [...files] })) {
  try{
      await navigator.share({
         files: [...files],
         title: 'Pictures',
         text: 'Our Pictures.',
      })
     console.log('Share was successful.')
   }catch(error){
     console.log('Sharing failed', error)
   }
} else {
  console.log(`Your system doesn't support sharing files.`);
}
The navigator.canShare() method checks if the intended files can be shared by the browser.
At the time of writing this article, Chrome does not support sharing of PDF files (see permitted file type extensions for Chrome).
Note that files passed to the files property should be in the form of JavaScript File objects, like what is retrieved from <input type='file'>.
Here’s a demo of the Web Share API Level 1 and 2 in action. Also, see the current browser support table here.
That’s not all, to take web sharing up a notch, the Web Target API Level 1 and 2 were released on Chrome 71 and Chrome 75 on Android. The Web Target Share API allows installed PWAs to be on the receiving end of sharing. Now, instead of only being able to provide content to be shared, installed PWAs can also receive shared content.
To do this, you first need to register your app as a share target within your manifest file:
//In manifest.json
{
  "share_target": {
    "action": "share.html",
    "params": {
      "title": "name",
      "text": "description",
      "url": "link"
    }
  }
}
The action property specifies the URL to handle the shared content within your PWA. How you decide to handle incoming shared data is really up to you and what your app does.
To see the Web Share Target API in action, check out this demo app. For browser support, the Web Share Target API is (at the time of writing this article) supported by Chrome and Edge 76 or later on Android and Chrome 89 or later on Chrome OS.
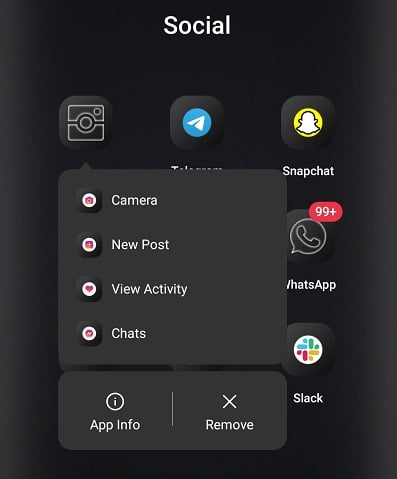
If you long press an application icon on your mobile device, a list of shortcuts will pop up. For example, if you long press the Instagram launcher icon on your device, a panel that lists Camera, New Post, Activity, and Chats will pop up.

This is exactly what the App Shortcuts API, released in Chrome 84 for Android and Chrome 85 for Windows, does for PWAs. Developers can now provide quick access to common actions that users frequently perform within their application. The presence of app shortcuts has been suggested to enhance users’ productivity as well as increase their levels of engagement with the web app.
To add app shortcuts to your PWA, add a shortcuts entry to your manifest file. For example, if you’re building a stock investment web app, your shortcuts could include “Buy Shares”, “Sell Shares” and “Deposit Funds”:
//in manifest.json
"shortcuts": [
    {
      "name": "Buy Shares",
      "url": "/buy-shares?utm_source=homescreen",
    },
    {
      "name": "Sell Shares",
      "url": "/sell-shares?utm_source=homescreen",
    },
    {
      "name": "Deposit Funds",
      "url": "/deposit-funds?utm_source=homescreen",
    },
]
The shortcuts manifest entry is an array of objects containing information for individual shortcuts. Each shortcut object should have a name and url property with or without optional short-name, description, and icon properties.
A few things you should know about this API:
Use this link to view current browser support. To see the app shortcuts in action, see this demo app.
You’ve probably seen those numbers displayed in the top right of app icons on your phone or desktop, indicating how many unread messages, notifications, or updates exist within the app. These usually serve as visual cues to get users to open the app and see what’s waiting, which increases engagement. The good news is, with the new Badging API, you can now add the same functionality to your PWAs.

The Badging API provides two methods — navigator.setAppBadge and navigator.clearAppBadge. The navigator.setAppBadge(value) method sets the value of the badge to the value of the value argument passed to it, while the navigator.clearAppBadge() removes the app’s badge:
if( "setAppBadge" in navigator && "clearAppBadge" in navigator){
   try{
      await navigator.setAppBadge(badgeCount)
   }catch(error){
      //handle errors here
   }
}
How you decide to implement badging for your PWA really depends on you and what you want to achieve with your app.
At the time of writing this, the Badging API does not work on mobile, but it currently works on Windows and macOS, in Chrome 81, and on Edge 84 or later. See the current browser support table here.
To see the Badging API in action, visit this demo app.
Depending on the user-defined settings of a device, a device is likely to go to sleep after a few minutes of being idle or not receiving any user gestures like a click or touch. This behavior can get frustrating, especially when you’re using virtual experience apps that require you to just watch or observe without any interactions. You’ll have to either tap or touch the screen at intervals to prevent the screen from dimming and eventually going off. Examples of such apps are a virtual tour app, a presentation app, or a follow-along recipe app.
The ability to prevent screens from going to sleep has only been available to native applications. Prior to the Screen Wake Lock API, web developers had to resort to hacky, security prone, and power-hungry workarounds to achieve this behavior.
To activate a screen lock:
let wakelock = null;
const requestWakeLock = async () => {
  if ('wakeLock' in navigator) {
      try {
        wakeLock = await navigator.wakeLock.request();
      catch (err) {
        console.error(`${err.name}, ${err.message}`);
    }
  }
}
Unlike previous APIs, this API does not require user gestures to be activated. The navigator.wakeLock.request() method is used to request a screen wake lock. It returns a promise which resolves to a WakeLockSentinel object if the request was successful. The wakelock variable is used to hold a reference to the WakeLockSentinel object, as you may need to access some of its methods and properties later.
To preserve battery life, it is advised to release the screen lock after it has fulfilled its purpose. For example, in the case of the virtual tour app, the screen lock should be released at the end of the tour. This can be done using the release method of the WakeLockSentinel object:
wakeLock.release();
wakeLock = null;
Release the screen lock and also release the reference to the existing WakeLockSentinel object by setting wakeLock variable back to null.
According to the Screen Wake Lock API lifecycle, when a page or window with an active screen lock is minimized or switched from, the screen wake lock will automatically be released. To reacquire the screen wake lock, listen for the visibilitychange event:
const handleVisibilityChange = async () => {
    if (wakeLock !== null && document.visibilityState === 'visible') {
        await requestWakeLock();
    }
};

document.addEventListener('visibilitychange', handleVisibilityChange);
First, check if there is an existing WakeLockSentinel object reference and if the page is visible to ensure that we only reacquire screen wake lock when the target page or window becomes active again.
To see what the WakeLockSentinel object looks like, you can run await navigator.wakeLock.request() on your browser’s console.
To see the Screen Wake Lock API in action, check out this demo web app. See the current browser support table here.
In this article, you’ve been introduced to five exciting APIs that will help you build better featured PWAs. Now, go build something great!
Install LogRocket via npm or script tag. LogRocket.init() must be called client-side, not
server-side
$ npm i --save logrocket

// Code:

import LogRocket from 'logrocket';
LogRocket.init('app/id');
// Add to your HTML:

<script src="https://cdn.lr-ingest.com/LogRocket.min.js"></script>
<script>window.LogRocket && window.LogRocket.init('app/id');</script>

@container scroll-state: Replace JS scroll listeners nowCSS @container scroll-state lets you build sticky headers, snapping carousels, and scroll indicators without JavaScript. Here’s how to replace scroll listeners with clean, declarative state queries.

Explore 10 Web APIs that replace common JavaScript libraries and reduce npm dependencies, bundle size, and performance overhead.

Russ Miles, a software development expert and educator, joins the show to unpack why “developer productivity” platforms so often disappoint.

Discover what’s new in The Replay, LogRocket’s newsletter for dev and engineering leaders, in the February 18th issue.
Would you be interested in joining LogRocket's developer community?
Join LogRocket’s Content Advisory Board. You’ll help inform the type of content we create and get access to exclusive meetups, social accreditation, and swag.
Sign up now