As a product manager, you’re responsible for ensuring that you create a functional product with an intuitive user journey. To help you accomplish this, you can use a user flow diagram to visualize how users interact with your product in each stage. This will allow you to see the way users move through your product and come to a better understanding of the user decision-making process.
User flow diagrams also enable you to streamline navigation, remove pain points, and create a more engaging experience.
In this article, you will learn what a user flow diagram is, the different types of user flows, and how you create and implement them within your team.
A user flow diagram is a visual representation of a user’s journey through your product. It shows the sequence of actions that a user takes from their initial interaction all the way through to their end goal.
User flow diagrams are usually used by product managers and UX designers to better understand and improve the user experience. The diagrams help to identify pain points and areas of confusion to make informed decisions about functionality.
According to the NN Group, user flows can be represented in three ways:
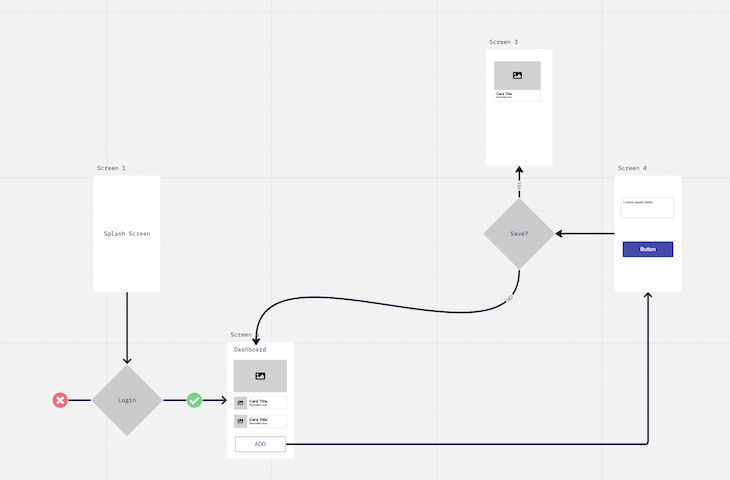
Wireflows are a visual representation of the screens in an app, alongside their user interactions. They can vary from very low fidelity (see example below) to high fidelity screens with arrows linking them. Wireflows provide an overview of all the interactions on a screen, where they lead, and any decision points:
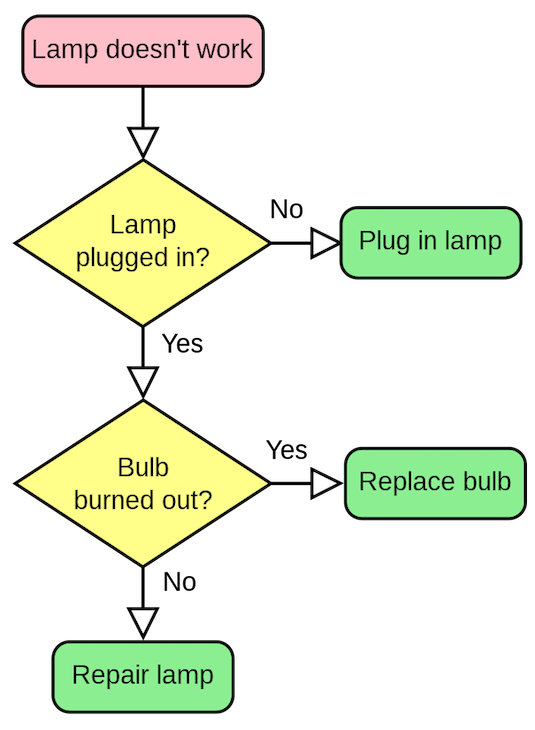
A flowchart is “a diagram of the sequence of movements or actions of people or things involved in a complex system or activity (Oxford Languages).” It shows a user’s journey through an application, including business logic and alternate flows. They can be used to map out flows inside an application, but also to map business processes:
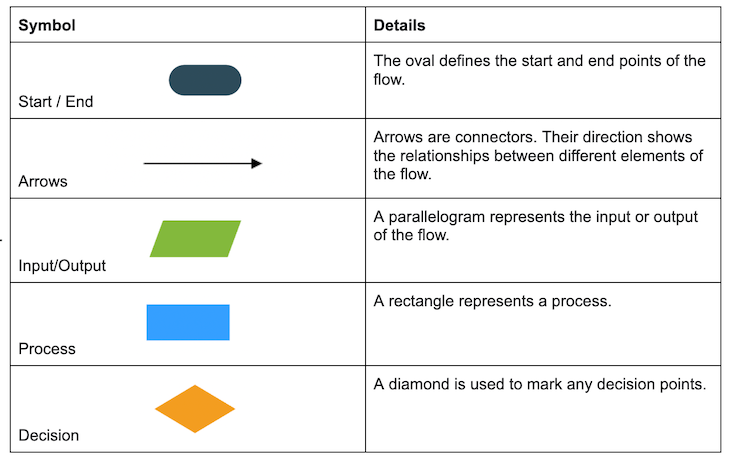
When creating a flowchart for a product, use the following elements:
Task diagrams are similar to flow charts, but they represent a single task within a larger path. Because of this, you can think of a task diagram as a subset of a flowchart. A task diagram utilizes the same components as a flowchart.
User flow diagrams allow you to:
A user flow diagram shows how the user interacts with the product to achieve a goal. You can use flows to understand existing applications, especially when you want to create a new product or a new feature.
User flow diagrams help you identify any inconsistencies or dead ends early in the process. By mapping out your user flow (either through a wireflow or through a flowchart), you make sure you don’t have any dead ends.
User flow diagrams are very useful for validating your concepts and aligning stakeholders.
The development team can better understand your concept and determine your interactions on the page. Subject matter experts can review your process and ensure that everything is in the correct order with the right conditions.
You can also use user flow diagrams to analyze situations and identify pain points and improvement opportunities. At any point in the journey you might notice that users consistently pause over a particular issue, or that they need more assistance to progress forward.
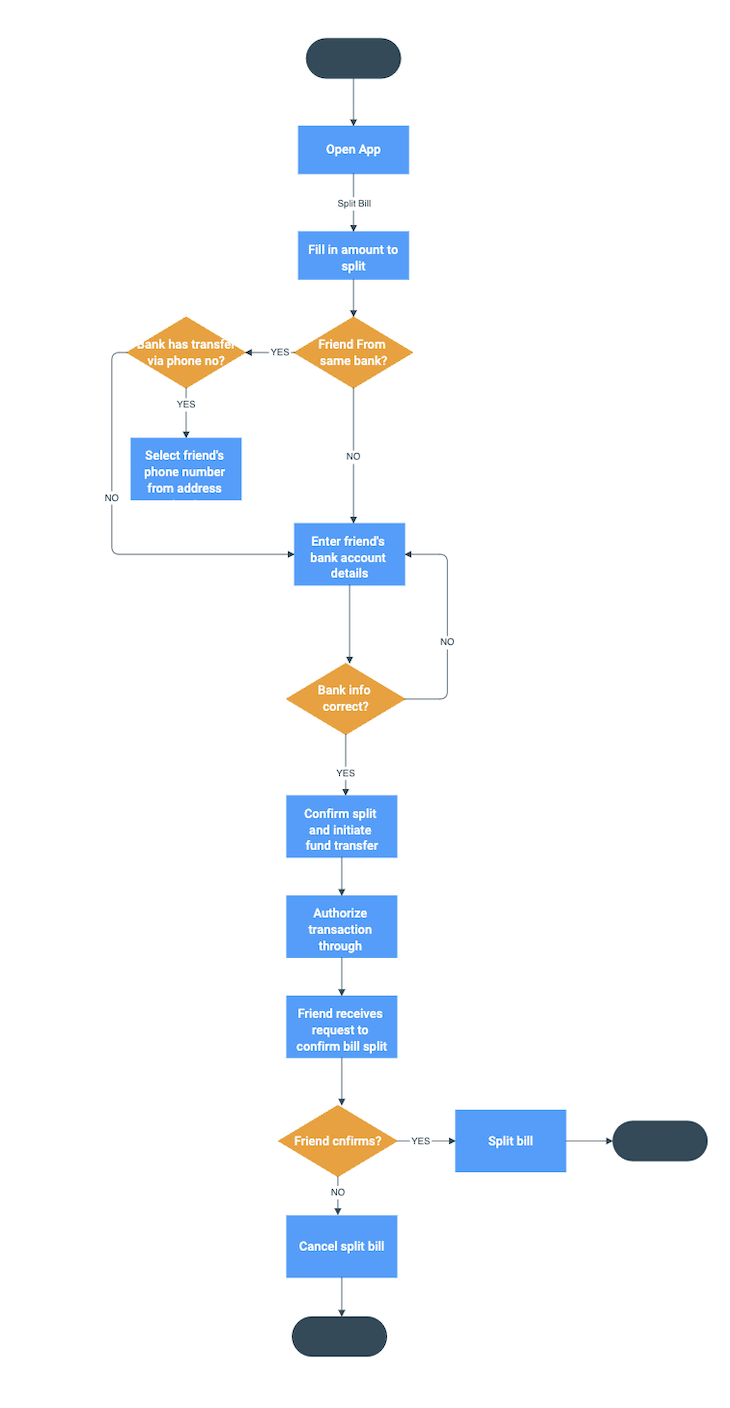
Now let’s walk through an example to better understand how you can create a user flow diagram in practice. Say you want to define the user flow for an application that allows friends from different banks to split bills, facilitating a seamless and secure money transfer. The steps would look like:
You should conduct user research and base your persona on actual data and pain points.
For this scenario, you’re looking at an individual who frequently shares expenses with friends and wants a convenient way to split bills, even if their friends are at different banks.
The user’s goal here is to initiate a bill split with a friend from a different bank and transfer the funds securely.
In this case, the entry point would be to open the app. The user would trigger this because they need to split a bill.
To achieve the goal, the user will need to navigate through the following:
Once you map out the flow, try to come up with any alternative steps that could come into play, such as:
To create a wireflow, you want to sketch the wireframes at this stage. After you have all the screens, use arrows to show their interactions.
While a UX designer can provide more detail, here are the screens we could have for this flow:
Once the flow is complete, you can share it with your stakeholders to receive feedback. Try to identify areas of improvement and work to optimize the user experience.
The user flow diagram for this example would look like:
There are a variety of tools to help you create user flows. Here are a few that also have free versions:
User flow diagrams are powerful tools to help you validate concepts and identify pain points. They allow you to fail fast with minimum effort and ensure that you build the right thing for your users.
By using user flow diagrams, you can:
You can follow the example included in this article to build out a user flow diagram for your own product.
Featured image source: IconScout

LogRocket identifies friction points in the user experience so you can make informed decisions about product and design changes that must happen to hit your goals.
With LogRocket, you can understand the scope of the issues affecting your product and prioritize the changes that need to be made. LogRocket simplifies workflows by allowing Engineering, Product, UX, and Design teams to work from the same data as you, eliminating any confusion about what needs to be done.
Get your teams on the same page — try LogRocket today.
Guard your focus, not just your time. Learn tactics to protect attention, cut noise, and do deep work that actually moves the roadmap.

Rumana Hafesjee talks about the evolving role of the product executive in today’s “great hesitation,” explores reinventing yourself as a leader, the benefits of fractional leadership, and more.

Trey Courtney talks about his process for evaluating partnerships or acquisitions and how he successfully implements these initiatives.

Asma Syeda shares the importance of responsible AI and best practices for companies to ensure their AI technology remains ethical.


